

DBase is an easy-to-use backend for your mobile and web applications, host the files in an Ubuntu server and use the SDKs to perform CRUD operations, create infinite databases, and send Push Notifications to iOS and Android devices.
This Readme file includes the complete Documentation of DBase, so keep reading!
Web SDK: https://github.com/frankeno/dbase-web-sdk
iOS SDK: https://github.com/frankeno/dbase-iOS-sdk
Android SDK: https://github.com/frankeno/dbase-android-sdk
Unity SDK: Coming soon
- A VPS Server, minimum 2GB RAM, 1 vCPUs is required to run the DBase API. I strongly recommend AWS Lightsail with Ubuntu 18.04, solid servers and good prices
- Sublime Text (recommended), or any other HTML/text editor of your choice
- An FTP account confgured in FileZilla, needed to upload/edit files
- Chrome Web Browser (recommended), and/or Safari or Firefox
- The latest official version of Xcode – Beta versions of an IDE usually never work properly, and the code of this SDK has been written using the latest official version of Xcode. You can download it from the Mac App Store. Please avoid Betas.
- An Apple Mac computer, updated to its latest OS version
- An Apple Developer Account with an active iOS Development Program – This is needed for you to publish apps on the iTunes App Store. Knowledge of Xcode and Swift programming
- A real device to test the app - The Simulator may fail during tests, they are not reliable like a real device is
- The latest official version of Android Studio – Beta versions of an IDE usually never work properly, and the code of this SDK has been written using the latest official version of Android Studio. Please avoid Betas.
- An Apple Mac or Windows computer, updated to its latest OS version.
- A Google Play Developer Account – This is needed for you to publish apps on the Play Store.
- Knowledge of Android Studio and Java/XML programming.
- A real device to test the app before submitting it to the Play Store – Emulators may fail during tests, they are not reliable like a real device is
In the Ubuntu terminal of your server, start by running an update:
sudo apt update
Then launch an upgrade:
sudo apt upgrade
Install Apache:
sudo apt install apache2
Install PHP:
sudo apt install php
Restart Apache:
sudo systemctl restart apache2
Install Pear PHP Mail
sudo apt-get install yum
sudo apt-get install php-pear
sudo pear install mail
sudo pear install Net_SMTP
Install cURL:
sudo apt-get install php-curl
Open the /etc/apache2/apache2.conf file, and use this lines to hide the JSON files from being viewed by web browsers:
<Directory /var/www/html/>
    <Files "*.json">
        Order allow,deny
	Deny from all
    </Files>
</Directory>
Want to check the PHP version? Run:
php -v
You may also need to increase the size of the following variables in the php.ini file of your server:
post_max_size = 2M
upload_max_filesize = 2M
The php.ini file is usually located in: /etc/php/7.x/apache2/php.ini
• Option 1:
Upload the dbase folder to your server with FileZilla (recommended), upload the DBase folder into the root of your server - for instance, the /var/www/html/ directory on AWS Lightsail with Ubuntu 18.04).
• Option 2: You may also protect your API by renaming the DBase folder into some random characters - something like as45DfR6y9S, or whatever you want - then upload that folder into the root of your server.
In any case, take note of the name of the API folder in order to propely configure the SDKs.
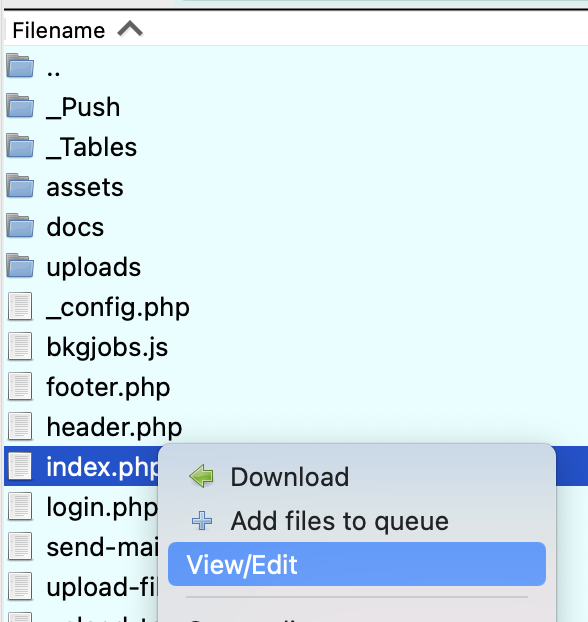
On FileZilla, right-click on a file and select the View/Edit option. That will open the selected file in your favorite text editor - I recommend you to configure Sublime Text as custom editor in the FileZilla's Settings panel -> File editing option.

If you installed DBase in an Ubuntu instance, open the apache2.conf file - it's into the /etc/apache2/ directory and you can access it with Filezilla - and add the following lines on the bottom of that file:
 <Directory /var/www/html/>
    <Files "*.json">
      Order allow,deny
      Deny from all
    </Files>
 </Directory>
Open _config.php file and start by editing the database path:
$DATABASE_PATH = "https://yourdomain.com/dbase/";
You must change that string into the URL of your server, where you've uploaded the DBase folder into - even if you've renamed it.
Example: Let's pretend your domain name is mydomain.net and you kept the DBase folder's name. You should set the $DATABASE_PATH variable as it follows:
$DATABASE_PATH = "https://mydomain.com/dbase/";
Instead, if you've renamed the DBase folder into something else:
$DATABASE_PATH = "https://mydomain.com/your-new-folder-name/";
Set the name of your application in this variable:
$APP_NAME = "DBase";
Change the default username and password strings into your own ones ~ they are needed to access the DBase admin dashboard:
$ADMIN_USERNAME = "admin";
$ADMIN_PASSWORD = "admin";
Provide an existing email address of your choice for users to get in touch with you:
$ADMIN_EMAIL = "[email protected]";
Since this backend contains the necessary code to allow you to send email with Pear PHP mail you must set your credentials here:
$EMAIL_FOR_SENDMAIL = "[email protected]"; // <-- set an email address for send-mail.php
$PASSWORD_FOR_SENDMAIL = "your-password"; // <-- set a password
$SMTP_HOST = "ssl://address"; // <-- Your ssl address
In case you want to use a Gmail address:
  $SMTP_HOST = 'ssl://smtp.gmail.com';
  $EMAIL_FOR_SENDMAIL = '[email protected]';
  $PASSWORD_FOR_SENDMAIL = 'your_gmail_password'
IMPORTANT: You must also turn the "Less Secure App" option ON on your Gmail settings here.
Be aware that the Gmail SMTP server sends no more than 99 emails/day, and the from input gets ignored, so the emails you'll receive will show your gmail address in the FROM field.
In order to sing in with Google on a Login web page, you must provide your own OAuth key. Create it on your own Google Cloud Platform and set it in this variable:
$GOOGLE_SIGNIN_KEY = '';
In order to make your iOS app send and receive Push Notifications and Sign In with Apple, you must perform the following actions:
- Register your app's Bundle Identifier (the App ID) on your Apple Developer Account -> Certificates, Identifiers & Profiles -> Identifiers section
- Click the Keys option from the left menu, then the (+) blue button to add a new Key.
- Type a key name, enable the Apple Push Notifications service (APNs) and Sign In with Apple options in the Register a New Key section.
- Click the Configure button next to the Sign In with Apple option and select your Bundle Identifier from the Primary App ID dropdown menu. Lastly, click the Save button.
- Download the
AuthKey.p8file on your computer - pay attention, you'll be able to download it only once, so save it in a safe place. - On the Configure key page, click the Continue and then the Save button.
- Upload that p8 file inside the
_Pushfolder. When you're done, replace the following variables in the_config.phpfile with your own data:
$AUTH_KEY_FILE = 'AuthKey_ABC123EFG.p8'; // Your p8 Key file name
$APN_KEY_ID = 'ABC123EFG';    // Your Apple Push Notification Key ID, you can get it by removing 'AuthKey_' and '.p8' from your Key file's name
$TEAM_ID = 'Z123ABC456D';
$BUNDLE_ID = 'com.yourname.appname';    // Your iOS App's Bundle Identifier, the one you've set in Xcode
$APN_URL = 'https://api.development.push.apple.com'; // OR: 'https://api.push.apple.com';   [for Production environment] */
NOTE: You can leave the
$APN_URLvariable as it is, since Push Notifications will still work even if you publish your app on the App Store without setting it into Production environment. It's just your choice.
If you don't have' a Firebase project on your Firebase Console, create one and enter the Project Overview -> Cloud Messaging section, copy the Server key from the Project credentials box and paste it in this varibale:
$FCM_SERVER_KEY = '';
Remember to also download the google-services.json file and replace the one in the app folder of the Android Studio project's folder, that file will set the values of your project to send/receive Push Notifications in your Android app.
If you want to send an email verification link to new users who sign up for the first time in your apps/website, just set the following variable into true:
$IS_EMAIL_VERIFICATION = false;
NOTE: If you want to edit the message and other details of the Verification email, open the
m-signup.phpfile that's inside the_Tablesfolder, scroll down and check the code inside theif ($IS_EMAIL_VERIFICATION) { ... }statement.
Do not change or remove the $APP_NAME and $DATABASE_PATH variables, you may change the message strings and "From" email address.
The _config.php file contains some utility functions and variables that make the entire system work.
Unless you're an experience developer, do not edit anything below this comment:
// UTILITY FUNCTIONS AND GLOBAL VARIABLES
Here's how the admin panel looks like, where you can view your database data, add/delete columns, edit/delete/add rows and sort objects, as well as send Push Notifications to mobile devices:
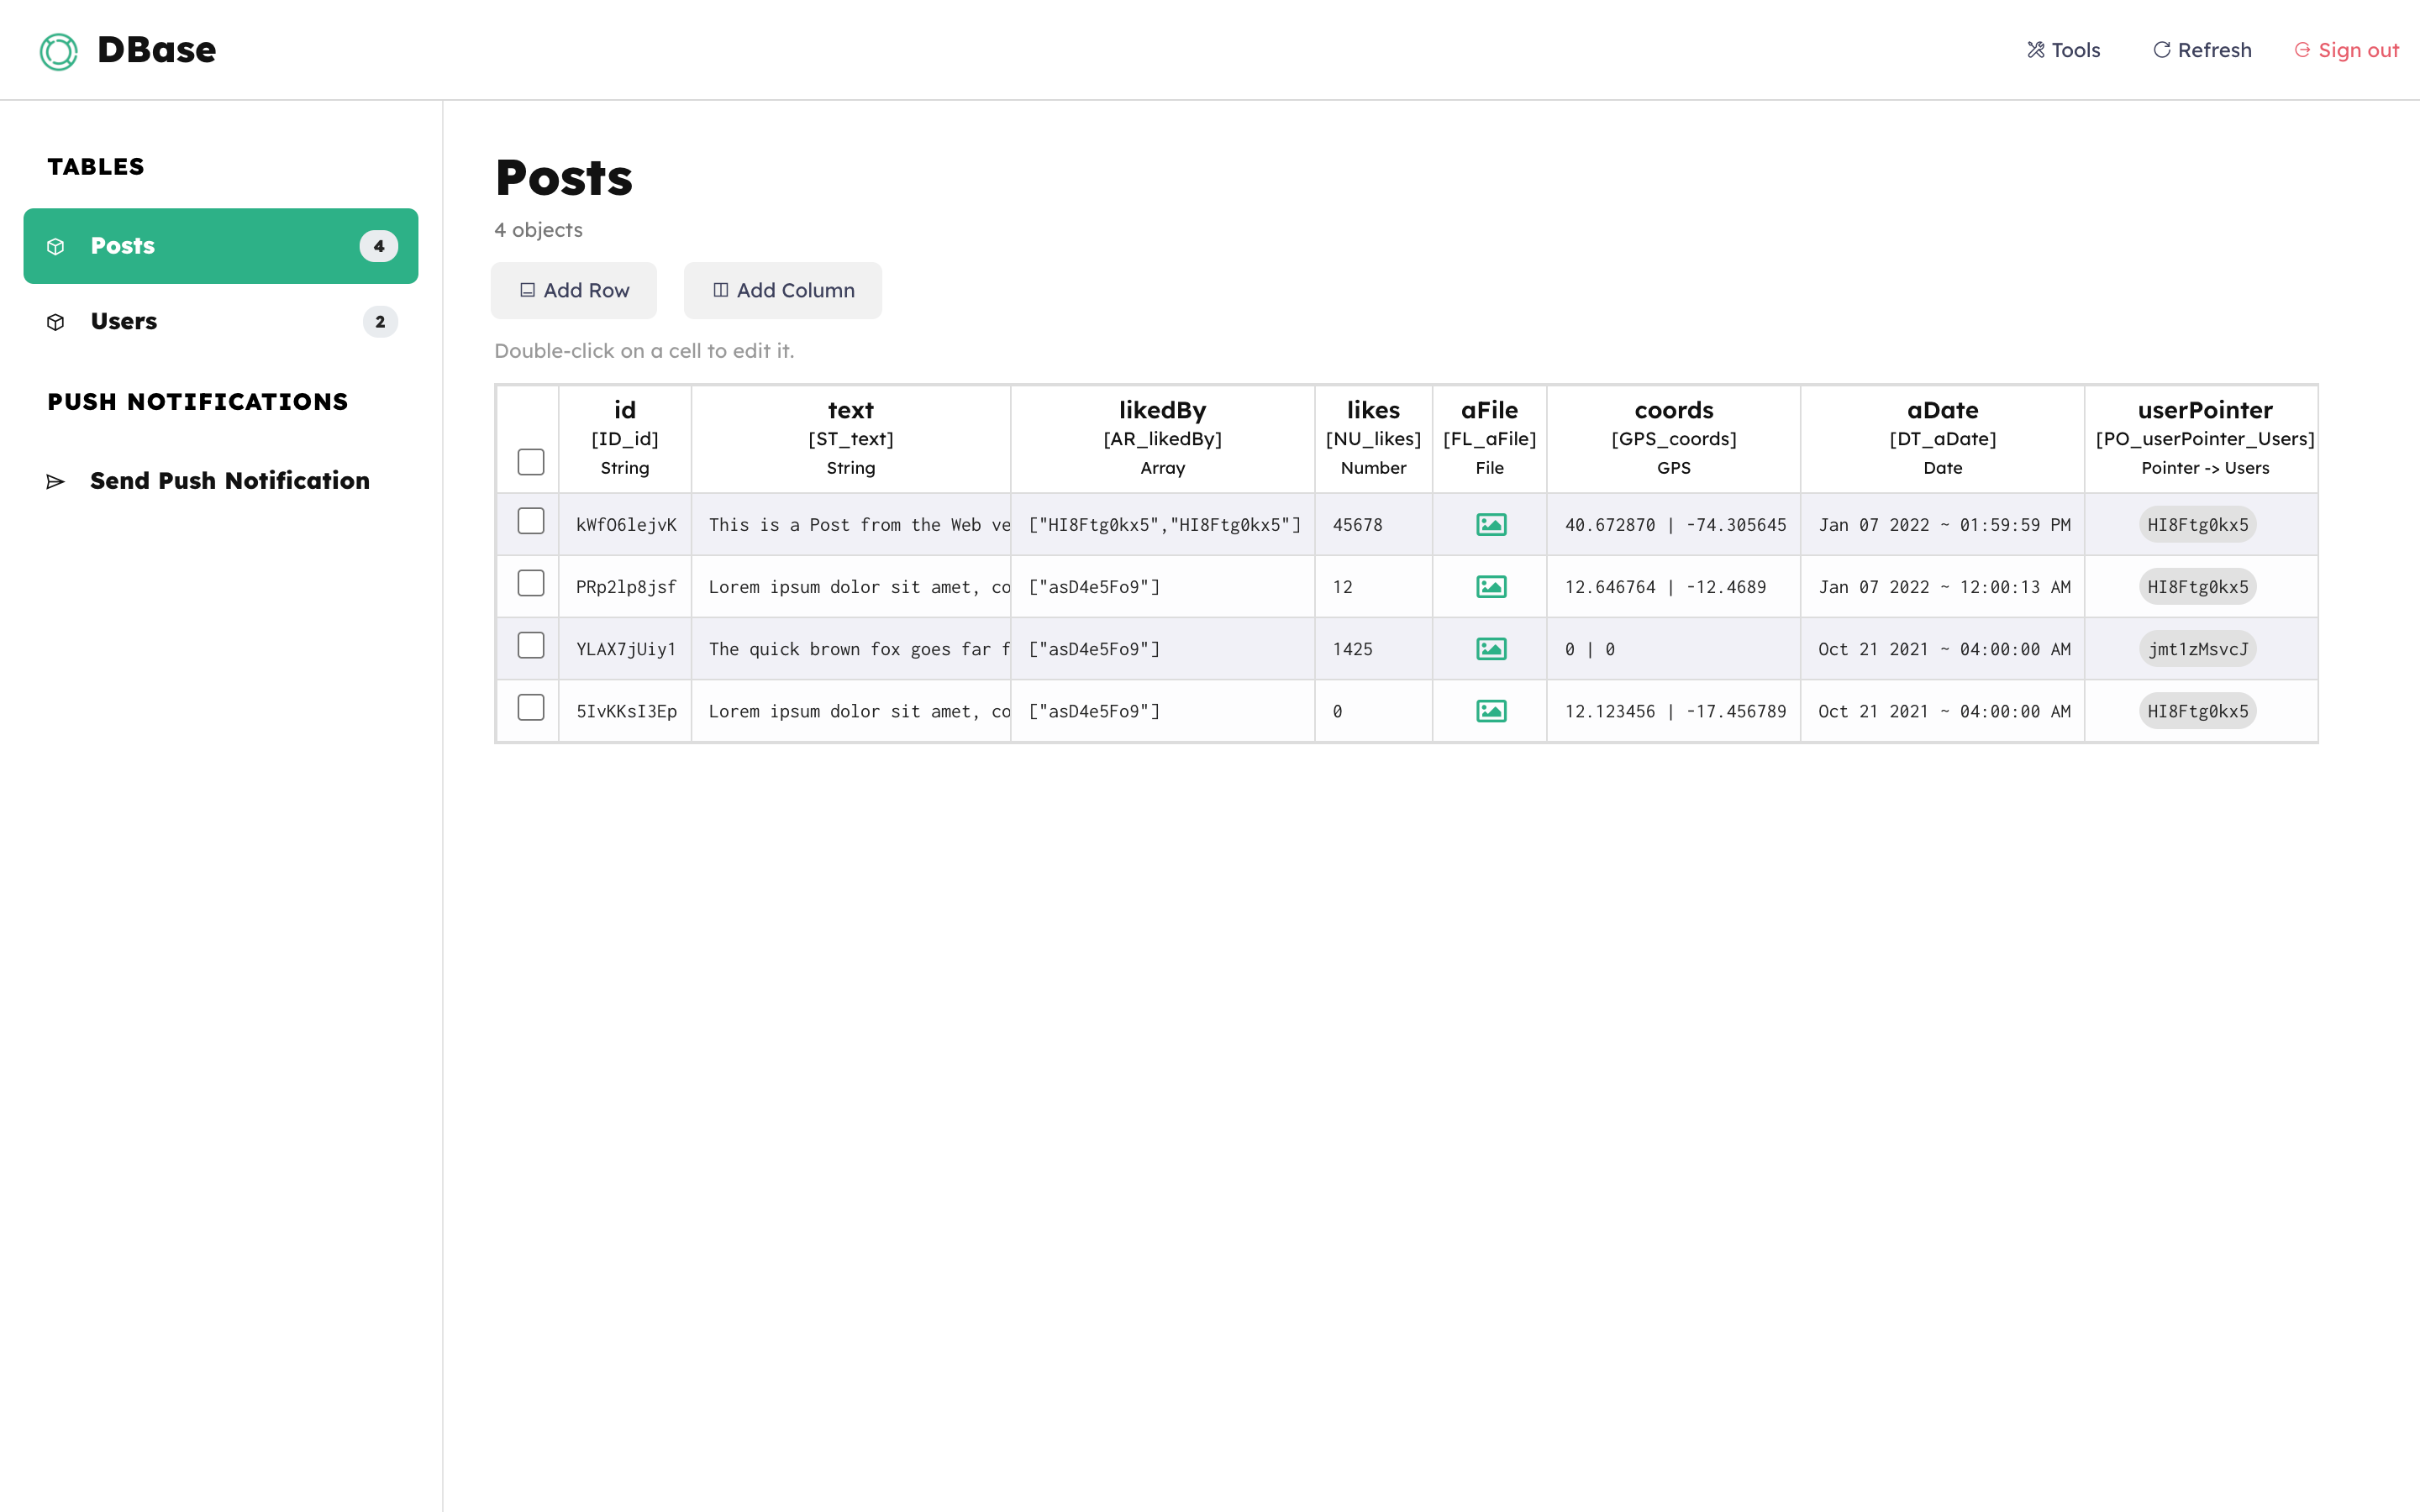
The DBase backend is based on JSON files, they are the Tables that host all data.
In the _Tables folder of the package you can find 2 files called Users.json and Posts.json.
You can rename the Posts.json file, or add new Tables with the Add Table button, anyway follow these important directions:
- You MUST NOT delete or rename the
Users.jsonfile - Use the Add Table button on the Dashboard to create JSON files in the
_Tablesfolder which will work as your database tables - When you create a Table, the next thing to do is to add columns, otherwise data cannot be properly saved.
- Your Tables must at least have 1 row to keep their column names, so if you use the Dashboard to delete rows, DBase will create an empty default row that won't be visible in the Dashboard, but if you manually delete all data in a JSON Table file, you will lose all columns and will have to add them again. You may manually edit a JSON file on your HTML editor, just be careful to keep the correct syntax and data Make a backup of your work frequently, as you may mess something up or lose important data for your database
On the top navigation bar you can find 3 buttons:
- Tools
- Refresh
- Logout
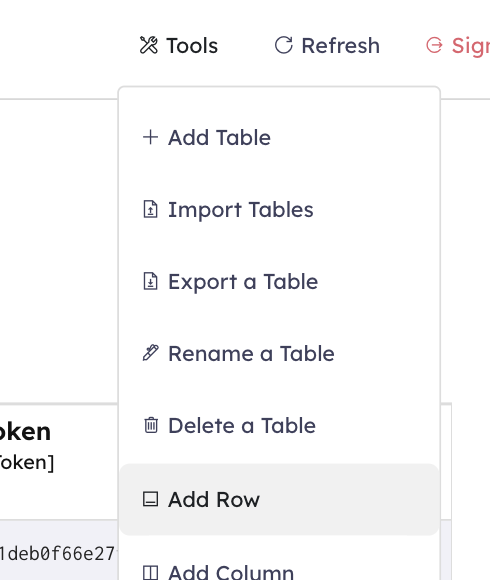
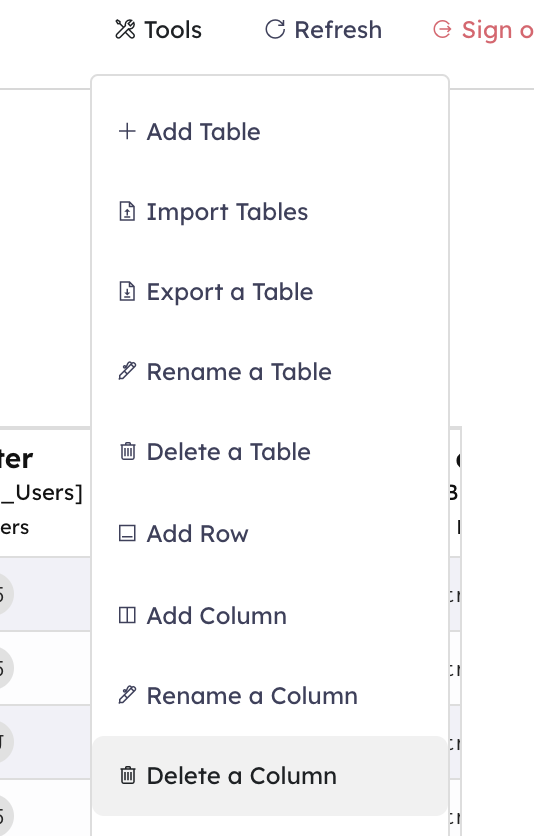
By clicking the Tools button you can find all the buttons that allow you to manage the database, such as Add Table, Add Column, etc.
You can create a Table by clicking the Add Table button and typing the desired name.

IMPORTANT:
- If you want to manually edit a Table's data, you must open its JSON file on your favorite HTML editor from your server's
_Tablesfolder - If you want to delete a Table, delete its JSON file form your server
- If you want to change a Table name, simply rename its JSON files
- Spaces and special characters are not allowed while naming a Table, so:
MyTable -> OK

My Table -> NO
@My Talbe -> NO
$myTable -> NO
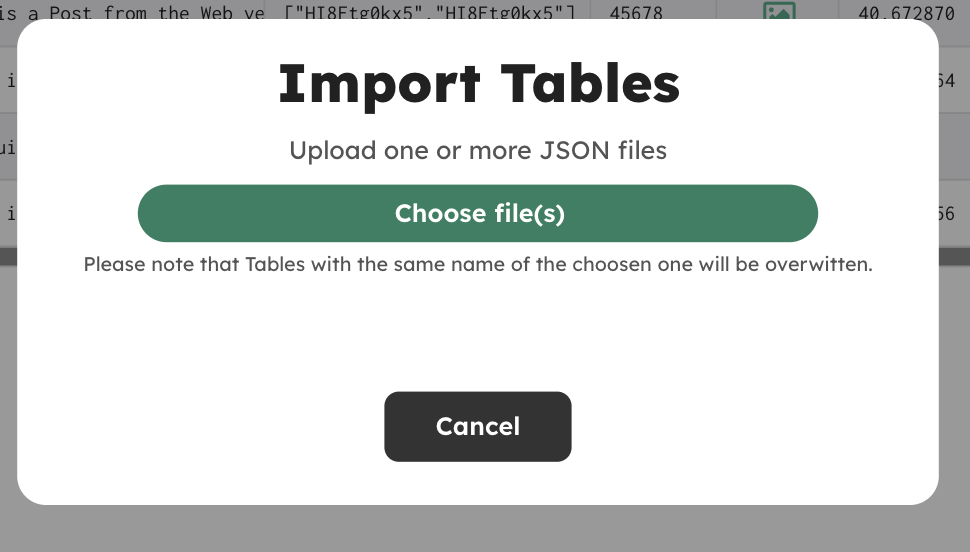
Click the Import Tables button in the Dashboard and choose one or more JSON files (just make sure they are compatible with the DBase's syntax for Tables):

You can download JSON tables with the Export a Table button and save them as a backup in your machine:


From the Tools menu, click che Rename a Table button, select the Table you want to rename, type a new name for it and hit Rename Table


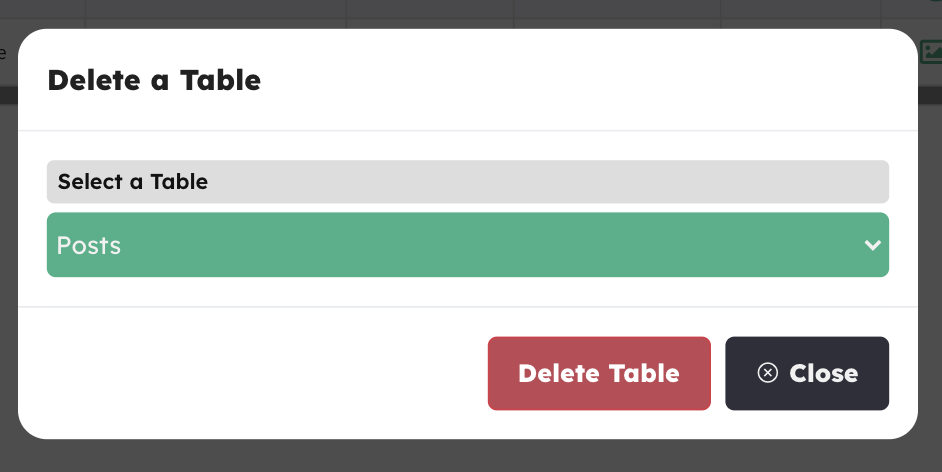
Click che Delete a Table tool button, select the Table you want to delete and hit Delete Table

When you want to add a row to a Table, click the Add Row button ~ either in the Tools menu or use the quick button:

Click the Add Column button ~ either from the Tools menu or the quick button ~ and select the Type of data you want to set between the following ones:
String
Number
Array
File
Boolean
GPS
Pointer
Date
Type a name for your column and click Add column.
If the Table is empty, your new column gets created along with 3 default ones, which are:
ID_id
DT_createdAt
DT_updatedAt


IMPORTANT ~ FOR THE Users TABLE!
When you add a column in the empty Users table with the Dashboard, DBase adds a few default columns that are needed for the Web and Mobile SDKs to work properly, as well as for the whole API:
ID_id
DT_createdAt
DT_updatedAt
ST_username
ST_password
ST_email
ST_iosDeviceToken
ST_androidDeviceToken
NU_badge
BL_emailVerified
ST_signInWith
Although the Dashboard doesn't allow you to delete those columns, it's still good to know that you MUST NOT manually delete them from the Users.json file, neither change their names!
There are 9 types of columns for your data, it's important to learn their syntax and meaning, so you'll be able to properly choose them while creating new columns for your database.
ID -> composed by ID_ prefix and id suffix
This is the object Identifier of each row of the Table. It cannot be created manually, it gets automatically created by the API and its key is always
ID_id. It also cannot be edited, but it can be copied by a double-click on its cell.
String | composed by ST_ prefix | the suffix will be the name you assigned to it
This is a String to host and display text
Number | composed by NU_ prefix | the suffix will be the name you assigned to it
It supports integer and decimal numbers. PLEASE NOTE that decimal numbers must have the dot (.) as separator, not the comma (,).
Example:
123.45
Array | composed by AR_ prefix | the suffix will be the name you assigned to it
This type is usually used to store arrays of Strings like object IDs or other text.
It's comma-separated, so be careful while storing an array, put commas where they are needed and do not use the array [""] brackets, just type values separated by commas in the array's input field.
Example:
lorem,ipsum,dolor,sit
File | composed by FL_ prefix | the suffix will be the name you assigned to it
This type hosts the URL of an uploaded file. Physical files get stored inside the uploads folder
Boolean | composed by BL_ prefix | the suffix will be the name you assigned to it
It's either true or false, as per standard JSON syntax.
Just keep in mind that if you use an input text field instead of a Checkbox or Switch button, the values you must pass are either "0" or "1" (True or False)
GPS | composed by GPS_ prefix | the suffix will be the name you assigned to it
This type is an array of 2 decimal numbers, the latitude and longitude coordinates, usually used for location purposes.
Like the Number data type, the decimal separator of the coordinates must be a dot (.), and the separator of the 2 coordinates must be a comma (,)
Example: 12.236548,-45.845987
Pointer | composed by PO_ prefix | the suffix will be the name you assigned to it
This type hosts the ID of an object taken from another Table. For instance, a user's ID from the Users table.
It's clickable in the Dashboard, it opens the selected object's row
Date | composed by DT_ prefix | the suffix will be the name you assigned to it
The Date format is
YYYY-MM-DDTHH:mm:ssand it's a String
It's important to first plan what tables and columns you need to display and edit in your app or website, then create the proper JSON files into the _Tables folder and add the necessary columns in your Dashboard.
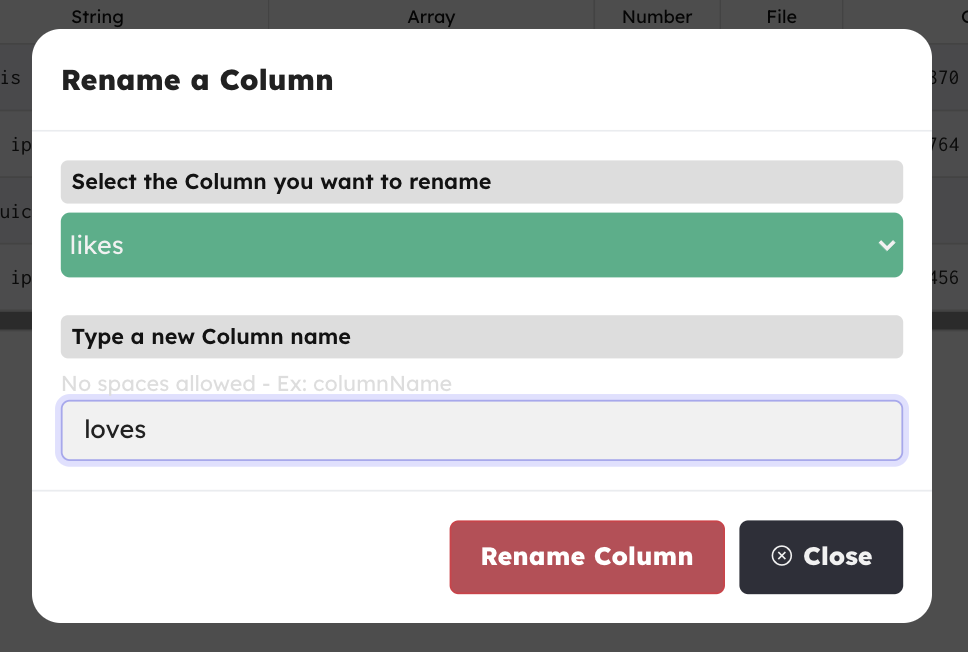
Click the Rename Column button, select the column you want to rename, type a new name and hit Rename Column

Click the Delete a Column button, select the column you wish to remove, then hit Delete column
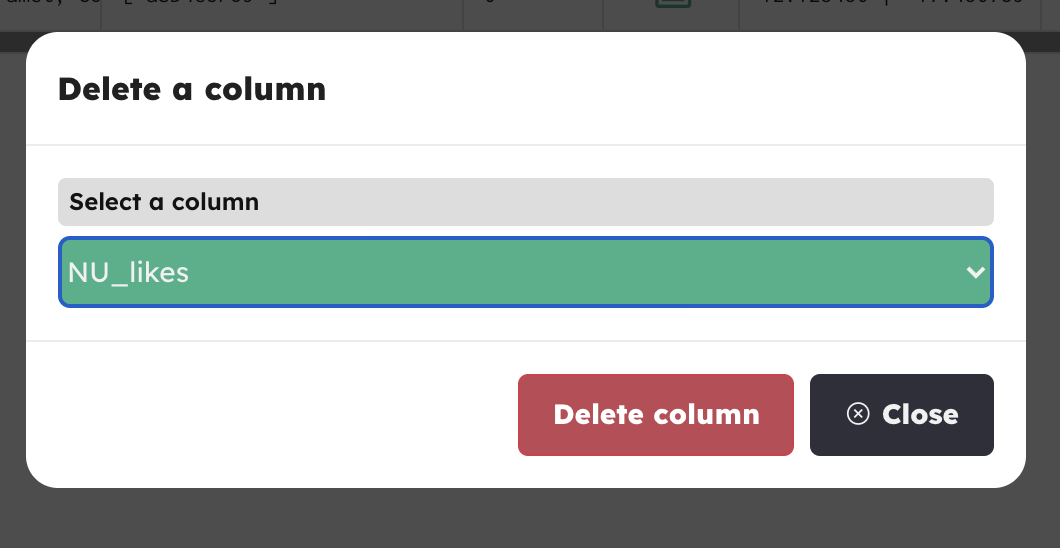
NOTE: The column names will be the full ones, which means that you'll see prefix and suffix together. Example: ST_text
You can search for data in your Dashboard by clicking the Search filters button, select the column you wish to search data for, then choose the condition of your query and type the desired data.
Lastly, click the Apply filters button


You can order data in your table by ascending or descending by clicking the Sort Data button, select a column and the desired sorting condition. Then click Order data


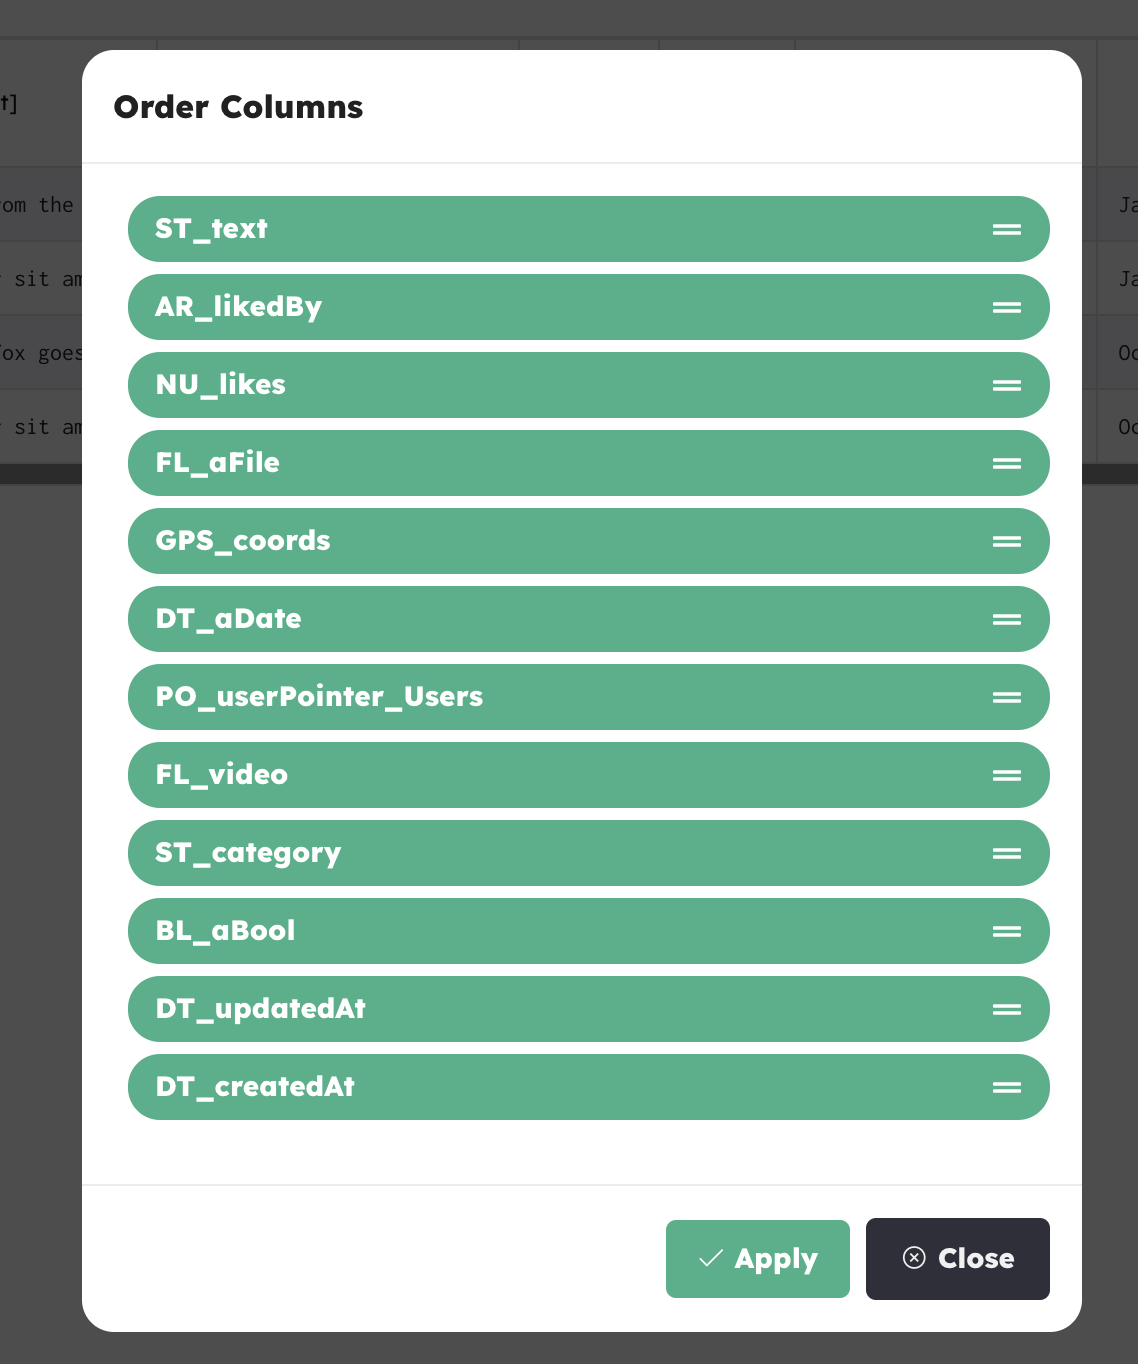
You can set the order of columns in your database by clicking the Order Columns button.
Drag the columns up or down basedon the order you need, then click Apply

You can send push notification texts to all those users who have allowed their devices to receive Push Notifications and are using an app based on this backend.
Click the Send Push Notification button in the left sidebar, select an audience, and type your message.
Hit the Send Push Notification button to send your push

You can also type a string in the
Push Type (optional)field, in case you want to add a specific type for your push message.
The bkgjobs.js file can host useful Javascript or jQuery functions that will be used as Background Jobs, here's an example:
$(function () {
 //------------------------------------------------
 // BACKGROUND JOB - DELETE ROWS WITH PASSED DATE
 //------------------------------------------------
 setInterval(function() {
   // Search Date in Posts.json
   $.getJSON("Posts.json", function(Posts){
     for (var i=0; i < Posts.length; i++) {
       var obj = Posts[i];
       var aDate = new Date(obj['DT_aDate']);
       var now = new Date();
       if (aDate <= now) {
         var rowID = obj['ID_id'];
         var tableName = 'Posts';

         // Delete row with passed Date
         $.ajax({
           url:"delete-row.php?tableName=Posts&rowID=" + rowID,
           success:function(data) {
             console.log('row deleted!');
           }
         });
        }// ./ If
	}// ./ For
  });// ./ getJSON
 }, 5 *1000); // execute every 5 seconds
});// ./ on page load
This is just an example to show you how to create a Background Job, a function that runs in a loop every X seconds and performs an action in the database. In this case, the code checks for dates in the Posts table -> DT_aDate column, and if it finds some dates that are older than the current Date, it deletes the found rows.
You can create your own Jobs by using the setInterval(function() { ... }, SECONDS *1000); function and perform actions in background (where "SECONDS" must be a number).
Please note that the Dashboard must be opened on your computer, like a 24/7 server.
In case you must shut it down, a good trick may be to open the Dashboard on your smartphone's browser (Safari, Chrome, etc.) and leave it in background (do not kill the browser app), and of course, keep your smartphone on :)
