
- Do you have a display with multiple inputs?
- Would you like to be able to switch inputs without the need of meddling with clunky OSD menus and akwardly-positioned control 'nipples'?
- Does this happen to you even with fancy, expensive displays like the Neo G9 line from Samsung?
- Can you imagine KVM scenarios based on home assistant automations?
Then this software is for you!!!
You only need a Linux machine connected to the display, a bit of knowledge on your display's support of DDC capabilities and this will create a device for your Home Assistance (or your MQTT setup) so you can control the display
First of all, you'd need some info about your display and its DDC capabilities wrt display inputs. You'd need the ddcutil tool to figure things out. For example: this is what my G95NC Samsung Neo G9 Reports:
$ ddcutil capabilities
Model: FALCON
MCCS version: 2.0
Commands:
   Op Code: 01 (VCP Request)
   Op Code: 02 (VCP Response)
   Op Code: 03 (VCP Set)
   Op Code: 07 (Timing Request)
   Op Code: 0C (Save Settings)
   Op Code: E3 (Capabilities Reply)
   Op Code: F3 (Capabilities Request)
VCP Features:
   Feature: 02 (New control value)
   Feature: 04 (Restore factory defaults)
   Feature: 05 (Restore factory brightness/contrast defaults)
   Feature: 08 (Restore color defaults)
   Feature: 10 (Brightness)
   Feature: 12 (Contrast)
   Feature: 14 (Select color preset)
      Values:
         05: 6500 K
         08: 9300 K
         0b: User 1
         0c: User 2
   Feature: 16 (Video gain: Red)
   Feature: 18 (Video gain: Green)
   Feature: 1A (Video gain: Blue)
   Feature: 52 (Active control)
   Feature: 60 (Input Source)
      Values:
         01: VGA-1
         03: DVI-1
         04: DVI-2
         11: HDMI-1
         12: HDMI-2
         0f: DisplayPort-1
         10: DisplayPort-2
   Feature: 62 (Audio speaker volume)
   Feature: 8D (Audio Mute)
   Feature: FF (Manufacturer specific feature)
We'll focus on the Feature: 60 (Input Source) ... I have good news and bad news:
- Good news: The display supports changing inputs with DDC!
- Bad news: The inputs and the values are, for the most part, bullsh*t!!
Because of this, we will need to figure out the actual input values for each actual input of the monitor.
You can use ddcutil again to figure them out like so:
# change the last number to figure the actual values that change the input.
# Have in mind these are hexadecimal values you'll need to convert to integers
$ sudo ddcutil setvcp 0x60 0x01
Once you have the values for the inputs you want to control, you can fill out the config.yml inside the folder ddc-mqtt that you'd need for the software to run. For my display this would be:
mqtt:
  username: #your mqtt server's username
  password: #your mqtt server's password
  host: 1.2.3.4 #your mqtt server's host
  port: 1883
display:
  - id: 1 #display to control. if only a single monitor, this must be 1
    inputs:
      HDMI1: 5 # key: value — you can change the name of the input.
      HDMI2: 6 # The codes here are input as integers, not hexadecimal
      HDMI3: 7
      DP: 15
interval: 20
You might want to use the docker container that comes with the code. If you use a Raspberry Pi you just do:
$ docker-compose up -d
And if your config is well formed, that should be it!
If you don't use a Raspberry Pi, you might need to pay attention to the docker-compose.yml in the root folder as we are forwarding the i2c devices for the ddcutil library to access.
    devices:
      - "/dev/i2c-20:/dev/i2c-20"
      - "/dev/i2c-21:/dev/i2c-21" #these might be different in your machine
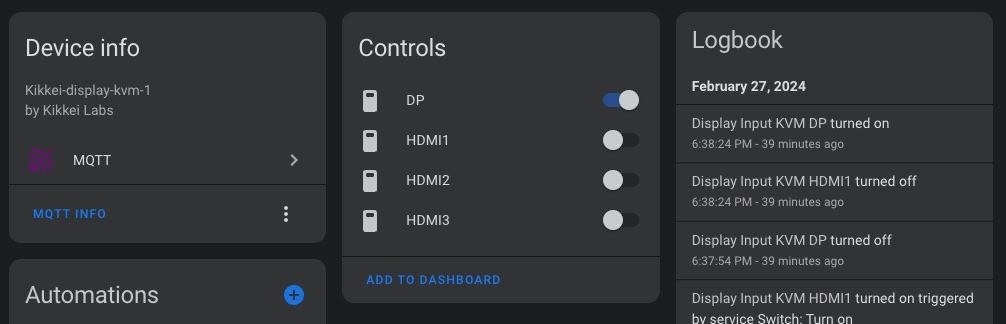
If your MQTT server is shared or is part of a Home Assistant setup, the usage is simple. You'll get a device with switches to change inputs and that's all!
 '
'
If you want to use it MQTT RAW!!! you'd have access to the entities in the following paths:
Subscribe to kikkei/display-kvm/{number_of_display}/{input_name_in_the_config}/state
-> with values 'true' or 'false' to check the state
Publish 'ON' to kikkei/display-kvm/{number_of_display}/{input_name_in_the_config}/command for activation
-> no need to send 'OFF'; switching is taken care of

Example: kikkei/display-kvm/1/HDMI1/state
This software is polling at an interval to re-check of the state of the active input— just in case you switch it manually...
This interval can be configured in the config.yml with the key interval. It is optional and by default is 20 seconds...
I coded this to support multiple monitors but I have not tested it at all... contributions are very welcome! :)
Hope it works for you as well as it works for me!


