A student that completes this project shows that they can:
- understand and explain what Auto Layout is, and the problems it solves
- implement common layouts using constraints in Interface Builder
- implement common layouts using UIStackView
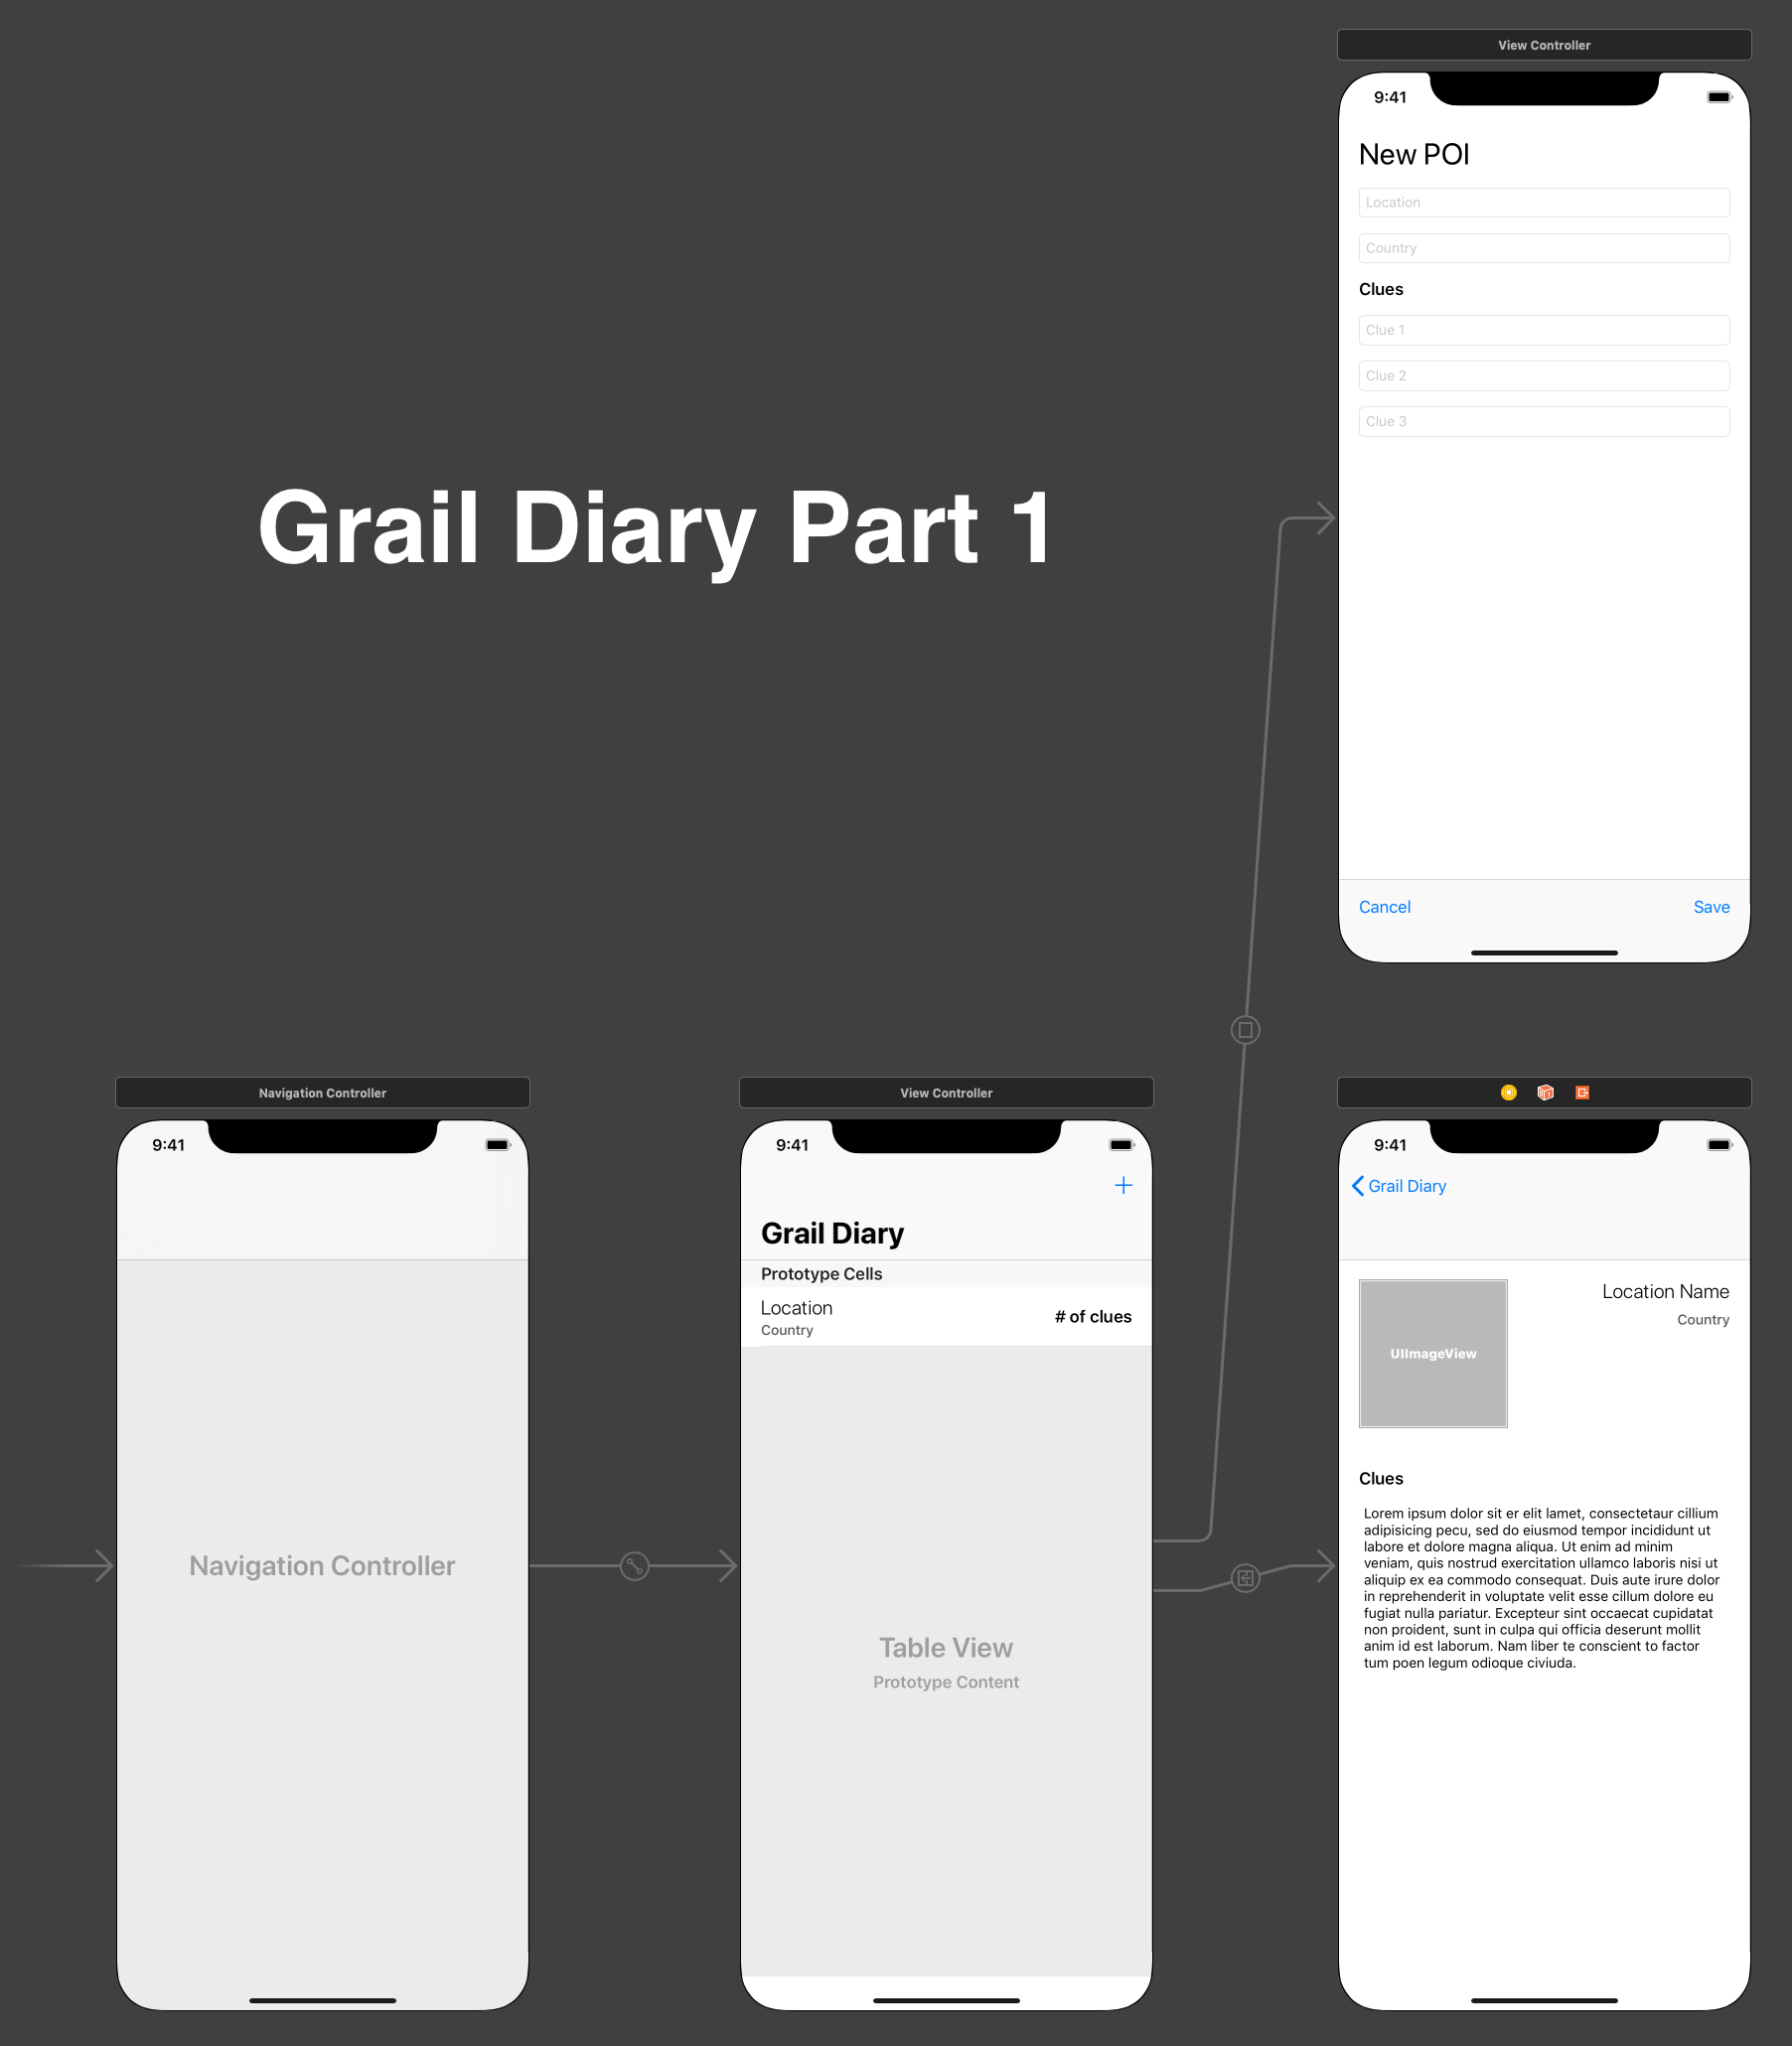
Grail Diary is an app that allows the user to track locations of interest (POIs) and useful clues about those locations.
Please fork and clone this repository. Create a new Xcode project inside of the cloned repository. Use the single view app template and name it "GrailDairy"
- Rename the View Controller to
POIsTableViewControllerwith the refactor->rename option in the source code file - Embed the single View Controller scene in a Navigation Controller
- Drag in a Table View to that View Controller
- Set the navigation bar to show large titles
- Give the View Controller scene a title of "Grail Diary"
- Add constraints with margins disabled to the Table View:
- Top =
0 - Leading =
0 - Trailing =
0 - Bottom =
0
- Top =
- Set the Table View to show 1 prototype cell (select the Table View and look in the attributes inspector); set the prototype cell identifier to "POICell"
- Set the Table View to show 60 pt rows (row height in the Table View's size inspector)
- Drag 3 labels into the cell prototype
- Give one a text value of
"Location", one"Country", and the last one"# of clues" - Change the text styles for the three labels to emphasize the location primarily
- Select the location and country labels and embed them in a vertical Stack View
- Use the following attributes for the Stack View:
- an alignment of
leading - a distribution of
fill - spacing =
2
- an alignment of
- Add the following constraints to the Stack View:
- vertical centering in the container (cell)
- margin-based leading =
0
- Add the following constraints to the clues label:
- vertical centering in the container (cell)
- margin-based trailing =
0
- Add a constraint between the Stack View and the clues label with these attributes:
- horizontal spacing
- change the relationship to
>= - constant =
8
- Add a bar button item to the right side of the navigation bar and set the system item value to "Add"
- Drag a View Controller scene onto the canvas
- Control-click from the add bar button item in the list of clues view to the new scene; choose "present modally" for the segue kind and use "AddPOIModalSegue" for the identifier
- Drag 5 text fields into the new View Controller scene; use these placeholders: "Location", "Country", "Clue 1", "Clue 2", "Clue 3"
- Place the 5 text fields into a vertical Stack View with the following Stack View attributes:
fillfor both alignment and distribution- spacing =
16
- Add the following constraints to the Stack View:
- leading =
20 - trailing =
20 - top =
20
- leading =
- Insert a label into the top of the Stack View and give it a value of "New POI"; set the font text style to "Large Title"
- Insert a label above the first clue Text Field in the Stack View and give it a value of "Clues"; set the font text style to "Headline"
- Add a toolbar to the bottom of the scene
- Constrain the toolbar to the view with the following:
- leading =
0 - trailing =
0 - bottom =
0
- leading =
- Add 3 bar button items: 1 set to "cancel", 1 to "flexible space", and 1 to "save"; this should separate the two buttons to the left and right edges
- Drag in a View Controller scene to the canvas
- Control-drag from the location cell to the new scene; select "show" for the segue kind and enter "ShowPOIDetailSegue" for the identifier
- Drag 3 labels into the new scene
- Set one to "Location Name" and use the following constraints:
- top =
20 - trailing =
20
- top =
- Place another label below that and set it to "Country"; control-drag from this label to the location name label above and add these constraints:
- trailing alignment (trailing edges of both labels are aligned)
- vertical spacing =
8
- Drag an Image View into the scene
- Constrain it with the following:
1:1aspect ratio (check the box and then edit the value to make it 1:1)- width =
150 - leading =
20 - align the top of the image with the top of the location name label
- Find a square image of an interesting location on Google and drag it into your asset catalog; set a sensible name and set the name as the image in the Image View attributes
- Add a horizontal distance constraint between the location label and the Image View
- set the constant value to
8 - make it a
>=constraint
- set the constant value to
- Add a horizontal distance constraint between the country label and the Image View
- set the constant value to
8 - make it a
>=constraint
- set the constant value to
- Place the third label below; set the value to "Clues"; use the following constraints:
- align the leading with the Image View
- set a top distance to the Image View =
40
- Drag a text view into the canvas
- Constrain it below the clues label with the following:
- leading alignment with clues label
- vertical distance of
8 - relate the text view and the "Country" label by aligning their trailing values
- bottom to view =
20
Grail Diary Part 2 - Delegates and Protocols
A student that completes this project shows that they can:
understand and explain what a protocol is and common scenarios for their use define a custom protocol, and make a class or struct conform to it understand and explain the purpose of UITableViewController use a regular UIViewController to display a UITableView create a custom UITableViewCell understand and explain the delegate pattern and why it is used Introduction
Grail Diary is an app that allows the user to track locations of interest (POIs) and useful facts about those locations.
Instructions
Please use the same repository you used yesterday for Grail Diary Part 1. If you've created a PR to submit your work, you'll continue to use the same PR. New commits will automatically be added to that PR. Just submit the same link again at the end of this assignment.
File Tasks
Create a new file using the Cocoa Touch Class template; call it POIsTableViewController and use the parent class UIViewController Create 2 more files in the same way; AddPOIViewController (subclassed from UIViewController) and POIDetailViewController (also subclassed from UIViewController) Create a class subclassed from UITableViewCell called POITableViewCell Create a Swift file called POI (this is your model) Storyboard Tasks
Set the custom class for each view controller scene in the storyboard to match the names of the files you just created Code Tasks
In POI.swift:
Create a struct called POI that models 3 properties: location, country, and clues; the data types are String, String, and an array of String objects In POIsTableViewController.swift:
Create an array property to store your POI models Create an IBOutlet to link the table view to your code; wire up this outlet to the table view in the storyboard In an extension, make this class conform to the UITableViewDataSource protocol Implement the following protocol methods: tableView(:numberOfRowsInSection:) and tableView(:cellForRowAt:indexPath:) Wire up the delegate property of the tableview in the storyboard to the view controller In AddPOIViewController.swift:
Declare IBOutlet properties for the 5 textfields in this view; wire these up to their appropriate textfields in the storyboard Declare a protocol above this class in the same file called AddPOIDelegate; declare a single function requirement called poiWasAdded(_ poi: POI) Declare a variable property called delegate of type AddPOIDelegate and make it optional Create 2 IBAction methods: cancelTapped(_ sender: UIBarButtonItem), and saveTapped(_ sender: UIBarButtonItem); wire them up to their appropriate bar button items in the storyboard Inside cancelTapped, simply dismiss this view as the user has indicated they want to leave this screen Inside saveTapped, guard unwrap the text inside the location and country textfields, initialize a POI object, and then if-let unwrap the 3 clue textfields and add them to the POI if applicable At the end of the saveTapped method, call the delegate method on the delegate property and pass the POI that was just created as an argument In an extension, make the class conform to the UITextFieldDelegate protocol In the storyboard, for each textfield in this view, connect the delegate property of the textfield to this class Implement the delegate method textFieldShouldReturn(_:); unwrap the text and make sure it's not empty, then switch off the textfield to determine which one called this method; change the firstResponder status to the appropriate textfield In POIsTableViewController.swift:
In an extension, make the class conform to the AddPOIDelegate protocol Implement the delegate method poiWasCreated(_:) Append the poi that was passed into the method to your array Dismiss the view so the modal animates offscreen Reload the tableview's data In the main class definition, implement the prepare(for:sender:) method (it might be commented out) Check the identifier of the segue first; look for the identifier AddPOIModalSegue If that identifier is found, use the segue object's destination property to grab the view controller we're transitioning to and cast it as an instance of AddPOIViewController; you'll need to unwrap this as the cast may not succeed If the unwrap is successful, use the view controller you unwrapped, set its delegate property to self; this ensures the POIsTableViewController will act on behalf of the AddPOIViewController In POITableViewCell.swift:
Declare IBOutlet properties for the following cell elements: locationLabel, countryLabel, and cluesCountLabel; connect them to their appropriate labels in the storyboard Declare an optional property called poi of type POI; add a didSet observer that calls a function named updateViews Define a private function named updateViews; inside, unwrap poi and use its properties to populate the various labels with data In POIDetailViewController.swift:
Declare 3 IBOutlet properties: locationLabel, countryLabel, and cluesTextView using UILabel and UITextView for the types; wire them to their appropriate subviews in the storyboard Declare a variable property called poi of type POI Create a private method called updateViews that takes no arguments Call the above method inside viewDidLoad In updateViews, unwrap the poi property with guard and set the various model properties to the text of the labels and the textview; you'll have to do a little formatting to show the clues as a list in the cluesTextView In POIsTableViewController.swift:
In the prepare(for:sender:) method, add an else-if to your existing code to check for a different segue identifier, ShowPOIDetailSegue If that identifier is found, unwrap the selected row's index path from the tableview, and then grab the segue's destination view controller and cast it as an instance of POIDetailViewController (do these two steps together in a compound if-let) If those unwraps are successful, set the detail view controller's poi property to the appropriate POI from the array you use in this class to track all POIs Testing
At this point, the app should run and allow new POIs to be entered. They should appear in the main tableview and when tapped, the app should transition to a detail view to show the rest of the information about each POI.


