![]()
- Features
- Changelog
- Screenshot
- Requirements
- Dependencies
- Schematic
- Setup
- Quick Start
- REST API Reference
- Documentation
- Additional Resources
- Tested On
- Special Thanks
-
Up and running in just three lines of code!
-
User-friendly interface hosted from the micro-controller itself!
-
Complete control over animations from delay time, color, brightness
-
Completely customizable animations and user interface which is written with just Python/HTML/CSS/JS!
-
Use with the user interface or programmatically using the Animations API
-
Call animations from the network!
-
Support for optional separate status indicator LED
- Rainbow
- Rainbow Chase
- Bounce
- Sparkle
- Wipe
- Chase
- RGB Fade
- Alternating Colors
- Random Fill
- Fill from Middle
- Fill from Sides
- Fill Strip
- Christmas
| Release | Changes | Date |
|---|---|---|
| v2.0 |
|
12/31/2020 |
| v1.2 |
|
3/22/2020 |
| v1.1 |
|
9/2/2019 |
| v1.0 |
|
8/12/2019 |
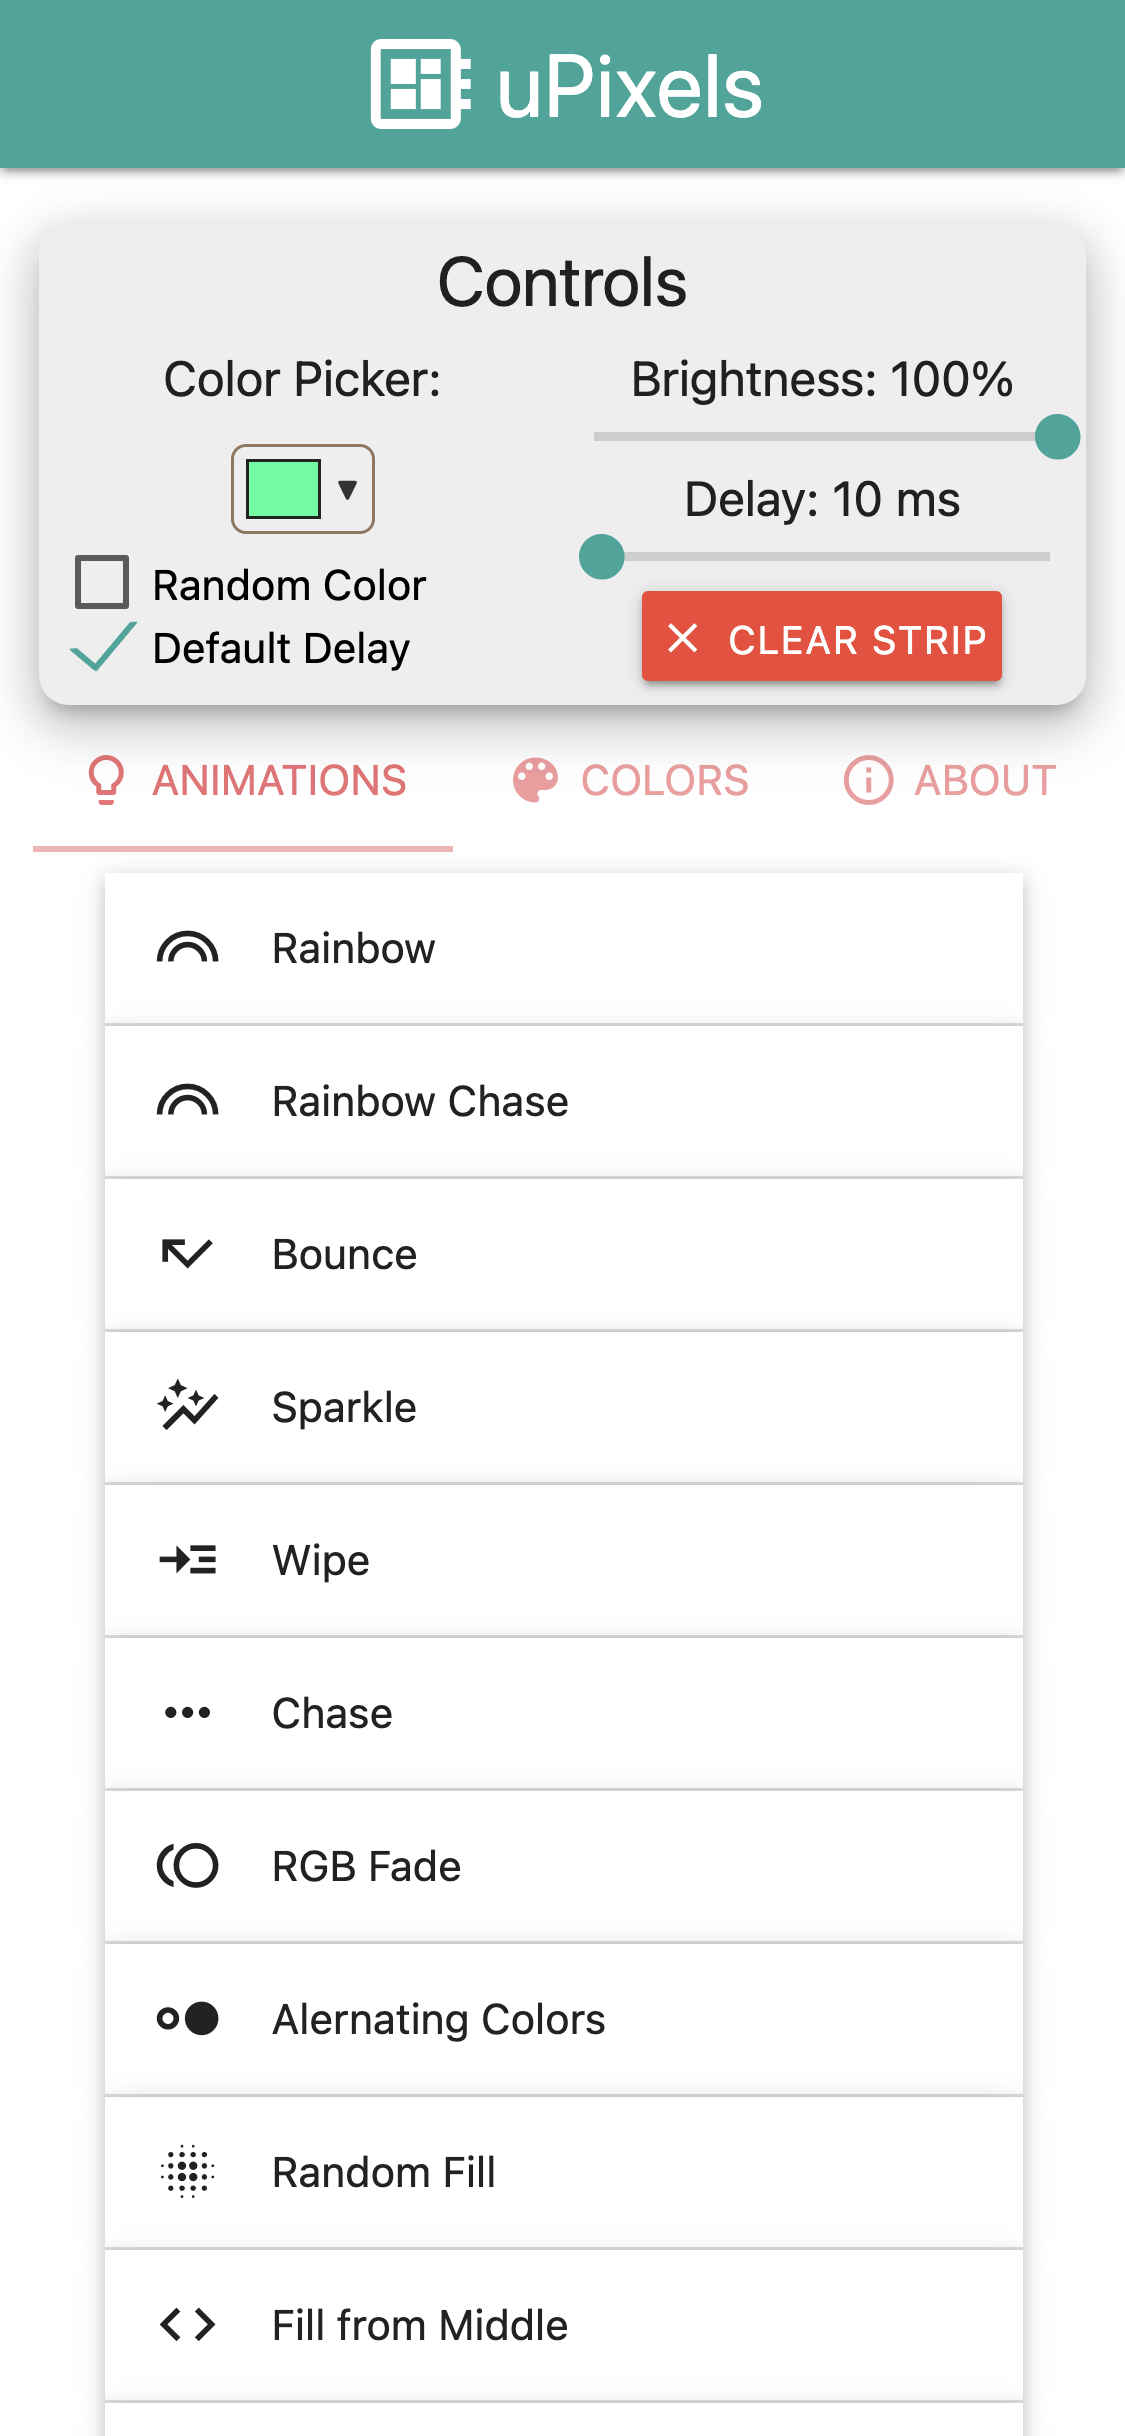
Animations screen
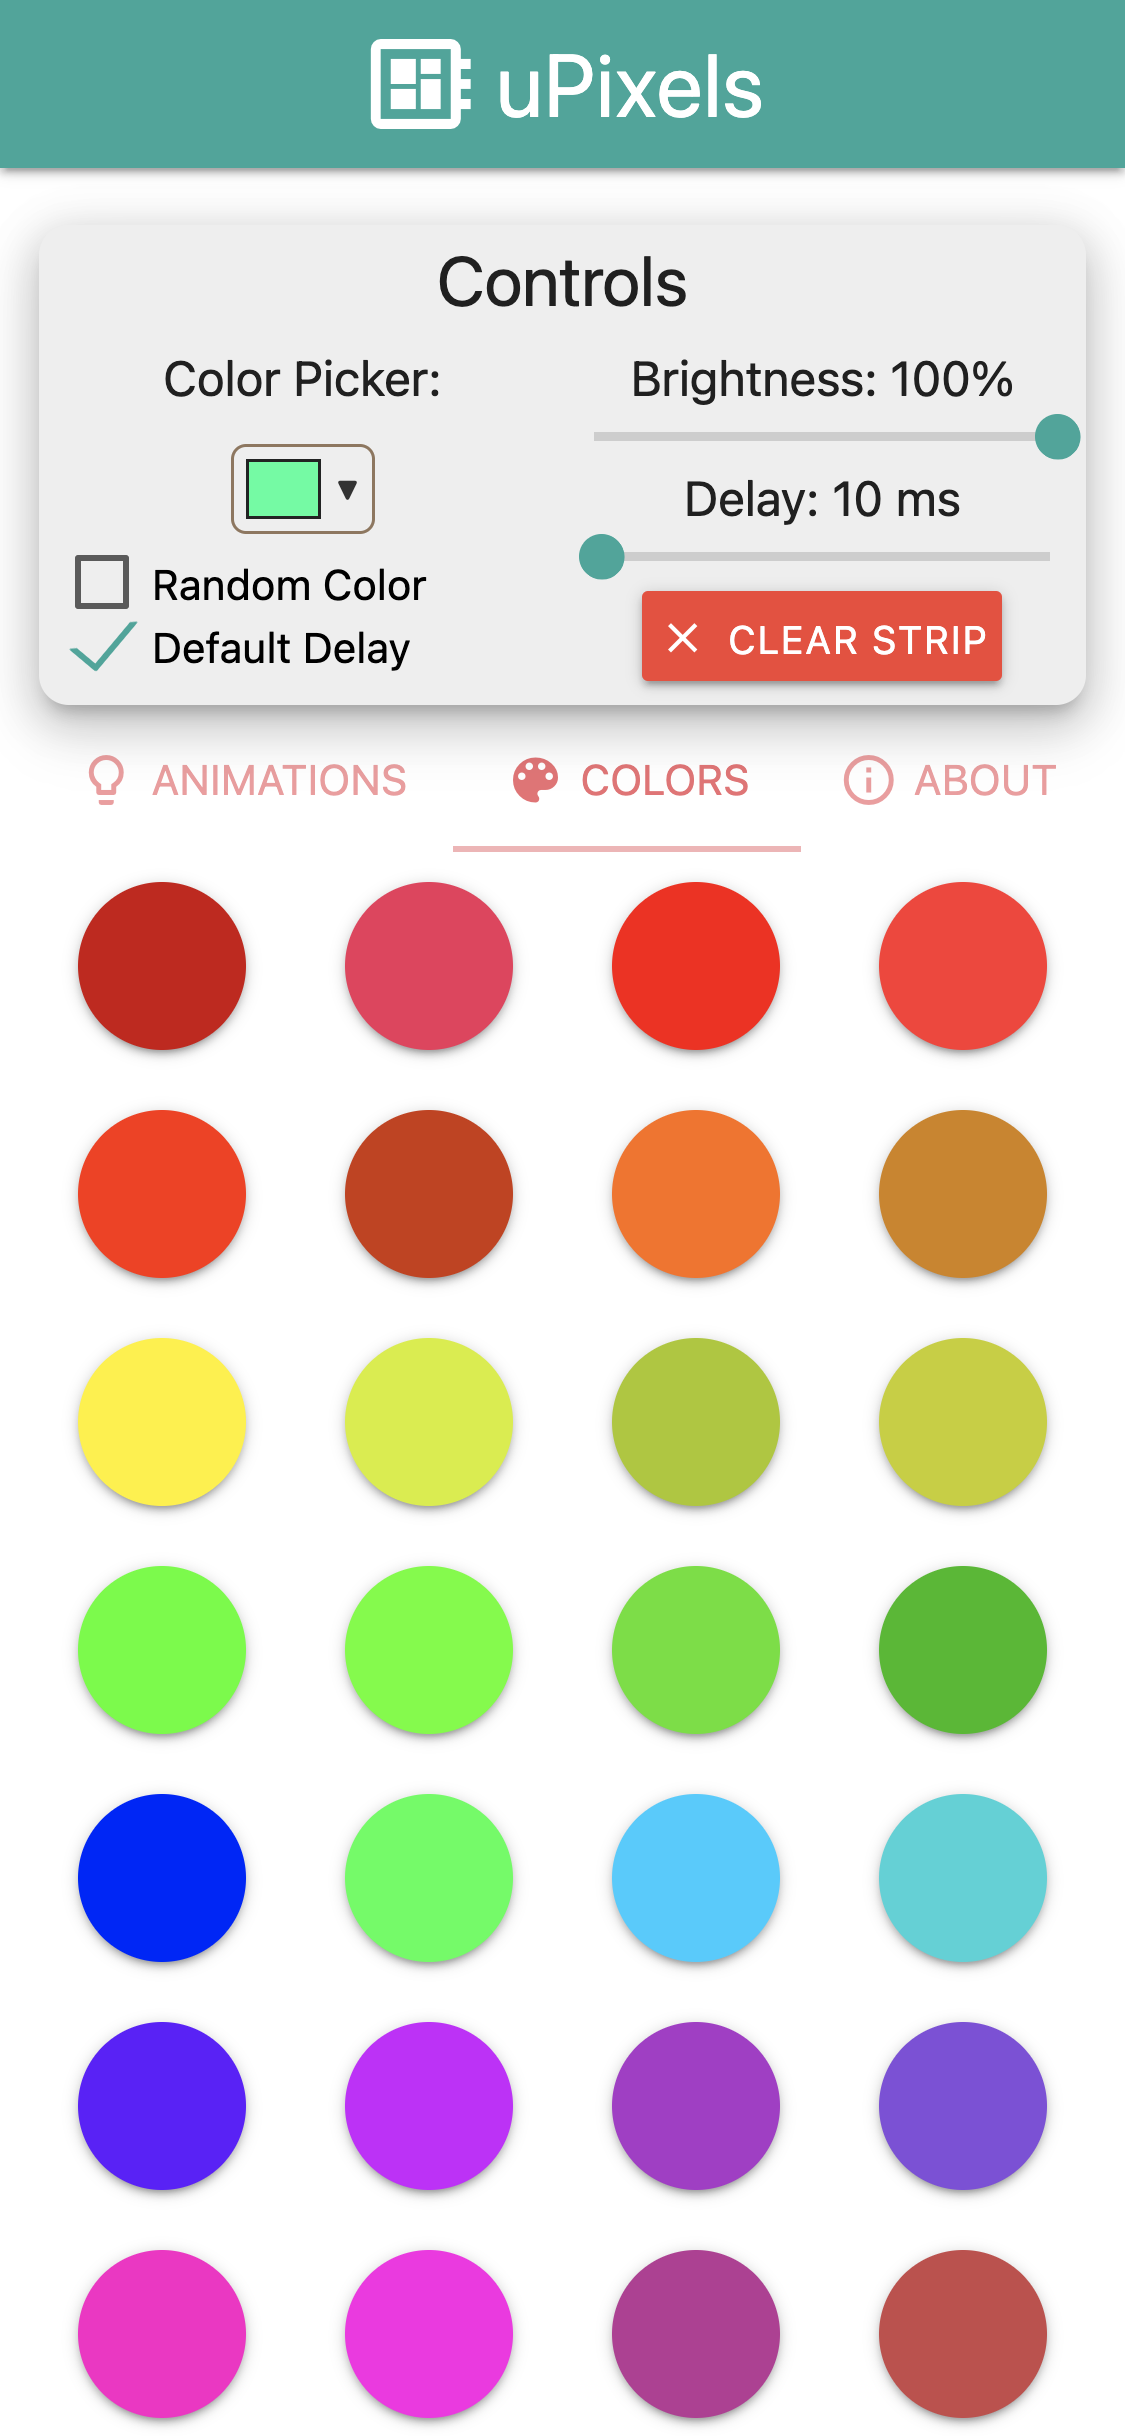
Colors screen
- Micro-controller that supports MicroPython(like the NodeMCU ESP8266)
- WS2812 Individually Addressable RGB LEDs
- 3V3 to 5V Logic Level Shifter
- A regular LED(optional)
- 270 ohm resistor
- 1000 μF capacitor
- 5V Power Supply(The amperage depends on your project. Each LED draws about 60mA @ full brightness/completely white)
- Wi-Fi network for your micro-controller to connect to(if you want to use the controller interface)
- USB cable to transfer files to your micro-controller(depending on your situation)
- More info on materials: Adafruit, Sparkfun
- uWeb (get it from my repo here)
- neopixel
- uos
- urandom
- ujson
- usocket
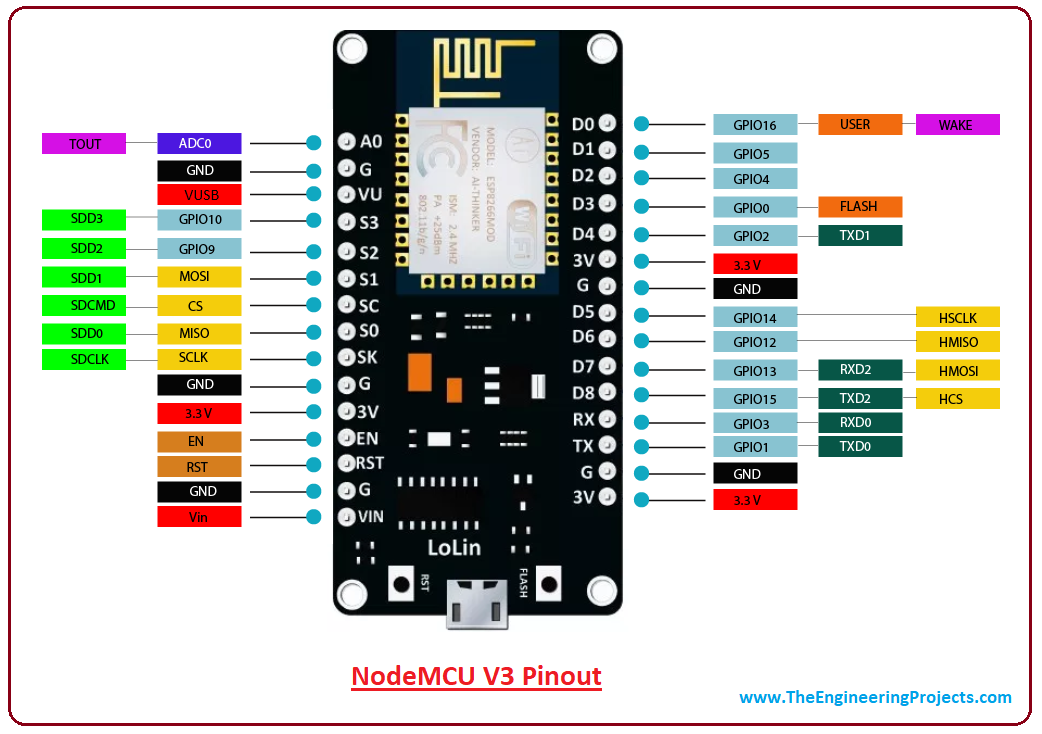
![]()
- Depending on your board, you may not need the Logic Level Shifter. The NodeMCU ESP8266(which I used for testing) is a 3V3 board while the LED Strip is a 5V device so it is important that the 3V3 signal is converted to 5V so that everything works properly.
- The power supply that you will need for your project will vary depending on the number of LEDS you want to drive(Rule of thumb: Each individual LED draws about 60mA @ full brightness/completely white). Refer to these resources to decide: Adafruit, Sparkfun
- The capacitor between the terminals of the power supply helps to smooth the supply of power as power draw can change drastically.
- It is important that all the grounds are connected together.
- It is recommended to power the LED strip directly from the power source. Don't power the strip from the board. Your board might not be able to supply the necessary current and it will blow up 💥.
- You may power the LEDs directly from the board if you only want to drive a few LEDs.
- Install MicroPython on your board if you have not already (ESP8266 installation)
- Install μWeb by following the INSTALLATION instructions on my repo.
- Head over to the releases tab on this repo. Download the source code for the latest version. Copy the μPixels project files to your board using the same method you used to copy the μWeb files. Make sure that you have transferred:
- uPixels.css
- uPixels.html
- uPixels.js
- uPixels.py
- Construct the circuit above (or a variation of it, depending on your board). You may also follow these hookup guides: Adafruit, Sparkfun
- Check out the Quick Start section for examples.
- Make sure you also have a boot.py for the initial setup of your board(ie: connecting to wifi) and main.py for the μPixels code.
- Power up your board.
- Navigate to your board's IP address on port 8000 using a web browser to access the UI(Ex: 192.168.100.48:8000)
- Enjoy the light show!
from uPixels import uPixels

pixels = uPixels(4, 30) # init a μPixels object using Pin 4 and controlling a LED strip with 30 LEDS
pixels.startServer() # start the server that hosts the UI on port 8000from uPixels import uPixels
pixels = uPixels(4, 30) # init a μPixels object on Pin 4 that is controlling a LED strip with 30 LEDS
for i in range(3):
pixels.chase(ms=40, color=(100, 0, 0), direction='right') # do a chase animation three times with delay of 40ms, red color, going right.
pixels.randomFill(ms=150, color=None) # random fill animation with 150ms delay and random colorsAfter running uPixels.startServer(), the following routes will be available at the address and port set when uPixels was initialized(Default: 0.0.0.0:8000).
- Returns uPixels user interface(works best on a mobile browser)
- Add this page to your phone's homescreen using Chrome(Android) or Safari(iOS) for an app-like experience(tutorial)!
- Run animations from the Animations API and other methods via a POST request to this route from any device connected on the same network as your microcontroller.
- All animations from the Animations API can be called from here as well as the
setStrip,setSegment, andclearmethods. - BEWARE of infinite loop animations. Once you start them, they can't be stopped unless you do a hard reset!
- This route takes a JSON body with an
actionandparamsto be passed to theaction - Required:
action- (string) name of function/animation to be run(name must be same as method names in documentation)params- (object) named params to be passed to the function(if no params, pass an empty object)- When color is needed, pass a
colorobject withr,g,bvalues, such as{ ... "color" : { "r": 100, "g": 100, "b": 100, } } - NOTE: For the
altColorsanimation, pass afirstColorandsecondColorobject
- When color is needed, pass a
Ex: To run the rainbow animation(w/ params), send a JSON body like this:
{
	"action": "rainbow",
	"params": {
		"ms": 10,
		"iterations": 1
	}
}
Ex: To run setStrip, which takes a color, send a JSON body like this:
{
	"action": "setStrip",
	"params": {
		"color": {
			"r": 255,
			"g": 50,
			"b": 50
		}
	}
}
Ex: To run clear, which takes no params, send a JSON body like this:
{
	"action": "clear",
	"params": {}
}- On success, the response will have a
200status with no body. - On error, the response will have a
400status and will return an error message. Check the MicroPython WebREPL for a more detailed error message!
Initialize a uPixels object to control a LED strip with num_leds on pin. Address and port specifies where to host the UI.
- pin - (int) pin where the LED strip data line is connected
- num_leds - (int) number of LEDS on strip
- address - (str) address to listen on. Default: "0.0.0.0"
- port - (int) port to listen on. Default: 8000
uPixels.device_name- (str) name of deviceuPixels.pin- (machine.Pin) pin object of board that LED is connected touPixels.np- (neopixel.NeoPixel) Neopixel objectuPixels.address- (str) address UI is hosted onuPixels.port- (int) port UI is hosted onuPixels.animation_map- (dict) mapping of animation names to their corresponding functions. Used when calling the animations from the UI.uPixels.statusLED- (int) pin number of status LED indicator. Default: 5
Sets name of device
- name - (str) device name
Serves the UI using the uWeb server on specified address and port
Renders the UI template to client
Runs when uPixels receives a POST request from the client and executes the animation from uPixels.animation_map
Set the pin number for the optional status LED indicator
- pin - (int) pin number where your LED is connected. NOTE: set this to False to disable the status LED indicator
Toggle the status LED indicator
- status - (int) state of the LED to set; 0 = off, 1 = on. Default: 1.
Default startup animation played when uPixels is first initialized. Override this method to set a custom animation.
Chase animation going left or right
- ms - (int) delay time in milliseconds. Default: 20
- color - (tuple) RGB color for animation in the format (r, g, b). Default: None(random color)
- segment_length - (int) number of LEDs to be used. Default: 5
- direction - (str) direction of animation; 'left' or 'right'. Default: 'right'
Fill strip animation starting from the first LED
- ms - (int) delay time in milliseconds. Default: 25
- color - (tuple) RGB color for animation in the format (r, g, b). Default: None(random color)
Fill strip animation starting from the middle of the strip
- ms - (int) delay time in milliseconds. Default: 40
- color - (tuple) RGB color for animation in the format (r, g, b). Default: None(random color)
Fill strip animation starting from both ends
- ms - (int) delay time in milliseconds. Default: 40
- color - (tuple) RGB color for animation in the format (r, g, b). Default: None(random color)
Random filling of strip one LED at a time
- ms - (int) delay time in milliseconds. Default: 150
- color - (tuple) RGB color for animation in the format (r, g, b). Default: None(random color)
Alternating colors every other LED on strip
- ms - (int) delay time in milliseconds. Default: 125
- firstColor - (tuple) RGB color for first color in the format (r, g, b). Default: None(random color)
- secondColor - (tuple) RGB color for second color in the format (r, g, b). Default: None(random color)
Bouncing animation of one LED from left to right and back
- ms - (int) delay time in milliseconds. Default: 20
- color - (tuple) RGB color for animation in the format (r, g, b). Default: False(random color)
Fade of RGB values on whole strip
- ms - (int) delay time in milliseconds. Default: 20
Cycle of colors in rainbow over entire strip
- ms - (int) delay time in milliseconds. Default: 20
- iterations - (int) repetitions of animation
Rainbow chase animation
- ms - (int) delay time in milliseconds. Default: 50
Wipe animation
- ms - (int) delay time in milliseconds. Default: 20
- color - (tuple) RGB color for animation in the format (r, g, b). Default: None(random color)
Sparkle animation
- ms - (int) delay time in milliseconds. Default: 10
- color - (tuple) RGB color for animation in the format (r, g, b). Default: None(random color)
Clears entire strip
Set entire strip to a color
- color - (tuple) RGB color in the format (r, g, b).
Set specified segments of LEDS to a color
- segment_of_leds - (list) positions of each individual LED to be set(Ex:
[1, 4, 10]will set LEDS @ index 1, 4, and 10 to the color). - color - (tuple) RGB color in the format (r, g, b).
Returns a random number between lower and upper(not including upper)
- lower - (int) lower bound
- upper - (int) upper bound(this value is not included in the function)
- (int) integer between
loweranduppernot includingupper
Return a random RGB tuple
- (tuple) RGB tuple in form (r, g, b). Min: 0, Max: 255
Rainbow wheel function used in the rainbow animations
- pos - (int) position in wheel
- (tuple) RGB tuple representing the position of the wheel
- NodeMCU v3 (ESP8266)
- WS2812b Individually Addressable RGB LEDs
- MaterializeCSS
- Google Material Design Icons
- Spectrum.js
- noUiSlider.js
- MicroPython
- jQuery
- jgarff - rpi_ws281x


