Someone converted it before, but the original interface from unknown origin is dead.
Analysing the circuit revealed switches organized in groups, eight per group, so multiplexing is possible and there were also diodes installed, which allows polyphonic muxed readout.
I replaced that interface board with the Arduino nano and kept an eye on using as few as possible external components (parts shortage, you know?). The AVRs have useful pullups, so nothing special.
Polyphonic. Base Note, Midi Channel and Velocity are configurable.

- Arduino Uno / Nano with Atmega328
- 2 220k resistors for MIDI
- 5 1k resistors for buttons and LED
- Buttons / momentary switches (! Carbon pad switches may have too much resistance) Schmatics are here.
The build is easy. I put the arduino on perfboard, added the midi resistors and the input filtering/protection, then connected the keys. If you change the design for more key groups, add a 1k resistor in the added multiplexed lines. This is basic protection when the MCU in in random condition at powerup.
When build, compile the arduino sketch, upload it and voila! If something doesn't go as expected, you can use the debugging mode for some basic checks.
For Power regulation, arduino's internal linear regulator is used. Depending on source, the absolute maximum voltage may be in the 15V ballpark (as my arduino clones from AZ Delivery are). If you power those, remember that rectified transformer powersupplies have peaking off-load-voltages which are much higher than the specified RMS (usually by 1.4141 * V_RMS) because of sinusodial RMS to peak values. Since our arduino has low power demands, voltage goes up to nearly off-load. I would say, a 9V DC powersupply is safe to use, every kind of switching power supply, Batteries etc.
The Midi handling is done by the FourtySevenEffects library. It may be a little overkill for sending simple note-on and note-off values, but I liked the Idea of trying it out, there is a good Doxygen documentation.
The software is customizable, feel free to change PIN numbers for your designs if needed.
There is some pointer magic and some size=sizeof() stuff implemented, to keep the design expandable, you can add additional key groups by adding pin numers to the MUX_PORTS[] array.
There is a simple debug mode implemented, which is activated if the mode button is held down during a reset until the software changes into modeswitch (led is blinking). If you connect a computer via the Arduino USB Interface and open a serial console on the usb serial device with 9600baud transmission rate, you'll see information about the internal eeprom state, which key is pressed, keyboard state values and if the unit tries to send on or off messages via midi.
Please note that midi operation is not possible in debug mode due to different UART speeds used for midi and debugging.
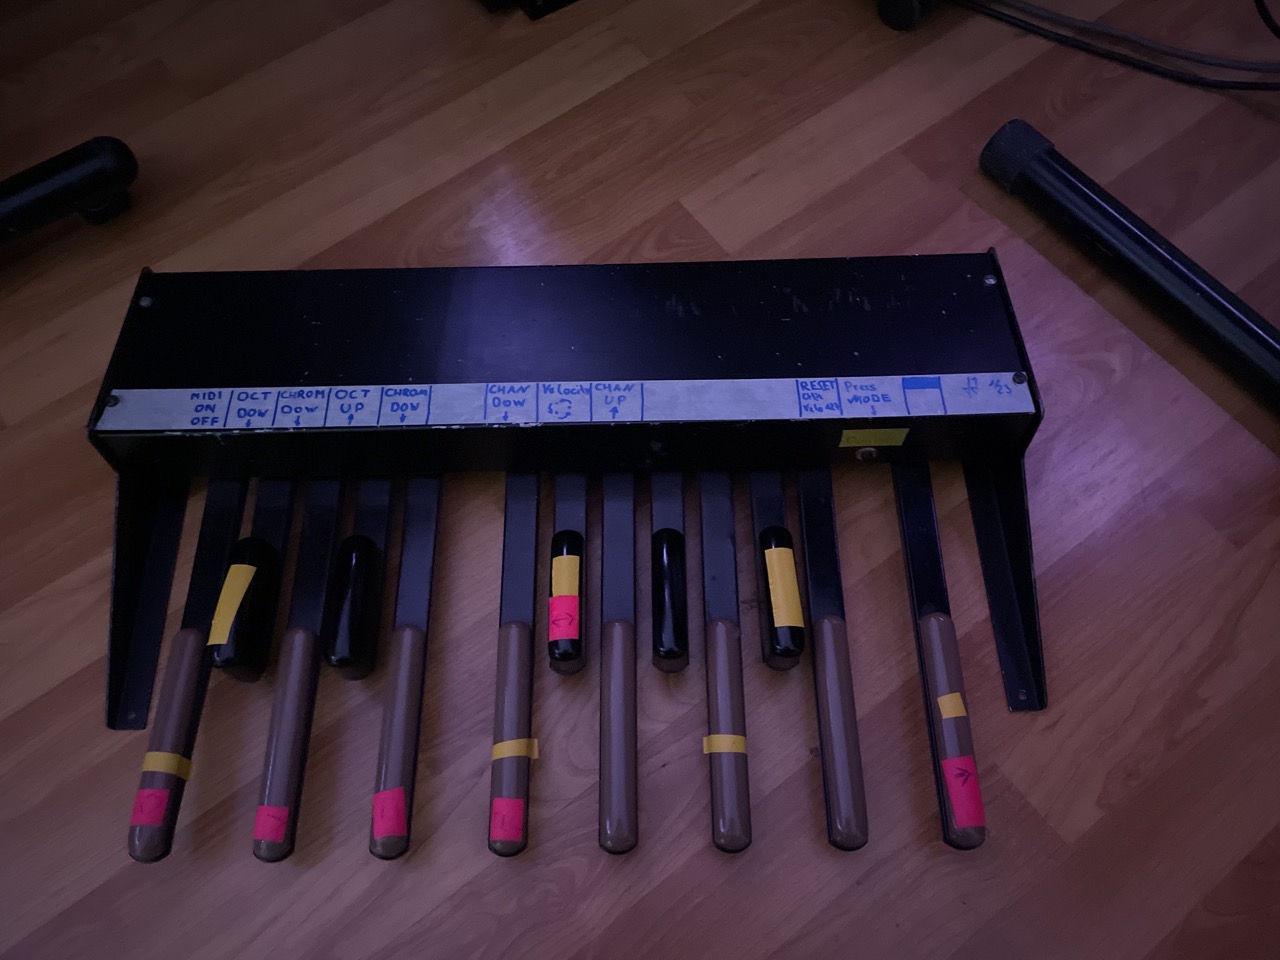
The mode button allows on-stage configuration of the interface. On my pedal, it is organized as following:
| Nr. | Key | Function |
|---|---|---|
| 1 | C_0 | Midi on/off (not implemented) |
| 2 | C#_0 | Shift Keys 1 Octave down |
| 3 | D_0 | Shift Keys 1 Semitone down |
| 4 | D#_0 | Shift Keys 1 Octave up |
| 5 | E_0 | Shift Keys 1 Semitone up |
| 6 | F_0 | Change MIDI channel DOWN |
| 7 | F#_0 | Cycle Velocity by + 1/4 range |
| 8 | G_0 | Change MIDI channel UP |
| 12 | B_0 | RESET settings to default |
| 13 | C_1 | Send Midi Panic CC120 on Chan |
To activate the options, press the mode button, the LED changes from static to blinking, then press the key corresponding to your intended change. The changes are immediately applied and stored in memory, so everything will be kept for the net gig. The new midi channel is displayed when changed.
If you have pressed mode by accident, just wait until the LED stops blinking, about 10 seconds.
Key Functions can be changed, rearranged or removed in Source Code. The Key numbers are absolute, so Key 9 means the first key in the second group.
