


xmpp-messenger-ios is available through CocoaPods. To install
it, simply add the following line to your Podfile:
pod "xmpp-messenger-ios"If you can't use cocoapod, you will have to download the files and add it to your Xcodeproject.
If you encounter compilation errors after the installation, you may change the following file:
-
In
XMPPFramework/Core/XMPPStream.h, change#import "CocoaAsyncSocket/GCDAsyncSocket.h"to@import CocoaAsyncSocket; -
In
XMPPFramework/Core/XMPPLogging.h, change#import "CocoaLumberjack/DDLog.h"to@import CocoaLumberjack; -
In
JSQMessagesViewController/JSQSystemSoundPlayer+JSQMessages.h, change to@import JSQSystemSoundPlayer;
A pull request will be made to the XMPPFramework to include thoses changes.
xmpp-messenger-ios was build for Xcode 7 and Swift 2, if you haven't upgraded yet, you should.
Made in Paris by ProcessOne
xmpp-messenger-ios is available under the MIT license. See the LICENSE file for more info.
We will build a Swift XMPP client built on XMPP Framework, using xmpp-messenger-ios and JSQMessageViewControllerSwift
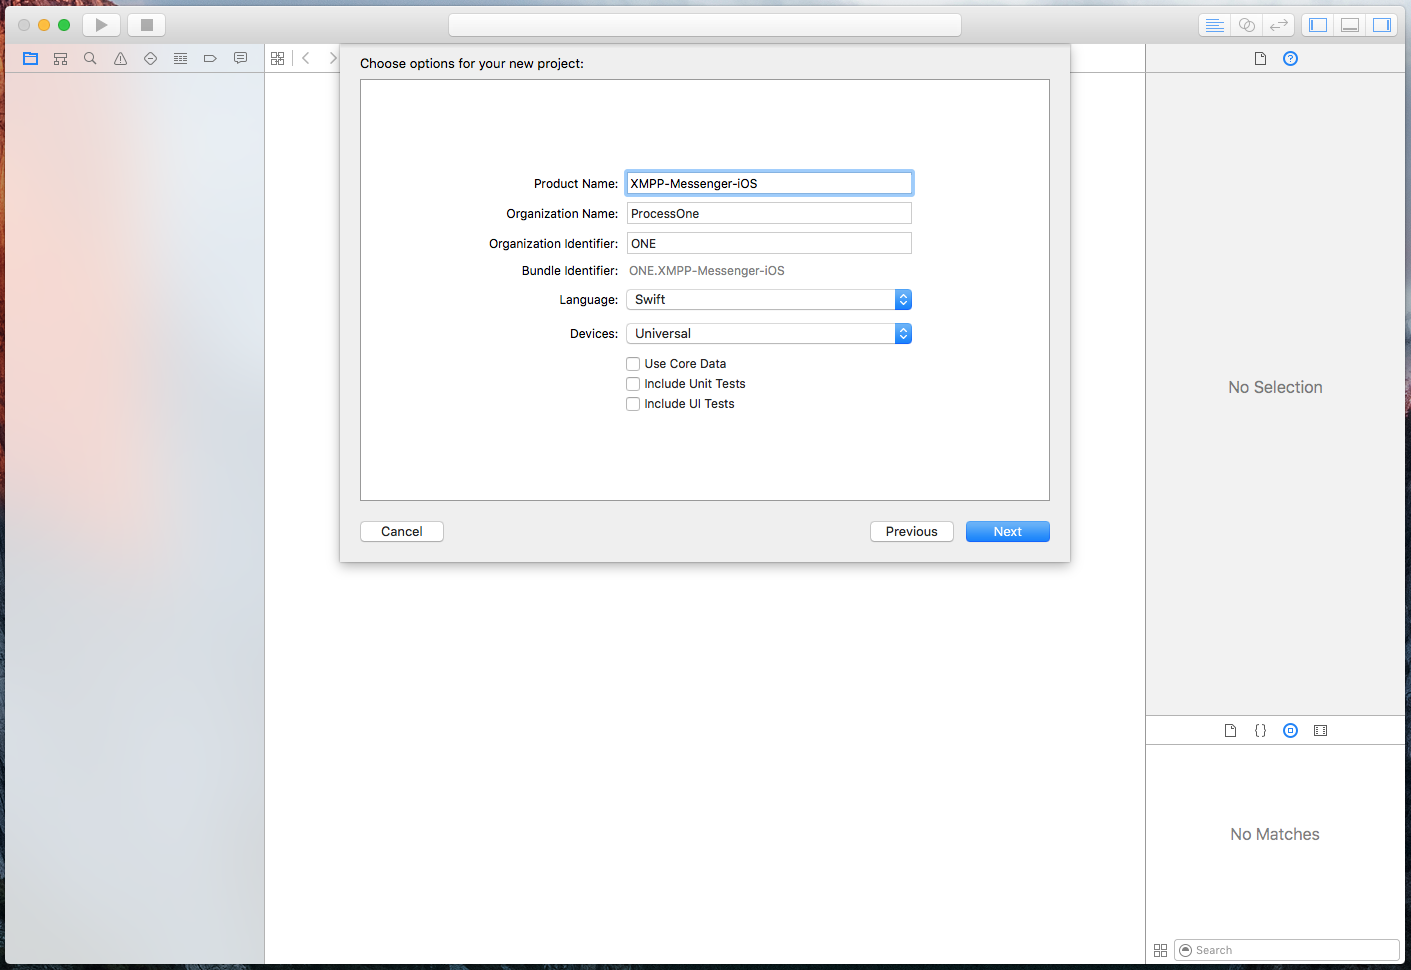
- Open
Xcodeand selectcreate a new project, you are free to choose wich kind of template you want, for this example, we will use thesingle view application. Fill up the required information, selectSwiftlanguage and choose the folder location.
-
Now quit
Xcodeand launch the terminal app (terminal.app)
-
Navigate to your project directory, and type
pod initlike so:


pod init will setup cocoapods for this project, so make sure that you're using the latest version.
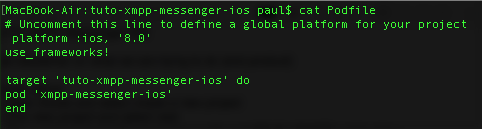
- Edit the newly created Podfile by taping
emacs Podfile(Feel free to usevim:)). It should look like this:
Press ctrl+x, ctrl+s to save, then ctrl+x, ctrl+c to end editing
- Almost good to go, type
pod install, and wait until the installation is over.
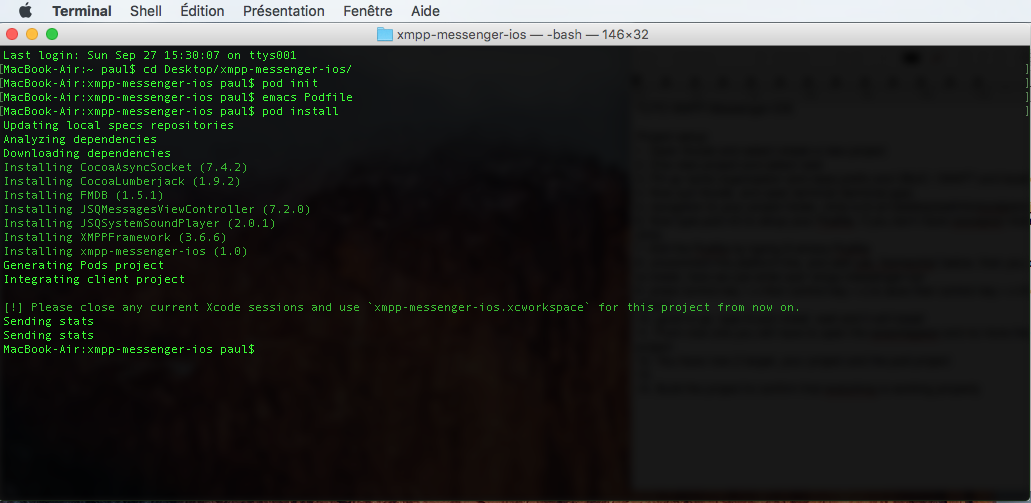
From now one you will have to open your project using the xcworkspace file, and no more the xcodeproject file
- Open the project, add:
import xmpp_messenger_iosto your AppDelegate.swift file. Build & run to confirm that everything went well.
if you encounter an error, try to deep clean Xcode (command+alt+shift+k)
At this point your project should compile without errors
We are going to create 4 classes, one to display the conversations, name it OpenChatsTableViewController.swift, one for chatting, name it ChatViewController.swift, one to display the list of contacts, name it ContactListTableViewController.swift and one to act as a settings page, name it SettingsViewController.swift.
You can remove or reuse the apple-provided ViewController.swift file
- Open your
Main.storyboardfile, and remove the current ViewController. - Drop in a
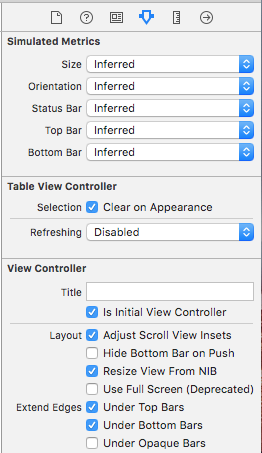
UITableViewController, and asign it toOpenChatsTableViewController.swift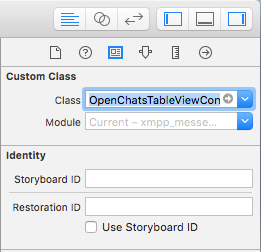
Now you will select this Controller as the initial view controller
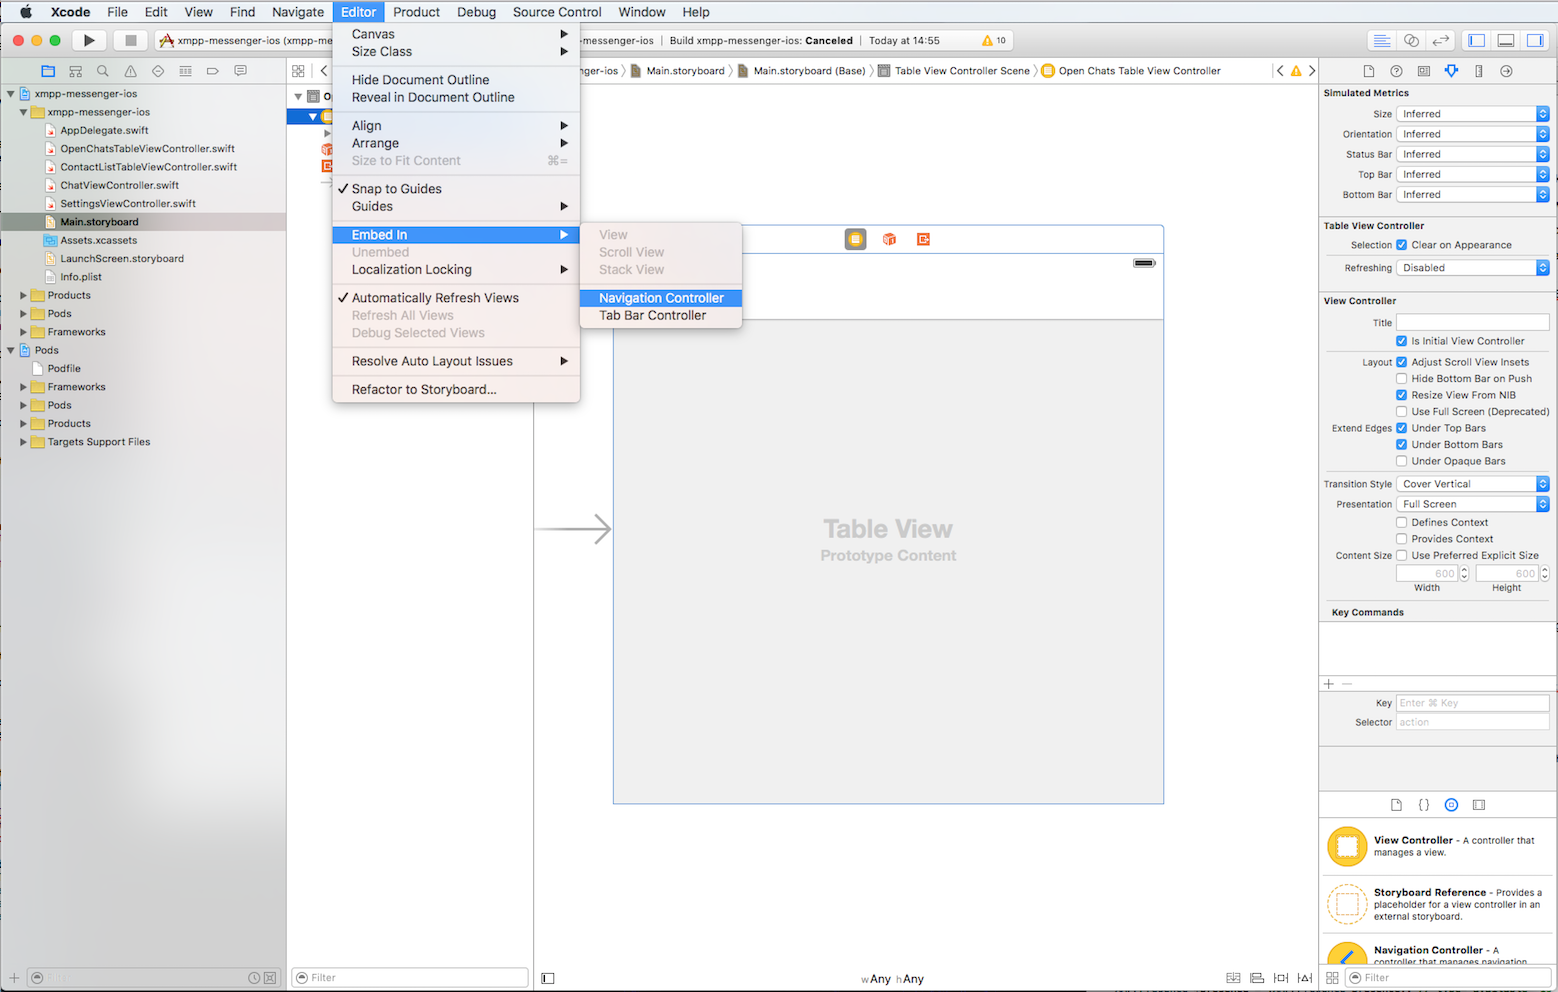
We will now embed an UINavigationController: within Xcode, go to editor->Embed in->Navigation controller
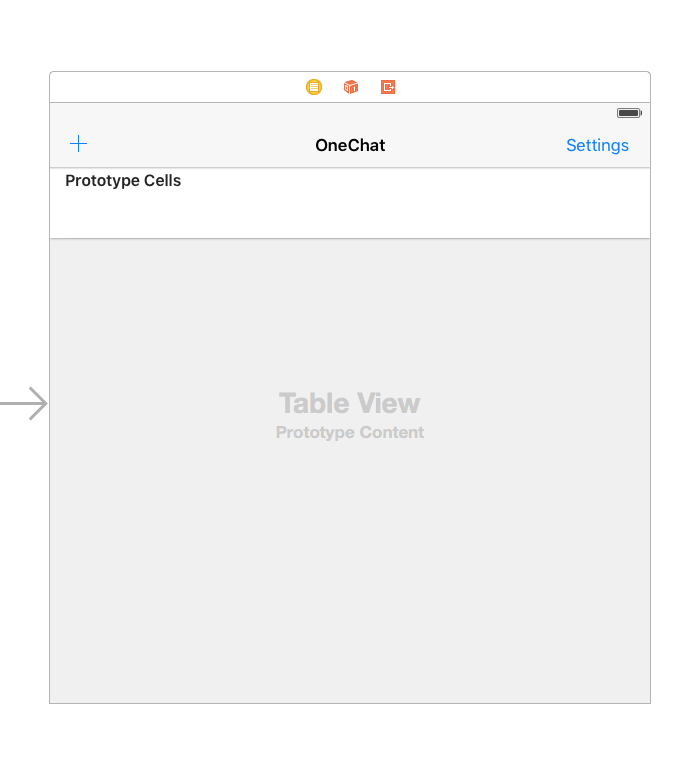
Now that we have a UINavigationBar on OpenChatsViewController, we will add two UIBarButtonItem:
- On the left, select system item
add - On the right, simply name it "Settings"
Once finished, it should look like this:
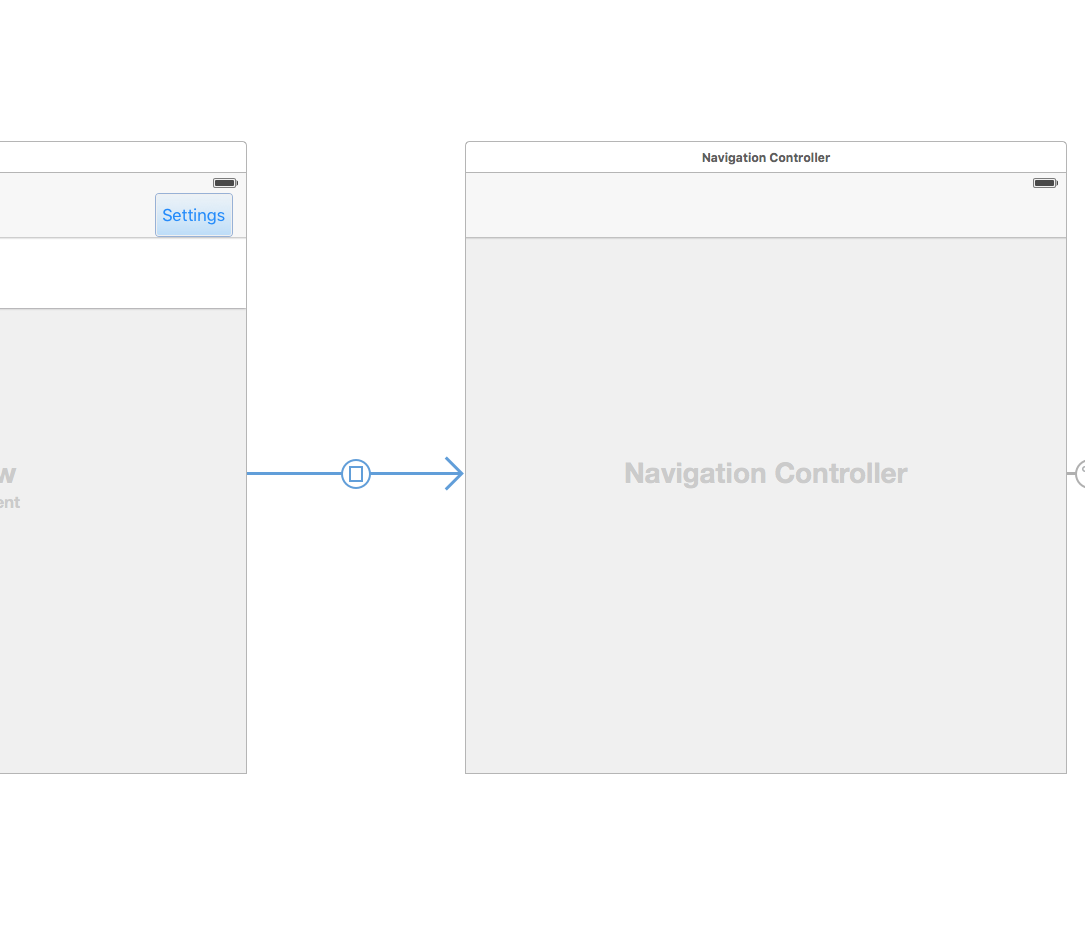
- Drop an
UIViewController, asign it toSettingsViewController.swift, then embed it inside anUINavigationController.
Return on OpenChatsTableViewController. Select the settings UIBarButtonItem with the ctrl key and drag the cursor on the SettingsViewController's UINavigationController to create a segue between the ViewControllers.
It should look like this:
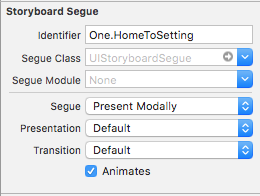
Now select the Segue, and in the properties, name it One.HomeToSettings
Return on SettingsViewController, and on the UINavigationBar, add an UIBarButtonItem, and name it "Done".
Also drop two UITextField, and one UIButton.
Name the UIbutton's title "validate" and set the UITextField's placeholder to "Username" and "Password".
It should look like this:
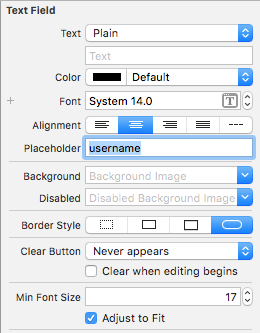
Note: you should select -secure entry- on the password's UITextField to replace every entered letter into dots
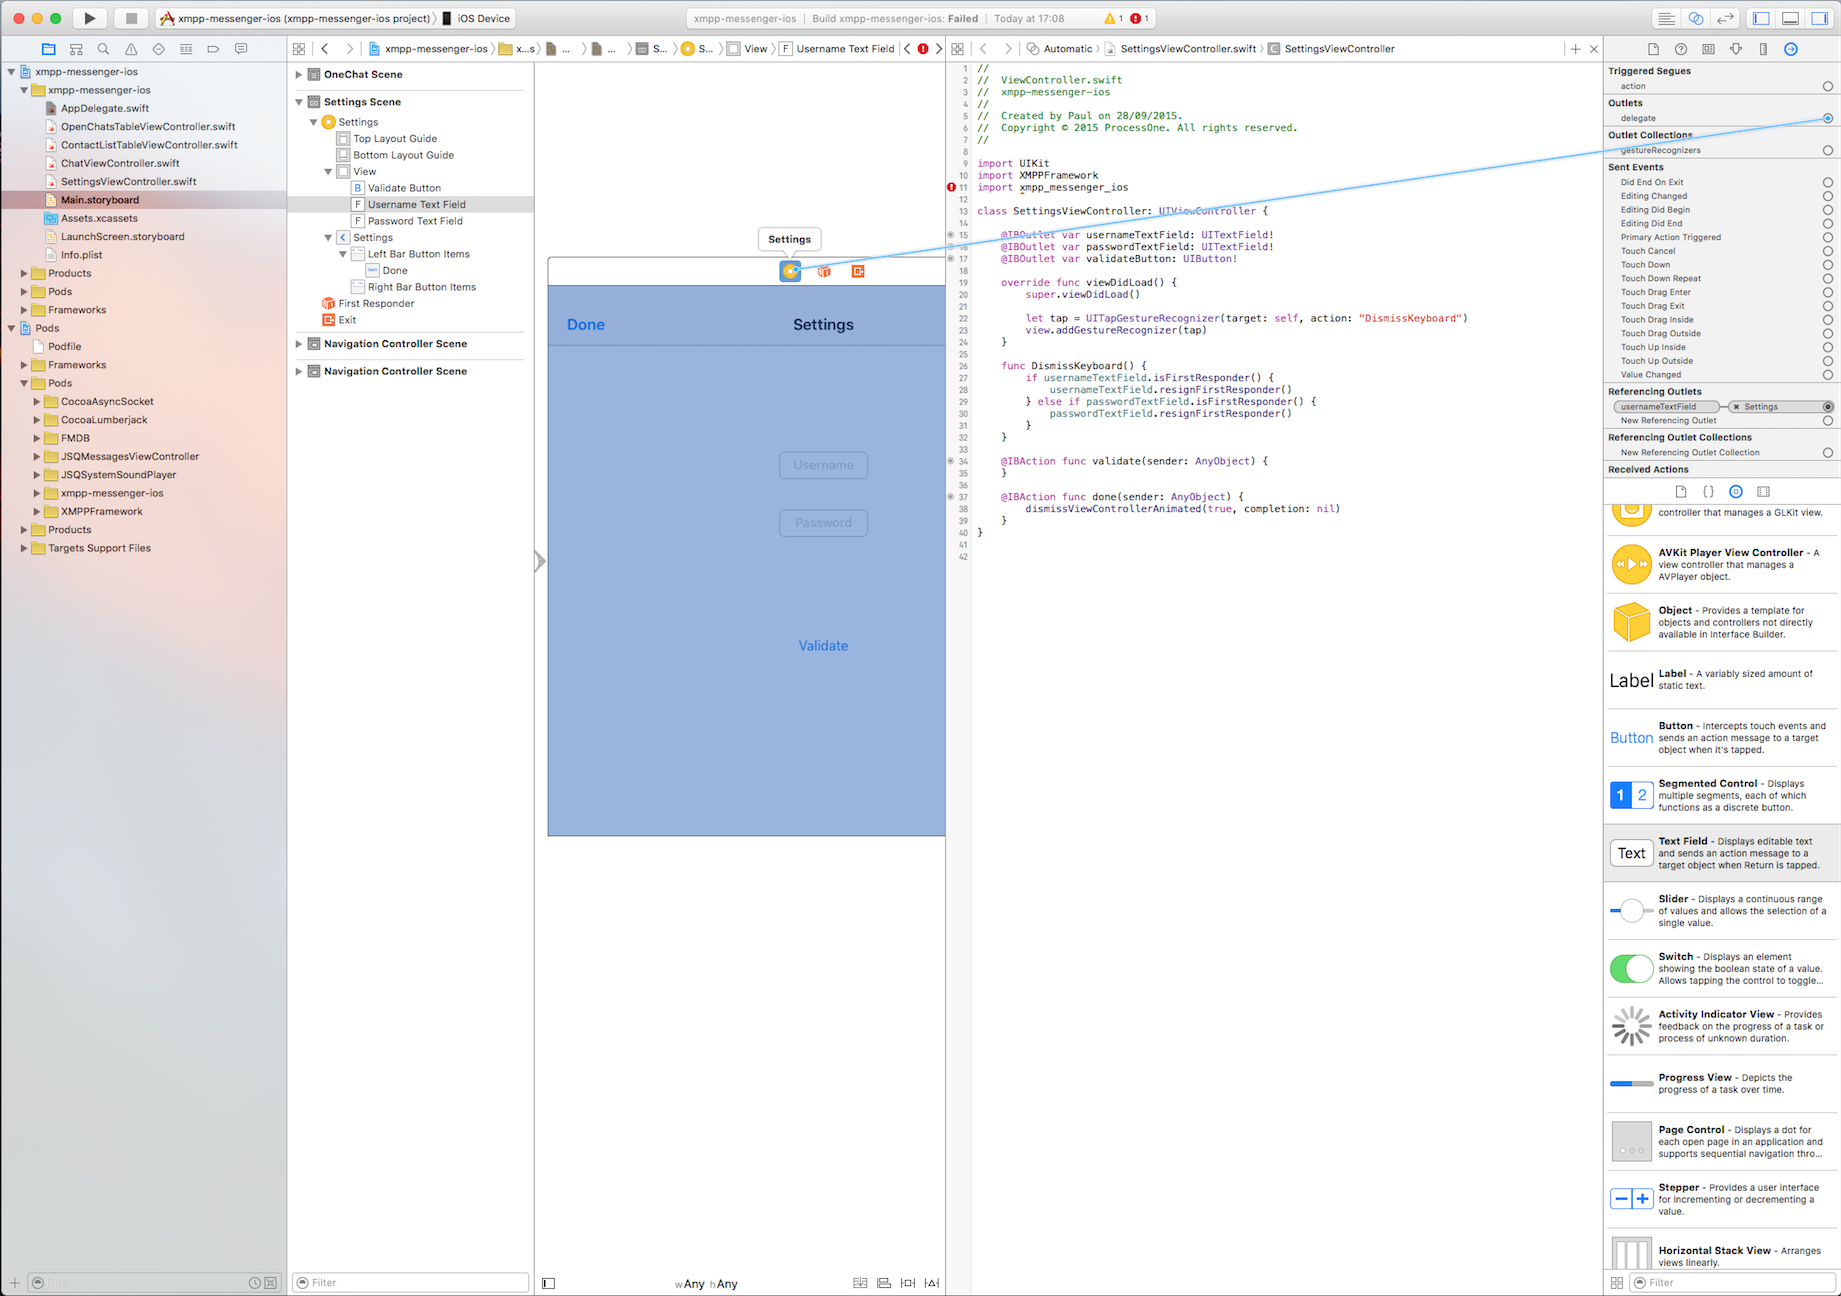
You will now split Xcode's screen to display side by side both interface and code, simply by selecting this button:

Once done, ctrl select the textfield's and validate's button to the class to create IBOutlet's. Name them respetctivly userNameTextField, passwordTextField and validateButton.
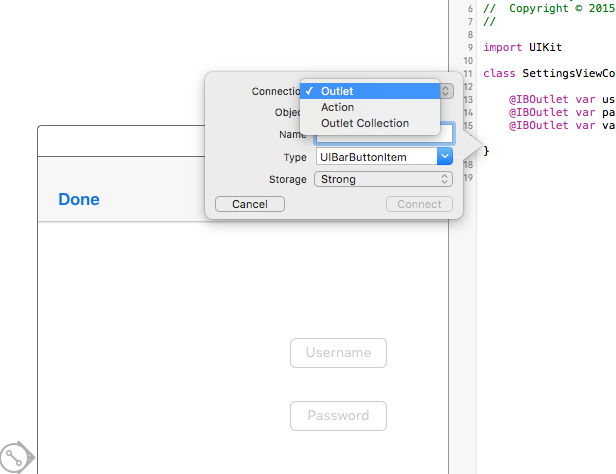
For the last one, the validate button, you will have to ctrl drag again, but this time, select action instead of outlet, and name the IBAction "close".
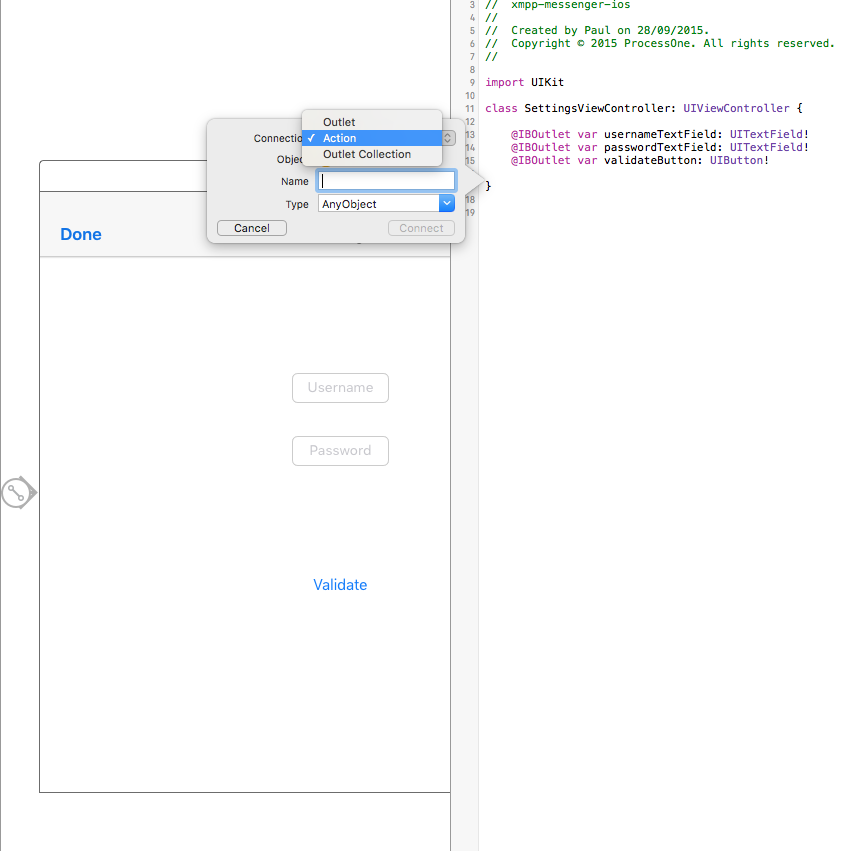
Do the same operation, but on the "Done" UIBarButtonItem, and name the method "close"
We need to do one last operation: setting the UITextField's delegates. For this, you will have to select a UITextField at the time, go to the connection tab and click-drag your cursor on the SettingsViewController.
###This is all about 'connection'
- Open
AppDelegate.swift. We will add to calls in here. One to start the services, and the other one to stop them.
In:
func application(application: UIApplication, didFinishLaunchingWithOptions launchOptions: [NSObject: AnyObject]?) -> BoolAdd the following code:
OneChat.start(archiving: true, delegate: nil) { (stream, error) -> Void in
	if let _ = error {
		//handle start errors here
	} else {
		//Activate online UI
	}
}
And in:
func applicationWillTerminate(application: UIApplication)Add:
OneChat.stop()- Go back to
SettingsViewController.swift, and add the followingimportat the top of the file:
import XMPPFramework
import xmpp_messenger_ios
We will now take care of the UITextField's delegates: we will add a method to hide the keyboard if the user if out of focus, and a method to trigger the validation if the user click on the keyboard's return key.
To hide the keyboard, Add:
let tap = UITapGestureRecognizer(target: self, action: "DismissKeyboard")In your viewDidLoad method, then implement the DismissKeyboard method:
func DismissKeyboard() {
	if usernameTextField.isFirstResponder() {
		usernameTextField.resignFirstResponder()
	} else if passwordTextField.isFirstResponder() {
		passwordTextField.resignFirstResponder()
	}
}
And to trigger the validation, we'll use the UITextField delegates:
func textFieldShouldReturn(textField: UITextField) -> Bool {
	if passwordTextField.isFirstResponder() {
		textField.resignFirstResponder()
		validate(self)
	} else {
		textField.resignFirstResponder()
	}
	return true
}
Now we are going to set default values in the UITextfield's, and add a way to change the "validate" UIButton if the user is already connected.
Add the following in your viewWillappear:
if OneChat.sharedInstance.isConnected() {
	usernameTextField.hidden = true
	passwordTextField.hidden = true
	validateButton.setTitle("Disconnect", forState: UIControlState.Normal)
} else {
	if NSUserDefaults.standardUserDefaults().stringForKey(kXMPP.myJID) != "kXMPPmyJID" {
	usernameTextField.text = NSUserDefaults.standardUserDefaults().stringForKey(kXMPP.myJID)
	passwordTextField.text = NSUserDefaults.standardUserDefaults().stringForKey(kXMPP.myPassword)
}
Here we just change the name of the "validate" UIButton and hide the UITextField's in case the user is already connected, if not, and if the user already gave credentials, we place them in the UITextField.
Place this inside the validate() method:
if OneChat.sharedInstance.isConnected() {
	OneChat.sharedInstance.disconnect()
	usernameTextField.hidden = false
	passwordTextField.hidden = false
	validateButton.setTitle("Validate", forState: UIControlState.Normal)
} else {
	OneChat.sharedInstance.connect(username: self.usernameTextField.text!, password: 	self.passwordTextField.text!) { (stream, error) -> Void in
	if let _ = error {
		let alertController = UIAlertController(title: "Sorry", message: "An error occured: \(error)", preferredStyle: UIAlertControllerStyle.Alert)
		alertController.addAction(UIAlertAction(title: "Ok", style: UIAlertActionStyle.Default, handler: { (UIAlertAction) -> Void in
				//do something
		}))
		self.presentViewController(alertController, animated: true, completion: nil)
	} else {
		self.dismissViewControllerAnimated(true, completion: nil)
	}
}
The validate method will connect the user and dismiss the settings screen if the connect() succeed, and if the user is already connected, it will disconnect him and reset the UI
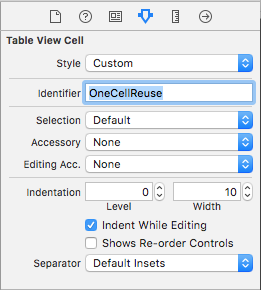
- Return to the
Storyboard, select theOpenChatsTableViewController, then select theUITableViewCellinside theUITableViewand in the property tabs, fill thereuse identifiertoOneCellReuse:
Open up the source code, OpenChatsTableViewController.swift, and add the following imports at the top of the file:
import XMPPFramework
import xmpp_messenger_ios
This Controller will be displaying all the open / stored chat conversation between two or more participants, so we need to set both datasource and delegate for the UITableView, as well as a way to know if a new conversation was added to the list.
Create a variable witch will contains the conversation:
var chatList = NSArray()Then, implement the following datasource methods:
override func tableView(tableView: UITableView, numberOfRowsInSection section: Int) -> Int {
	return OneChats.getChatsList().count
}

override func numberOfSectionsInTableView(tableView: UITableView) -> Int {
	return 1
}
And the most important delegate:
override func tableView(tableView: UITableView, cellForRowAtIndexPath indexPath: NSIndexPath) -> UITableViewCell {
	let cell: UITableViewCell? = tableView.dequeueReusableCellWithIdentifier("OneCellReuse", forIndexPath: indexPath)
	let user = OneChats.getChatsList().objectAtIndex(indexPath.row) as! XMPPUserCoreDataStorageObject

	cell!.textLabel!.text = user.displayName

	OneChat.sharedInstance.configurePhotoForCell(cell!, user: user)

	cell?.imageView?.layer.cornerRadius = 24
	cell?.imageView?.clipsToBounds = true

	return cell!
}
If, like me, you don't like the extra lines on the UITableView, you can add the following delegate:
override func tableView(tableView: UITableView, heightForFooterInSection section: Int) -> CGFloat {
	return 0.01
}

override func tableView(tableView: UITableView, viewForFooterInSection section: Int) -> UIView? {
	return UIView()
}
Last UITableView's touch, add tableView.rowHeight = 50 at the end of your viewDidLoad.
You can now conform the class to the OneRosterDelegate:
class OpenChatsTableViewController: UITableViewController, OneRosterDelegateAn error should now pop:

This is because we have to conform to the OneRosterProtocol. Do it by implementing the following method:
func oneRosterContentChanged(controller: NSFetchedResultsController) {
	//Will reload the tableView to reflect roster's changes
	tableView.reloadData()
}
Implementing a delegate method is great, but we need to set yourself as the delegate if we want to be notified when the roster content change.
You will do this in your viewWillAppear method:
OneRoster.sharedInstance.delegate = selfFollowing the same logic, remove yourself as delegate in your viewWillDisapear method:
OneRoster.sharedInstance.delegate = nilReturn to the top, in your viewWillAppear, and add the connect() function, to present the SettingViewController if the user isn't logged in:
OneChat.sharedInstance.connect(username: kXMPP.myJID, password: kXMPP.myPassword) { (stream, error) -> Void in
	if let _ = error {
		self.performSegueWithIdentifier("One.HomeToSetting", sender: self)
	} else {
		//set up online UI
	}
}- Displaying a list of chat conversation is great, but creating one is even better ! Switch back to your
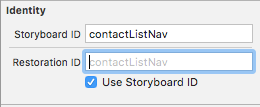
Storyboard, and drop aUITableViewController. Asing it toContactListTableViewController.swift. Embed aUINavigationControllerand name it'sStoryboard ID"contactListNav":
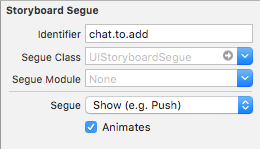
Now you will create a Modal presentation segue between the + UIBarButtonItem in the OpenChatsTableViewController and the ContactListViewController.
Name this segue "chat.to.add"
Return to ContactListTableViewController and drop a UIBarButtonItem, select the system style "done" and create an action method named "close":
@IBAction func close(sender: AnyObject) {
	self.dismissViewControllerAnimated(true, completion: nil)
}
Now select the UITableViewCell and set the reuse identifier like you did for the OpenChatsTableViewController.
Let's take care of this ContactListTableViewController, at the top of the file, add:
import XMPPFramework
import xmpp_messenger_ios
Like you did for the OpenChatsTableViewController, add OneRosterDelegate to your class declaration, set up the delegate in viewWillAppear and viewWillDisapear, as well as implementing the required protocol method oneRosterContentChanged.
Let's implement the UITableViewDelegate now:
override func tableView(tableView: UITableView, numberOfRowsInSection section: Int) -> Int {
	let sections: NSArray? =  OneRoster.buddyList.sections

	if section < sections!.count {
		let sectionInfo: AnyObject = sections![section]

		return sectionInfo.numberOfObjects
	}

	return 0;
}

override func numberOfSectionsInTableView(tableView: UITableView) -> Int {
	return OneRoster.buddyList.sections!.count
}

override func tableView(tableView: UITableView, titleForHeaderInSection section: Int) -> String? {
	let sections: NSArray? = OneRoster.sharedInstance.fetchedResultsController()!.sections

	if section < sections!.count {
		let sectionInfo: AnyObject = sections![section]
		let tmpSection: Int = Int(sectionInfo.name)!

		switch (tmpSection) {
			case 0 :
				return "Available"

			case 1 :
				return "Away"

			default :
				return "Offline"

		}
	}

	return ""
}

override func tableView(tableView: UITableView, cellForRowAtIndexPath indexPath: NSIndexPath) -> UITableViewCell {
	let cell: UITableViewCell? = tableView.dequeueReusableCellWithIdentifier("OneCellReuse", forIndexPath: indexPath)
	let user = OneRoster.userFromRosterAtIndexPath(indexPath: indexPath)

	cell!.textLabel!.text = user.displayName;

	if user.unreadMessages.intValue > 0 {
		cell!.backgroundColor = .orangeColor()
	} else {
		cell!.backgroundColor = .whiteColor()
	}
	OneChat.sharedInstance.configurePhotoForCell(cell!, user: user)

	return cell!;
}
This will populate the UITableView with the content of your roster. It will display the name and picture of your contacts, ordered by status available, away, offline.
- In this section we will add the ability to select a contact and start chatting !
Open your Storyboard and drop a UIViewController. Asign it to ChatViewController.swift.
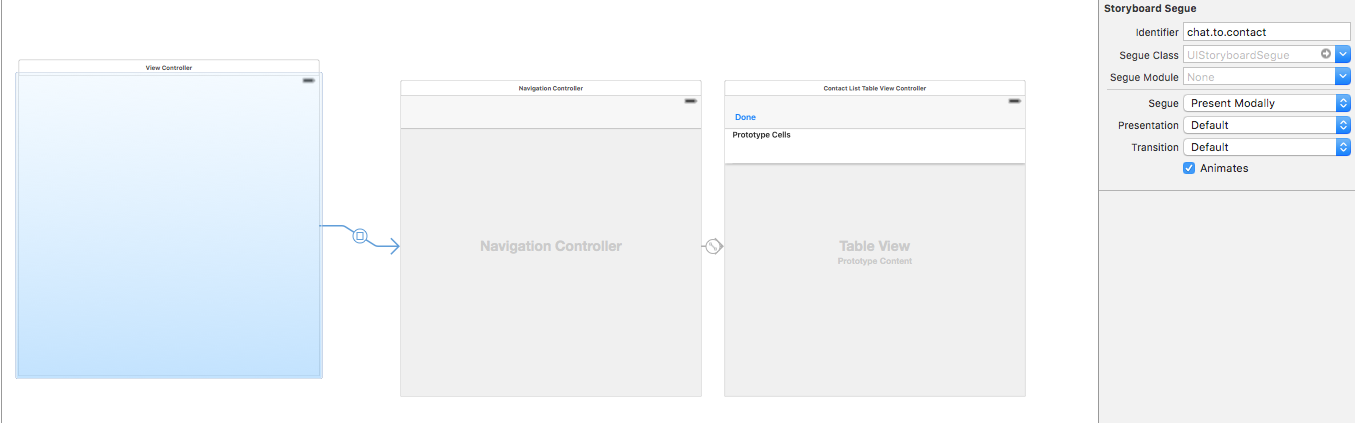
Remove the chat.to.add segue from the + button to the ContactListTableViewController and re-create it from the ChatViewController itself. Name it "chat.to.contact". It should look like this:
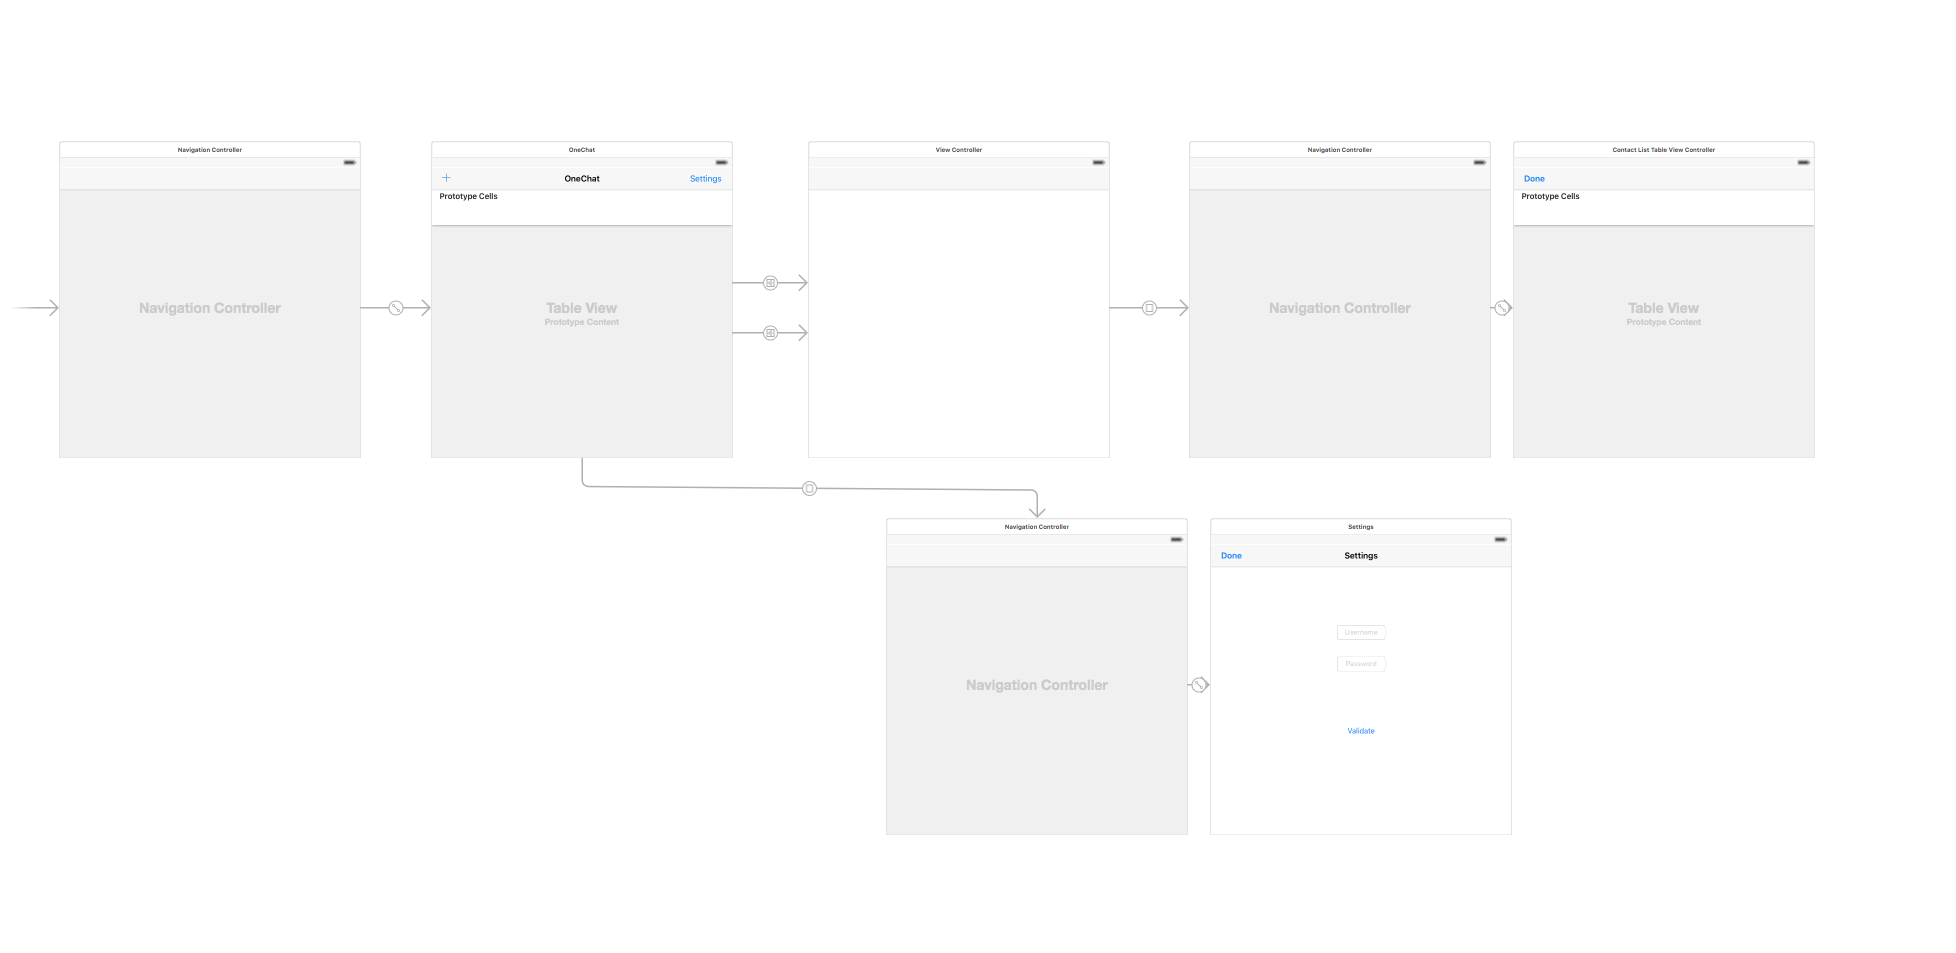
Now you will create two more push/show segue, from OpenChatsTableViewController to ChatViewController. One from the + button, you will name it chat.to.add, and the other from the UITableViewCell of OpenChatsTableViewController to ChatViewController, name it chat.to.chat. The completed Storyboard should now look like this:
You can return to ChatViewController.swift. There will be a lot going on in this ViewController so make sure you're fully loaded with cafeine !
As usual, add the following import at the top of the file:
import xmpp_messenger_ios
import JSQMessagesViewController
import XMPPFramework
There will be some interesting stuff in that class, we will need a variable to store the recipient, and a library to give us the User Interface.
Create the recipient variable:
var recipient: XMPPUserCoreDataStorageObject?In your viewWillAppear method, we will check if a recipient has been set, in that case we will display the chat history, if not we’ll present the ContactListTableViewCcontroller to allow the user to select a contact. It’ll look like this :
if let recipient = recipient {
	navigationItem.rightBarButtonItems = []
	navigationItem.title = recipient.displayName
} else {
	navigationItem.title = "New message"

	navigationItem.setRightBarButtonItem(UIBarButtonItem(barButtonSystemItem: .Add, target: self, action: "addRecipient"), animated: true)
	addRecipient()
}
Implement the addRecipient() method:
func addRecipient() {
	let navController = storyboard?.instantiateViewControllerWithIdentifier("contactListNav") as? UINavigationController

	presentViewController(navController!, animated: true, completion: nil)
}
If you Build and run at this point, you will notice that every time you tap on done, the ContactListViewController is displayed over and over, and that the cell selection does nothing … yet ! We will use a bool to solve the first problem, and a delegate for the second !
Add the var firstTime = true, then, in your viewWillAppear, encapsulate the addRecipient() like this :
if firstTime {
	firstTime = false
	addRecipient()
}
Now, it’s time to create your delegate ! Open ContactListTableViewController, and add the following protocol behind the import’s statement
protocol ContactPickerDelegate {
	func didSelectContact(recipient: XMPPUserCoreDataStorageObject)
}
It will be called whenever an user select a contact in the list. Add the following property to call on :
var delegate:ContactPickerDelegate?And implement it in the UITableView didselectRowAtIndex method:
override func tableView(tableView: UITableView, didSelectRowAtIndexPath indexPath: NSIndexPath) {
	delegate?.didSelectContact(OneRoster.userFromRosterAtIndexPath(indexPath: indexPath))
	close(self)
}
Now that the protocol is setup, go back to ChatViewController.swift, and add ContactPickerDelegate to the class declaration. Implement the mandatory method didSelectContact():
func didSelectContact(recipient: XMPPUserCoreDataStorageObject) {
	self.recipient = recipient
	navigationItem.title = recipient.displayName
}
However, it will not work until you set yourself as ContactPickerDelegate. In the addRecipient(), just before presentViewController, add this line:
let contactController: ContactListTableViewController? = navController?.viewControllers[0] as? ContactListTableViewController
contactController?.delegate = self
We will now extend the contact selection, open up OpenChatsViewController and implement the segue delegates:
override func shouldPerformSegueWithIdentifier(identifier: String, sender: AnyObject?) -> Bool {
	if identifier == "chat.to.add" {
		if !OneChat.sharedInstance.isConnected() {
			let alert = UIAlertController(title: "Attention", message: "You have to be connected to start a chat", preferredStyle: UIAlertControllerStyle.Alert)
			alert.addAction(UIAlertAction(title: "Ok", style: UIAlertActionStyle.Default, handler: nil))

			self.presentViewController(alert, animated: true, completion: nil)

			return false
		}
	}
	return true
}

override func prepareForSegue(segue: UIStoryboardSegue?, sender: AnyObject?) {
	if segue?.identifier == "chats.to.chat" {
		if let controller = segue?.destinationViewController as? ChatViewController {
			if let cell: UITableViewCell? = sender as? UITableViewCell {
				let user = OneChats.getChatsList().objectAtIndex(tableView.indexPathForCell(cell!)!.row) as! XMPPUserCoreDataStorageObject
				controller.recipient = user
			}
		}
	}
}
The first one will prevent contact selection if the user is offline, the second will fill the recipient corresponding at the selected cell.
- Now go back to ChatViewController, for the final part, the Chat !
Add JSQMessagesViewController to the class declaration, and create a variable message witch will hold the fetched message if there is some:
var messages = NSMutableArray()Now, you will need to implement the JSQMessageViewController delegates. Thoses methods are pretty simple, they will display and create an interface for the stored messages:
override func collectionView(collectionView: JSQMessagesCollectionView!, messageDataForItemAtIndexPath indexPath: NSIndexPath!) -> JSQMessageData! {
	let message: JSQMessage = self.messages[indexPath.item] as! JSQMessage

	return message
}

override func collectionView(collectionView: JSQMessagesCollectionView!, messageBubbleImageDataForItemAtIndexPath indexPath: NSIndexPath!) -> JSQMessageBubbleImageDataSource! {
	let message: JSQMessage = self.messages[indexPath.item] as! JSQMessage

	let bubbleFactory = JSQMessagesBubbleImageFactory()

	let outgoingBubbleImageData = bubbleFactory.outgoingMessagesBubbleImageWithColor(UIColor.jsq_messageBubbleLightGrayColor())
	let incomingBubbleImageData = bubbleFactory.incomingMessagesBubbleImageWithColor(UIColor.jsq_messageBubbleGreenColor())

	if message.senderId == self.senderId {
		return outgoingBubbleImageData
	}

	return incomingBubbleImageData
}

override func collectionView(collectionView: JSQMessagesCollectionView!, avatarImageDataForItemAtIndexPath indexPath: NSIndexPath!) -> JSQMessageAvatarImageDataSource! {
	let message: JSQMessage = self.messages[indexPath.item] as! JSQMessage

	if message.senderId == self.senderId {
		if let photoData = OneChat.sharedInstance.xmppvCardAvatarModule?.photoDataForJID(OneChat.sharedInstance.xmppStream?.myJID) {
			let senderAvatar = JSQMessagesAvatarImageFactory.avatarImageWithImage(UIImage(data: photoData), diameter: 30)
				return senderAvatar
			} else {
				let senderAvatar = JSQMessagesAvatarImageFactory.avatarImageWithUserInitials("SR", backgroundColor: UIColor(white: 0.85, alpha: 1.0), textColor: UIColor(white: 0.60, alpha: 1.0), font: UIFont(name: "Helvetica Neue", size: 14.0), diameter: 30)
				return senderAvatar
			}
		} else {
			if let photoData = OneChat.sharedInstance.xmppvCardAvatarModule?.photoDataForJID(recipient!.jid!) {
				let recipientAvatar = JSQMessagesAvatarImageFactory.avatarImageWithImage(UIImage(data: photoData), diameter: 30)
				return recipientAvatar
			} else {
				let recipientAvatar = JSQMessagesAvatarImageFactory.avatarImageWithUserInitials("SR", backgroundColor: UIColor(white: 0.85, alpha: 1.0), textColor: UIColor(white: 0.60, alpha: 1.0), font: UIFont(name: "Helvetica Neue", size: 14.0)!, diameter: 30)
				return recipientAvatar
			}
		}
}

override func collectionView(collectionView: JSQMessagesCollectionView!, attributedTextForCellTopLabelAtIndexPath indexPath: NSIndexPath!) -> NSAttributedString! {
	if indexPath.item % 3 == 0 {
		let message: JSQMessage = self.messages[indexPath.item] as! JSQMessage
		return JSQMessagesTimestampFormatter.sharedFormatter().attributedTimestampForDate(message.date)
	}

	return nil;
}

override func collectionView(collectionView: JSQMessagesCollectionView!, attributedTextForMessageBubbleTopLabelAtIndexPath indexPath: NSIndexPath!) -> NSAttributedString! {
	let message: JSQMessage = self.messages[indexPath.item] as! JSQMessage

	if message.senderId == self.senderId {
		return nil
	}

	if indexPath.item - 1 > 0 {
		let previousMessage: JSQMessage = self.messages[indexPath.item - 1] as! JSQMessage
		if previousMessage.senderId == message.senderId {
			return nil
		}
	}

	return nil
}

override func collectionView(collectionView: JSQMessagesCollectionView!, attributedTextForCellBottomLabelAtIndexPath indexPath: NSIndexPath!) -> NSAttributedString! {
	return nil
}

// Mark: UICollectionView DataSource

override func collectionView(collectionView: UICollectionView, numberOfItemsInSection section: Int) -> Int {
	return self.messages.count
}

override func collectionView(collectionView: UICollectionView, cellForItemAtIndexPath indexPath: NSIndexPath) -> UICollectionViewCell {
	let cell: JSQMessagesCollectionViewCell = super.collectionView(collectionView, cellForItemAtIndexPath: indexPath) as! JSQMessagesCollectionViewCell
	let msg: JSQMessage = self.messages[indexPath.item] as! JSQMessage

	if !msg.isMediaMessage {
		if msg.senderId == self.senderId {
			cell.textView!.textColor = UIColor.blackColor()
			cell.textView!.linkTextAttributes = [NSForegroundColorAttributeName:UIColor.blackColor(), NSUnderlineStyleAttributeName: NSUnderlineStyle.StyleSingle.rawValue]
		} else {
			cell.textView!.textColor = UIColor.whiteColor()
			cell.textView!.linkTextAttributes = [NSForegroundColorAttributeName:UIColor.whiteColor(), NSUnderlineStyleAttributeName: NSUnderlineStyle.StyleSingle.rawValue]
		}
	}

	return cell
}

// Mark: JSQMessages collection view flow layout delegate

override func collectionView(collectionView: JSQMessagesCollectionView!, layout collectionViewLayout: JSQMessagesCollectionViewFlowLayout!, heightForCellTopLabelAtIndexPath indexPath: NSIndexPath!) -> CGFloat {
	if indexPath.item % 3 == 0 {
		return kJSQMessagesCollectionViewCellLabelHeightDefault
	}

	return 0.0
}

override func collectionView(collectionView: JSQMessagesCollectionView!, layout collectionViewLayout: JSQMessagesCollectionViewFlowLayout!, heightForMessageBubbleTopLabelAtIndexPath indexPath: NSIndexPath!) -> CGFloat {
	let currentMessage: JSQMessage = self.messages[indexPath.item] as! JSQMessage
		if currentMessage.senderId == self.senderId {
			return 0.0
		}

		if indexPath.item - 1 > 0 {
			let previousMessage: JSQMessage = self.messages[indexPath.item - 1] as! JSQMessage
			if previousMessage.senderId == currentMessage.senderId {
				return 0.0
			}
		}

	return kJSQMessagesCollectionViewCellLabelHeightDefault
}

override func collectionView(collectionView: JSQMessagesCollectionView!, layout collectionViewLayout: JSQMessagesCollectionViewFlowLayout!, heightForCellBottomLabelAtIndexPath indexPath: NSIndexPath!) -> CGFloat {
	return 0.0
}- Now we can handle the
UI, but we still need to be able to send and receive messages ! AddOneMessageDelegateto the class declaration, and implement the mandatoryprotocol:
func oneStream(sender: XMPPStream, didReceiveMessage message: XMPPMessage, from user: XMPPUserCoreDataStorageObject) {
	if message.isChatMessageWithBody() {
		JSQSystemSoundPlayer.jsq_playMessageReceivedSound()

		if let msg: String = message.elementForName("body")?.stringValue() {
			if let from: String = message.attributeForName("from")?.stringValue() {
				let message = JSQMessage(senderId: from, senderDisplayName: from, date: NSDate(), text: msg)
				messages.addObject(message)

				self.finishReceivingMessageAnimated(true)
			}
		}
	}
}

func oneStream(sender: XMPPStream, userIsComposing user: XMPPUserCoreDataStorageObject) {
self.showTypingIndicator = !self.showTypingIndicator
self.scrollToBottomAnimated(true)
}
The first method will be called whenever a message is received, while the second will be called when the remote user is composing a new message.
- Add this to your
viewDidLoadmethod :
OneMessage.sharedInstance.delegate = self

if OneChat.sharedInstance.isConnected() {
	self.senderId = OneChat.sharedInstance.xmppStream?.myJID.bare()
	self.senderDisplayName = OneChat.sharedInstance.xmppStream?.myJID.bare()
}
self.inputToolbar!.contentView!.leftBarButtonItem!.hidden = true
self.collectionView!.collectionViewLayout.springinessEnabled = true
We will now add a method in your viewWillApear to fetch stored messages, if there is some:
self.messages = OneMessage.sharedInstance.loadArchivedMessagesFrom(jid: recipient.jidStr)
self.collectionView?.reloadData()
The completed viewWillAppear function should now look like this:
override func viewWillAppear(animated: Bool) {
	if let recipient = recipient {
		navigationItem.rightBarButtonItems = []
		navigationItem.title = recipient.displayName

		self.messages = OneMessage.sharedInstance.loadArchivedMessagesFrom(jid: recipient.jidStr)
		self.collectionView?.reloadData()
	} else {
		navigationItem.title = "New message"

		navigationItem.setRightBarButtonItem(UIBarButtonItem(barButtonSystemItem: .Add, target: self, action: "addRecipient"), animated: true)

		if firstTime {
			firstTime = false
			addRecipient()
		}
	}
}
Now, edit didSelectContact, and add the following:
if !OneChats.knownUserForJid(jidStr: recipient.jidStr) {
	OneChats.addUserToChatList(jidStr: recipient.jidStr)
} else {
	messages = OneMessage.sharedInstance.loadArchivedMessagesFrom(jid: recipient.jidStr)
	finishReceivingMessageAnimated(true)
}
It will fetch the stored message of un user we just select form the roster.
- Implement the
JSQMessageViewControllerdelegate:
override func didPressSendButton(button: UIButton!, withMessageText text: String!, senderId: String!, senderDisplayName: String!, date: NSDate!) {
	let fullMessage = JSQMessage(senderId: OneChat.sharedInstance.xmppStream?.myJID.bare(), senderDisplayName: OneChat.sharedInstance.xmppStream?.myJID.bare(), date: NSDate(), text: text)
	messages.addObject(fullMessage)

	if let recipient = recipient {
		OneMessage.sendMessage(text, to: recipient.jidStr, completionHandler: { (stream, message) -> Void in
			JSQSystemSoundPlayer.jsq_playMessageSentSound()
			self.finishSendingMessageAnimated(true)
		})
	}
}


