觉得不错,给我的github源码点个赞吧QAQ

这篇文章是总结自己写项目时的思路,遇到的问题,和学到的东西,本文只截取一部分来讲,源码已奉上,觉得项目还行的点个赞吧,谢谢
- 安装vue-cli
npm install -g vue-cli
- 创建webpack项目
vue init webpack vogue cd vogue
- 安装依赖
npm install
- 安装vue-router
npm install vue-router --save-dev
- 安装vuex
npm install vuex --save-dev
- 运行
npm run dev
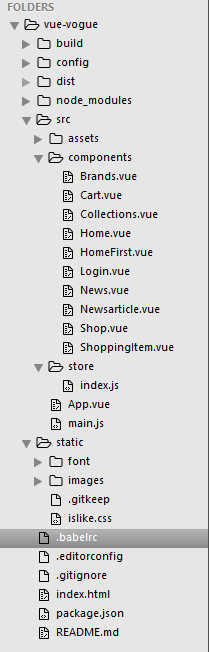
- components中是所有页面组件
- store中的index.js存放了vuex状态管理的东西,此处本应分成actions.js,mutations.js,getters.js的,可是我试了很多次没成功,还是将他们放在一个文件中,显得有点冗余了,这点失误了,会找原因的
- static中存放了图片,图片是压缩了的,网站是https://tinypng.com/,还存放了字体,和一点css,css放在这里有一个原因就是,我想给某个元素设置background时,将style写在static里才行。
- dist文件是后来npm run build后生成的,生成的dist中的index.html中的link都是没有加引号的,我自己加上才可以直接运行
开发过程中,页面是一个一个写的,不过还是要先确定路由,路由嵌套
先说说路由吧,写在了main.js中,直接上图
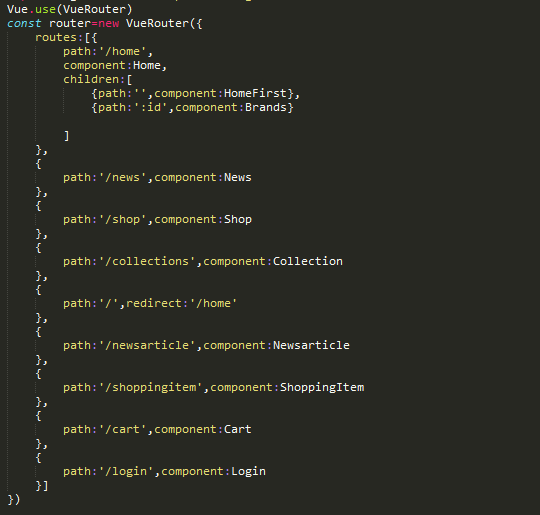
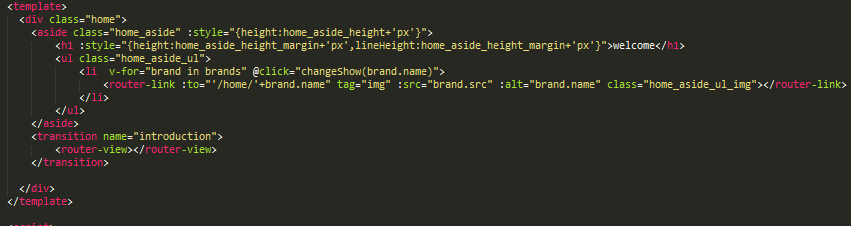
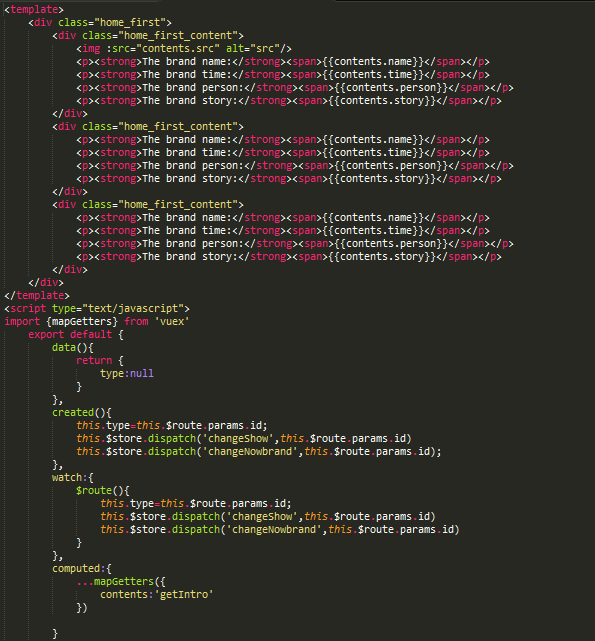
文章开头有首页,home的路径就是‘/home’,这里路由嵌套,用‘:id’来识别,Brands.vue组件在后文中会解释如何得到id,home页的八个导航,分别导向‘/home’,‘/news’,'/collections','/shop','/home/clot','/home/madness','/home/bape','/home/assc',购物车导向'/cart','login|register'导向‘/login’,'/newsarticle'是在news组件中导向的,‘/shoppingitem’是shop组件中导向的
如何得到state中的数据 import {mapGetters} from 'vuex' computed:{ ...mapGetters({ show:'getShow', items:'getFootItems', cart:'getCart', brands:'getBrands', left_navs:'getLeft_nav' }) },
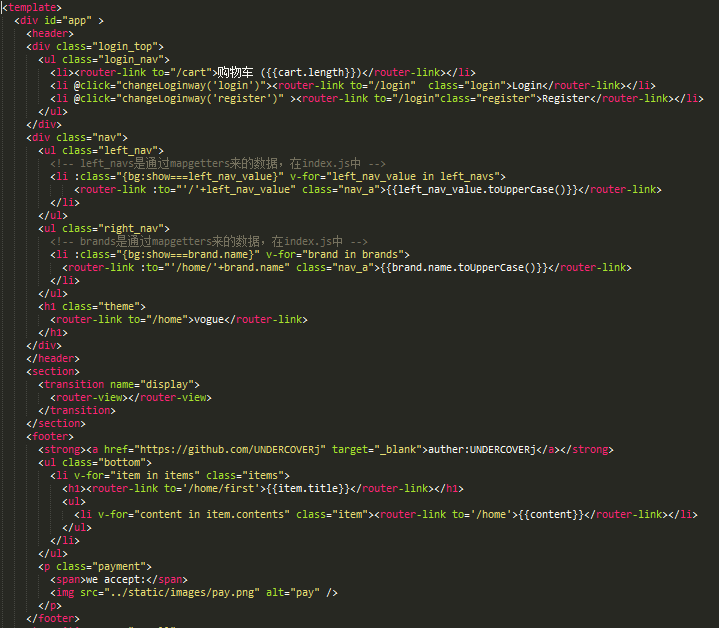
**在布局上,我的思路是:**首页三行,上下定高,中间自适应高度,于是在app.vue的created()中设置事件委托
    var self=this;
      window.onload=()=>{
        this.$store.dispatch('change_hw',{
          h:document.documentElement.clientHeight||document.body.clientHeight,
          w:document.documentElement.clientWidth||document.body.clientWidth
        })
      }
      window.onresize=()=>{
        if(self.timer){
          clearTimeout(self.timer)
        }
        self.timer=setTimeout(function(){
          self.$store.dispatch('change_hw',{
            h:document.documentElement.clientHeight||document.body.clientHeight,
            w:document.documentElement.clientWidth||document.body.clientWidth
          })
        },100)
      }
      window.onscroll=()=>{
         var scrollTop = document.documentElement.scrollTop || window.pageYOffset || document.body.scrollTop;
            if(scrollTop>10){
              this.scroll=true;
            }else{
              this.scroll=false;
            }

      }
   }
然后中间那行用的三栏布局,左右定宽中间自适应宽度,再设置一个min-height不免得将中间的轮播弄来没有了,具体见css
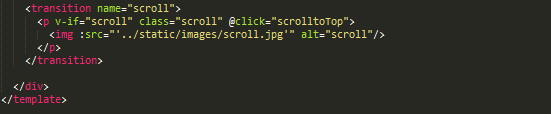
**细节:**其中用data中的scroll,用来显示可以让页面一键划到顶端的按钮,滑动动画代码如下
scrolltoTop:()=>{
      if(document.documentElement.scrollTop){
        var scrollTop=document.documentElement.scrollTop
        var step=scrollTop/30;
        var now=scrollTop-step;
        var i=0;
        var time=setInterval(function(){
          i++;
          if(i>32){
            clearInterval(time)
          }
          document.documentElement.scrollTop=now;
          scrollTop=document.documentElement.scrollTop
          now=scrollTop-step;
        },10)
      }else if(document.body.scrollTop){
        var scrollTop=document.body.scrollTop
        var step=scrollTop/30;
        var now=scrollTop-step;
        var i=0;
        var time=setInterval(function(){
          i++;
          if(i>32){
            clearInterval(time)
          }
          document.body.scrollTop=now;
          scrollTop=document.body.scrollTop
          now=scrollTop-step;
        },10)
      }

    },
这里比较坑的地方就是document.documentElement.scrollTop和document.documentElement.scrollTop需要注意
2.21号修改 重新改了下轮播,通过改变left来实现无限轮播,思路如下:
<div class="wrapper-content" :class="{wrapper_trans:isTrans}" :style="{width:originalData.img_width*(originalData.num+2)+'px',height:originalData.img_height+'px',left:-originalData.img_width+'px'}" ref="wrapperContent">
	<img class="wrapper-content_img" alt="4" :src="'../static/images/home_4.jpg'" :style="{width:originalData.img_width+'px',height:originalData.img_height+'px'}"/>
	<img class="wrapper-content_img" alt="1" :src="'../static/images/home_1.jpg'" :style="{width:originalData.img_width+'px',height:originalData.img_height+'px'}"/>
    <img class="wrapper-content_img" alt="2" :src="'../static/images/home_2.jpg'" :style="{width:originalData.img_width+'px',height:originalData.img_height+'px'}"/>
	<img class="wrapper-content_img" alt="3" :src="'../static/images/home_3.jpg'" :style="{width:originalData.img_width+'px',height:originalData.img_height+'px'}"/>
	<img class="wrapper-content_img" alt="4" :src="'../static/images/home_4.jpg'" :style="{width:originalData.img_width+'px',height:originalData.img_height+'px'}"/>
	<img class="wrapper-content_img" alt="1" :src="'../static/images/home_1.jpg'" :style="{width:originalData.img_width+'px',height:originalData.img_height+'px'}"/>
</div>
共四张图片,前后再加一张,变成六张,当向后滚动到第五张时,index为4,下一次滚动,滚动到第六张结束后立即跳到第二张,index依然为3。向前滑动道理一样
methods如下
export default {
		data (){
			return {
				originalData:{
    				img_width:350,
    				img_height:350,
    				btn_width:40,
    				btn_height:40,
    				num:4,
    				delay:300
    			},
    			isTrans:true,//因为到最后一张图片,index为1时,需要立即跳到第二张index也为1的图片,这个用来是否给出transition
    			index:1,
    			timer:null,//setInterval
    			clickdelay:false//用来防止连续点击
			}
		},
		computed:{
			...mapGetters({
				hw:'getHW'
			}),
			 home_first_width:function(){
			 	return parseInt(this.hw.w)-400;
			},
			home_first_height:function(){

				var a= parseInt(this.hw.h)-200
				return a<389?389:a
			},
			home_first_height_margin:function(){
				return parseInt(this.home_first_height-300)/2
			}
		},
		methods:{
    			next(){
    				if(this.clickdelay){
    					return
    				}
    				this.clickdelay=true
    				if(this.index==this.originalData.num){
    					this.index=1
    				}else{

    					this.index+=1
    				}
    				this.animate(this.originalData.img_width)

    			},
    			prev(){
    				if(this.clickdelay){
    					return
    				}
    				this.clickdelay=true
    				if(this.index==1){
    					this.index=this.originalData.num
    				}else{
    					this.index-=1
    				}
    				this.animate(-this.originalData.img_width)
    			},
    			animate(offset){
    				var node=this.$refs.wrapperContent
    				var self=this;
    				var left=parseInt(node.style.left)-offset
    				this.isTrans=true
    				node.style.left=left+'px'
    				setTimeout(function(){
    					if(left<-(self.originalData.num*self.originalData.img_width)){
    						self.isTrans=false
    						node.style.left=-self.originalData.img_width+'px'
    						self.clickdelay=false //当到达最后一张图片时
    					}
    					if(left>-100){
    						self.isTrans=false
    						node.style.left=-self.originalData.num*self.originalData.img_width+'px'
    						self.clickdelay=false //当到达第一张图片时
    					}
    				},this.originalData.delay)
    			},
    			play(){

    				var self=this;
    				this.timer=setInterval(function(){
    					self.next()
    				},2000)
    			},
    			stop(){
    				this.clickdelay=false//用来防止连续点击
    				clearInterval(this.timer)
    				this.timer=null
    			},
    			turnTo(flag){
    				if(flag==this.index){
    					return
    				}else{
    					var offset=(flag-this.index)*this.originalData.img_width
    					this.index=flag
    					this.animate(offset)

    				}

    			}
    		},

    		mounted(){
    			/*下面是判断过渡动画是否完成*/
    			var node=this.$refs.wrapperContent
    			var transitions = {
			         'transition':'transitionend',
			         'OTransition':'oTransitionEnd',
			         'MozTransition':'transitionend',
			         'WebkitTransition':'webkitTransitionEnd'
     				}
     				var self=this

		       for(var t in transitions){

		           if( node.style[t] !== undefined ){
		               var transitionEvent=transitions[t];
		           }
		       }
		       transitionEvent && node.addEventListener(transitionEvent, function() {
   					self.clickdelay=false
   			   });
    		   this.play()
    		},
		created(){
			this.$store.dispatch('changeShow','home')
		}
	}

methods:{
			changeSize(index){
				this.$store.dispatch('changeSize',index)
			},
			changeColor(num){
				this.$store.dispatch('changeColor',num)
			},
			changeNumSub(){
				if(this.item.num>1){
					this.$store.dispatch('changeNumSub')
				}

			},
			changeNumAdd(){
				if(this.item.num<8){
					this.$store.dispatch('changeNumAdd')
				}
			},
			addToCart(){
				if(!!this.item.color&&!!this.item.size){
					this.$store.dispatch('addToCart')
				}
			}
		}
index.js中的方法如下
ADD_TO_CART(state){
		var cart=state.cart;
		var thing=mutations.clone(state.selectedItem);
		//查看购物车是否已经有相同的商品,信息都一样

		if(!cart.length){
			cart.push(thing)
		}else{
			var flag=cart.some(function(e){
				return e.color==thing.color&&e.size==thing.size&&e.src==thing.src
			})
			try{
				if(!flag){
					cart.push(thing);
					throw new Error("can't find")
				}
				cart.forEach(function(e,index){
					if(e.color==thing.color&&e.size==thing.size&&e.src==thing.src){
						cart[index].num+=thing.num;
						foreach.break=new Error("StopIteration");
					}
				})
			}catch(e){
				//用于跳出循环
			}

		}
		state.selectedItem={};
	},
添加到购物车中的方法中,我用try,catch来跳出forEach循环,还有这句state.selectedItem={};如果state.selectedItem是直接引用别的对象,那么另一个对象也会跟着改变,为了避免引用,我用了如下方法
//js复制对象
	clone(myObj){
	  if(typeof(myObj) != 'object') return myObj;
	  if(myObj == null) return myObj;

	  var myNewObj = new Object();

	  for(var i in myObj)
	    myNewObj[i] = mutations.clone(myObj[i]);

	  return myNewObj;
	},
组件的介绍大致就是这些
我在vuex这里没有做好,状态和数据应该分开,而且actions,mutations,getters,state,应该分开,不然太冗余了
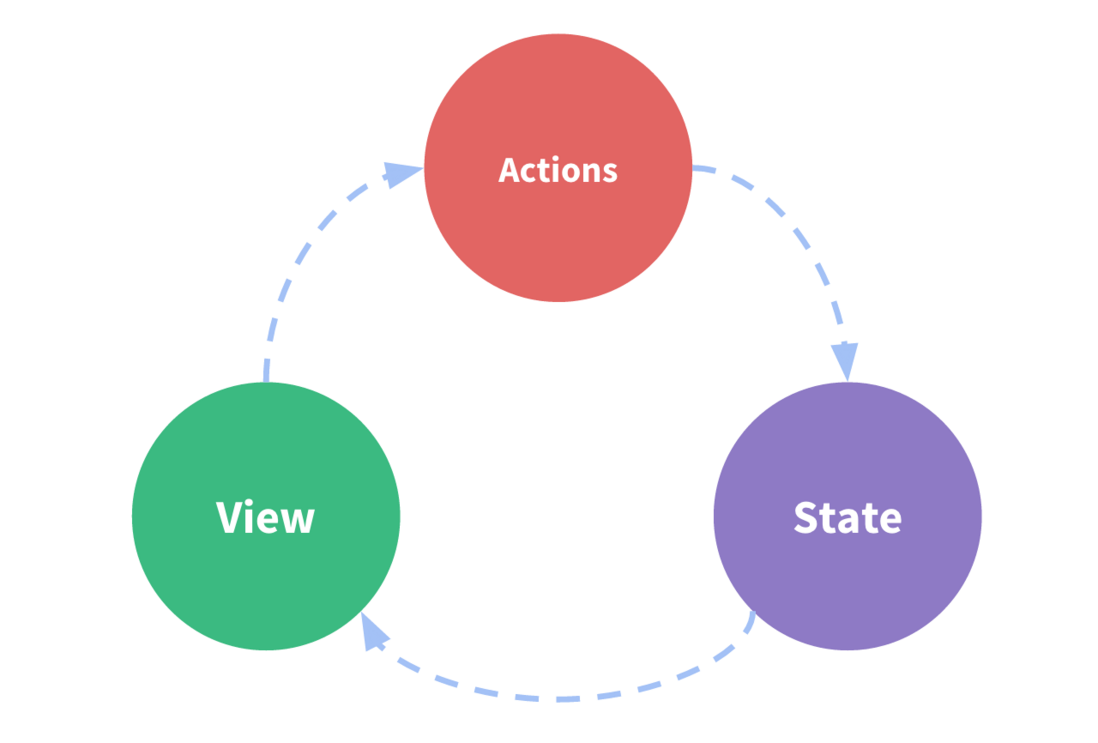
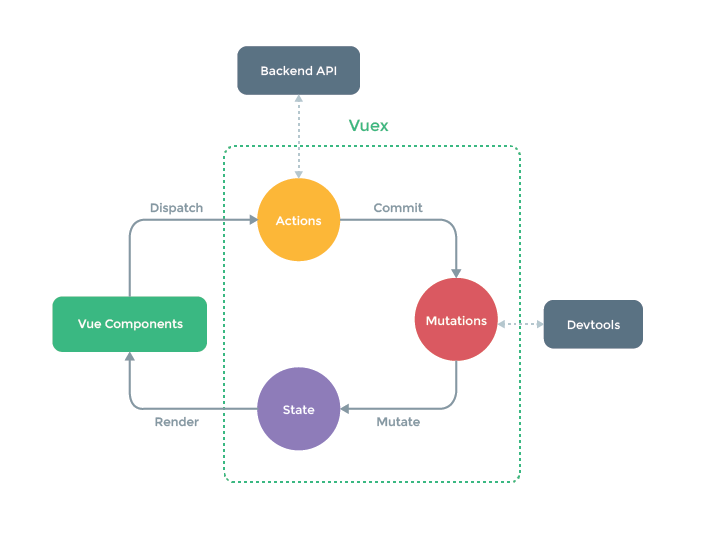
Vuex 是一个专为 Vue.js 应用程序开发的状态管理模式。它采用集中式存储管理应用的所有组件的状态,并以相应的规则保证状态以一种可预测的方式发生变化。Vuex 也集成到 Vue 的官方调试工具 devtools extension,提供了诸如零配置的 time-travel 调试、状态快照导入导出等高级调试功能。 这个状态自管理应用包含以下几个部分: state,驱动应用的数据源; view,以声明方式将state映射到视图; actions,响应在view上的用户输入导致的状态变化。
大概罗列一点
const state={
	loginway:'',
	show:'home',
	clientheight:0,
	clientwidth:0,
	footItems:[
		{title:'ABOUT US',contents:{content_1:'contact us',content_2:'about vogue'}},
		{title:'SERVICE',contents:{content_1:'payment methods',content_2:'track order'}},
		{title:'POLICY',contents:{content_1:'privacy policy',content_2:'terms & condition'}},
		{title:'FOLLOW US',contents:{content_1:'Facebook',content_2:'Instagram'}},
	],
	left_nav:{
		home:'home',
		news:'news',
		collections:'collections',
		shop:'shop'
	},
]
const mutations={
	CHANGE_HW(state,obj){
		state.clientwidth=obj.w;
		state.clientheight=obj.h;
	},
	CHANGE_SHOW(state,type){
		state.show=type
	},
	CHANGE_NOWBRAND(state,type){
		state.nowbrand=type+'Intro'
	},
	CHANGE_LIKE(state,index){
		state.goods[index].isLike=!state.goods[index].isLike;
		if(!state.goods[index].isLike){
			state.goods[index].likes+=1
		}else{
			state.goods[index].likes-=1
		}
	},
]
更改 Vuex 的 store 中的状态的唯一方法是提交 mutation。Vuex 中的 mutations 非常类似于事件:每个 mutation 都有一个字符串的 事件类型 (type) 和 一个 回调函数 (handler)。这个回调函数就是我们实际进行状态更改的地方,并且它会接受 state 作为第一个参数:
const actions={
	change_hw({commit},obj){
		commit('CHANGE_HW',obj)
	},
	changeShow({commit},type){
		commit('CHANGE_SHOW',type)
	},
	changeNowbrand({commit},type){
		commit('CHANGE_NOWBRAND',type)
	},
	changeLike({commit},index){
		commit('CHANGE_LIKE',index)
	},
]
Action 类似于 mutation,不同在于:
Action 提交的是 mutation,而不是直接变更状态。 Action 可以包含任意异步操作。
const getters={
	getHW:function(state){
		return {
			h:state.clientheight,
			w:state.clientwidth
		}
	},
	getBrands:function(state){
		return state.brandsArr
	},
	getLeft_nav:function(state){
		return state.left_nav
	},
	getShow:function(state){
		return state.show
	}
]
有时候我们需要从 store 中的 state 中派生出一些状态,或用于得到信息
自己写的这个项目,蛮有收获的,遇到了问题到处问,都解决的差不多了, 下面罗列了一些收货和本项目的不足
- Firefox中不支持 table 的 min-height
- CSS 的话 考虑用 normalize.css解决不同浏览器初始样式不一样的问题
- css 的命名啥的可以参考一下 BEM 的命名规范
- 代码组织有点杂乱
- vuex只要专心做页面状态管理,尽量不要掺杂页面数据
- <input type="checkbox" @change="selectAll" id="selectAll" v-model="isAll"/>此处的isAll是从state中get到得数据,可以被改变,我自己尝试得到的这个结论
- 轮播还需要改进
- 第一次在gh-pages中显示时,发现图片加载太慢 ,于是我把图片压缩了
- 在用git上传代码是出过差错,解决了。
最后感谢您能阅读到这里,本人小白,努力学习中,献丑了。
- Vue2.0中文文档:https://cn.vuejs.org/
- Vue-router2.0中文文档:http://router.vuejs.org/zh-cn/essentials/getting-started.html
- Vuex2.0中文文档:http://router.vuejs.org/zh-cn/essentials/getting-started.html
- git教程:http://www.liaoxuefeng.com/
