![]()
An application framework and design system built in React at REPAY.
You will need to install the following for runtime and package management:
- Node.js (LTS)
- Yarn
- Git (MacOS comes with this pre-installed, but the first time you attempt to use it, you'll recieve a popup prompting you to install the
command line developer tools)
The following are not required to use this repo, but make it easier to work within it. They can be installed on your machine, or added as an extension through your code editor.
- ESLint
- Prettier (Largely overlaps with ESLint)
- GitLens (VS Code only)
- Auto Rename Tag (VS Code only)
@repay/cactus-fwk- Cactus Framework@repay/cactus-i18n- Cactus I18n library@repay/cactus-form- Cactus/Final Form wrapper library@repay/cactus-icons- Cactus Icons@repay/cactus-theme- Cactus UI Theme@repay/cactus-web- Cactus Web UI Components
To run and view the Storybook for Cactus Web, run yarn web start.
To run and view the Storybook for Cactus Icons, run yarn icons start.
For a more detailed rundown of commands for these two modules, as well as how to interact with the rest, go to the Commands section.
- Standard Example - Generic implementations of features as a basic web app.
- Theme Components - Exploration of using the components more in depth than the standard.
- Mock EBPP - A more fully-featured web app mocking out some features from EBPP.
Each of the example apps listed above can be run locally to play around with yourself. To run any example app, follow these steps:
- Make sure all necessary dependencies are installed by running
yarn installat the root of this repository. - Make sure each module is built by running
yarn buildat the root of this repository. - Navigate to any example app you wish to run. Ex:
cd examples/mock-ebpp - Run
yarn start - After the application builds, you can copy/paste the url from your terminal into your browser to view it.
You can install the packages from this repository using any node based package manager that pulls from the NPM repository.
yarn add --dev @repay/cactus-fwk
# OR
npm install --save-dev @repay/cactus-fwk
Before contributing, please read our guidelines for contributing
In particular, please ensure that you run yarn commit to run the prompts that format our commit messages. When you do this, please add the JIRA ticket number when asked if your change affects any issues.. In addition, please add the JIRA ticket number to all PR titles.
After installing the Prerequisites, clone the repository and install the dependencies. Be sure to do this from the repository root.
yarn install
Next we should build all the modules locally by running the following command in the terminal:
yarn build
Now you are ready to start developing on the modules, examples, or documentation website.
We format commit messages according to a standard:
tag(module): write a short summary of changes made (start with verb)

Long description of changes, rationales, etc.

BREAKING CHANGE: Description of breaking changes, if any.

CACTUS-851
If the commit applies to the whole repo, you can omit the module & parens. The one-line summary should be imperative tense (i.e. "add this", "set that", "fix the other"). Long description is optional, and can be multiple paragraphs if needed; obviously if there are no breaking changes you don't have to describe them. Only the tag, one-line summary, and ticket number are always required.
These are the tags:
| Tag name | Description |
|---|---|
| feat | A new feature |
| fix | A bug fix |
| docs | Documentation only changes |
| style | Changes that do not affect the meaning of the code (white-space, formatting, missing semi-colons, etc) |
| refactor | A code change that neither fixes a bug nor adds a feature |
| perf | A code change that improves performance |
| test | Adding missing tests or correcting existing tests |
| build | Changes that affect the build system or external dependencies (example scopes: gulp, broccoli, npm) |
| ci | Changes to our CI configuration files and scripts (example scopes: Travis, Circle, BrowserStack, SauceLabs) |
| chore | Other changes that don't modify src or test files |
| revert | Reverts a previous commit |
We use Yarn Workspaces to help manage the dependencies for the monorepository; however, this also means you should initiate commands on individual modules from the root directory. We've added some aliases in the base package.json to ease the typing burden. yarn w is equivalent to yarn workspace and yarn ws is equivalent to yarn workspaces.
We've also added shortcuts for each of the published modules:
yarn i18n=>yarn workspace @repay/cactus-i18nyarn form=>yarn workspace @repay/cactus-formyarn icons=>yarn workspace @repay/cactus-iconsyarn fwk=>yarn workspace @repay/cactus-fwkyarn theme=>yarn workspace @repay/cactus-themeyarn web=>yarn workspace @repay/cactus-web
For example, the following two commands do the same thing. (They run tests in watch mode for Cactus I18n)
yarn w @repay/cactus-i18n tdd
yarn i18n tdd
replace <lib> in the following examples with the module shortcut codes listed above.
The start command will run a website such as in the examples or Storybook for UI based libraries. Not all repositories have an interactive implementation so they do not all have a start command. In cases of no start command, use the example applications for implementation practice and testing; the modules are automatically linked from Yarn Workspaces.
Builds the specified library in watch mode and will rebuild on changes.
yarn <lib> dev
yarn <lib> start
Runs the given library's Jest based tests in watch mode to help with writing tests and test driven development as desired.
yarn <lib> tdd
Runs the given library's tests and checks the TypeScript types.
yarn <lib> test
Runs the given libraries tests with coverage and checks the TypeScript types.
*Required in all libraries and examples, even if there are no Jest tests (though there should at least be TypeScript validations)
yarn <lib> test:ci
Only validates the TypeScript types for the given library.
yarn <lib> test:types
Removes built files and folders from previous builds.
yarn <lib> cleanup
Creates a production build of the given library and builds the TS definition files.
*Required in all libraries, but not examples.
yarn <lib> build
Only builds the TypeScript definition files.
yarn <lib> build:types
To publish a release, open Terminal or command prompt and call:
yarn releaseThis command will install all dependencies, build packages, and then call Lerna to handle the release process. Lerna will automatically determine which packages have changed and will prompt you for the type of version bump (major/minor/patch). It will then publish the updated packages, create commits with package.json changes, and create git tags.
We also have a yarn release:beta command that will do roughly the same thing, but will pass additional options to Lerna that are needed for beta versions/pre-releases.
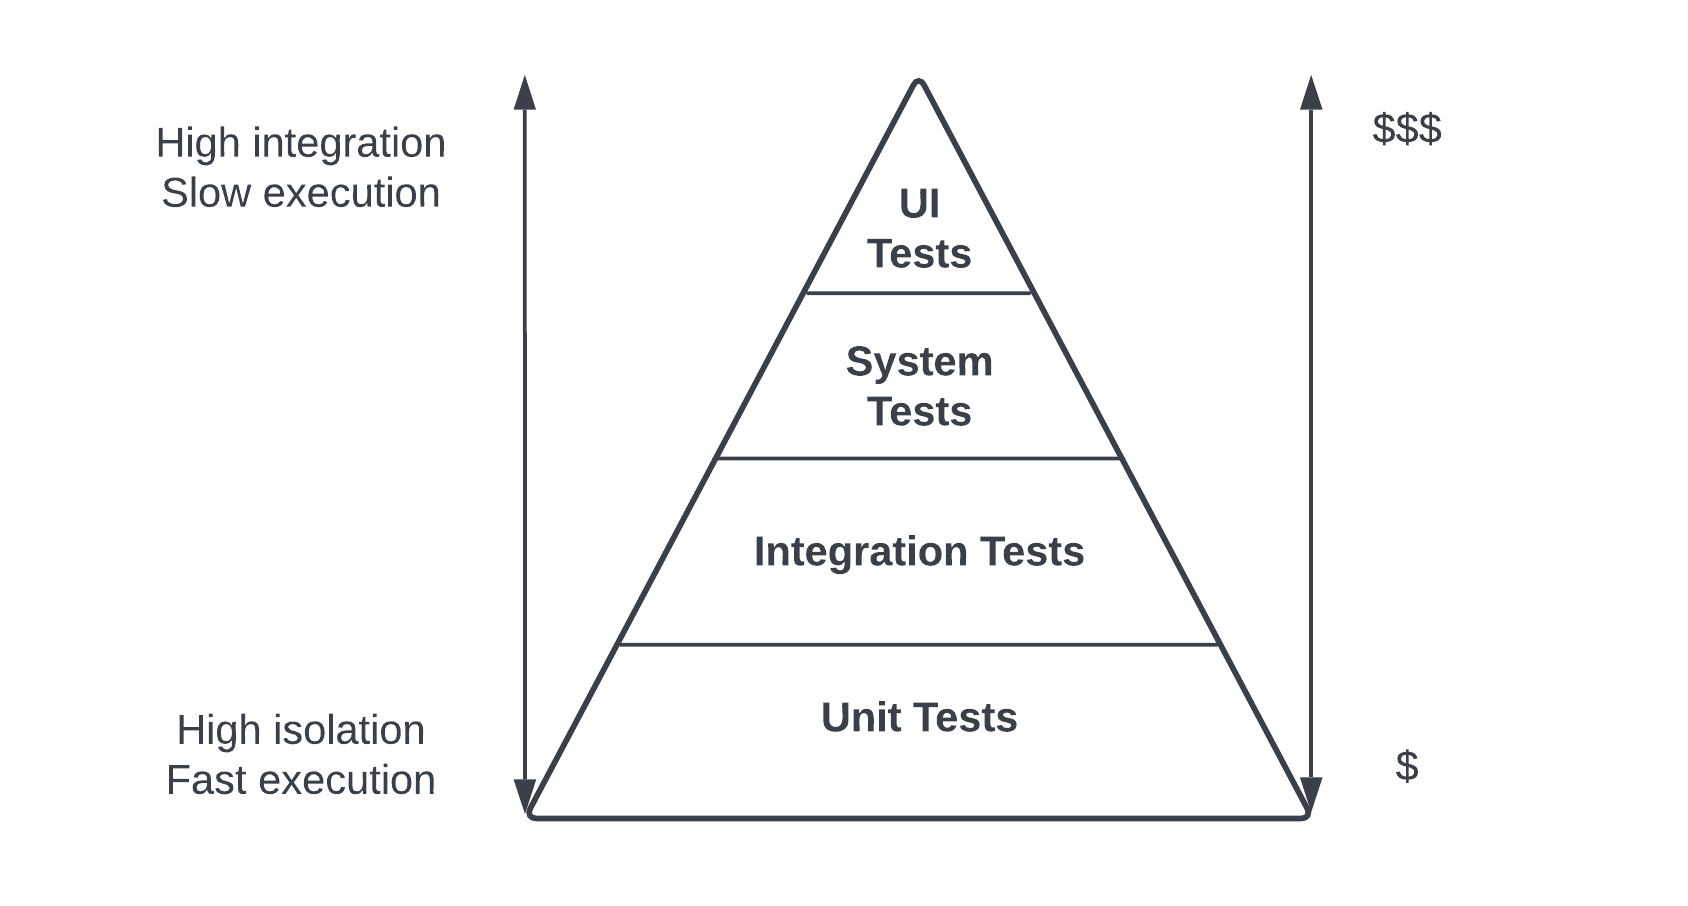
We have developed three example apps that double as vehicles to run integrations tests. We use TestCafe along with the TestCafe BrowserStack Plugin to run integration tests against these applications on both Chrome and IE11. While not everything needs an integration test, we should try to keep the coverage relatively high so that we can automatically catch cross-browser issues.
To run integration tests locally, first create a local.env file in the folder of the app for which
you want to run tests (i.e. standard or mock-ebpp). In that file, you'll need to add:
BROWSERSTACK_USERNAME=<SOMETHING>
BROWSERSTACK_ACCESS_KEY=<SOMETHING ELSE>
To obtain the actual value of those secrets, you can get in touch with a member of the UI team, who will send them to you via onetimesecret.
yarn w <app-name...i.e. mock-ebpp> test -b "Chrome -incognito"Storybook is an open-source tool that helps with the development of isolated UI components. With Storybook you will browse a library component, run each of those components in a private environment and explore them in different states. We implemented Storybook for two of our libraries @repay/cactus-icons and @repay/cactus-web.
In a Storybook application, all the content is being organized on two basic levels, the components, and their child stories; each story is a kind of a permutation of their parent component and each component could have as many stories as needed. The main story that every component should have along our libraries is the Basic usage. This story should show a simple implementation of the selected component. In addition to basic usage you can include the rest of the variations of the component as either separate stories or as knobs (see the Knobs section below). There are many possible variations, like the content, the size, the children that the component supports, or any other prop defined that modifies the component’s performance.
In addition to the creation of stories from specific components, we keep a track of the snapshots of every component for testing purposes, this helps us catch bugs in UI appearance. Every time that a component or a component's story is modified or created, a screenshot of the story will be created or updated and compared with the last commit to identify any possible changes.
Every story has the canvas and the docs sections. On canvas section you’ll find the component running with the main props that you set for this specific permutation. Below the frame where the component is running, there are three addons: Knobs, Cactus Theme, and Actions.
The Cactus Theme add-on allows you to play with a set of global parameters that modify the component appearance, such as the theme colors, the border width, component shape, the text’s font, and others. It allows us to make our components more customizable by the users.
The Actions add-on logs the events triggered by the user, such as onClick, onFocus, or onBlur.
The knobs are controls that allow the user to control and edit the component’s props dynamically, exploring the component behavior. These are the knobs that are available:
Text: To get a text from the user.Boolean: To get a boolean value from the user.Number: To get a number from the user.Select: To get a value from a list of options.Radios: To get a value from a list of radio buttons.
Knobs should be used as much as possible to give the user access to the different props of a component. For example, if you have a button component that includes a variant prop with a list of variants like standard, action, danger, warning and success, you can make those variants accessible and controllable from the Knobs section of the button's story.
These are other use-cases where you must set up a knob for a prop from the parent component:
- To Modify text from labels, inputs, textareas, headers and/or other contents.
- To enable or disable user's actions like clicks.
- To change a specific CSS property like
justify-content,align-items,flex-direction,width,height - To hide or show a specific component from the story.
Knobs are a powerful way to explore the component behavior through their properties. However, there are specific cases where it is more convenient to show those behaviors by splitting them into different stories. In the main Basic usage story, it is not necessary to include knobs for all of the props. Here are some cases that you would consider creating a new story instead of using knobs: if the component has different variants, (such standard, warning, success), a better choice could be to create a new story showing all the variants on the same canvas, so the user could compare them. Another case where you must consider creating a new story is if the props modify the component by making significant changes to its appearance, or if the component has specific optional functionalities or integrations with other small components like buttons or icons.
If you want to look for more information about how to write stories, please visit the documentation.

![dependabot[bot] avatar](https://avatars.githubusercontent.com/in/29110?v=4 "dependabot[bot]")