提醒!请在掌握了基本的辅种续种过程,再来理解本教程。先占坑简单写写
辅种&续种教程
同文件不同文件名 辅种教程 新手慎用】硬链工具 From 千反田える@U2
介绍
如果你从站点A下载了一个电影,看到站点B也有这个电影,那么常规的辅种(cross seeding)流程是,你从站点B的网站上重新下载(re-download)下来一个包含自己个人信息passkey的torrent,每个人下载到的每个种子都是不同的,但是又有规律可寻。如果你只有这一个辅种,那么这么做肯定也不费什么事,可如果你要同时辅种5+个PT站点呢?或者你要辅种200个种子到B站点呢?比如你最近PY到大佬给你发的PTP的邀请,那你最好的方式就是从其他站点下载一堆PTP的“金种子(PTP Golden Popcorn)”去PTP上辅种,比如你在TJUPT上搜索PTP Golden Popcorn这时你就得到可快200个PTP金种子,你就可以在TJUPT上下载了这些种子,去PTP上辅种了,持续保种PTP积分bonus蹭蹭的长,也就分分钟生存下来了。或者说你最近要在5个0day站点同时辅种,那你下载到一个种子,编辑一下,就可以辅种了,不用去原网站下载torrent。以上说法的前提是对应的网站有这个一模一样的种子,而且你看过了对应站点的torrent修改的地方;如果不是这样的话,那么你修改得到的种子一般会提示你“种子未注册(unregistered)”之类的
那么接下来的教程就是教大家如何不从B站点上下载这200+个种子,就可以得到这200+包含自己passkey的专属种子,经过修改(change/edit/modefy)的种子文件(.torrent)的MD5 HASH会和你从网站上手动下载下来的一模一样,也就是说通过编辑torrent文件实际上模拟了对于PT站点在接收到上传的torrent的处理过程,这样编辑得到的torrent和网站后台处理过程是一样的,得到的也是一个相同的种子。
种子文件分析
部分站点上传torrent后的修改情况大致分为3类,为避免有幸被哪位大佬看中然后全球ban什么的,我就不放出具体的统计结果了:
1.只修改了announce字段,或添加announce-list的list
2.修改了announce、announce-list、source字段
3.除了常规的修改announce、announce-list、source字段,还会添加或者修改一些字段ttg_tag,publisher-url,comment或者一些特殊的检验字段什么的。
以TJUPT为例子,TJUPT属于情况2和情况3
TJUPT:
- 1.如果原torrent包含source字段,那么就是常规的修改announce字段,添加announce-list的list,修改source为“[www.tjupt.org] 北洋园PT”.
- 2.如果原torrent不包含source字段(比如转发TTG的种子),除了常规的修改announce字段,添加announce-list的list,会删除了TTG的torrent特有的ttg_tag字段,增加了source字段“[www.tjupt.org] 北洋园PT”,还修改了comment字段“Torrent From TJUPT”和created by“[www.tjupt.org]”字段。
国内、国外大部分PT站点都属于情况2,也就是修改了announce+source字段.
如果是情况3的话,就比较繁琐了,需要修改的地方比较多了,有的甚至就没必要去编辑torrent来得到相同hash的种子了,这时候最简单省时的反而是直接去相应的站点下载torrent文件,此时建议你用PT跨站点聚合搜索的辅助工具,如:
PT聚合搜索
Jackett,
ptsearch,
PT助手,
conductorr(原btsearch),
X-seed,
Search-All-PT.
工具链接
工具较多,有的不知道来源了,如果有所冒犯,还请知会,侵删。
GUI工具
BEncode Editor
ChangeTorrentTracker v1.0
torrent-file-editor
TorrentsAutoReTracker trackereditor
torrent_s2 1.1
CLI工具:
xseed
pyrocore(chtor,mktor,lstor)
torf-cli
transmission-edit
dottorrent-cli
Ref:
https://pyrocore.readthedocs.io/en/latest/index.html
https://github.com/pyroscope/pyrocore
https://github.com/transmission/transmission
https://github.com/rndusr/torf-cli
https://github.com/whatbox/xseed
https://github.com/kz26/dottorrent-cli
https://github.com/GerryFerdinandus/bittorrent-tracker-editor
GUI工具教程
建议用CLI工具之前,先用上边的GUI工具手动掌握熟练了,要不然一下批量制作出几百个错误的torrent也是无用功。
利用GUI工具修改单个种子,分为2种::
1.仅仅需要修改torrent文件的announce字段。
这个还是比较容易的,有很多工具可以实现。
其中全能的有:BEncode Editor和torrent-file-editor,他俩具有直接修改BEncode编码的功能,可以修改、增加、删除所有字段。
需要注意:
- 1.TorrentsAutoReTracker这个工具可以批量修改announce字段和source字段,但是同时也会将torrent文件的comment,created by,creation date字段修改掉。这样的话,无法得到相同hash的torrent文件,这个工具可以用来转发种子,不能用来直接辅种。好处在于可以在配置文件种加入好多个tracker,然后给你一个菜单再去选择这是其他工具所不能的。
- 2.torrent_s2 这个工具,转自skyeysnow天雪动漫,除了可以修改tracker之外还可以制作种子。Windows版:直接把文件/文件夹拖到 torrent_s2上面即可完成制作种子;Linux版: mktorrent_s2 -h直接把文件夹或文件拖到 torrent_s2.exe 上使用即可,提供修改tracker功能以及一个鼠标右键弹出菜单的方案,见文件夹"附加功能"内。
- 3. trackereditor_win32这个工具本来是BT用的,但是PT也可以用。可以批量修改announce字段,但无法修改source字段
- 4.TorrentsAutoReTracker通过拖动可以用来修改announce字段,但无法修改source字段
2.除了announce字段还需要修改source字段或者其他自定义字段。
这个具有BEncode编码编辑功能的少量工具可以实现。目前测试过的,只有BEncode Editor和torrent-file-editor可以实现。
由于国内介绍BEncode Editor的比较多,我就来以torrent-file-editor举例吧。
举例Example
那么就以金种子这种比较复杂的第二种的情况来举例了,其他的自己试试就可以了。
这里提前给出一下各个阶段文件的MD5和种子的hash值,定义如下
1.[TJUPT].Alice.in.Wonderland.2010.1080p.BluRay.x264-EbP.mkv.torrent直接从TJUPT下载到的种子
2.**[EDIT-TJUPT].Alice.in.Wonderland.2010.1080p.BluRay.x264-EbP.mkv.torrent基于TJUPT种子修改了announce和删除source字段的种子。
3.[EDIT2-TJUPT].Alice.in.Wonderland.2010.1080p.BluRay.x264-EbP.mkv.torrent基于TJUPT种子修改了announce和删除source字段、删除了announce-list字段的种子。
4.Alice in Wonderland.2010.1080p.Blu-ray.x264.MKV.145756.torrent**直接从PTP下载的种子。
MD5值以及种子hash(不是torrent文件的hash)
文件: \[TJUPT\].Alice.in.Wonderland.2010.1080p.BluRay.x264-EbP.mkv.torrent
大小: 57, 566 字节
MD5: AFAE51C23FCB7076EA50B605D039A4F1
种子hash:8eed76047b30c3a634130396a359c9a0dc20d2fd


文件: \[EDIT-TJUPT\].Alice.in.Wonderland.2010.1080p.BluRay.x264-EbP.mkv.torrent
大小: 57, 334 字节
MD5: E38EBAB17D98AA88D2EA7BEA2DFB2FE1
种子hash:bac93f451b47a1f4c62837069d802970b0af56a7

文件: \[EDIT2-TJUPT\].Alice.in.Wonderland.2010.1080p.BluRay.x264-EbP.mkv.torrent
大小: 57, 237 字节
MD5: 4438183AF02D7EA493B06C3865087BFB
种子hash:bac93f451b47a1f4c62837069d802970b0af56a7

文件: Alice in Wonderland.2010.1080p.Blu-ray.x264.MKV.145756.torrent
大小: 57, 237 字节
MD5: 4438183AF02D7EA493B06C3865087BFB
种子hash:bac93f451b47a1f4c62837069d802970b0af56a7
第一层次:
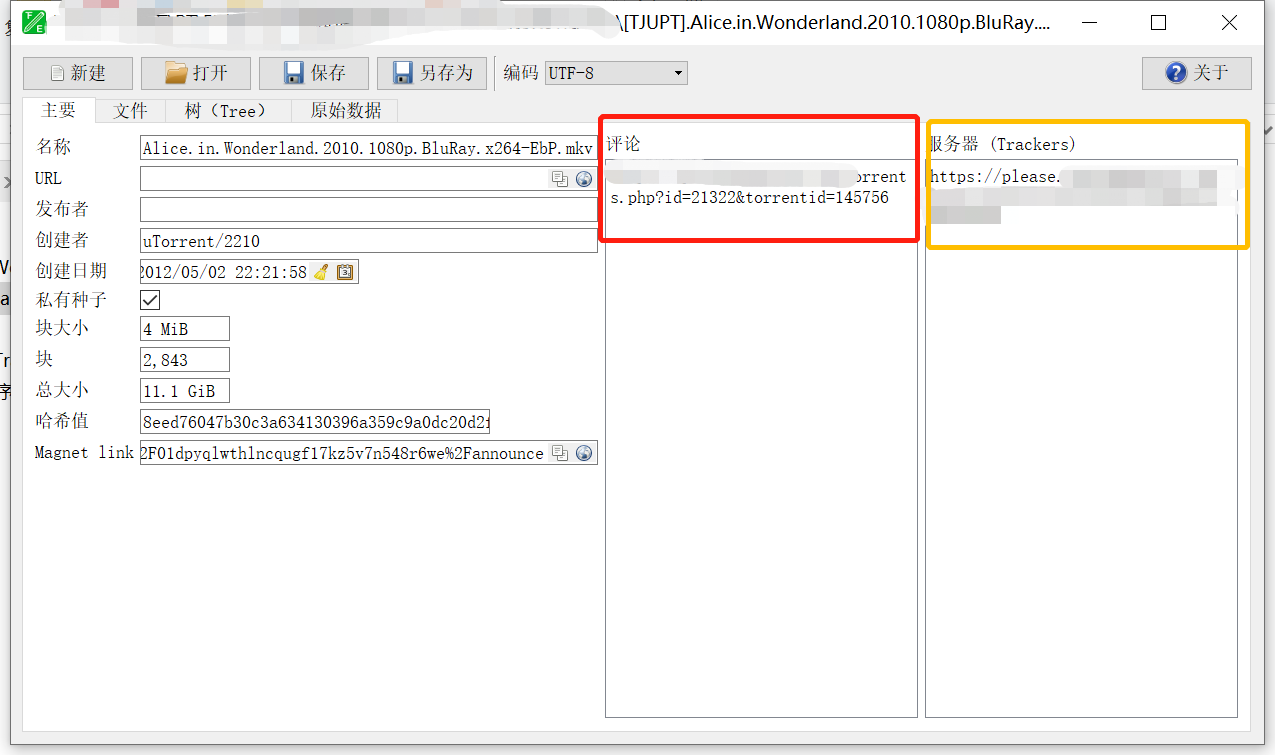
比如你已经下载到了TJUPT上的Alice.in.Wonderland.2010.1080p.BluRay.x264-EbP这个资源,得到了[TJUPT].Alice.in.Wonderland.2010.1080p.BluRay.x264-EbP.mkv.torrent文件,此时你可以用torrent-file-editor打开torrent,如下图1黄色方框中所示,将其修改为你PTP中包含个人passkey的announce地址(你可以手动从PTP下载一个torrent后,打开torrent复制其中的announce中的地址),将其修改为图2所示,这样就完成了announce字段的修改。
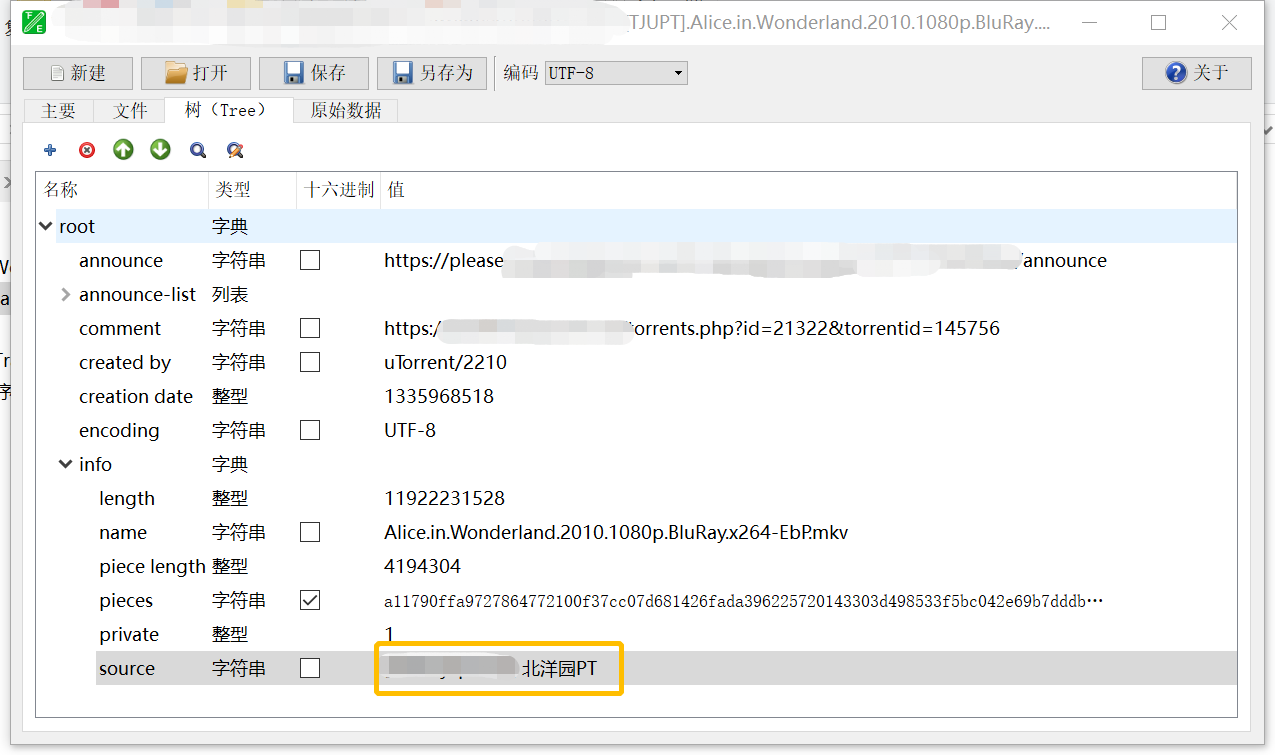
第二层次:
接下来进行source字段的修改,source字段的修改需要从现在的标签“主要”切换标签“树”下,进行修改,如图3黄色方框中所示,将其中的字段修改为PTP即可。一般来说即使就完成了所有的修改,另存为[EDIT-TJUPT].Alice.in.Wonderland.2010.1080p.BluRay.x264-EbP.mkv.torrent,此时你就可以将[EDIT-TJUPT].Alice.in.Wonderland.2010.1080p.BluRay.x264-EbP.mkv.torrent加载到utorrent进行辅种了。只要torrent文件具有相同的torrent hash对于utorrent以及tracker服务器等来说,这其实就是一个种子了,即使他们的MD5值不一定不用。
补充
之前还好奇为何这样修改后种子的hash为何保持不变,却没有进一步去研究。谢R酱提醒,验证了一下,发现修改torrent文件的tree根目录下的announce,announce-list,comment,created by,creation date,encoding甚至直接添加一个字段都不会改变种子的hash,只有在修改info字典下的字段才会改变hash,如info.length,info.name,info.piece length,info.pieces,info.private,info.source等均会改变种子的hash。
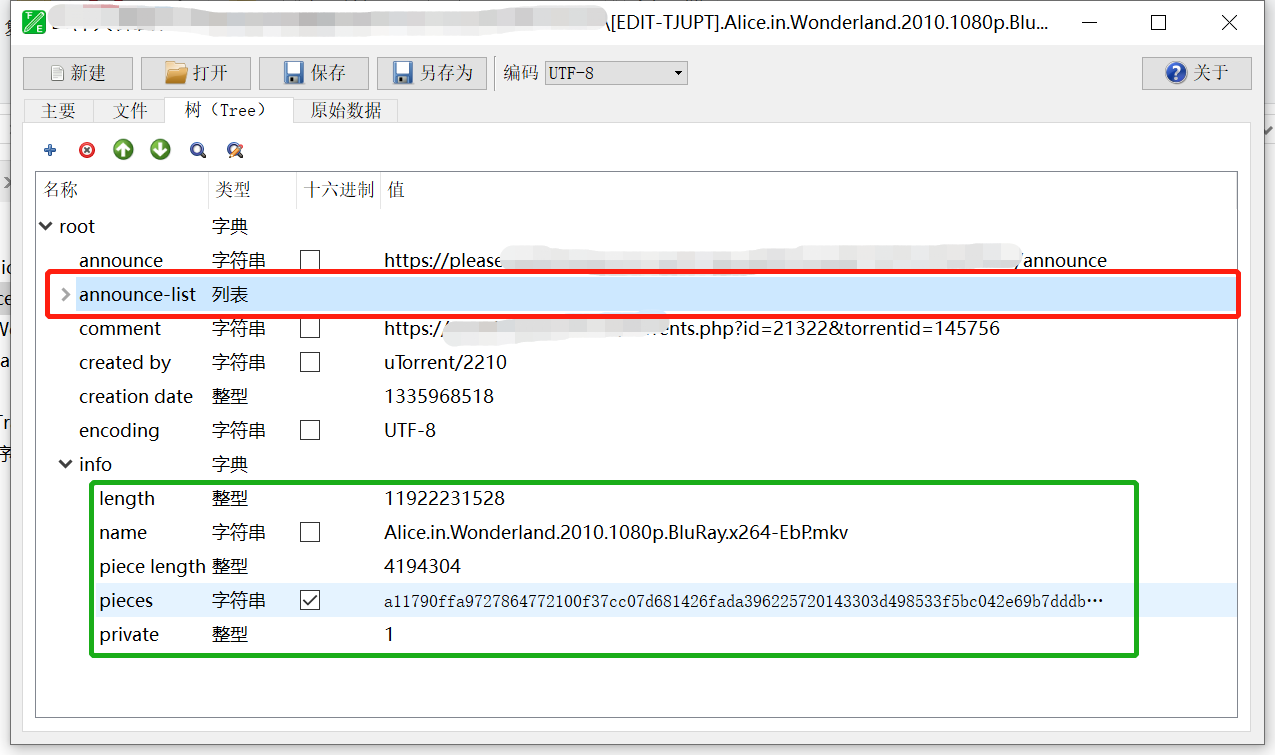
第三层次:
然而,你可能会得到一个红种提示你该种子未注册。这个种子可能是比较早期的原因,这个时候PTP官方下载的种子其实并没有source字段,这个种子其实就相当于我上边说的第一种比较理想的情况了,但是因为这个种子被上传到TJUPT的时候被添加了source字段,所以咱们需要手动把source字段删除,这时候得到的hash应该和PTP直接下载到的Alice in Wonderland.2010.1080p.Blu-ray.x264.MKV.145756.torrent的hash一模一样了,此时直接加载到utorrent就可以了。其实这时已经可以告一段落了,但是这时你检验[EDIT-TJUPT].Alice.in.Wonderland.2010.1080p.BluRay.x264-EbP.mkv.torrent的MD5发现和Alice in Wonderland.2010.1080p.Blu-ray.x264.MKV.145756.torrent的MD5不同,也就是说他俩严格意义上海不是相同的文件,为了得到一模一样的MD5,你需要把[EDIT-TJUPT].Alice.in.Wonderland.2010.1080p.BluRay.x264-EbP.mkv.torrent里的announce-list字段删除,因为PTP种子里Alice in Wonderland.2010.1080p.Blu-ray.x264.MKV.145756.torrent并没有announce-list字段,这时另存为[EDIT2-TJUPT].Alice.in.Wonderland.2010.1080p.BluRay.x264-EbP.mkv.torrent,检验一下就发现MD5一样了,现在可以说我们通过编辑制作出了一模一样的torrent文件了,这时你去辅种,更是毫无疑问,因为这个文件和你从PTP下载下来的一模一样!是真正意义上的同一个文件。

补充
PS:因为PTP上存在有新旧2种模式的种子,所以大家要辅种PTP种子的时候,可以分别批量制作2次种子,然后再辅种,把其中的红种删除即可。另外,torrent文件里存在mkv之外的文件,一般来说是没法成功辅种的,因为PTP要去种子不能有nfo,sample之类的资源,所以这个种子并不是从PTP自己转载的torrent,这样的种子是没法取修改来辅种的。辅种第一步可以检查TJUPT上下载下来的这个torrent的comment字段,是不是有**https://XXXXXXXXXXXX/torrents.php?id=21322&torrentid=145756**这样的字段,有的话一般说明是直接从PTP转载来的种子而不是上传者自行制作的torrentr。
完成done
进阶教程:
利用CLI工具批量修改种子
1.【python】xseed命令
https://github.com/whatbox/xseed
在linux或mac或WSL下,请先安装好git和python-pip工具,先下载xseed命令行工具
git clone https://github.com/whatbox/xseed
pip install bencode
chmod +x ./xseed
cp ./xseed /usr/bin/xseed
xseed -h
在windows下,python2可行,python3貌似需要自己安装比较多的模块,不兼容?不推荐。
打开https://raw.githubusercontent.com/whatbox/xseed/master/xseed
复制文本到记事本,粘贴,另存为xseed.py
pip install bencode
然后在xseed.py的文件夹(或者你放到环境变量的文件中)输入python xseed.py -h即可查看到命令帮助文件
帮助命令如下
usage: xseed [-h] [-v] [-e] [-o OUTFILE] [-d PATH] [-a URL] [-p] [-n]
[-c COMMENT]
files [files ...]positional arguments:
files files to be modifiedoptional arguments:
-h, --help show this help message and exit
-v, --verbose switch on verbose mode
-e, --edit-in-place overwrite files without prompting
-o OUTFILE, --output OUTFILE
specify output filename. (can not be used if multiple
files are given)
-d PATH, --directory PATH
specify a directory to save output to
-a URL, --announce URL
replace announce-url with the one specified
-p, --private make torrent private
-n, --no-cross-seed do not randomize info hashes
-c COMMENT, --comment COMMENT
replace comment with the one specified
举例:
1.修改某个torrent的tracker并另存为123.torrent(默认是直接在原torrent上修改的)
xseed -o 123.torrent -a http://test.com/announce Baby.Driver.2017.720p.BluRay.DD5.1.x264-decibeL.torrent
2.直接在原torrent文件上批量修改tracker
xseed -ea http://test.com/announce ./temp/*.torrent
进阶教程:
利用CLI工具批量修改种子
2.【python2】pyrocore套装(mktor,chtor,lstor)
https://pyrocore.readthedocs.io/en/latest/index.html
https://github.com/pyroscope/pyrocore
pyrocore是一个强大的套装工具,>这包括:
命令行工具用于自动执行常见任务,例如torrent文件创建,以及 过滤和批量更改已加载的种子。
rTorrent扩展,如rTorrent队列管理器和统计信息(正在进行中)。
所有这些都基于pyrocorePython包,您可以使用它来编写自己的脚本,以满足标准工具未涵盖的任何特殊需求。
安装方法一:(推荐)
在linux或mac或WSL或者windows下,请先安装好python-pip工具
pip2 install pyrocore
安装方法二:
以Ubuntu16.04为例,root身份安装会失败,请切换为普通账户安装!
sudo apt-get install python python-dev python-virtualenv python-pip \
python-setuptools python-pkg-resources git build-essential
mkdir -p ~/bin ~/.local
git clone "https://github.com/pyroscope/pyrocore.git" ~/.local/pyroscope

\# Pass "/usr/bin/python2", or whatever else fits, to the script as its
\# 1st argument, if the default of "/usr/bin/python" is not a suitable
\# version.
~/.local/pyroscope/update-to-head.sh

\# Check success
pyroadmin --version # call "exec $SHELL -l" if this fails, and retry
这个套装里有很多命令,
lstor显示torrent文件的信息info。
mktor制作torrent种子,支持辅种(cross seeding)
chtor更改现有torrent元文件,例如添加快速恢复信息。
hashcheck根据给定torrent元文件的来检验文件。
pyrotorque是rTorrent的伴随守护进程,它处理自动化任务,例如队列管理,通过文件系统通知从目录树加载即时元文件,以及其他后台任务。
rtsweep按照给定顺序的规则清理磁盘空间。这些规则是配置的一部分,并确定在新项目需要磁盘空间时首先要删除的内容。
pyroadmin是管理任务的助手(主要是配置处理)。
rtevent,rtmv,rtsweep,rtxmlrpc都是rtorrent的配套工具
安装完毕来看一下几个命令的使用帮助:
chtor -h
Usage: chtor [options] ...
chtor 0.5.3 from /usr on Python 2.7.12
Copyright (c) 2009 - 2017 Pyroscope ProjectChange attributes of a bittorrent metafile.
For more details, see the full documentation at
https://pyrocore.readthedocs.io/
Options:
--version show program's version number and exit
-h, --help show this help message and exit
-q, --quiet omit informational logging
-v, --verbose increase informational logging
--debug always show stack-traces for errors
--cron run in cron mode (with different logging
configuration)
--config-dir=DIR configuration directory [~/.pyroscope]
--config-file=PATH additional config file(s) to read
-D KEY=VAL [-D ...], --define=KEY=VAL [-D ...]
override configuration attributes
-n, --dry-run don't write changes to disk, just tell what would
happen
-V, --no-skip do not skip broken metafiles that fail the integrity
check
-o PATH, --output-directory=PATH
optional output directory for the modified metafile(s)
-p, --make-private make torrent private (DHT/PEX disabled)
-P, --make-public make torrent public (DHT/PEX enabled)
-s KEY=VAL [-s ...], --set=KEY=VAL [-s ...]
set a specific key to the given value; omit the '=' to
delete a key
-r KEYcREGEXcSUBSTc [-r ...], --regex=KEYcREGEXcSUBSTc [-r ...]
replace pattern in a specific key by the given
substitution
-C, --clean remove all non-standard data from metafile outside the
info dict
-A, --clean-all remove all non-standard data from metafile including
inside the info dict
-X, --clean-xseed like --clean-all, but keep libtorrent resume
information
-R, --clean-rtorrent remove all rTorrent session data from metafile
-H DATAPATH, --hashed=DATAPATH, --fast-resume=DATAPATH
add libtorrent fast-resume information (use {} in
place of the torrent's name in DATAPATH)
-a URL, --reannounce=URL
set a new announce URL, but only if the old announce
URL matches the new one
--reannounce-all=URL set a new announce URL on ALL given metafiles
--no-ssl force announce URL to 'http'
--no-cross-seed when using --reannounce-all, do not add a non-standard
field to the info dict ensuring unique info hashes
--comment=TEXT set a new comment (an empty value deletes it)
--bump-date set the creation date to right now
--no-date remove the 'creation date' field
mktor -h
Usage: mktor [options] ... |
mktor 0.5.3 from /usr on Python 2.7.12
Copyright (c) 2009 - 2017 Pyroscope ProjectCreate a bittorrent metafile.
If passed a magnet URI as the only argument, a metafile is created
in the directory specified via the configuration value 'magnet_watch',
loadable by rTorrent. Which means you can register 'mktor' as a magnet:
URL handler in Firefox.For more details, see the full documentation at
https://pyrocore.readthedocs.io/
Options:
--version show program's version number and exit
-h, --help show this help message and exit
-q, --quiet omit informational logging
-v, --verbose increase informational logging
--debug always show stack-traces for errors
--cron run in cron mode (with different logging
configuration)
--config-dir=DIR configuration directory [~/.pyroscope]
--config-file=PATH additional config file(s) to read
-D KEY=VAL [-D ...], --define=KEY=VAL [-D ...]
override configuration attributes
-p, --private disallow DHT and PEX
--no-date leave out creation date
-o PATH, --output-filename=PATH
optional file name (or target directory) for the
metafile
-r NAME, --root-name=NAME
optional root name (default is basename of the data
path)
-x PATTERN [-x ...], --exclude=PATTERN [-x ...]
exclude files matching a glob pattern from hashing
--comment=TEXT optional human-readable comment
-s KEY=VAL [-s ...], --set=KEY=VAL [-s ...]
set a specific key to the given value; omit the '=' to
delete a key
--no-cross-seed do not automatically add a field to the info dict
ensuring unique info hashes
-X LABEL, --cross-seed=LABEL
set additional explicit label for cross-seeding
(changes info hash, use '@entropy' to randomize it)
-H, --hashed, --fast-resume
create second metafile containing libtorrent fast-
resume information
lstor -h
lstor 0.5.3 from /usr on Python 2.7.12
Copyright (c) 2009 - 2017 Pyroscope ProjectList contents of a bittorrent metafile.
For more details, see the full documentation at
https://pyrocore.readthedocs.io/
Options:
--version show program's version number and exit
-h, --help show this help message and exit
-q, --quiet omit informational logging
-v, --verbose increase informational logging
--debug always show stack-traces for errors
--cron run in cron mode (with different logging
configuration)
--reveal show full announce URL including keys
--raw print the metafile's raw content in all detail
-V, --skip-validation
show broken metafiles with an invalid structure
-o KEY,KEY1.KEY2,..., --output=KEY,KEY1.KEY2,...
select fields to print, output is separated by TABs;
note that __file__ is the path to the metafile,
__hash__ is the info hash, and __size__ is the data
size in bytes
hashcheck -h
Usage: hashcheck [options] []
hashcheck 0.5.3 from /usr on Python 2.7.12
Copyright (c) 2009 - 2017 Pyroscope ProjectCheck a bittorrent metafile.
For more details, see the full documentation at
https://pyrocore.readthedocs.io/
Options:
--version show program's version number and exit
-h, --help show this help message and exit
-q, --quiet omit informational logging
-v, --verbose increase informational logging
--debug always show stack-traces for errors
--cron run in cron mode (with different logging
configuration)
--config-dir=DIR configuration directory [~/.pyroscope]
--config-file=PATH additional config file(s) to read
-D KEY=VAL [-D ...], --define=KEY=VAL [-D ...]
override configuration attributes
我们只介绍这里的用来制作种子的mktor,用来编辑种子的chtor,用来显示种子信息的lstor命令,用来检验种子完整性的hashcheck命令
mktor举例:
1.将当前目录下的文件全部制作为种子,并保存到/home/torrent文件夹下,并排除nfo文件
ls -1 | xargs -d$'\\n' -I{} mktor -p --exclude *.nfo -o /home/torrent "{}" "http://test.com"
2.将当前目录下的文件夹全部制作为种子,并保存到当前文件夹下,并排除nfo文件
find . -mindepth 1 -maxdepth 1 -type d \\! -name ".*" -print0 | sort -z | xargs -0I{} mktor --exclude *.nfo -p "{}" "http://test.com"
lstor举例:
1.只显示当前文件夹下所有种子的hash字段和文件大小、种子名字段,
lstor -qo \_\_hash\_\_,info.piece\ length,info.name *.torrent
2.显示123.torrent的简单信息
lstor 123.torrent
3.显示123.torrent全部的信息,默认会打码passkey
lstor --raw 123.torrent
4.3.显示123.torrent信息,并显示passkey
lstor --reveal 123.torrent
【找了许久的神器】chtor举例:
这个chtor工具相比其他BEncode工具较为完整,可以修改增加删除任何字段.可以与GUI工具BEncode Editor和torrent-file-editor媲美.
需要注意的是如果字符串在字典(Dictionary)之下,需要在字符串前加上字典名,如一般来说source字段位于torrent结构树(tree)中的info之下,那么修改或者设置的source的时候,就需要写为info.source;而如果要删除某个字段,则直接“-s 字段名”即可,不用加等号来赋值,如“chtor -s info.source 123.torrent”即可删除123.torrent中的source字段.
1.将本目录下所有种子的tracker修改,并修改source字段为PTP,并禁止默认添加的x_cross_seed字段,并另存到此文件夹下的torrent文件夹
chtor --reannounce-all=http://test.com -s info.source=PTP --no-cross-seed *.torrent ./torrent/
2.将本目录下所有种子的tracker修改,并禁止默认添加的x_cross_seed字段,直接修改在原torrent文件上.
chtor --reannounce-all=http://test.com --no-cross-seed *.torrent
3.将本目录下所有种子的tracker修改,并删除source字段,并禁止默认添加的x_cross_seed字段,并另存到此文件夹下的torrent文件夹
chtor --reannounce-all=http://test.com -s info.source --no-cross-seed *.torrent -o ./torrent/
【校验文件】hashcheck举例:
1.校验种子123.torrent对应的123文件夹是否完整
hashcheck -v 123.torrent ./123
进阶教程:
利用CLI工具批量修改种子
3.【python3】torf-cli工具
https://github.com/rndusr/torf
https://pypi.org/project/torf/
https://github.com/rndusr/torf-cli
https://rndusr.github.io/torf-cli/torf.1.html
在linux或mac或WSL下,请先安装好python-pip工具,先下载命令行工具
需要注意的是,此工具需要python3
pip install torf
pip install pyxdg
pip3 install torf-cli
torf -h
使用说明:
torf - CLI tool to create, read and edit torrent files

USAGE
    torf PATH [OPTIONS] [-o TORRENT]
    torf -i TORRENT
    torf -i TORRENT [OPTIONS] -o NEW TORRENT

ARGUMENTS
    PATH                   Path to torrent's content
    --exclude, -e EXCLUDE  File matching pattern that is used to exclude
                           files in PATH
    --in, -i TORRENT       Read metainfo from TORRENT
    --out, -o TORRENT      Write metainfo to TORRENT (default: NAME.torrent)
    --name, -n NAME        Torrent name (default: basename of PATH)
    --tracker, -t TRACKER  Announce URL
    --webseed, -w WEBSEED  Webseed URL
    --private, -p          Forbid clients to use DHT and PEX
    --comment, -c COMMENT  Comment that is stored in TORRENT
    --date, -d DATE        Creation date as YYYY-MM-DD[ HH:MM[:SS]], 'now'
                           or 'today' (default: 'now')
    --source, -s SOURCE    Add "source" field
    --xseed, -x            Randomize info hash

    --notracker, -T        Remove trackers from TORRENT
    --nowebseed, -W        Remove webseeds from TORRENT
    --noprivate, -P        Remove private flag from TORRENT
    --nocomment, -C        Remove comment from TORRENT
    --nodate, -D           Remove date from TORRENT
    --nosource, -S         Remove "source" field from TORRENT
    --noxseed, -X          De-randomize info hash of TORRENT
    --nocreator, -R        Remove creator from TORRENT
    --notorrent, -N        Don't create torrent file
    --nomagnet, -M         Don't create magnet link

    --yes, -y              Answer all yes/no prompts with "yes"
    --config, -f FILE      Read configuration from FILE
                           (default: ~/.config/torf/config
    --noconfig, -F         Ignore configuration file
    --profile, -z PROFILE  Use options from PROFILE

    --human, -u            Force human-readable output
    --nohuman, -U          Force machine-readable output
    --help, -h             Show this help screen and exit
    --version, -V          Show version number and exit
举例:
1.制作一个名为foo。torrent的种子,并包含2个tracker
torf path/to/foo -t http://bar:123/announce -t http://baz:321/announce --private
2.显示foo.torrent的信息
torf -i foo.torrent
3.修改种子的comment字段,删除制作时间字段,并另存为bar.torrent
torf -i foo.torrent -c 'New comment' -D -o bar.torrent
4.显示foo.torrent里文件列表
torf -i foo.torrent | grep '^Files' | cut -f2-
5.修改种子的source字段为"PTP",并另存为bar2.torrent
torf -i foo.torrent -s PTP -o bar2.torrent
进阶教程:
利用CLI工具批量制作,修改种子
4.transmission套装之transmission-edit命令
transmission很是强大,包括transmission-create, transmission-daemon, transmission-edit, transmission-gtk, transmission-qt, transmission-remote, transmission-show,transmission-cli.网络上的教程很多,我就不再赘述了。
https://linux.die.net/man/1/transmission-edit
https://linux.die.net/man/1/transmission-cli
https://github.com/transmission/transmission/wiki/Scripts
安装transmission后,查看命令帮助
transmission-edit -h
Usage: transmission-edit [options] torrent-file(s)
Options:
-h --help Display this help page and exit
-a --add Add a tracker's announce URL
-d --delete Delete a tracker's announce URL
-r --replace Search and replace a substring in the announce URLs
-V --version Show version number and exit
举例:
1.在网站上重置passkey后,批量修改torrent文件的passkey
transmission-edit -r old-passcode new-passcode ~/.config/transmission/torrents/*\\.torrent
2.添加种子的tracker
transmission-edit -a http://test.com ~/.config/transmission/torrents/*\\.torrent
3.删除种子的tracker
transmission-edit -d http://test.com ~/.config/transmission/torrents/*\\.torrent
进阶教程:
利用CLI工具批量制作种子
5.【python3】dottorrent-cli命令
https://github.com/kz26/dottorrent-cli
https://github.com/kz26/dottorrent
https://github.com/kz26/dottorrent-gui
在linux或mac或WSL或windows下,请先安装好python-pip工具,先下载命令行工具
pip3 install dottorrent-cli
dottorrent -h
用法
usage: dottorrent [-h] [--tracker TRACKER] [--web_seed WEB_SEED]
[--piece_size PIECE_SIZE] [--private] [--source SOURCE]
[--exclude RE] [--comment COMMENT] [--date DATE] [--md5]
[--verbose]
path output_path Create a .torrent file
positional arguments:
path path to file/directory to create torrent from
output_path Output path for created .torrent file. If a directory
is provided, the filename will be automatically
generated based on the input.
optional arguments:
-h, --help show this help message and exit
--tracker TRACKER, -t TRACKER
tracker URL (can be specified multiple times)
--web_seed WEB_SEED, -w WEB_SEED
web seed URL (can be specified multiple times)
--piece_size PIECE_SIZE, -s PIECE_SIZE
piece size, e.g. 16KB, 1M. Leave unspecified for
automatic piece size
--private, -p set private flag (useful for private trackers)
--source SOURCE source string (useful for private trackers)
--exclude RE, -x RE filename patterns that should be excluded (can be
specified multiple times)
--comment COMMENT, -c COMMENT
string for the torrent comment field
--date DATE, -d DATE Torrent creation date. Valid values: unix
timestamp/none/now (default: now)
--md5 Add per-file MD5 hashes
--verbose, -v verbose mode
这是一个制作种子,torrent的命令行工具,
举例:
1.将123.mkv制作一个名为test.torrent
dottorrent -t http://test.com/announce -v 123.mkv ./test.torrent
2.将123.mkv制作一个名为test1.torrent,区块大小16MB,私有种子,source设置为PTP,添加评论"this is a test file",并将文件MD5值加入torrent中。
dottorrent -t http://test.com/announce -s 16M -p --source PTP -c "this is a test file" --md5 -v xseed ./test1.torrent
题外话:
接下来我们通过之前提到的lstor命令可以验证一下这个种子的信息.
lstor test.torrent --raw
可得到此种子的信息
WARNING:pyrocore.scripts.lstor.MetafileLister:Found 0 candidate versions
WARNING:pyrocore.scripts.lstor.MetafileLister:Software version cannot be determined!
{'announce': 'http://test.com/announce',
'comment': 'this is a test file',
'created by': 'dottorrent/1.10.0 (https://github.com/kz26/dottorrent)',
'creation date': 1546956055,
'info': {'length': 5899,
'md5sum': '3eb13567ba944ca13d48777d2e7f77ac',
'name': 'xseed',
'piece length': 16777216,
'pieces': '<1 piece hashes>',
'private': 1,
'source': 'PTP'}}
INFO:pyrocore.scripts.lstor.MetafileLister:Total time: 0.008 seconds.
md5sum ./xseed
3eb13567ba944ca13d48777d2e7f77ac ./xseed
