This software is intended to demonstrate the direction of arrival (DoA) estimation capabilities of the KrakenSDR and other RTL-SDR based coherent receiver systems which use the compatible data acquisition system - HeIMDALL DAQ Firmware.
The complete application is broken down into two main modules in terms of implementation, into the DAQ Subsystem and to the DSP Subsystem. These two modules can operate together either remotely through Ethernet connection or locally on the same host using shared-memory.
Running these two subsystems on separate processing units can grant higher throughput and stability, while running on the same processing unit makes the entire system more compact.
Please consult the Wiki on the kraken_docs repo for full documentation on the use of the KrakenSDR.
We have a beta Pi 4 SD card image available here
Latest Image: https://github.com/krakenrf/krakensdr_doa/releases/
**Older Images: ** 190522: https://drive.google.com/file/d/1e6AAR8uOb0MLig4TqesRi9qqQ-80J62k/view?usp=sharing
150422: https://drive.google.com/file/d/1JT41DfkaYNSgGlxqaAvUwHQO_NwXewRW/view?usp=sharing
In this image the code will automatically run on boot. Note that it may take 2-3 minutes for the boot process to complete.
To run this code flash the image file to an SD Card using Etcher. The SD Card needs to be at least 8GB and we recommend using a class 10 card or faster. For advanced users the login/password details for SSH and terminal are "krakenrf"/"krakensdr"
In this image there are three ways to connect to the web GUI interface.
- Pi 4 WiFi Hotspot: If you simply boot up the image without setting up options 2 or 3, then the Pi 4 will automatically create a WiFi hotspot with SSID name "krakensdr" that you can connect to. The SSID password is also "krakensdr". Once connected, you can use a web brower to browse to "http://192.168.50.5:8080", which will load up the web interface.
Note that if you use this method, your mobile device will not have any internet access. So if you are using the Android App, be sure to download offline maps first.
- Android WiFi Mobile Hotspot: In this method you use your Android device to set up a WiFi mobile 4G/5G hotspot with SSID/password "KrakenAndroid"/"KrakenAndroid". The setup procedure is different on every phone, but it's usually under a setting called "Mobile Hotspot". When the Pi 4 boots up the image, if the KrakenAndroid SSID is detected, the Pi4 will automatically connect to the KrakenAndroid SSID. With this method your mobile device will retain full mobile internet access, allowing the KrakenSDR Android App to download maps as you drive.
To connect to the web interface you will need to determine the IP address given to the KrakenSDR. You can find this in the mobile hotspot settings too. Again this is different on every Android device, so you'll need to determine this yourself for your own device.
If the KrakenAndroid SSID is not detected, the Pi 4 will automatically revert to option 1, and create it's own hotspot without internet.
- Connect to your own WiFi Network If you are running the KrakenSDR at a fixed location, it makes sense to connect to your home/facilities WiFi network. There are two ways to do this.
- Option A: Either connect a monitor, and etc
sudo nano /etc/wpa_supplicant/wpa_supplicant.confin terminal. In the entry where it says "MY_SSID" and "MY_SSID_PASSWORD" enter your own WiFi information there. If you are outside the USA, make sure to set your two letter country code on the top line too. Then press "CTRL+X", "Y", to save and exit. - Option B: Add a wpa_supplicant.conf file in the boot drive of the image. You can do this by connecting your SD Card to a Windows machine, and opening up the boot drive that can be seen. In the boot drive we've left a file called "wpa_supplicant_example.conf". Make a copy of this file in the same directory, and rename it to "wpa_supplicant.conf". Now edit wpa_supplicant.conf with Notepad, replacing "MY_SSID" and "MY_SSID_PASSWORD" with your own WiFi information. If you are outside the USA, make sure to set your two letter country code on the top line too. Save this file.
Now after performing either option a) or b) when you reboot the Pi 4 should automatically connect to your home WiFi. If the KrakenAndroid WiFi is present, priority will be given to that connection first, so be sure to turn your hotspot off if you want to connect to the fixed WiFi network.
With this method you can then browse to http://krakensdr:8080 to load up the web interface.
To get the best performance we recommend adding aftermarket cooling to your Pi 4 and overclocking to at least 2000 MHz. We won't provide instructions for overclocking here, but they can be easily Googled.
KerberosSDR Setup Information
The Pi 4 hardware has a problem where it will not boot if a powered USB hub drawing current from the Pi 4 is plugged in. Inside the KerberosSDR is a powered USB hub and hence the Pi 4 will not boot if the KerberosSDR is plugged in. So please plug the KerberosSDR in after booting. For the KrakenSDR the hardware implementation forces external power only, so this problem does not occur.
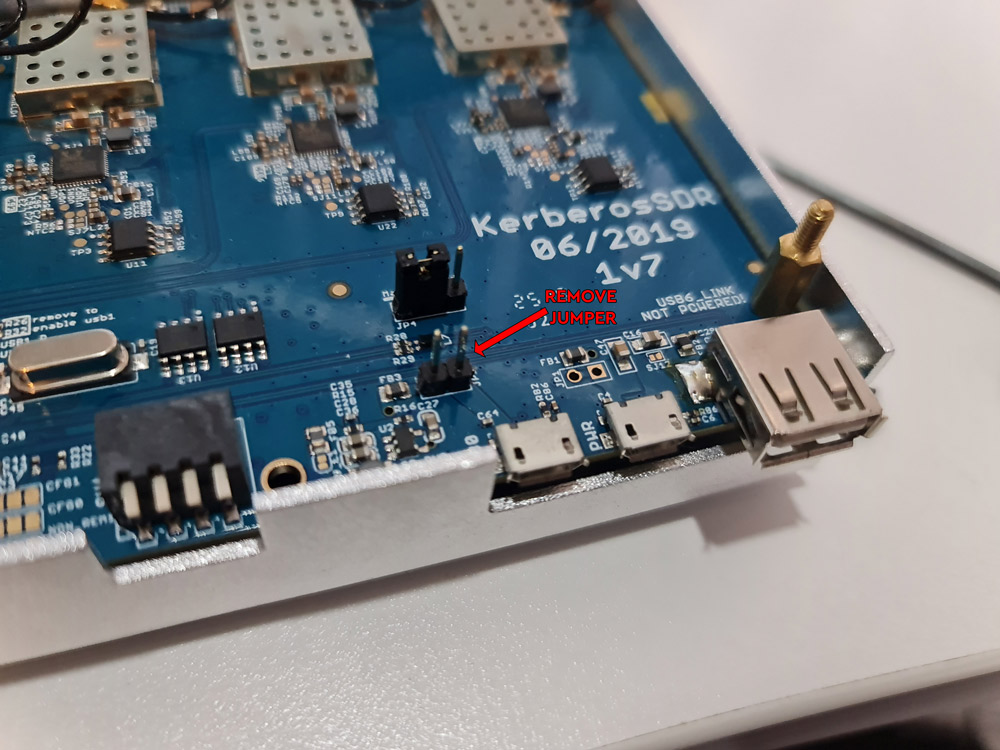
We strongly recommend making a small modification by removing a jumper on the KerberosSDR PCB to avoid this Pi 4 issue. This modification force external power only on the KerberosSDR by opening the enclosure, carefully removing the top calibration board, and then removing the JP2 jumper from the PCB.
For KerberosSDR users you will need to initially flash the EEPROM to use the new serial numbering scheme. Connect a monitor and boot up the image file. The code will not start as the EEPROMs are incorrect.
There is a script in ~/krakensdr_doa/heimdall_daq_fw/util/eeprom_init.sh that can guide your through this. Just plug in your KerberosSDR (ensuring it is powered from the power port), and run the script ./eeprom_init.sh. The script will guide you to use the DIP switches to turn all units off, except the currently requested tuner. It will then flash the realtek_oem firmware, then the serial number, before asking you to turn off that tuner, and turn on the next one. Answer Y each time it asks to flash.
Once the EEPROM is flashed you can reboot and follow the reconfiguration step below.
The image is currently set up for the KrakenSDR. For KerberosSDR users, please update the EEPROM as described above first, then reboot. Once the web interface has loaded, expand the "Basic DAQ Settings" by clicking on the checkbox. Under "Preconfigured DAQ Files" select "kerberosSDR_default", and then click on "Reconfigure and Restart DAQ chain". This may take a minute or so, but after it's completed the software should connect and begin processing.
The KrakenSDR code is designed to autocalibrate phase on each retune. Unfortunately this feature is not available on the KerberosSDR due to the lack of a noise source switching circuit. So with the KerberosSDR every time you change the frequency or DAQ settings, you must make sure that you have the antennas disconnected.
Also if you make any custom changes to the DAQ settings (which is not recommended), always ensure that Calibration Track Mode is set to No Tracking otherwise the software will attempt to recalibrate every X-minutes.
Once you've set the center frequency, you can connect your antennas. In the Spectrum screen you can use 'click to tune' to tune to any frequency within the active bandwidth without needing to recalibrate.
- The code will automatically begin processing on boot, please wait for it to start. If started the "Frame Index" will be incrementing.
- Enter your desired center frequency and click on "Update Receiver Parameters" to tune and calibrate on that frequency.
- Enter your antenna array configuration details in the "DoA Configuration" card.
- Set the VFO-0 bandwidth to the bandwidth of your signal.
- Open the "Spectrum" button and ensure that your signal of interest is active and selected by the VFO-0 window. If it is a bursty signal, determine an appropriate squelching power, and enter it back into the VFO-0 squelch settings in the confuration screen.
- Open the DOA Estimation tab to see DOA info.
- Connect to the Android App for map visualization (See Android Instructions - coming later)
You can also 'click to tune' in the spectrum. Either by clicking on the spectrum graph or the waterfall at the frequency of interest.
- Install the prerequisites
sudo apt update
sudo apt install php-cli nodejs- Install Heimdall DAQ
If not done already, first, follow the instructions at https://github.com/krakenrf/heimdall_daq_fw/tree/main to install the Heimdall DAQ Firmware.
- Set up Miniconda environment
You will have created a Miniconda environment during the Heimdall DAQ install phase.
Please run the installs in this order as we need to ensure a specific version of dash and Werkzeug is installed because newer versions break compatibility with other libraries.
conda activate kraken

conda install quart
conda install pandas
conda install orjson
conda install matplotlib
conda install requests

pip3 install dash_bootstrap_components==1.1.0
pip3 install quart_compress
pip3 install dash_devices
pip3 install pyargus

conda install dash==1.20.0
conda install werkzeug==2.0.2- (OPTIONAL) Install GPSD if you want to run a USB GPS on the Pi 4.
sudo apt install gpsd
pip3 install gpsd-py3
- Install the
krakensdr_doasoftware
cd ~/krakensdr
git clone https://github.com/krakenrf/krakensdr_doa
Copy the the krakensdr_doa/util/kraken_doa_start.sh and the krakensdr_doa/util/kraken_doa_stop.sh scripts into the krakensdr root folder of the project.
cp krakensdr_doa/util/kraken_doa_start.sh .
cp krakensdr_doa/util/kraken_doa_stop.sh ../kraken_doa_start.shPlease be patient on the first run, at it can take 1-2 minutes for the JIT numba compiler to compile the numba optimized functions, and during this compilation time it may appear that the software has gotten stuck. On subsqeuent runs this loading time will be much faster as it will read from cache.
UNTESTED
- Start the DAQ Subsystem either remotely. (Make sure that the
daq_chain_config.inicontains the proper configuration) (See:https://github.com/krakenrf/heimdall_daq_fw/Documentation) - Set the IP address of the DAQ Subsystem in the
settings.json,default_ipfield. - Start the DoA DSP software by typing:
./gui_run.sh - To stop the server and the DSP processing chain run the following script:
./kill.sh
After starting the script a web based server opens at port number 8080, which then can be accessed by typing KRAKEN_IP:8080/ in the address bar of any web browser. You can find the IP address of the KrakenSDR Pi4 wither via your routers WiFi management page, or by typing ip addr into the terminal. You can also use the hostname of the Pi4 in place of the IP address, but this only works on local networks, and not the internet, or mobile hotspot networks.

-
[FEATURE] It would be better if the KrakenSDR controls, spectrum and/or DOA graphs could be accessible from the same page. Future work will look to integrate the controls in a sidebar.
-
[FEATURE] Wideband scanning. There should be a feature to rapidly scan through a set of frequencies over a wide bandwidth, and perform DFing on a signal in that set if it is active. To do this a rapid scan feature that does not do coherent calibration needs to be implemented first. Then when an active signal is found, calibrate as fast as possible, and do the DoA calculation on that signal for a set period of time, before returning to scan mode.
Please find the array sizing calculator at https://docs.google.com/spreadsheets/d/1w_LoJka7n38-F0a3vgaTVcSXxjXvH2Td/edit?usp=sharing&ouid=113401145893186461043&rtpof=true&sd=true. Download this file and use it in Excel.
For our own KrakenSDR branded magnetic whip antenna sets we have a paper printable array template for UCA radius spacings every 50mm linked below. Print 5 arms and one middle and cut out the template and holes so that the antenna base fits inside them. Then use a glue stick to glue the arms onto the base.
Array Arms: https://drive.google.com/file/d/16tjBljRIHRUfqSs5Vb5xsypVTtHK_vDl/view?usp=sharing
Array Middle Pentagon: https://drive.google.com/file/d/1ekBcr3fQEz1d8WlKEerOmj-JriCywHhg/view?usp=sharing
You can also 3D print a more rigid template:
Array Arm: https://drive.google.com/file/d/1LsiqZolMU4og2NStPewQWhIh3z6N1zb5/view?usp=sharing
Array Middle Pentagon: https://drive.google.com/file/d/1fn4KO7orITNJWV99XJHYu8RlZgmTl6-5/view?usp=sharing


