Slides and assets for the FBBot workshop [first presented at Toronto Ruby Hack Night, June 30, 2016]
Workshop for learning Chatbots, Facebook messaging and Wit.ai
Created by David Andrews and Jason Schweier
There are no slides for this workshop. All of the materials are contained in this readme.
Here is what we're going to build:
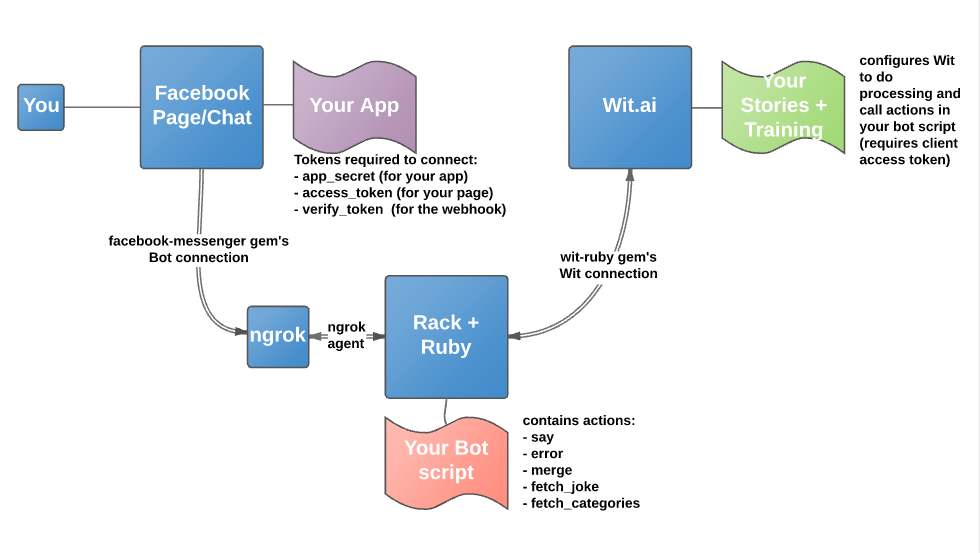
###Introduction This project is a simple Ruby project. The workshop comes in four parts:
- create a Facebook app and host it on a page
- create a Wit.ai bot
- connect Facebook and Wit.ai
- customize your bot for a particular purpose
###Setup
Here are the steps to get you started with the repo.
- For this workshop, you will need a laptop with the following:
- Ruby 2.x
- A Github account
Note: We have included a .ruby-version file locked to 2.2.3, which you can change to any Ruby 2.x version if you don't have 2.2.3 installed
More detailed instructions for each platform are included in the footer. Refer there if you are having issues.
-
Fork the repo (optional, recommended): From the page https://github.com/k00ka/fbbot, click the Fork button in the top-right corner. Copy the new repo address (in a box just below the thick red line) into your clipboard. Detailed instructions on forking a repo can be found here: https://help.github.com/articles/fork-a-repo/
-
At Ryatta Group we use rbenv, and so we've included some optional elements - just skip them if you're using rvm or are not versioning your Ruby. If you forked the repo above, your repo_address will be in your clipboard. If not, you should use my repo_address
[email protected]:k00ka/fbbot.git
% git clone <paste repo_address>
% cd fbbot
% gem install bundler
Fetching: bundler-1.7.4.gem (100%)
Successfully installed bundler-1.7.4
1 gem installed
% bundle
Fetching gem metadata from https://rubygems.org/.........
Resolving dependencies...
Installing rake 10.3.2
...
Using bundler 1.7.4
Your bundle is complete!
Use `bundle show [gemname]` to see where a bundled gem is installed.
Note: if you use rbenv...
% rbenv rehashYou are (almost) there!
- Do the above
- Create an ngrok account - http://ngrok.com
- Download and install ngrok
- Start ngrok
- Sign into Facebook
- Create a page - community - use your name and check “add to favorites”
- Go here https://developers.facebook.com/quickstarts/?platform=web
- Create a new app (I called mine k00kabot)
- Paste your ngrok URL into Site URL (check this)
- In your project space (shell) type: rackup -p 3000 (don’t hit return)
- Back in the browser go to your app using top-right menu
- Click dashboard
- Click Show beside App Secret
- Copy the app secret token to the end of your command line
- Add Messenger on the left menu
- Choose your new page from the page dropdown
- Accept the warnings
- Copy the page access to the end of your command line
- Click setup web hooks
- Copy ngrok HTTPS token into the callback URL
- Set your verify token to something you’ll remember
- Add the verify token to the end of your command line
- Click at least the “messages” checkbox
- Add the text “config.ru” to the end of your command line
- Hit enter on your command line to run the bot (WEBrick starts)
- Click verify and save on the application page (should verify)
- Surf back to your new page
- Click the “. . .” in the header and choose “View as page visitor”
- Click “Message” in the header
- Send a message - you should see “Hello, human”
- Type ctrl-c to stop your script (don’t kill ngrok!)
- Echo your command line into the file run1.sh (note: it’s in .gitignore, so you can't check it in with your private deets)
- Chmod +x run1.sh
- CELEBRATE BRIEFLY - you have integrated with Facebook successfully - you're 1/3 of the way there
- Create an account on wit.ai
- In your Wit.ai app, click settings
- Click the "spinny" icon beside Client Access Token to create one
- Copy the access to token
- Paste the access token into the command-line you created earlier (before config1.ru)
- Change config1.ru to config2.ru and "echo" the resulting command line to run2.sh
- Chmod +x run2.sh
- In Wit.ai add a story to your app
- Create a User Says node, and type "tell me a joke about technology"
- Highlight "technology" and click "add a new entity"
- Type "category" and make sure the value says "technology", hit enter
- Create a Bot Executes node and type "merge"
- Create a Bot Executes node and type "fetch_joke"
- Create a Bot Says node and type "{response}"
- Create a Bot Executes node and type "clear_context"
- This above node is the main story, providing a joke to the user
- Click Understanding
- Think of many different ways of asking for a joke, like: "I like jokes about cars"
- For each ensure the category, if any, is highlight and correctly identified. Fix it if not.
- After creating 4 or more examples (some may not include the category), click Stories
- Continue with a new User Says node, typ4e "What are the categories of jokes?"
- Highlight the phrase "categories of jokes" phrase and click "add a new entity"
- Name the entity "meta" and ensure it has the value "categories of jokes"
- Create a Bot Executes node and type "fetch_categories"
- Create a Bot Says node and type "{response}"
- Create a Bot Executes node and type "clear_context"
- Click "understanding"
- Click on meta in the lower list and remove "trait"
- Click "understanding" to go back
- This of many differetnt ways of asking for categories
- For each, ensure the query is interpreted correctly (i.e. meta is assigned "categories of jokes")
- Extend your story with a new User Says node
- Type the phrase "That was funny"
- Click "add a new entity" and name it "Sentiment", set the value to "positive"
- Add a Bot Executes node and type "merge"
- In "updates context keys with" put "sentiment"
- Add a Bot Says node and type "Glad you liked it"
- Add another User Says node
- Type the text "That's stupid"
- Click "add a new entity" and name it "Sentiment", set the value to "negative"
- Add a Bot Executes node to run the "merge" function
- In "updates context keys with" put "sentiment"
- Add a Bot Says node and type "There's no pleasing some people."
- Click "understanding" and train up these two interactions - ensuring each has either positive or negative values for sentiment
- Run your bot by typiing "./run2.sh" at the command-line
- Go into your Facebook chat and give it a try!
- CELEBRATE MORE - you now have FB hooked to your Wit.ai back-end
- Play, train and revise using the Understanding tab in Wit.ai
- The Wit.ai Stories tab is in beta as I write this - save and opy your storied often or risk losing your work!
Congratulations, you've created a Facebook bot with an AI back-end!

