solocao / aliyun-abc Goto Github PK
View Code? Open in Web Editor NEW阿里云ecs配置记录
阿里云ecs配置记录


紧急处理,您fork https://github.com/sproutcui/Znwl_Xingyun_Cixi 是公司临时开放的项目库,请快速删除处理,谢谢!
1、gcc 安装,编译依赖 gcc 环境。
yum install gcc-c++
2、pcre、pcre-devel 安装 。
PCRE(Perl Compatible Regular Expressions) 是一个Perl库,包括 perl 兼容的正则表达式库。nginx 的 http 模块使用 pcre 来解析正则表达式,所以需要在 linux 上安装 pcre 库,pcre-devel 是使用 pcre 开发的一个二次开发库。
yum install -y pcre pcre-devel
3、zlib 安装 。
zlib 库提供了很多种压缩和解压缩的方式, nginx 使用 zlib 对 http 包的内容进行 gzip ,所以需要在 Centos 上安装 zlib 库
yum install -y zlib zlib-devel
4、OpenSSL 安装
OpenSSL 是一个强大的安全套接字层密码库,囊括主要的密码算法、常用的密钥和证书封装管理功能及 SSL 协议,并提供丰富的应用程序供测试或其它目的使用。
nginx 不仅支持 http 协议,还支持 https(即在ssl协议上传输http),所以需要在 Centos 安装 OpenSSL 库
yum install -y openssl openssl-devel
1、下载nginx源码包
wget -c https://nginx.org/download/nginx-1.14.0.tar.gz
2、解压缩源码包并进入
tar -zxvf nginx-1.14.0.tar.gz
cd nginx-1.14.0
3、配置
推荐使用默认配置
./configure
4、编译并且安装
make && make install
5、 查找安装路径
whereis nginx
进入目录
cd /usr/local/nginx/sbin/
1、启动 nginx
./nginx
2、停止 nginx
./nginx -s stop
3、从容停止 nginx
./nginx -s quit
4、重启nginx
./nginx -s reload
5、推荐先停止再启动
./nginx -s quit
./nginx
6、修改了 nginx 的配置文件 nginx.conf 想让它立即生效时 这时我们就需要重启nginx
./nginx -s reload
1、先删除原来的
yum remove git
2、安装依赖包
yum install -y zlib-devel bzip2-devel openssl-devel ncurses-devel gcc perl-ExtUtils-MakeMaker package
3、下载压缩包
wget https://www.kernel.org/pub/software/scm/git/git-2.17.1.tar.gz
4、解压
tar -zxvf git-2.17.1.tar.gz
cd git-2.17.1
5、安装
make prefix=/usr/local all
make prefix=/usr/local install
6、验证是否安装完成
git --version
7、生成ssh密钥
ssh-keygen -t rsa -C "[email protected]"
8、查看密钥
cat ~/.ssh/id_rsa.pub
9、将密码复制到码云/github上面
10、正常能下载,说明正确
git clone [email protected]:lonecloud/XXXX.git
curl 是一种命令行工具,作用是发出网络请求,然后获取数据,显示在"标准输出"(stdout)上面。它支持多种协议,下面列举其常用功能。
直接在 curl 命令后加上网址,就可以看到网页源码。以网址 www.sina.com为例(选择该网址,主要因为它的网页代码较短)。
$ curl www.sina.com
<html>
<head><title>301 Moved Permanently</title></head>
<body bgcolor="white">
<center><h1>301 Moved Permanently</h1></center>
<hr><center>nginx</center>
</body>
</html>
如果要把这个网页保存下来,可以使用 -o 参数:
$ curl -o [文件名] www.sina.com
有的网址是自动跳转的。使用 -L 参数,curl 就会跳转到新的网址。
$ curl -L www.sina.com
键入上面的命令,结果自动跳转为 www.sina.com.cn。
-i 参数可以显示 http response 的头信息,连同网页代码一起。-I 参数则只显示 http response 的头信息。
$ curl -i www.sina.com
HTTP/1.1 301 Moved Permanently
Server: nginx
Date: Tue, 23 Aug 2016 08:30:16 GMT
Content-Type: text/html
Location: http://www.sina.com.cn/
Expires: Tue, 23 Aug 2016 08:32:16 GMT
Cache-Control: max-age=120
Age: 102
Content-Length: 178
X-Cache: HIT from xd33-83.sina.com.cn

<html>
<head><title>301 Moved Permanently</title></head>
<body bgcolor="white">
<center><h1>301 Moved Permanently</h1></center>
<hr><center>nginx</center>
</body>
</html>
-v 参数可以显示一次 http 通信的整个过程,包括端口连接和 http request 头信息。
$ curl -v www.sina.com
* Rebuilt URL to: www.sina.com/
* Hostname was NOT found in DNS cache
*   Trying 202.108.33.60...
* Connected to www.sina.com (202.108.33.60) port 80 (#0)
> GET / HTTP/1.1
> User-Agent: curl/7.35.0
> Host: www.sina.com
> Accept: */*
>
< HTTP/1.1 301 Moved Permanently
* Server nginx is not blacklisted
< Server: nginx
< Date: Tue, 23 Aug 2016 08:48:14 GMT
< Content-Type: text/html
< Location: http://www.sina.com.cn/
< Expires: Tue, 23 Aug 2016 08:50:14 GMT
< Cache-Control: max-age=120
< Age: 40
< Content-Length: 178
< X-Cache: HIT from xd33-81.sina.com.cn
<
<html>
<head><title>301 Moved Permanently</title></head>
<body bgcolor="white">
<center><h1>301 Moved Permanently</h1></center>
<hr><center>nginx</center>
</body>
</html>
* Connection #0 to host www.sina.com left intact
如果觉得上面的信息还不够,那么下面的命令可以查看更详细的通信过程。
$ curl --trace output.txt www.sina.com
或者
$ curl --trace-ascii output.txt www.sina.com
运行后,打开 output.txt 文件查看。
发送表单信息有 GET 和 POST 两种方法。GET 方法相对简单,只要把数据附在网址后面就行。
$ curl example.com/form.cgi?data=xxx
POST 方法必须把数据和网址分开,curl 就要用到 --data 或者 -d 参数。
$ curl -X POST --data "data=xxx" example.com/form.cgi
如果你的数据没有经过表单编码,还可以让 curl 为你编码,参数是 --data-urlencode。
$ curl -X POST--data-urlencode "date=April 1" example.com/form.cgi
curl 默认的 HTTP 动词是 GET,使用 -X 参数可以支持其他动词。
$ curl -X POST www.example.com
$ curl -X DELETE www.example.com
这个字段是用来表示客户端的设备信息。服务器有时会根据这个字段,针对不同设备,返回不同格式的网页,比如手机版和桌面版。
浏览器的 User Agent 是:
Mozilla/5.0 (Windows NT 10.0; WOW64) AppleWebKit/537.36 (KHTML, like Gecko) Chrome/51.0.2704.84 Safari/537.36
curl 可以这样模拟:
$ curl --user-agent "[User Agent]" [URL]
使用 --cookie 参数,可以让 curl 发送 cookie。
$ curl --cookie "name=xxx" www.example.com
至于具体的 cookie 的值,可以从 http response 头信息的 Set-Cookie 字段中得到。
有时需要在 http request 之中,自行增加一个头信息。--header 参数就可以起到这个作用。
$ curl --header "Content-Type:application/json" http://example.com
有些网域需要 HTTP 认证,这时 curl 需要用到 --user 或者 -u 参数。
$ curl --user name:password example.com
$ curl --help
Usage: curl [options...] <url>
Options: (H) means HTTP/HTTPS only, (F) means FTP only
     --anyauth       Pick "any" authentication method (H)
 -a, --append        Append to target file when uploading (F/SFTP)
     --basic         Use HTTP Basic Authentication (H)
     --cacert FILE   CA certificate to verify peer against (SSL)
     --capath DIR    CA directory to verify peer against (SSL)
 -E, --cert CERT[:PASSWD] Client certificate file and password (SSL)
     --cert-type TYPE Certificate file type (DER/PEM/ENG) (SSL)
     --ciphers LIST  SSL ciphers to use (SSL)
     --compressed    Request compressed response (using deflate or gzip)
 -K, --config FILE   Specify which config file to read
     --connect-timeout SECONDS  Maximum time allowed for connection
 -C, --continue-at OFFSET  Resumed transfer offset
 -b, --cookie STRING/FILE  String or file to read cookies from (H)
 -c, --cookie-jar FILE  Write cookies to this file after operation (H)
     --create-dirs   Create necessary local directory hierarchy
     --crlf          Convert LF to CRLF in upload
     --crlfile FILE  Get a CRL list in PEM format from the given file
 -d, --data DATA     HTTP POST data (H)
     --data-ascii DATA  HTTP POST ASCII data (H)
     --data-binary DATA  HTTP POST binary data (H)
     --data-urlencode DATA  HTTP POST data url encoded (H)
     --delegation STRING GSS-API delegation permission
     --digest        Use HTTP Digest Authentication (H)
     --disable-eprt  Inhibit using EPRT or LPRT (F)
     --disable-epsv  Inhibit using EPSV (F)
     --dns-servers    DNS server addrs to use: 1.1.1.1;2.2.2.2
     --dns-interface  Interface to use for DNS requests
     --dns-ipv4-addr  IPv4 address to use for DNS requests, dot notation
     --dns-ipv6-addr  IPv6 address to use for DNS requests, dot notation
 -D, --dump-header FILE  Write the headers to this file
     --egd-file FILE  EGD socket path for random data (SSL)
     --engine ENGINE  Crypto engine (SSL). "--engine list" for list
 -f, --fail          Fail silently (no output at all) on HTTP errors (H)
 -F, --form CONTENT  Specify HTTP multipart POST data (H)
     --form-string STRING  Specify HTTP multipart POST data (H)
     --ftp-account DATA  Account data string (F)
     --ftp-alternative-to-user COMMAND  String to replace "USER [name]" (F)
     --ftp-create-dirs  Create the remote dirs if not present (F)
     --ftp-method [MULTICWD/NOCWD/SINGLECWD] Control CWD usage (F)
     --ftp-pasv      Use PASV/EPSV instead of PORT (F)
 -P, --ftp-port ADR  Use PORT with given address instead of PASV (F)
     --ftp-skip-pasv-ip Skip the IP address for PASV (F)
     --ftp-pret      Send PRET before PASV (for drftpd) (F)
     --ftp-ssl-ccc   Send CCC after authenticating (F)
     --ftp-ssl-ccc-mode ACTIVE/PASSIVE  Set CCC mode (F)
     --ftp-ssl-control Require SSL/TLS for ftp login, clear for transfer (F)
 -G, --get           Send the -d data with a HTTP GET (H)
 -g, --globoff       Disable URL sequences and ranges using {} and []
 -H, --header LINE   Custom header to pass to server (H)
 -I, --head          Show document info only
 -h, --help          This help text
     --hostpubmd5 MD5  Hex encoded MD5 string of the host public key. (SSH)
 -0, --http1.0       Use HTTP 1.0 (H)
     --http1.1       Use HTTP 1.1 (H)
     --http2.0       Use HTTP 2.0 (H)
     --ignore-content-length  Ignore the HTTP Content-Length header
 -i, --include       Include protocol headers in the output (H/F)
 -k, --insecure      Allow connections to SSL sites without certs (H)
     --interface INTERFACE  Specify network interface/address to use
 -4, --ipv4          Resolve name to IPv4 address
 -6, --ipv6          Resolve name to IPv6 address
 -j, --junk-session-cookies Ignore session cookies read from file (H)
     --keepalive-time SECONDS  Interval between keepalive probes
     --key KEY       Private key file name (SSL/SSH)
     --key-type TYPE Private key file type (DER/PEM/ENG) (SSL)
     --krb LEVEL     Enable Kerberos with specified security level (F)
     --libcurl FILE  Dump libcurl equivalent code of this command line
     --limit-rate RATE  Limit transfer speed to this rate
 -l, --list-only     List only mode (F/POP3)
     --local-port RANGE  Force use of these local port numbers
 -L, --location      Follow redirects (H)
     --location-trusted like --location and send auth to other hosts (H)
 -M, --manual        Display the full manual
     --mail-from FROM  Mail from this address (SMTP)
     --mail-rcpt TO  Mail to this/these addresses (SMTP)
     --mail-auth AUTH  Originator address of the original email (SMTP)
     --max-filesize BYTES  Maximum file size to download (H/F)
     --max-redirs NUM  Maximum number of redirects allowed (H)
 -m, --max-time SECONDS  Maximum time allowed for the transfer
     --metalink      Process given URLs as metalink XML file
     --negotiate     Use HTTP Negotiate Authentication (H)
 -n, --netrc         Must read .netrc for user name and password
     --netrc-optional Use either .netrc or URL; overrides -n
     --netrc-file FILE  Set up the netrc filename to use
 -N, --no-buffer     Disable buffering of the output stream
     --no-keepalive  Disable keepalive use on the connection
     --no-sessionid  Disable SSL session-ID reusing (SSL)
     --noproxy       List of hosts which do not use proxy
     --ntlm          Use HTTP NTLM authentication (H)
     --oauth2-bearer TOKEN  OAuth 2 Bearer Token (IMAP, POP3, SMTP)
 -o, --output FILE   Write output to <file> instead of stdout
     --pass PASS     Pass phrase for the private key (SSL/SSH)
     --post301       Do not switch to GET after following a 301 redirect (H)
     --post302       Do not switch to GET after following a 302 redirect (H)
     --post303       Do not switch to GET after following a 303 redirect (H)
 -#, --progress-bar  Display transfer progress as a progress bar
     --proto PROTOCOLS  Enable/disable specified protocols
     --proto-redir PROTOCOLS  Enable/disable specified protocols on redirect
 -x, --proxy [PROTOCOL://]HOST[:PORT] Use proxy on given port
     --proxy-anyauth Pick "any" proxy authentication method (H)
     --proxy-basic   Use Basic authentication on the proxy (H)
     --proxy-digest  Use Digest authentication on the proxy (H)
     --proxy-negotiate Use Negotiate authentication on the proxy (H)
     --proxy-ntlm    Use NTLM authentication on the proxy (H)
 -U, --proxy-user USER[:PASSWORD]  Proxy user and password
     --proxy1.0 HOST[:PORT]  Use HTTP/1.0 proxy on given port
 -p, --proxytunnel   Operate through a HTTP proxy tunnel (using CONNECT)
     --pubkey KEY    Public key file name (SSH)
 -Q, --quote CMD     Send command(s) to server before transfer (F/SFTP)
     --random-file FILE  File for reading random data from (SSL)
 -r, --range RANGE   Retrieve only the bytes within a range
     --raw           Do HTTP "raw", without any transfer decoding (H)
 -e, --referer       Referer URL (H)
 -J, --remote-header-name Use the header-provided filename (H)
 -O, --remote-name   Write output to a file named as the remote file
     --remote-name-all Use the remote file name for all URLs
 -R, --remote-time   Set the remote file's time on the local output
 -X, --request COMMAND  Specify request command to use
     --resolve HOST:PORT:ADDRESS  Force resolve of HOST:PORT to ADDRESS
     --retry NUM   Retry request NUM times if transient problems occur
     --retry-delay SECONDS When retrying, wait this many seconds between each
     --retry-max-time SECONDS  Retry only within this period
     --sasl-ir       Enable initial response in SASL authentication
 -S, --show-error    Show error. With -s, make curl show errors when they occur
 -s, --silent        Silent mode. Don't output anything
     --socks4 HOST[:PORT]  SOCKS4 proxy on given host + port
     --socks4a HOST[:PORT]  SOCKS4a proxy on given host + port
     --socks5 HOST[:PORT]  SOCKS5 proxy on given host + port
     --socks5-hostname HOST[:PORT] SOCKS5 proxy, pass host name to proxy
     --socks5-gssapi-service NAME  SOCKS5 proxy service name for gssapi
     --socks5-gssapi-nec  Compatibility with NEC SOCKS5 server
 -Y, --speed-limit RATE  Stop transfers below speed-limit for 'speed-time' secs
 -y, --speed-time SECONDS  Time for trig speed-limit abort. Defaults to 30
     --ssl           Try SSL/TLS (FTP, IMAP, POP3, SMTP)
     --ssl-reqd      Require SSL/TLS (FTP, IMAP, POP3, SMTP)
 -2, --sslv2         Use SSLv2 (SSL)
 -3, --sslv3         Use SSLv3 (SSL)
     --ssl-allow-beast Allow security flaw to improve interop (SSL)
     --stderr FILE   Where to redirect stderr. - means stdout
     --tcp-nodelay   Use the TCP_NODELAY option
 -t, --telnet-option OPT=VAL  Set telnet option
     --tftp-blksize VALUE  Set TFTP BLKSIZE option (must be >512)
 -z, --time-cond TIME  Transfer based on a time condition
 -1, --tlsv1         Use TLSv1 (SSL)
     --trace FILE    Write a debug trace to the given file
     --trace-ascii FILE  Like --trace but without the hex output
     --trace-time    Add time stamps to trace/verbose output
     --tr-encoding   Request compressed transfer encoding (H)
 -T, --upload-file FILE  Transfer FILE to destination
     --url URL       URL to work with
 -B, --use-ascii     Use ASCII/text transfer
 -u, --user USER[:PASSWORD][;OPTIONS]  Server user, password and login options
     --tlsuser USER  TLS username
     --tlspassword STRING TLS password
     --tlsauthtype STRING  TLS authentication type (default SRP)
 -A, --user-agent STRING  User-Agent to send to server (H)
 -v, --verbose       Make the operation more talkative
 -V, --version       Show version number and quit
 -w, --write-out FORMAT  What to output after completion
     --xattr        Store metadata in extended file attributes
 -q                 If used as the first parameter disables .curlrc
参考地址
https://www.cnblogs.com/chen1carpolite/p/8986320.html
若结尾出现complete!,则说明MySQL源安装完成
若结尾出现Complete!, 则MySQL安装完成
5、设置开启启动mysql服务:systemctl enable mysqld
6、设置开启启动mysql服务:systemctl enable mysqld
7、查看安装的mysql版本:rpm -aq | grep -i mysql
8、启动MySQL服务:systemctl restart mysqld
9、查看MySQL初始密码:grep 'A temporary password' /var/log/mysqld.log
10、更改MySQL密码:mysqladmin -u root -p'旧密码' password '新密码'
这里更改密码出了问题,更改失败,这是因为密码太过简单的原因。有两个接解决方法:
方法一:把密码设置复杂点(这是最直接的方法)
方法二:关闭mysql密码强度验证(validate_password)
编辑配置文件:vim /etc/my.cnf, 增加这么一行validate_password=off
编辑后重启mysql服务:systemctl restart mysqld
11、设置mysql能够远程访问
登录进MySQL:mysql -uroot -p. 密码
增加一个用户给予访问权限:grant all privileges on . to '用户名'@'ip地址' identified by '密码' with grant option; //可将ip改为%%,表示开启所有的
grant all privileges on *.* to 'root'@'%%' identified by '**********' with grant option;
择添加安全组规则,开启3306端口。授权对象选择0.0.0.0/0所有ip可访问,如果添加限制可以点击旁面的小叹号。一定要重启服务器,必须要。。。
Centos7.4 安装mongodb3.6
1、系统更新一下
yum -y update
2、编辑Mongodb安装源
vim /etc/yum.repos.d/mongodb-org-3.6.repo
编辑内容如下:
[mongodb-org-3.6]
name=MongoDB Repository
baseurl=https://repo.mongodb.org/yum/redhat/$releasever/mongodb-org/3.6/x86_64/
gpgcheck=1
enabled=1
gpgkey=https://www.mongodb.org/static/pgp/server-3.6.asc
3、安装mongodb
yum install -y mongodb-org
4、查看mongo安装位置
whereis mongod
5、查看修改配置文件
vim /etc/mongod.conf
1、启动mongodb
systemctl start mongod.service
2、停止mongodb
systemctl stop mongod.service
3、设置开机启动
systemctl enable mongod.service
CentOS 7.0默认使用的是firewall作为防火墙,这里改为iptables防火墙。
1、关闭firewall:停止firewall
systemctl stop firewalld.service
2、 禁止firewall开机启动
systemctl disable firewalld.service
mongo
1、查看数据库
show dbs
2、设置mongodb远程访问
编辑mongod.conf注释bindIp,并重启mongodb.
vim /etc/mongod.conf
3、重启mongodb:
systemctl restart mongod.service
vim /etc/mongod.conf
systemLog:
  destination: file
  logAppend: true
  path: /var/log/mongodb/mongod.log

storage:
  dbPath: /var/lib/mongo
  journal:
    enabled: true

processManagement:
  fork: true
  pidFilePath: /var/run/mongodb/mongod.pid

net:
  port: 21111
  bindIp: 0.0.0.0

security:
  authorization: enabled
  javascriptEnabled: false
其中端口被修改为21111(随意),并且允许远程访问,不允许则修改bandIp为:127.0.0.1
已经启用了用户身份验证,并关闭了javascript
重启系统
reboot
这种方式会自动使用/etc/mongod.conf配置文件
service mongod start
新建管理员用户
mongo --port 21111
> use admin
> db.createUser({user:"userAdmin",pwd:"123456",roles:[{role:"userAdminAnyDatabase",db:"admin"}]})
> db.auth("userAdmin","123456")
新建普通用户
> use test
> db.createUser({user:"test",pwd:"123456",roles:[{role:"readWrite",db:"test"}]})
退出
exit
停止
mongod -f /etc/mongod.conf --shutdown
1、在本地机器上使用ssh-keygen产生公钥私钥对
ssh -keygen -t rsa
2、用ssh-copy-id将公钥复制到远程服务器中
ssh-copy-id -i .ssh/id_rsa.pub [email protected]
3、然后会提示输入服务器密码
4、以后可以使用下面代码登录
CentOS系统可以使用yum install git来安装git,但是版本较低,在CentOS 7上试验后,使用git --version查看版本,是1.8.3,建议重新安装高版本。
如果使用yum安装过git,先使用yum remove git 卸载低版本的git
安装依赖包
yum install -y zlib-devel bzip2-devel openssl-devel ncurses-devel gcc perl-ExtUtils-MakeMaker package
下载压缩包
wget https://www.kernel.org/pub/software/scm/git/git-2.17.1.tar.gz
使用的2.17.1版本的,也可以下载更高版本
4.解压安装
tar -zxvf git-2.17.1.tar.gz
cd git-2.17.1

./configure --prefix=/usr/local/git all
make && make install
123456
echo "export PATH=$PATH:/usr/local/git/bin" >> /etc/bashrc
source /etc/bashrc
验证
git –-version
git version 2.17.1
安装成功
1‘、安装mysql数据库
a)下载mysql源安装包:wget http://dev.mysql.com/get/mysql57-community-release-el7-8.noarch.rpm
b)安装mysql源:yum localinstall mysql57-community-release-el7-8.noarch.rpm
若结尾出现complete!,则说明MySQL源安装完成
c)检测是否安装完成:yum repolist enabled | grep "mysql.-community."
d)安装mysql:yum install mysql-community-server
若结尾出现Complete!, 则MySQL安装完成
ssh -t [email protected] -p 22
温故而知新,为学日益
iTerm2是一个免费的、针对termial增强的一个工具。
可以在这里下载最新版的。
通常情况下,iTerm2访问远程Linux使用ssh,与Termial基本一样,方法如下:
ssh <用户名>@<ip>
然后输入访问的密码即可。当然还有的时候需要指定访问端口。
ssh -p <端口号> <用户名>@<ip地址>
如果在iTerm2下的操作与termial一样,我还用它干甚?
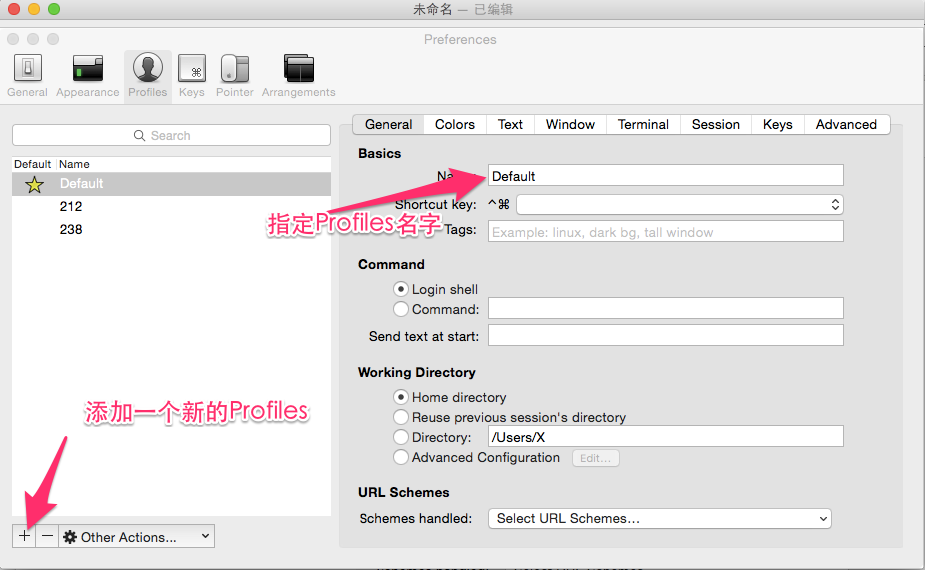
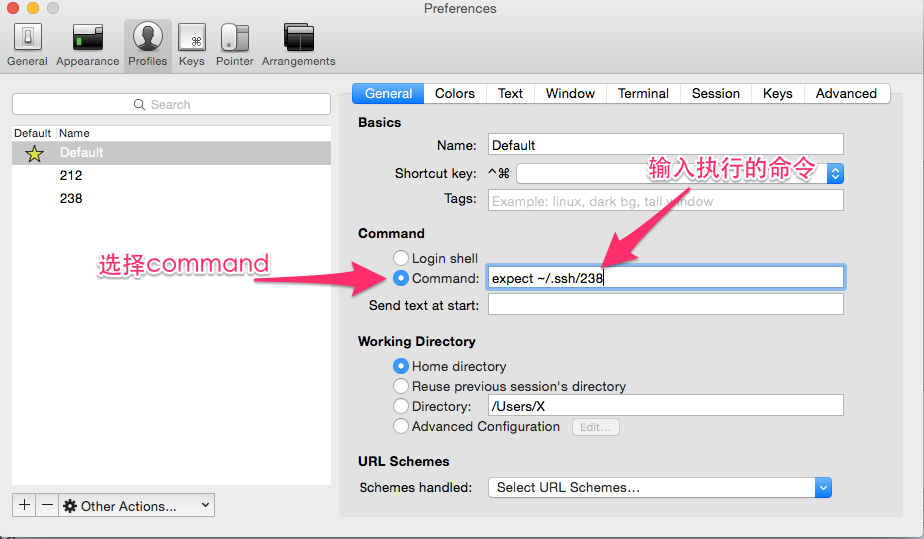
当然iTerm2有它特有的功能,这里使用它的是Profiles这个功能。
我们将远程访问的相关内容写成一个脚本,然后在Profile里调用即可。
脚本内容如下:
 #!/usr/bin/expect -f
  set user <用户名>
  set host <ip地址>
  set password <密码>
  set timeout -1

  spawn ssh $user@$host
  expect "*assword:*"
  send "$password\r"
  interact
  expect eof
把这个脚本保存起来,放到一个目录下(这个可以根据自己的实际情况来定,没有特殊性)
接下来,就是如何调用这个脚本了.
接下来,
使用命令
expect <保存的脚本完整路径>
保存即可。
接下来就是如何使用了。使用方法也很简单,打开iTerm2后,选择菜单Profiles下自定的profiles即可
cd /usr/local/nginx/sbin/
./nginx
在 CentOS、Fedora 和 RHEL 操作系统中,你可以通过我们的 RPM 包仓库来安装 Yarn。
sudo wget https://dl.yarnpkg.com/rpm/yarn.repo -O /etc/yum.repos.d/yarn.repo
如果你尚未安装 Node.js,你应该同时配置 NodeSource 仓库:
curl --silent --location https://rpm.nodesource.com/setup_6.x | bash -
然后执行:
sudo yum install yarn
1. 安装git
yum install git -y
注:安装git是用来自动执行下载到本地的shell脚本,即下面要下载的nvm安装脚本。
2. 安装nvm服务,这个是用来管理node版本的工具,可以在服务器上切换不同的node环境
打开github找到nvm:
https://github.com/creationix/nvm
两种安装方式任选一种:
curl -o- https://raw.githubusercontent.com/creationix/nvm/v0.33.11/install.sh | bash
或:
wget -qO- https://raw.githubusercontent.com/creationix/nvm/v0.33.11/install.sh | bash
注:安装nvm后如果是使用xshell等工具连接服务器,则需要重新连接一次,不然会提示没有nvm
3. 使用nvm进行安装nodejs
nvm install v10.1.0
注:版本可以自己选择,我为了方便选择的是我本地的版本
4. 如果没有自动启用当前下载的版本,使用下面命令
nvm use v10.1.0
5. 当然如果要是没有自动配置成默认的node版本的话,执行下面命令
nvm alias default v8.2.1
6. 可选: 使用淘宝源安装最新的npm
npm --registry=https://registry.npm.taobao.org install -g npm
netstat -lnp|grep 8082
kill -9 10426
1、下载安装包
wget http://download.redis.io/releases/redis-4.0.10.tar.gz
2、解压并进入目录
tar xzf redis-4.0.10.tar.gz && cd redis-4.0.10
3、安装
make && make install
4、启动
redis-server
5、常用命令介绍
redis-server:顾名思义,redis服务

redis-cli:redis client,提供一个redis客户端,以供连接到redis服务,进行增删改查等操作

redis-sentinel:redis实例的监控管理、通知和实例失效备援服务

redis-benchmark:redis的性能测试工具

redis-check-aof:若以AOF方式的持久化,当意外发生时用来快速修复

redis-check-rdb:若以RDB方式的持久化,当意外发生时用来快速修复
6、启动redis-server,并运行redis-cli进行测试
redis-server
redis-cli
出现127.0.0.1:6379说明redis已经启动,如果redis服务未启动,则运行redis-cli时会报Could not connect to Redis at 127.0.0.1:6379: Connection refused的错误。
redis源代码目录的utils文件夹中有一个名为redis_init_script的初始化脚本文件。放在/etc/init.d下,redis会作为系统的daemon进程去运行,每次系统启动,redis进程一起启动。我们需要配置Redis的运行方式和持久化文件、日志文件的存储位置。步骤如下:
1、复制配置文件到init.d目录
cp redis-4.0.10/utils/redis_init_script /etc/init.d/redis_6379
2、打开配置文件redis_6379查看一下
cd /etc/init.d && vi redis_6379
看中文注释
#!/bin/sh
#
# Simple Redis init.d script conceived to work on Linux systems
# as it does use of the /proc filesystem.

# 根据需要修改端口号
REDISPORT=6379
 # 修改安装的redis目录
EXEC=/usr/local/bin/redis-server
CLIEXEC=/usr/local/bin/redis-cli

PIDFILE=/var/run/redis_${REDISPORT}.pid
# 可以修改配置文件目录,也可以安找这个目录在linux上创建
CONF="/etc/redis/${REDISPORT}.conf"

case "$1" in
    start)
        if [ -f $PIDFILE ]
        then
                echo "$PIDFILE exists, process is already running or crashed"
        else
                echo "Starting Redis server..."
                $EXEC $CONF
        fi
        ;;
    stop)
        if [ ! -f $PIDFILE ]
        then
                echo "$PIDFILE does not exist, process is not running"
        else
                PID=$(cat $PIDFILE)
                echo "Stopping ..."
                $CLIEXEC -p $REDISPORT shutdown
                while [ -x /proc/${PID} ]
                do
                    echo "Waiting for Redis to shutdown ..."
                    sleep 1
                done
                echo "Redis stopped"
        fi
        ;;
    *)
        echo "Please use start or stop as first argument"
        ;;
esac
2、建立以下需要的文件夹。
| 目录名 | Value |
|---|---|
| /etc/redis | 存放redis的配置文件 |
| /var/redis/ 6379 | 存放redis的持久化文件 |
cd /etc && mkdir redis
cd /var && mkdir redis && cd redis && mkdir 6379
3、将配置文件模板redis-4.0.10/redis.conf复制到/etc/redis 目录中,以端口号命名6379.conf
cp redis-4.0.10/redis.conf /etc/redis/6379.conf
对参数进行编辑
vi /etc/redis/6379.conf
| 参数 | 值 | 说明 |
|---|---|---|
| daemonize | yes | 使Redis以守护进程模式运行 |
| pidfile | /var/run/redis_6379.pid | 设置Redis的PID文件位置 |
| port | 6379 | 设置Redis监听的端口号 |
| dir | /var/redis/6379 | 设置持久化文件存放位置 |
4、启动redis
进入redis启动脚本的存放目录
cd /etc/init.d
启动redis
./redis_6379 start
关闭redis
./redis_6379 stop
启动关闭的等价命令
 service redisd start
 service redisd stop
验证redis是否启动成功
ps -ef | grep redis
5、设置为开机自启动
chkconfig redis_6379 on
若报错service redisd does not support chkconfig
参照 此篇文章 ,在启动脚本开头添加如下两行注释以修改其运行级别:
#!/bin/sh
# chkconfig:   2345 90 10
# description:  Redis is a persistent key-value database
#
A declarative, efficient, and flexible JavaScript library for building user interfaces.
🖖 Vue.js is a progressive, incrementally-adoptable JavaScript framework for building UI on the web.
TypeScript is a superset of JavaScript that compiles to clean JavaScript output.
An Open Source Machine Learning Framework for Everyone
The Web framework for perfectionists with deadlines.
A PHP framework for web artisans
Bring data to life with SVG, Canvas and HTML. 📊📈🎉
JavaScript (JS) is a lightweight interpreted programming language with first-class functions.
Some thing interesting about web. New door for the world.
A server is a program made to process requests and deliver data to clients.
Machine learning is a way of modeling and interpreting data that allows a piece of software to respond intelligently.
Some thing interesting about visualization, use data art
Some thing interesting about game, make everyone happy.
We are working to build community through open source technology. NB: members must have two-factor auth.
Open source projects and samples from Microsoft.
Google ❤️ Open Source for everyone.
Alibaba Open Source for everyone
Data-Driven Documents codes.
China tencent open source team.