React Native Course
React Native is a port of React to build native applications on iOS and Android. It differs from some other cross-platform frameworks in that it uses native views rather than a webview. JavaScript code is executed in a separate thread from the UI to ensure animations are smooth and the app stays responsive.
If you have experience in React, then React Native will seem intuitive. In fact, the same core JavaScript library is used. React Native just uses a different renderer than ReactDOM and instead renders to native iOS and Android components.
More details can be found at https://facebook.github.io/react-native/
Your mission...
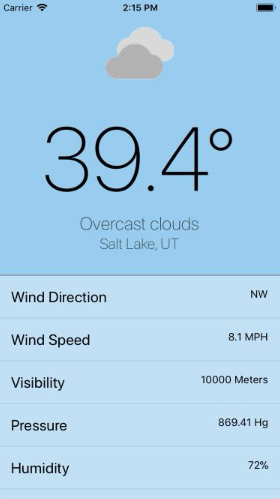
...should you choose to accept it, is building a location-aware weather app. Display the nearest city name, temperature, description of conditions, and an icon representing those conditions.
Setup
The API we'll be using to fetch weather information from is weatherbit.io. Accounts can take a few minutes to provision, so signing up now will ensure it's available when needed.
After signing up, you'll receive an API key in your email. Hang on to this.
Start with a Snack
Snack is an in-browser environment for prototyping React Native applications. Think of it as similar to JSFiddle, but specifically for React Native. We'll be using this to jump-start our learning experience.
When you arrive, you'll be prompted with a QR code and instructions to install the Expo app. You can skip this for now, as Snack also provides in-browser emulators for both iOS and Android.
To enable the in-browser emulator, toggle "Preview", and click "Tap to Play".
Now that your app is running, let's start coding.
You seem familiar
Right away, you'll notice that the example code looks like a normal React
component, a class extending React.Component. Something's different about the
JSX though. Where are the <div> tags?
Because we're not rendering to the browser, we use <View> tags that are an
abstraction over iOS's UIView, Android's android.view (and possibly even
<div>!). A View is just a container.
<Text> is a component to render text output. Unlike React for web, rendered
text must be placed within a <Text> component. It can be thought of as
similar to a <span>.
Update the content of the <Text> tag to "Hello!" and watch the app refresh to
reflect your change.
<View style={styles.container}>
  <Text style={styles.paragraph}>
    Hello there!
  </Text>
</View>
Now you're styling
React Native doesn't have css files, but instead has a feature called
StyleSheet. A
StyleSheet is an object that takes properties similar to css, but using
camelCase instead of dash-case. Styles are then assigned to components through
the style attribute. An example already exists within the project.
You can also use inline styles directly in the style attribute, but
Stylesheet offers a more performant and organized way of managing styles.
Multiple sets of styles can be applied by passing an array to style
(ex: style={[styles.title, styles.main, {fontSize: 20}]}).
Change the color and fontSize properties of the paragraph style and watch
the change be reflected in your emulator.
Fake it 'til you make it
Let's start building our weather app by creating a Display component. It will
show four pieces of information. Take them in as props.
temperaturedescriptioncitystate
Like any weather app, temperature should be large and prominent.
Within App, replace the example JSX with a Display component with hardcoded
data.
<View style={styles.container}>
  <Display
    temperature={85}
    description={'Hazy'}
    city={'Provo'}
    state={'UT'} />
</View>
Requesting backup
Still have your weatherbit.io key from earlier? Add it as a variable in the file.
const KEY = 'abc123';We'll start by using Weatherbit's postal API that will take a zip code and look up the current weather. React Native provides the standard fetch for making http requests.
Add a componentDidMount to App and hit the endpoint including your key.
console.log the response to take a look at what we're getting back.
componentDidMount() {
  fetch(`https://api.weatherbit.io/v1.0/current/postal?country=US&postal_code=84044&units=I&key=${KEY}`)
    .then(res => res.json())
    .then(json => console.log(json))
}
units=I returns imperial metrics instead of metric.
To prevent rate limiting: replace https://api.weatherbit.io with https://weatherbitproxy-hbpqeytmef.now.sh, a cached proxy of weatherbit's API.
Getting real
After knowing the shape of the response, it can be used to show real data in
the Display component.
The response has a data array with only one item in it. Wrap that and set it
to state.
.then(json => {
  this.setState({
    current: json.data[0]
  });
});
Now that actual weather data is in state, it can be used within the App
render method. Wire up the Display props.
<Display
  temperature={this.state.current.temp}
  ...
  />
Picture this
Weatherbit offers a set of icons to
represent the current conditions. Using the current.weather.icon field, we
can build a url for the corresponding icon.
https://www.weatherbit.io/static/img/icons/${code}.png
Add an Image component to the Display component. Make it 120x120.
<Image
  source={{uri: `ICON_URL_HERE`}}
  style={styles.icon} />
Getting local
Hardcoding a postal code works for testing the API, but we're on mobile devices with geolocation sensors. Let's use those to retrieve more accurate weather.
React Native includes a polyfill for the browser
navigator.geolocation
API. It abstracts over the iOS and Android specific calls. When using
geolocation, the user will be prompted for location access.
navigator.geolocation.getCurrentPosition(
  position => console.log(position),
  err => console.error(err),
  {timeout: 2000}
)
getCurrentPosition is asynchronous, and it takes 2 callbacks, one for a
success, and another for failure. On success, position.coords holds the
latitude and logitude of our current position.
Note: The timeout is necessary for the in-browser emulator. The emulated
device waits to resolve a position, causing neither success or failure
callbacks to get called. The timeout forces the error callback to get invoked
after 2 seconds. Shim it by returning an default position of American Fork:
{coords: { latitude: 40.4, longitude: -111.8 }};Weatherbit has a
/current
endpoint that supports lat and lon.
Change your fetch call to use it instead of postal code.
https://api.weatherbit.io/v1.0/current?key=${key}&units=I&lat=${position.coords.latitude}&lon=${position.coords.longitude}
Stats for nerds
The weather API returns various other stats that our app can list below the
title. Create a Stat component to show a stat like Wind Direction on the
left and SW on the right. flexDirection: row and flex: 1 will help with
this.
const Stat = ({ title, value }) => (
  <View style={styles.stat}>
    <Text style={styles.statTitle}>{title}</Text>
    <Text>{value}</Text>
  </View>
);
Add a few stats to a <View> styled with flex: 1 in the App component
<View style={styles.stats}>
  <Stat title="Wind Direction" value={current.wind_cdir} />
  <Stat title="Wind Speed" value={`${current.wind_spd} MPH`} />
  <Stat title="Visibility" value={current.visibility} />
  <Stat title="Pressure" value={`${current.pres} Hg`} />
  <Stat title="Humidity" value={`${current.rh}%`} />
  <Stat title="Timezone" value={current.timezone} />
</View>
Scroll
Did you notice that the stats list isn't scrollable? When in React Native, you
explicitly choose when something should scroll by using the ScrollView
component.
Import it and replace the <View> from the last step with <ScrollView>.
Congrats! you've built a basic cross-platform, location-aware, realtime weather app.
Extras
Making promises
navigator.geolocation.getCurrentPosition is awkward because it is callback
based. We can wrap it with a Promise to take advantage of Promise chaining.
const getPosition = options => new Promise((resolve, reject) => {
  navigator.geolocation.getCurrentPosition(resolve, reject, options);
});
This promise will resolve when a position is successfully found and reject when an error occurs.
It now allows us to write readable async code as follows:
getPosition({timeout: 2000})
  .catch(() => ({coords: { latitude: 40.4, longitude: -111.8 }}))
  .then(position => fetch(...))
  .then(res => res.json())
  .then(json => {
    this.setState({current: json.data[0]});
  });
They don't stop
While looking up location and making a request, a loading spinner can improve the user experience over a blank screen.
React Native includes a built-in ActivityIndicator component. Import it, and
render it while state.current is null.
if (!state.current) {
  return <ActivityIndicator size="large" style={{flex: 1}} />
}


