Netty 4.x tutorials.
The minimum requirements to run the quick start are:
- JDK 1.8 or above
- A java-based project management software like Maven or Gradle
Netty 4.x tutorials.
Home Page: http://netty.io/
License: Apache License 2.0
Netty 4.x tutorials.
The minimum requirements to run the quick start are:


在上一篇文章 【Netty4.x教程】Reactor 模式 我们对Reactor模式有了一定对了解,接下来我们看一下Netty是如何支持Reactor模式的。
前面几节分别讲解了 Reactor 的三种线程模型,都知道主从 Reactor 多线程模型的性能非常的好,那么 Netty 是否就是使用主从 Reactor 多线程模型呢?其实 Netty 线程模型是基于主从 Reactor 多线程模型做了一定的改造,Netty 的线程模型要比 Reactor 主从多线程模型还要复杂。本节主要是通过图解的方式逐步分析 Netty 线程模型的原理。

Netty 模型架构说明:
每个 BossGroup 的 NioEventLoop 分别循环执行三个步骤:
每个 WorkerGroup 的 NioEventLoop 分别循环执行三个步骤:
Netty 内部逻辑的流转:

以上便是 Netty 各个组件的整体交互流程,你只需要对每个组件的工作职责有所了解,心中可以串成一条流水线即可,具体每个组件的实现原理后续课程我们会深入介绍。
Channel 的字面意思是“通道”,它是网络通信的载体。Channel提供了基本的 API 用于网络 I/O 操作,如 register、bind、connect、read、write、flush 等。Netty 自己实现的 Channel 是以 JDK NIO Channel 为基础的,相比较于 JDK NIO,Netty 的 Channel 提供了更高层次的抽象,同时屏蔽了底层 Socket 的复杂性,赋予了 Channel 更加强大的功能,你在使用 Netty 时基本不需要再与 Java Socket 类直接打交道。
小结:
EventLoopGroup eventGroup = new NioEventLoopGroup(1);

ServerBootstrap b = new ServerBootstrap();
b.group(eventGroup)
EventLoopGroup eventGroup = new NioEventLoopGroup();

ServerBootstrap b = new ServerBootstrap();
b.group(eventGroup)
EventLoopGroup bossGroup = new NioEventLoopGroup();
EventLoopGroup workerGroup = new NioEventLoopGroup();
ServerBootstrap b = new ServerBootstrap();
b.group(bossGroup, workerGroup)
由于netty动辄管理100w+的连接,每一个连接都会有很多超时任务。比如发送超时、心跳检测间隔等,如果每一个定时任务都启动一个Timer,不仅低效,而且会消耗大量的资源。
根据George Varghese 和 Tony Lauck 1996 年的论文:Hashed and Hierarchical Timing Wheels: data structures to efficiently implement a timer facility。提出了一种定时轮的方式来管理和维护大量的Timer调度。
时间轮底层数据结构 是 环形队列,它能够让需要处理的数据(任务的抽象)集中,在 Netty 中存在大量的延迟操作,比如发送超时、心跳检测等。Netty 并没有使用 JDK 自带的 Timer 或者 DelayQueue 来实现延迟的功能,而是基于时间轮自定义了一个用于实现延迟功能的定时器(HashedWheelTimer)。JDK 的 Timer 和 DelayQueue 插入和删除操作的平均时间复杂度为 O(nlog(n)),并不能满足 Kafka 的高性能要求,而基于时间轮可以将插入和删除操作的时间复杂度都降为 O(1)。
时间轮其实就是一种环形的数据结构,可以想象成时钟,分成很多格子,一个格子代码一段时间(这个时间越短,Timer的精度越高)。并用一个链表报错在该格子上的到期任务,同时一个指针随着时间一格一格转动,并执行相应格子中的到期任务。任务通过取模决定放入那个格子。如下图所示:

针对上图的几个名词简单解释下:
netty中的HashedWheelTimer提供的是一个定时任务的一个优化实现方案,在netty中主要用于异步IO的定时规划触发(A timer optimized for approximated I/O timeout scheduling)。数据结构如下:

这个图基本上就涵盖了HashedWheelTimer的所有的概念要素:
除此之外,netty的HashedWheelTimer实现还有两个东西值得关注,分别是pending-timeouts队列和cancelled-timeouts队列。这两个队列分别记录新添加的定时任务和要取消的定时任务,当workerThread每次循环运行时,它会先将取消掉cancelled-timeouts中所有的任务,然后将pending-timeouts队列中一定数量的任务移动到它们对应的bucket。由于添加和取消任务可以由任意线程发起,而相应的处理只会在workerThread里,所以为了进一步提高性能,这两个队列都是用了JCTools里面的MPSC(multiple-producer-single-consumer)队列。
而 延迟操作,通常可以采用两个方案:
时间轮(timingWheel ) 把维护 task 从 优先队列 O(nlog(n)) 降到 双向链表 O(1),而执行 task 也只要轮询一个时间点的 tasks O(N),不需要像优先队列,放入和删除元素 O(nlog(n))。
下面我们就来分析时间轮涉及的核心接口和实现。
在 Netty 中,所有延时任务都要实现 TimerTask 接口。TimerTask 只定义了一个 run() 方法,入参是一个 Timeout 接口对象,如下:
public interface TimerTask {

    void run(Timeout timeout) throws Exception;
}
Timeout 对象与 TimerTask 对象一一对应,类似线程池返回的 Future 对象与提交到线程池中的任务对象之间的关系。
通过 Timeout 对象,不仅可以查看定时任务的状态,还可以操作定时任务(例如取消关联的定时任务),如下:
public interface Timeout {

    Timer timer();

    TimerTask task();

    boolean isExpired();

    boolean isCancelled();

    boolean cancel();
}
Timer 接口定义了定时器的基本行为,核心是 newTimeout() :提交一个定时任务(TimerTask)并返回关联的 Timeout 对象,类似于向线程池提交任务。如下:
public interface Timer {

    Timeout newTimeout(TimerTask task, long delay, TimeUnit unit);

    Set<Timeout> stop();
}
HashedWheelTimeout 是 Timeout 接口的唯一实现,是 HashedWheelTimer 的内部类。HashedWheelTimeout 扮演了两个角色:
    private static final class HashedWheelTimeout implements Timeout {

        private static final int ST_INIT = 0;
        private static final int ST_CANCELLED = 1;
        private static final int ST_EXPIRED = 2;
        private static final AtomicIntegerFieldUpdater<HashedWheelTimeout> STATE_UPDATER =
                AtomicIntegerFieldUpdater.newUpdater(HashedWheelTimeout.class, "state");

        private final HashedWheelTimer timer;
        private final TimerTask task;
        private final long deadline;

        @SuppressWarnings({"unused", "FieldMayBeFinal", "RedundantFieldInitialization" })
        private volatile int state = ST_INIT;

        // remainingRounds will be calculated and set by Worker.transferTimeoutsToBuckets() before the
        // HashedWheelTimeout will be added to the correct HashedWheelBucket.
        long remainingRounds;

        // This will be used to chain timeouts in HashedWheelTimerBucket via a double-linked-list.
        // As only the workerThread will act on it there is no need for synchronization / volatile.
        HashedWheelTimeout next;
        HashedWheelTimeout prev;

        // The bucket to which the timeout was added
        HashedWheelBucket bucket;

        HashedWheelTimeout(HashedWheelTimer timer, TimerTask task, long deadline) {
            this.timer = timer;
            this.task = task;
            this.deadline = deadline;
        }
其中,deadline 是 定时任务执行的时间,是在创建 HashedWheelTimeout 时指定
计算公式:currentTime(创建 HashedWheelTimeout 的时间) + delay(任务延迟时间) - startTime(HashedWheelTimer 的启动时间),逻辑在 HashedWheelTimer#newTimeout方法中,如下:
        // Add the timeout to the timeout queue which will be processed on the next tick.
        // During processing all the queued HashedWheelTimeouts will be added to the correct HashedWheelBucket.
        long deadline = System.nanoTime() + unit.toNanos(delay) - startTime;

        // Guard against overflow.
        if (delay > 0 && deadline < 0) {
            deadline = Long.MAX_VALUE;
        }
        HashedWheelTimeout timeout = new HashedWheelTimeout(this, task, deadline);
        timeouts.add(timeout);
        return timeout;
state,定时任务当前所处状态,取值如下:
STATE_UPDATER 用于实现 state 状态变更的原子性。
remainingRounds 当前任务剩余的时钟周期数。时间轮所能表示的时间长度有限,在任务到期时间与当前时刻的时间差,超过时间轮单圈能表示时长,就出现套圈,需要该字段值表示剩余的时钟周期。
HashedWheelTimeout 的方法如下:
        public boolean compareAndSetState(int expected, int state) {
            return STATE_UPDATER.compareAndSet(this, expected, state);
        }

        public int state() {
            return state;
        }

        @Override
        public boolean isCancelled() {
            return state() == ST_CANCELLED;
        }

        @Override
        public boolean isExpired() {
            return state() == ST_EXPIRED;
        }
cancel方法:
        @Override
        public boolean cancel() {
            // only update the state it will be removed from HashedWheelBucket on next tick.
            if (!compareAndSetState(ST_INIT, ST_CANCELLED)) {
                return false;
            }
            // If a task should be canceled we put this to another queue which will be processed on each tick.
            // So this means that we will have a GC latency of max. 1 tick duration which is good enough. This way
            // we can make again use of our MpscLinkedQueue and so minimize the locking / overhead as much as possible.
            timer.cancelledTimeouts.add(this);
            return true;
        }
expire方法:
        public void expire() {
            if (!compareAndSetState(ST_INIT, ST_EXPIRED)) {
                return;
            }

            try {
                task.run(this);
            } catch (Throwable t) {
                if (logger.isWarnEnabled()) {
                    logger.warn("An exception was thrown by " + TimerTask.class.getSimpleName() + '.', t);
                }
            }
        }
remove方法:
        void remove() {
            HashedWheelBucket bucket = this.bucket;
            if (bucket != null) {
                bucket.remove(this);
            } else {
                timer.pendingTimeouts.decrementAndGet();
            }
        }
HashedWheelBucket 是 时间轮中的一个槽。
时间轮中的槽实际上就是一个用于缓存和管理双向链表的容器,双向链表中的每一个节点就是一个 HashedWheelTimeout 对象,也就关联了一个 TimerTask 定时任务。
HashedWheelBucket 持有双向链表的首尾两个节点 - head 和 tail,再加上每个 HashedWheelTimeout 节点均持有前驱和后继引用,即可正、逆向遍历整个链表。
将HTTP协议的主要弊端总结如下:
现在很多网站的消息推送都是使用轮询,即客户端每隔1S或者其他时间给服务器发送请求,然后服务器返回最新的数据给客户端。HTTP协议中的Header非常冗长,因此会占用很多的带宽和服务器资源。
比较新的技术是Comet,使用了AJAX。虽然可以双向通信,但是依然需要发送请求,而且在Comet中,普遍采用了长连接,也会大量消耗服务器的带宽和资源。
为了解决这个问题,HTML5定义的WebSocket协议。
在WebSocket API中,浏览器和服务器只需要一个握手的动作,然后,浏览器和服务器之间就形成了一条快速通道,两者就可以直接互相传送数据了。
WebSocket基于TCP双向全双工协议,即在同一时刻,即可以发送消息,也可以接收消息,相比于HTTP协议,是一个性能上的提升。
特点:
拥有以上特点的WebSocket就是为了取代轮询和Comet技术,使得客户端浏览器具备像C/S架构下桌面系统一样的实时能力。
浏览器通过js建立一个WebSocket的请求,连接建立后,客户端和服务器端可以通过TCP直接交换数据。
本示例源码已上传至Github 传送门
pom.xml
    <properties>
        <netty.version>4.1.56.Final</netty.version>
    </properties>

        <dependency>
            <groupId>io.netty</groupId>
            <artifactId>netty-all</artifactId>
            <version>${netty.version}</version>
        </dependency>
Server端 业务处理Handler如下:
import com.mindflow.netty4.common.util.NettyUtils;
import com.mindflow.netty4.websocket.entity.UserInfo;
import com.mindflow.netty4.websocket.manager.UserChannelManager;
import io.netty.channel.ChannelHandlerContext;
import io.netty.channel.SimpleChannelInboundHandler;
import io.netty.handler.codec.http.websocketx.TextWebSocketFrame;
import io.netty.handler.codec.http.websocketx.WebSocketServerProtocolHandler;
import org.slf4j.Logger;
import org.slf4j.LoggerFactory;

import java.time.LocalDateTime;

/**
 * @author Ricky Fung
 */
public class TextWebSocketHandler extends SimpleChannelInboundHandler<TextWebSocketFrame> {
    private final Logger LOG = LoggerFactory.getLogger(this.getClass());

    @Override
    protected void channelRead0(ChannelHandlerContext ctx, TextWebSocketFrame textWebSocketFrame) throws Exception {
        // 打印接收到的消息
        String body = textWebSocketFrame.text();
        UserInfo userInfo = UserChannelManager.getInstance().getUser(ctx.channel());

        LOG.info("服务端接收消息开始, channelId={}, 用户={}, 内容={}", NettyUtils.getChannelId(ctx), userInfo.getNickname(), body);

        // 返回消息给客户端
        ctx.writeAndFlush(new TextWebSocketFrame("服务器时间: " + LocalDateTime.now() + " : " + body));
    }

    @Override
    public void userEventTriggered(ChannelHandlerContext ctx, Object evt) throws Exception {
        if (evt instanceof WebSocketServerProtocolHandler.HandshakeComplete) {
            LOG.info("客户端握手完成, channelId={}", NettyUtils.getChannelId(ctx));
        }
        super.userEventTriggered(ctx, evt);
    }

    @Override
    public void channelActive(ChannelHandlerContext ctx) throws Exception {
        super.channelActive(ctx);
        LOG.info("客户端建立连接, channelId={}", NettyUtils.getChannelId(ctx));
        //ChannelsManager.getInstance().put(ctx.channel());
    }

    @Override
    public void channelInactive(ChannelHandlerContext ctx) throws Exception {
        super.channelInactive(ctx);
        LOG.info("客户端断开连接, channelId={}", NettyUtils.getChannelId(ctx));
        UserChannelManager.getInstance().remove(ctx.channel());
    }

    @Override
    public void exceptionCaught(ChannelHandlerContext ctx, Throwable cause) throws Exception {
        LOG.error("客户端连接异常, channelId={}", NettyUtils.getChannelId(ctx), cause);
        UserChannelManager.getInstance().remove(ctx.channel());
        ctx.close();
    }

}
Server端代码:
import io.netty.bootstrap.ServerBootstrap;
import io.netty.channel.ChannelFuture;
import io.netty.channel.ChannelInitializer;
import io.netty.channel.ChannelPipeline;
import io.netty.channel.EventLoopGroup;
import io.netty.channel.nio.NioEventLoopGroup;
import io.netty.channel.socket.SocketChannel;
import io.netty.channel.socket.nio.NioServerSocketChannel;
import io.netty.handler.codec.http.HttpObjectAggregator;
import io.netty.handler.codec.http.HttpServerCodec;
import io.netty.handler.codec.http.websocketx.WebSocketServerProtocolHandler;
import io.netty.handler.logging.LogLevel;
import io.netty.handler.logging.LoggingHandler;
import io.netty.handler.stream.ChunkedWriteHandler;
import org.slf4j.Logger;
import org.slf4j.LoggerFactory;

/**
 * @author Ricky Fung
 */
public class NettyWsServer {
    private final Logger LOG = LoggerFactory.getLogger(this.getClass());

    public static void main(String[] args) throws Exception {
        new NettyWsServer().start(8088);
    }

    public void start(int port) throws InterruptedException {
        // 1.创建对应的EventLoopGroup对象
        EventLoopGroup bossGroup = new NioEventLoopGroup(1);
        EventLoopGroup workGroup = new NioEventLoopGroup();
        ServerBootstrap bootstrap = new ServerBootstrap();
        try{
            bootstrap.group(bossGroup, workGroup)
                    .channel(NioServerSocketChannel.class)
                    .handler(new LoggingHandler(LogLevel.INFO))
                    .childHandler(new ChannelInitializer<SocketChannel>() {
                        @Override
                        protected void initChannel(SocketChannel socketChannel) throws Exception {
                            // websocket 相关的配置
                            ChannelPipeline pipeline = socketChannel.pipeline();
                            //因为基于http协议,使用http的编码和解码器
                            pipeline.addLast(new HttpServerCodec());
                            //是以块方式写,添加ChunkedWriteHandler处理器
                            pipeline.addLast(new ChunkedWriteHandler());
                            // http在传输过程中是分段的,这就是为什么当浏览器发送大量数据的时候,会发出多次http请求
                            pipeline.addLast(new HttpObjectAggregator(1024 * 64));

                            //根据websocket规范,处理升级握手以及各种websocket数据帧
                            pipeline.addLast(new WebSocketServerProtocolHandler("/hello", true, 10000));

                            // 自定义handler,处理业务逻辑
                            pipeline.addLast(new TextWebSocketHandler());

                        }
                    });

            ChannelFuture future = bootstrap.bind(port).sync();
            LOG.info("服务启动了, port={}", port);
            future.channel().closeFuture().sync();
        } finally {
            bossGroup.shutdownGracefully();
            workGroup.shutdownGracefully();
        }
    }
WebSocketServerProtocolHandler处理所有规定的WebSocket 帧类型和升级握手本身。
注:因为本示例中需要从uri中获取token信息,所以 使用的 new WebSocketServerProtocolHandler("/hello", true,10000),第二个参数checkStartsWith必须指定为true(默认值为false),不然不会走升级握手。
原因可以查看 WebSocketServerProtocolHandler#handlerAdded,如下:
    @Override
    public void handlerAdded(ChannelHandlerContext ctx) {
        ChannelPipeline cp = ctx.pipeline();
        if (cp.get(WebSocketServerProtocolHandshakeHandler.class) == null) {
            // Add the WebSocketHandshakeHandler before this one.
            cp.addBefore(ctx.name(), WebSocketServerProtocolHandshakeHandler.class.getName(),
                    new WebSocketServerProtocolHandshakeHandler(serverConfig));
        }
        if (serverConfig.decoderConfig().withUTF8Validator() && cp.get(Utf8FrameValidator.class) == null) {
            // Add the UFT8 checking before this one.
            cp.addBefore(ctx.name(), Utf8FrameValidator.class.getName(),
                    new Utf8FrameValidator());
        }
    }
WebSocketServerProtocolHandler会自动往ChannelPipeline插入WebSocketServerProtocolHandshakeHandler 来处理升级握手。
如下:
package io.netty.handler.codec.http.websocketx;

class WebSocketServerProtocolHandshakeHandler extends ChannelInboundHandlerAdapter {

    private final WebSocketServerProtocolConfig serverConfig;
    private ChannelHandlerContext ctx;
    private ChannelPromise handshakePromise;

    WebSocketServerProtocolHandshakeHandler(WebSocketServerProtocolConfig serverConfig) {
        this.serverConfig = checkNotNull(serverConfig, "serverConfig");
    }

    @Override
    public void channelRead(final ChannelHandlerContext ctx, Object msg) throws Exception {
        final FullHttpRequest req = (FullHttpRequest) msg;
        if (!isWebSocketPath(req)) {
            ctx.fireChannelRead(msg);
            return;
        }
        //省略其他代码。。。
    }
}
重点关注一下 isWebSocketPath逻辑:
    private boolean isWebSocketPath(FullHttpRequest req) {
        String websocketPath = serverConfig.websocketPath();
        String uri = req.uri();
        boolean checkStartUri = uri.startsWith(websocketPath);
        boolean checkNextUri = checkNextUri(uri, websocketPath);
        return serverConfig.checkStartsWith() ? (checkStartUri && checkNextUri) : uri.equals(websocketPath);
    }
这里 serverConfig.checkStartsWith() 返回的就是 我们传入的 checkStartsWith。
chat.html 如下:
<!DOCTYPE html>
<html lang="en">
<head>
    <meta charset="UTF-8">
    <title>websocket案例测试</title>
</head>
<body>
<script>

    const getParameterByName = (name, url = window.location.search) => {
        let match = RegExp('[?&]' + name + '=([^&]*)').exec(url);
        return match && decodeURIComponent(match[1].replace(/\+/g, ' '));
    }
    var socket;
    //判断当前浏览器是否支持websocket
    if(window.WebSocket) {
        //go on
        let token = getParameterByName("token");
        socket = new WebSocket("ws://localhost:8080/hello?token="+token);
        //相当于channelReado, ev 收到服务器端回送的消息
        socket.onmessage = function (ev) {
            var rt = document.getElementById("responseText");
            rt.value = rt.value + "\n" + ev.data;
        }

        //相当于连接开启(感知到连接开启)
        socket.onopen = function (ev) {
            var rt = document.getElementById("responseText");
            rt.value = "连接开启了.."
        }

        //相当于连接关闭(感知到连接关闭)
        socket.onclose = function (ev) {

            var rt = document.getElementById("responseText");
            rt.value = rt.value + "\n" + "连接关闭了.."
        }
    } else {
        alert("当前浏览器不支持websocket")
    }

    //发送消息到服务器
    function send(message) {
        if(!window.socket) { //先判断socket是否创建好
            return;
        }
        if(socket.readyState == WebSocket.OPEN) {
            //通过socket 发送消息
            socket.send(message)
        } else {
            alert("连接没有开启");
        }
    }

</script>
<form onsubmit="return false">
    <textarea name="message" style="height: 300px; width: 300px"></textarea>
    <input type="button" value="发生消息" onclick="send(this.form.message.value)">
    <textarea id="responseText" style="height: 300px; width: 300px"></textarea>
    <input type="button" value="清空内容" onclick="document.getElementById('responseText').value=''">
</form>
</body>
</html>
UserChannelManager.java
import com.mindflow.netty4.websocket.entity.UserInfo;
import io.netty.channel.Channel;
import io.netty.util.AttributeKey;

import java.util.concurrent.ConcurrentHashMap;

/**
 * @author Ricky Fung
 */
public class UserChannelManager {
    private static final AttributeKey<UserInfo> USER_KEY = AttributeKey.valueOf("_uid");

    private final ConcurrentHashMap<String, Channel> channelMap = new ConcurrentHashMap<>();

    public static UserChannelManager getInstance() {
        return SingletonHolder.INSTANCE;
    }

    public Channel put(Channel channel) {
        UserInfo userInfo = getUser(channel);
        if (userInfo == null) {
            return null;
        }
        return channelMap.put(userInfo.getNickname(), channel);
    }

    public Channel put(String key, Channel channel) {
        return channelMap.put(key, channel);
    }

    public Channel remove(String id) {
        return channelMap.remove(id);
    }

    public Channel remove(Channel channel) {
        UserInfo userInfo = getUser(channel);
        if (userInfo == null) {
            return null;
        }
        return channelMap.remove(userInfo.getNickname());
    }

    //=========
    public void setUser(Channel channel, UserInfo userInfo) {
        channel.attr(USER_KEY).set(userInfo);
    }

    public UserInfo getUser(Channel channel) {
        return channel.attr(USER_KEY).get();
    }

    //=========
    private static class SingletonHolder {
        private static final UserChannelManager INSTANCE = new UserChannelManager();

    }
}
UserAuthManager.java
import com.mindflow.netty4.common.util.Base64Codec;
import com.mindflow.netty4.common.util.JsonUtils;
import com.mindflow.netty4.websocket.entity.UserInfo;

/**
 * @author Ricky Fung
 */
public class UserAuthManager {

    public static UserAuthManager getInstance() {
        return UserAuthManager.SingletonHolder.INSTANCE;
    }

    public UserInfo validateToken(String token) {
        String json = Base64Codec.decode(token);
        return JsonUtils.parseObject(json, UserInfo.class);
    }

    public String genToken(Long id, String nickname) {
        UserInfo userInfo = new UserInfo();
        userInfo.setId(id);
        userInfo.setNickname(nickname);
        return Base64Codec.encode(JsonUtils.toJson(userInfo));
    }

    private static class SingletonHolder {
        private static final UserAuthManager INSTANCE = new UserAuthManager();

    }
}
NettyUtils.java
import io.netty.channel.Channel;
import io.netty.channel.ChannelHandlerContext;

import java.net.InetSocketAddress;
import java.util.HashMap;
import java.util.Map;

/**
 * @author Ricky Fung
 */
public abstract class NettyUtils {

    public static String getClientIp(ChannelHandlerContext ctx) {
        return getClientIp(ctx.channel());
    }

    public static String getClientIp(Channel channel) {
        InetSocketAddress ipSocket = (InetSocketAddress) channel.remoteAddress();
        String clientIp = ipSocket.getAddress().getHostAddress();
        return clientIp;
    }

    public static String getChannelId(ChannelHandlerContext ctx) {
        return ctx.channel().id().asShortText();
    }

    public static String getChannelId(Channel channel) {
        return channel.id().asShortText();
    }

    //==========
    public static String getUriParam(String requestUri, String paramName) {
        Map<String, String> map = parseUriParams(requestUri);
        return map != null ? map.get(paramName) : null;
    }

    /**
     * 解析uri上的请求参数
     * @param requestUri
     * @return
     */
    public static Map<String, String> parseUriParams(String requestUri) {
        if (StringUtils.isEmpty(requestUri)) {
            return null;
        }
        int idx = requestUri.indexOf("?");
        if (idx < 0) {
            return null;
        }
        String queryString = requestUri.substring(idx+1);
        if(StringUtils.isNotEmpty(queryString)) {
            String[] paramsArr = queryString.split("&");
            HashMap<String, String> params = new HashMap<>();
            for(String param : paramsArr) {
                String [] keyValue = param.split("=");
                if(keyValue != null && keyValue.length >= 2) {
                    params.put(keyValue[0], keyValue[1]);
                }
            }
            return params;
        }
        return null;
    }
}
阻塞,非阻塞:进程/线程要访问的数据是否就绪,进程/线程是否需要等待;
同步,异步:访问数据的方式,同步需要主动读写数据,在读写数据的过程中还是会阻塞;异步只需要I/O操作完成的通知,并不主动读写数据,由操作系统内核完成数据的读写。
通过前面的学习,我们已经知道 Netty 高性能的奥秘在于其 Reactor 线程模型。 EventLoop 是 Netty Reactor 线程模型的核心处理引擎,那么它是如何高效地实现事件循环和任务处理机制的呢?本节课我们就一起学习 EventLoop 的实现原理和最佳实践。
网络框架的设计离不开 I/O 线程模型,线程模型的优劣直接决定了系统的吞吐量、可扩展性、安全性等。目前主流的网络框架几乎都采用了 I/O 多路复用的方案。Reactor 模式作为其中的事件分发器,负责将读写事件分发给对应的读写事件处理者。大名鼎鼎的 Java 并发包作者 Doug Lea,在 Scalable I/O in Java 一文中阐述了服务端开发中 I/O 模型的演进过程。Netty 中三种 Reactor 线程模型也来源于这篇经典文章。下面我们对这三种 Reactor 线程模型做一个详细的分析。
Netty 推荐使用主从多线程模型,这样就可以轻松达到成千上万规模的客户端连接。在海量客户端并发请求的场景下,主从多线程模式甚至可以适当增加 SubReactor 线程的数量,从而利用多核能力提升系统的吞吐量。
介绍了上述三种 Reactor 线程模型,再结合它们各自的架构图,我们能大致总结出 Reactor 线程模型运行机制的四个步骤,分别为连接注册、事件轮询、事件分发、任务处理,如下图所示。

以上介绍了 Reactor 线程模型的演进过程和基本原理,Netty 也同样遵循 Reactor 线程模型的运行机制,下面我们来了解一下 Netty 是如何实现 Reactor 线程模型的。
EventLoop 这个概念其实并不是 Netty 独有的,它是一种事件等待和处理的程序模型,可以解决多线程资源消耗高的问题。例如 Node.js 就采用了 EventLoop 的运行机制,不仅占用资源低,而且能够支撑了大规模的流量访问。
下图展示了 EventLoop 通用的运行模式。每当事件发生时,应用程序都会将产生的事件放入事件队列当中,然后 EventLoop 会轮询从队列中取出事件执行或者将事件分发给相应的事件监听者执行。事件执行的方式通常分为立即执行、延后执行、定期执行几种。

在 Netty 中 EventLoop 可以理解为 Reactor 线程模型的事件处理引擎,每个 EventLoop 线程都维护一个 Selector 选择器和任务队列 taskQueue。它主要负责处理 I/O 事件、普通任务和定时任务。
Netty 中推荐使用 NioEventLoop 作为实现类,那么 Netty 是如何实现 NioEventLoop 的呢?首先我们来看 NioEventLoop 最核心的 run() 方法源码,本节课我们不会对源码做深入的分析,只是先了解 NioEventLoop 的实现结构。
protected void run() {

    for (;;) {

        try {

            try {

                switch (selectStrategy.calculateStrategy(selectNowSupplier, hasTasks())) {

                case SelectStrategy.CONTINUE:

                    continue;

                case SelectStrategy.BUSY_WAIT:

                case SelectStrategy.SELECT:

                    select(wakenUp.getAndSet(false)); // 轮询 I/O 事件

                    if (wakenUp.get()) {

                        selector.wakeup();

                    }

                default:

                }

            } catch (IOException e) {

                rebuildSelector0();

                handleLoopException(e);

                continue;

            }


            cancelledKeys = 0;

            needsToSelectAgain = false;

            final int ioRatio = this.ioRatio;

            if (ioRatio == 100) {

                try {

                    processSelectedKeys(); // 处理 I/O 事件

                } finally {

                    runAllTasks(); // 处理所有任务

                }

            } else {

                final long ioStartTime = System.nanoTime();

                try {

                    processSelectedKeys(); // 处理 I/O 事件

                } finally {

                    final long ioTime = System.nanoTime() - ioStartTime;

                    runAllTasks(ioTime * (100 - ioRatio) / ioRatio); // 处理完 I/O 事件,再处理异步任务队列

                }

            }

        } catch (Throwable t) {

            handleLoopException(t);

        }

        try {

            if (isShuttingDown()) {

                closeAll();

                if (confirmShutdown()) {

                    return;

                }

            }

        } catch (Throwable t) {

            handleLoopException(t);

        }

    }

}
上述源码的结构比较清晰,NioEventLoop 每次循环的处理流程都包含事件轮询 select、事件处理 processSelectedKeys、任务处理 runAllTasks 几个步骤,是典型的 Reactor 线程模型的运行机制。而且 Netty 提供了一个参数 ioRatio,可以调整 I/O 事件处理和任务处理的时间比例。下面我们将着重从事件处理和任务处理两个核心部分出发,详细介绍 Netty EventLoop 的实现原理。

结合 Netty 的整体架构,我们一起看下 EventLoop 的事件流转图,以便更好地理解 Netty EventLoop 的设计原理。NioEventLoop 的事件处理机制采用的是无锁串行化的设计思路。
NioEventLoop 无锁串行化的设计不仅使系统吞吐量达到最大化,而且降低了用户开发业务逻辑的难度,不需要花太多精力关心线程安全问题。虽然单线程执行避免了线程切换,但是它的缺陷就是不能执行时间过长的 I/O 操作,一旦某个 I/O 事件发生阻塞,那么后续的所有 I/O 事件都无法执行,甚至造成事件积压。在使用 Netty 进行程序开发时,我们一定要对 ChannelHandler 的实现逻辑有充分的风险意识。
NioEventLoop 线程的可靠性至关重要,一旦 NioEventLoop 发生阻塞或者陷入空轮询,就会导致整个系统不可用。在 JDK 中, Epoll 的实现是存在漏洞的,即使 Selector 轮询的事件列表为空,NIO 线程一样可以被唤醒,导致 CPU 100% 占用。这就是臭名昭著的 JDK epoll 空轮询的 Bug。Netty 作为一个高性能、高可靠的网络框架,需要保证 I/O 线程的安全性。那么它是如何解决 JDK epoll 空轮询的 Bug 呢?实际上 Netty 并没有从根源上解决该问题,而是巧妙地规避了这个问题。
NioEventLoop 不仅负责处理 I/O 事件,还要兼顾执行任务队列中的任务。任务队列遵循 FIFO 规则,可以保证任务执行的公平性。NioEventLoop 处理的任务类型基本可以分为三类。
普通任务:通过 NioEventLoop 的 execute() 方法向任务队列 taskQueue 中添加任务。例如 Netty 在写数据时会封装 WriteAndFlushTask 提交给 taskQueue。taskQueue 的实现类是多生产者单消费者队列 MpscChunkedArrayQueue,在多线程并发添加任务时,可以保证线程安全。
定时任务:通过调用 NioEventLoop 的 schedule() 方法向定时任务队列 scheduledTaskQueue 添加一个定时任务,用于周期性执行该任务。例如,心跳消息发送等。定时任务队列 scheduledTaskQueue 采用优先队列 PriorityQueue 实现。
尾部队列:tailTasks 相比于普通任务队列优先级较低,在每次执行完 taskQueue 中任务后会去获取尾部队列中任务执行。尾部任务并不常用,主要用于做一些收尾工作,例如统计事件循环的执行时间、监控信息上报等。
下面结合任务处理 runAllTasks 的源码结构,分析下 NioEventLoop 处理任务的逻辑,源码实现如下:
protected boolean runAllTasks(long timeoutNanos) {

    // 1. 合并定时任务到普通任务队列

    fetchFromScheduledTaskQueue();

    // 2. 从普通任务队列中取出任务

    Runnable task = pollTask();

    if (task == null) {

        afterRunningAllTasks();

        return false;

    }

    // 3. 计算任务处理的超时时间

    final long deadline = ScheduledFutureTask.nanoTime() + timeoutNanos;

    long runTasks = 0;

    long lastExecutionTime;

    for (;;) {

        // 4. 安全执行任务

        safeExecute(task);

        runTasks ++;

        // 5. 每执行 64 个任务检查一下是否超时

        if ((runTasks & 0x3F) == 0) {

            lastExecutionTime = ScheduledFutureTask.nanoTime();

            if (lastExecutionTime >= deadline) {

                break;

            }

        }

        task = pollTask();

        if (task == null) {

            lastExecutionTime = ScheduledFutureTask.nanoTime();

            break;

        }

    }

    // 6. 收尾工作

    afterRunningAllTasks();

    this.lastExecutionTime = lastExecutionTime;

    return true;

}
我在代码中以注释的方式标注了具体的实现步骤,可以分为 6 个步骤。
在日常开发中用好 EventLoop 至关重要,这里结合实际工作中的经验给出一些 EventLoop 的最佳实践方案。
处理流程主要在ChannelPipeline中完成的,如下:
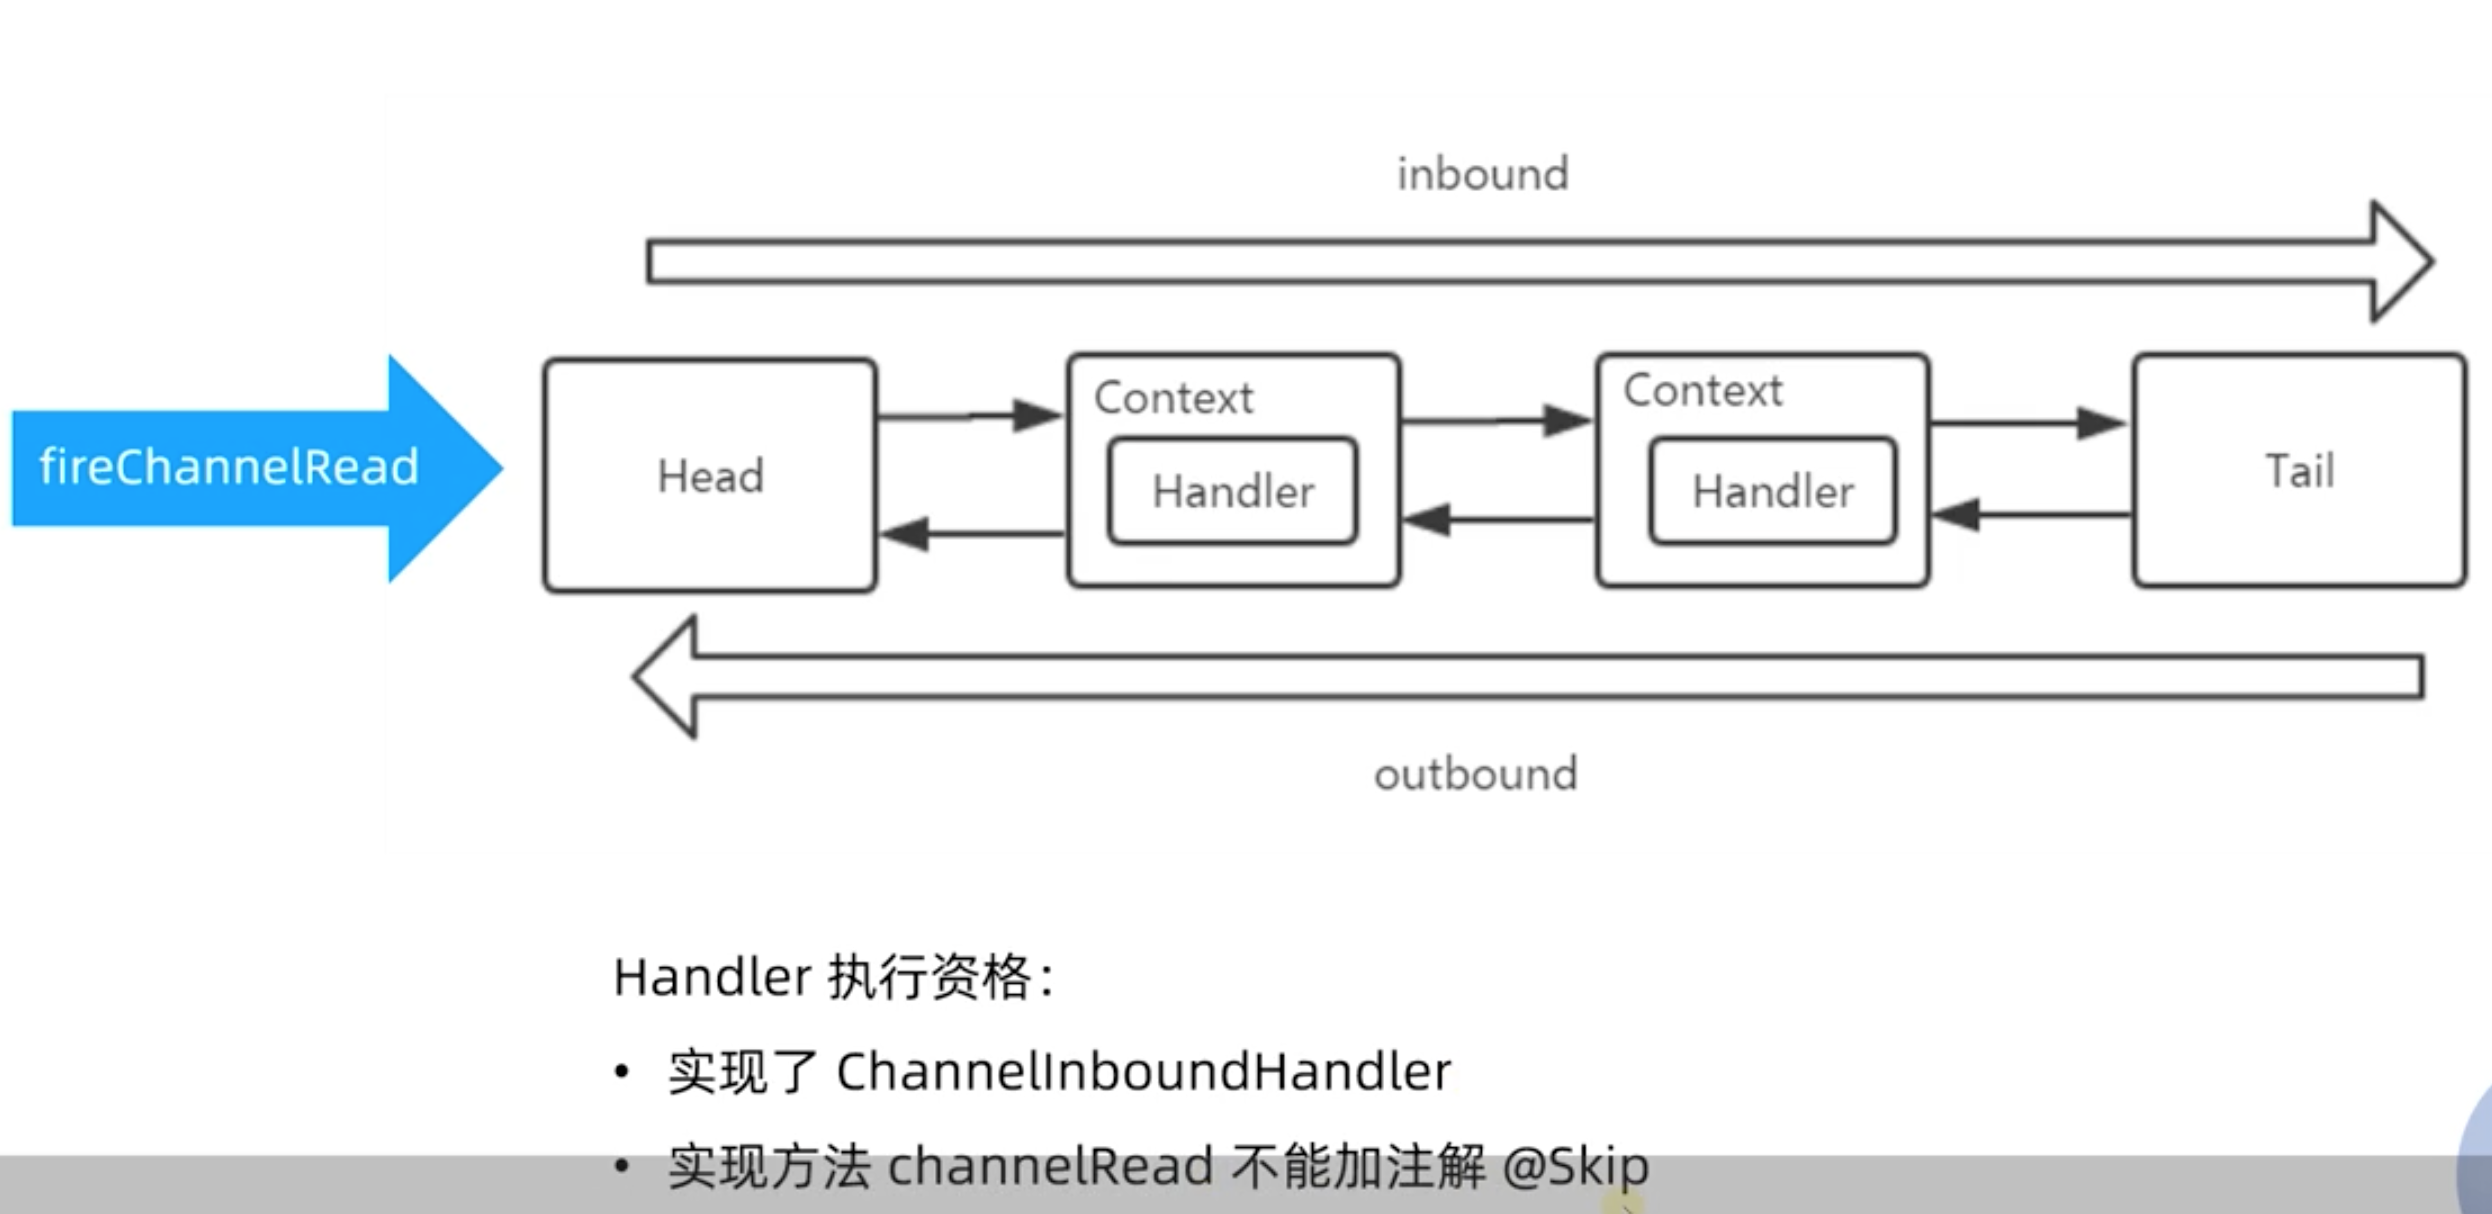
ChannelHandler并不处理事件,而由其子类代为处理:ChannelInboundHandler拦截和处理入站事件,ChannelOutboundHandler拦截和处理出站事件。ChannelHandler和ChannelHandlerContext通过组合或继承的方式关联到一起成对使用。事件通过ChannelHandlerContext主动调用如fireXXX()和write(msg)等方法,将事件传播到下一个处理器。
注意:入站事件在ChannelPipeline双向链表中由头到尾正向传播,出站事件则方向相反。
当客户端连接到服务器时,Netty新建一个ChannelPipeline处理其中的事件,而一个ChannelPipeline中含有若干ChannelHandler。如果每个客户端连接都新建一个ChannelHandler实例,当有大量客户端时,服务器将保存大量的ChannelHandler实例。为此,Netty提供了Sharable注解,如果一个ChannelHandler状态无关,那么可将其标注为Sharable,如此,服务器只需保存一个实例就能处理所有客户端的事件。
总结如下:
如下所示:
如下:


首先,我们来看看 io.netty.channel.nio.NioEventLoop类的run方法:
    @Override
    protected void run() {
        for (;;) {
            try {
                try {
                    switch (selectStrategy.calculateStrategy(selectNowSupplier, hasTasks())) {
                    case SelectStrategy.CONTINUE:
                        continue;

                    case SelectStrategy.BUSY_WAIT:
                        // fall-through to SELECT since the busy-wait is not supported with NIO

                    case SelectStrategy.SELECT:
                        select(wakenUp.getAndSet(false));

                        // 'wakenUp.compareAndSet(false, true)' is always evaluated
                        // before calling 'selector.wakeup()' to reduce the wake-up
                        // overhead. (Selector.wakeup() is an expensive operation.)
                        //
                        // However, there is a race condition in this approach.
                        // The race condition is triggered when 'wakenUp' is set to
                        // true too early.
                        //
                        // 'wakenUp' is set to true too early if:
                        // 1) Selector is waken up between 'wakenUp.set(false)' and
                        //    'selector.select(...)'. (BAD)
                        // 2) Selector is waken up between 'selector.select(...)' and
                        //    'if (wakenUp.get()) { ... }'. (OK)
                        //
                        // In the first case, 'wakenUp' is set to true and the
                        // following 'selector.select(...)' will wake up immediately.
                        // Until 'wakenUp' is set to false again in the next round,
                        // 'wakenUp.compareAndSet(false, true)' will fail, and therefore
                        // any attempt to wake up the Selector will fail, too, causing
                        // the following 'selector.select(...)' call to block
                        // unnecessarily.
                        //
                        // To fix this problem, we wake up the selector again if wakenUp
                        // is true immediately after selector.select(...).
                        // It is inefficient in that it wakes up the selector for both
                        // the first case (BAD - wake-up required) and the second case
                        // (OK - no wake-up required).

                        if (wakenUp.get()) {
                            selector.wakeup();
                        }
                        // fall through
                    default:
                    }
                } catch (IOException e) {
                    // If we receive an IOException here its because the Selector is messed up. Let's rebuild
                    // the selector and retry. https://github.com/netty/netty/issues/8566
                    rebuildSelector0();
                    handleLoopException(e);
                    continue;
                }

                cancelledKeys = 0;
                needsToSelectAgain = false;
                final int ioRatio = this.ioRatio;
                if (ioRatio == 100) {
                    try {
                        processSelectedKeys();
                    } finally {
                        // Ensure we always run tasks.
                        runAllTasks();
                    }
                } else {
                    final long ioStartTime = System.nanoTime();
                    try {
                        processSelectedKeys();
                    } finally {
                        // Ensure we always run tasks.
                        final long ioTime = System.nanoTime() - ioStartTime;
                        runAllTasks(ioTime * (100 - ioRatio) / ioRatio);
                    }
                }
            } catch (Throwable t) {
                handleLoopException(t);
            }
            // Always handle shutdown even if the loop processing threw an exception.
            try {
                if (isShuttingDown()) {
                    closeAll();
                    if (confirmShutdown()) {
                        return;
                    }
                }
            } catch (Throwable t) {
                handleLoopException(t);
            }
        }
    }
会处理SelectStrategy.SELECT,然后交给 processSelectedKeys方法执行,如下:
    private void processSelectedKeys() {
        if (selectedKeys != null) {
            //使用优化过的selectedKeys,性能更好
            processSelectedKeysOptimized();
        } else {
            processSelectedKeysPlain(selector.selectedKeys());
        }
    }
接下来,我们看一下 processSelectedKeysOptimized方法:
    private void processSelectedKeysOptimized() {
        for (int i = 0; i < selectedKeys.size; ++i) {
            final SelectionKey k = selectedKeys.keys[i];
            // null out entry in the array to allow to have it GC'ed once the Channel close
            // See https://github.com/netty/netty/issues/2363
            selectedKeys.keys[i] = null;

            final Object a = k.attachment();

            if (a instanceof AbstractNioChannel) {
                processSelectedKey(k, (AbstractNioChannel) a);
            } else {
                @SuppressWarnings("unchecked")
                NioTask<SelectableChannel> task = (NioTask<SelectableChannel>) a;
                processSelectedKey(k, task);
            }

            if (needsToSelectAgain) {
                // null out entries in the array to allow to have it GC'ed once the Channel close
                // See https://github.com/netty/netty/issues/2363
                selectedKeys.reset(i + 1);

                selectAgain();
                i = -1;
            }
        }
    }
当前进来后会执行 processSelectedKey方法:
    private void processSelectedKey(SelectionKey k, AbstractNioChannel ch) {
        final AbstractNioChannel.NioUnsafe unsafe = ch.unsafe();
        if (!k.isValid()) {
            final EventLoop eventLoop;
            try {
                eventLoop = ch.eventLoop();
            } catch (Throwable ignored) {
                // If the channel implementation throws an exception because there is no event loop, we ignore this
                // because we are only trying to determine if ch is registered to this event loop and thus has authority
                // to close ch.
                return;
            }
            // Only close ch if ch is still registered to this EventLoop. ch could have deregistered from the event loop
            // and thus the SelectionKey could be cancelled as part of the deregistration process, but the channel is
            // still healthy and should not be closed.
            // See https://github.com/netty/netty/issues/5125
            if (eventLoop != this || eventLoop == null) {
                return;
            }
            // close the channel if the key is not valid anymore
            unsafe.close(unsafe.voidPromise());
            return;
        }

        try {
            int readyOps = k.readyOps();
            // We first need to call finishConnect() before try to trigger a read(...) or write(...) as otherwise
            // the NIO JDK channel implementation may throw a NotYetConnectedException.
            if ((readyOps & SelectionKey.OP_CONNECT) != 0) {
                // remove OP_CONNECT as otherwise Selector.select(..) will always return without blocking
                // See https://github.com/netty/netty/issues/924
                int ops = k.interestOps();
                ops &= ~SelectionKey.OP_CONNECT;
                k.interestOps(ops);

                unsafe.finishConnect();
            }

            // Process OP_WRITE first as we may be able to write some queued buffers and so free memory.
            if ((readyOps & SelectionKey.OP_WRITE) != 0) {
                // Call forceFlush which will also take care of clear the OP_WRITE once there is nothing left to write
                ch.unsafe().forceFlush();
            }

            // Also check for readOps of 0 to workaround possible JDK bug which may otherwise lead
            // to a spin loop
            if ((readyOps & (SelectionKey.OP_READ | SelectionKey.OP_ACCEPT)) != 0 || readyOps == 0) {
                unsafe.read();
            }
        } catch (CancelledKeyException ignored) {
            unsafe.close(unsafe.voidPromise());
        }
    }
到这里会执行 unsafe.read()方法,unsafe是个什么类呢?
io.netty.channel.nio.AbstractNioChannel类定义的NioUnsafe接口:
    /**
     * Special {@link Unsafe} sub-type which allows to access the underlying {@link SelectableChannel}
     */
    public interface NioUnsafe extends Unsafe {
        /**
         * Return underlying {@link SelectableChannel}
         */
        SelectableChannel ch();

        /**
         * Finish connect
         */
        void finishConnect();

        /**
         * Read from underlying {@link SelectableChannel}
         */
        void read();

        void forceFlush();
    }
实现类有2个:
AbstractNioMessageChannel$NioMessageUnsafe类read方法如下:
    private final class NioMessageUnsafe extends AbstractNioUnsafe {

        private final List<Object> readBuf = new ArrayList<Object>();

        @Override
        public void read() {
            assert eventLoop().inEventLoop();
            final ChannelConfig config = config();
            final ChannelPipeline pipeline = pipeline();
            final RecvByteBufAllocator.Handle allocHandle = unsafe().recvBufAllocHandle();
            allocHandle.reset(config);

            boolean closed = false;
            Throwable exception = null;
            try {
                try {
                    do {
                        int localRead = doReadMessages(readBuf);
                        if (localRead == 0) {
                            break;
                        }
                        if (localRead < 0) {
                            closed = true;
                            break;
                        }

                        allocHandle.incMessagesRead(localRead);
                    } while (allocHandle.continueReading());
                } catch (Throwable t) {
                    exception = t;
                }

                int size = readBuf.size();
                for (int i = 0; i < size; i ++) {
                    readPending = false;
                    pipeline.fireChannelRead(readBuf.get(i));
                }
                readBuf.clear();
                allocHandle.readComplete();
                pipeline.fireChannelReadComplete();

                if (exception != null) {
                    closed = closeOnReadError(exception);

                    pipeline.fireExceptionCaught(exception);
                }

                if (closed) {
                    inputShutdown = true;
                    if (isOpen()) {
                        close(voidPromise());
                    }
                }
            } finally {
                // Check if there is a readPending which was not processed yet.
                // This could be for two reasons:
                // * The user called Channel.read() or ChannelHandlerContext.read() in channelRead(...) method
                // * The user called Channel.read() or ChannelHandlerContext.read() in channelReadComplete(...) method
                //
                // See https://github.com/netty/netty/issues/2254
                if (!readPending && !config.isAutoRead()) {
                    removeReadOp();
                }
            }
        }
    }
这里我们重点关注它的 doReadMessages 方法,它的实现类是 io.netty.channel.socket.nio.NioServerSocketChannel,其doReadMessages方法如下::
    @Override
    protected int doReadMessages(List<Object> buf) throws Exception {
        SocketChannel ch = SocketUtils.accept(javaChannel());

        try {
            if (ch != null) {
                buf.add(new NioSocketChannel(this, ch));
                return 1;
            }
        } catch (Throwable t) {
            logger.warn("Failed to create a new channel from an accepted socket.", t);

            try {
                ch.close();
            } catch (Throwable t2) {
                logger.warn("Failed to close a socket.", t2);
            }
        }

        return 0;
    }
我们看一下 SocketUtils.accept(javaChannel())代码实现:
    public static SocketChannel accept(final ServerSocketChannel serverSocketChannel) throws IOException {
        try {
            return AccessController.doPrivileged(new PrivilegedExceptionAction<SocketChannel>() {
                @Override
                public SocketChannel run() throws IOException {
                    return serverSocketChannel.accept();
                }
            });
        } catch (PrivilegedActionException e) {
            throw (IOException) e.getCause();
        }
    }
这个地方才真正调用 serverSocketChannel.accept();
AbstractNioByteChannel$NioByteUnsafe类 read方法如下:
        @Override
        public final void read() {
            final ChannelConfig config = config();
            if (shouldBreakReadReady(config)) {
                clearReadPending();
                return;
            }
            final ChannelPipeline pipeline = pipeline();
            final ByteBufAllocator allocator = config.getAllocator();
            final RecvByteBufAllocator.Handle allocHandle = recvBufAllocHandle();
            allocHandle.reset(config);

            ByteBuf byteBuf = null;
            boolean close = false;
            try {
                do {
                    byteBuf = allocHandle.allocate(allocator);
                    allocHandle.lastBytesRead(doReadBytes(byteBuf));
                    if (allocHandle.lastBytesRead() <= 0) {
                        // nothing was read. release the buffer.
                        byteBuf.release();
                        byteBuf = null;
                        close = allocHandle.lastBytesRead() < 0;
                        if (close) {
                            // There is nothing left to read as we received an EOF.
                            readPending = false;
                        }
                        break;
                    }

                    allocHandle.incMessagesRead(1);
                    readPending = false;
                    pipeline.fireChannelRead(byteBuf);
                    byteBuf = null;
                } while (allocHandle.continueReading());

                allocHandle.readComplete();
                pipeline.fireChannelReadComplete();

                if (close) {
                    closeOnRead(pipeline);
                }
            } catch (Throwable t) {
                handleReadException(pipeline, byteBuf, t, close, allocHandle);
            } finally {
                // Check if there is a readPending which was not processed yet.
                // This could be for two reasons:
                // * The user called Channel.read() or ChannelHandlerContext.read() in channelRead(...) method
                // * The user called Channel.read() or ChannelHandlerContext.read() in channelReadComplete(...) method
                //
                // See https://github.com/netty/netty/issues/2254
                if (!readPending && !config.isAutoRead()) {
                    removeReadOp();
                }
            }
        }
我们重点关注一下 pipeline.fireChannelRead(byteBuf);,pipeline是ChannelPipeline接口的实例,当前只有一个默认实现类:io.netty.channel.DefaultChannelPipeline,fireChannelRead方法如下:
    @Override
    public final ChannelPipeline fireChannelRead(Object msg) {
        AbstractChannelHandlerContext.invokeChannelRead(head, msg);
        return this;
    }
AbstractChannelHandlerContext.invokeChannelRead方法如下:
    static void invokeChannelRead(final AbstractChannelHandlerContext next, Object msg) {
        final Object m = next.pipeline.touch(ObjectUtil.checkNotNull(msg, "msg"), next);
        EventExecutor executor = next.executor();
        if (executor.inEventLoop()) {
            next.invokeChannelRead(m);
        } else {
            executor.execute(new Runnable() {
                @Override
                public void run() {
                    next.invokeChannelRead(m);
                }
            });
        }
    }
AbstractChannelHandlerContext#invokeChannelRead方法如下:
    private void invokeChannelRead(Object msg) {
        if (invokeHandler()) {
            try {
                ((ChannelInboundHandler) handler()).channelRead(this, msg);
            } catch (Throwable t) {
                notifyHandlerException(t);
            }
        } else {
            fireChannelRead(msg);
        }
    }
其实就是调用 业务实现的Handler的channelRead方法,channelRead执行完后会调用AbstractChannelHandlerContext#fireChannelRead方法,如下:
    @Override
    public ChannelHandlerContext fireChannelRead(final Object msg) {
        invokeChannelRead(findContextInbound(MASK_CHANNEL_READ), msg);
        return this;
    }

    private AbstractChannelHandlerContext findContextInbound(int mask) {
        AbstractChannelHandlerContext ctx = this;
        do {
            ctx = ctx.next;
        } while ((ctx.executionMask & mask) == 0);
        return ctx;
    }

    static void invokeChannelRead(final AbstractChannelHandlerContext next, Object msg) {
        final Object m = next.pipeline.touch(ObjectUtil.checkNotNull(msg, "msg"), next);
        EventExecutor executor = next.executor();
        if (executor.inEventLoop()) {
            next.invokeChannelRead(m);
        } else {
            executor.execute(new Runnable() {
                @Override
                public void run() {
                    next.invokeChannelRead(m);
                }
            });
        }
    }
通过前面的学习,我们已经对 Netty 的技术**和基本原理有了初步的认识,从今天这节课开始我们将正式进入 Netty 核心源码学习的课程。希望能够通过源码解析的方式让你更加深入理解 Netty 的精髓,如 Netty 的设计**、工程技巧等,为之后继续深入研究 Netty 打下坚实的基础。
在课程开始之前,我想分享一下关于源码学习的几点经验和建议。
作为源码解析的第一节课,我们将深入分析 Netty 服务端的启动流程。启动服务的过程中我们可以了解到 Netty 各大核心组件的关系,这将是学习 Netty 源码一个非常好的切入点,让我们一起看看 Netty 的每个零件是如何运转起来的吧。
说明:本文参考的 Netty 源码版本为 4.1.56.Final。
这里我们使用Netty官网上的 Discard 服务器代码,作为调试 Netty 服务端启动的源码。
package io.netty.example.discard;

import io.netty.bootstrap.ServerBootstrap;

import io.netty.channel.ChannelFuture;
import io.netty.channel.ChannelInitializer;
import io.netty.channel.ChannelOption;
import io.netty.channel.EventLoopGroup;
import io.netty.channel.nio.NioEventLoopGroup;
import io.netty.channel.socket.SocketChannel;
import io.netty.channel.socket.nio.NioServerSocketChannel;

/**
 * Discards any incoming data.
 */
public class DiscardServer {

    private int port;

    public DiscardServer(int port) {
        this.port = port;
    }

    public void run() throws Exception {
        EventLoopGroup bossGroup = new NioEventLoopGroup(); // (1)
        EventLoopGroup workerGroup = new NioEventLoopGroup();
        try {
            ServerBootstrap b = new ServerBootstrap(); // (2)
            b.group(bossGroup, workerGroup)
             .channel(NioServerSocketChannel.class) // (3)
             .childHandler(new ChannelInitializer<SocketChannel>() { // (4)
                 @Override
                 public void initChannel(SocketChannel ch) throws Exception {
                     ch.pipeline().addLast(new DiscardServerHandler());
                 }
             })
             .option(ChannelOption.SO_BACKLOG, 128)          // (5)
             .childOption(ChannelOption.SO_KEEPALIVE, true); // (6)

            // Bind and start to accept incoming connections.
            ChannelFuture f = b.bind(port).sync(); // (7)

            // Wait until the server socket is closed.
            // In this example, this does not happen, but you can do that to gracefully
            // shut down your server.
            f.channel().closeFuture().sync();
        } finally {
            workerGroup.shutdownGracefully();
            bossGroup.shutdownGracefully();
        }
    }

    public static void main(String[] args) throws Exception {
        int port = 8080;
        if (args.length > 0) {
            port = Integer.parseInt(args[0]);
        }

        new DiscardServer(port).run();
    }
}
我们以引导器 ServerBootstrap 为切入点,开始深入分析 Netty 服务端的启动流程。在服务端启动之前,需要配置 ServerBootstrap 的相关参数,这一步大致可以分为以下几个步骤:
配置 ServerBootstrap 参数的过程非常简单,把参数值保存在 ServerBootstrap 定义的成员变量里就可以了。我们可以看下 ServerBootstrap 的成员变量定义,基本与 ServerBootstrap 暴露出来的配置方法是一一对应的。
如下所示,我以注释的形式说明每个成员变量对应的调用方法。
volatile EventLoopGroup group; // group()

volatile EventLoopGroup childGroup; // group()

volatile ChannelFactory<? extends C> channelFactory; // channel()

volatile SocketAddress localAddress; // localAddress

Map<ChannelOption<?>, Object> childOptions = new ConcurrentHashMap<ChannelOption<?>, Object>(); // childOption()

volatile ChannelHandler childHandler; // childHandler()

ServerBootstrapConfig config = new ServerBootstrapConfig(this);
关于 ServerBootstrap 如何为每个成员变量保存参数的过程,我们就不一一展开了,你可以理解为这部分工作只是一个前置准备,课后你可以自己跟进下每个方法的源码。今天我们核心聚焦在 b.bind().sync() 这行代码,bind() 才是真正进行服务器端口绑定和启动的入口,sync() 表示阻塞等待服务器启动完成。接下来我们对 bind() 方法进行展开分析。
在开始源码分析之前,我们带着以下几个问题边看边思考:
首先我们来看下 ServerBootstrap 中 bind() 方法的源码实现:
    /**
     * Create a new {@link Channel} and bind it.
     */
    public ChannelFuture bind() {
        validate();
        SocketAddress localAddress = this.localAddress;
        if (localAddress == null) {
            throw new IllegalStateException("localAddress not set");
        }
        return doBind(localAddress);
    }

    private ChannelFuture doBind(final SocketAddress localAddress) {
        final ChannelFuture regFuture = initAndRegister();
        final Channel channel = regFuture.channel();
        if (regFuture.cause() != null) {
            return regFuture;
        }

        if (regFuture.isDone()) {
            // At this point we know that the registration was complete and successful.
            ChannelPromise promise = channel.newPromise();
            doBind0(regFuture, channel, localAddress, promise);
            return promise;
        } else {
            // Registration future is almost always fulfilled already, but just in case it's not.
            final PendingRegistrationPromise promise = new PendingRegistrationPromise(channel);
            regFuture.addListener(new ChannelFutureListener() {
                @Override
                public void operationComplete(ChannelFuture future) throws Exception {
                    Throwable cause = future.cause();
                    if (cause != null) {
                        // Registration on the EventLoop failed so fail the ChannelPromise directly to not cause an
                        // IllegalStateException once we try to access the EventLoop of the Channel.
                        promise.setFailure(cause);
                    } else {
                        // Registration was successful, so set the correct executor to use.
                        // See https://github.com/netty/netty/issues/2586
                        promise.registered();

                        doBind0(regFuture, channel, localAddress, promise);
                    }
                }
            });
            return promise;
        }
    }
由此可见,doBind() 方法是我们需要分析的重点。我们再一起看下 doBind() 具体做了哪些事情:
doBind() 整个实现结构非常清晰,其中 initAndRegister() 负责 Channel 初始化和注册,doBind0() 用于端口绑定。这两个过程最为重要,下面我们分别进行详细的介绍。
initAndRegister() 方法顾名思义,主要负责初始化和注册的相关工作,我们具体看下它的源码实现:
    final ChannelFuture initAndRegister() {
        Channel channel = null;
        try {
            channel = channelFactory.newChannel(); // 创建 Channel
            init(channel); // 初始化 Channel
        } catch (Throwable t) {
            if (channel != null) {
                channel.unsafe().closeForcibly();
                return new DefaultChannelPromise(channel, GlobalEventExecutor.INSTANCE).setFailure(t);
            }
            return new DefaultChannelPromise(new FailedChannel(), GlobalEventExecutor.INSTANCE).setFailure(t);
        }

        ChannelFuture regFuture = config().group().register(channel);
        if (regFuture.cause() != null) {
            if (channel.isRegistered()) {
                channel.close();
            } else {
                channel.unsafe().closeForcibly();
            }
        }

        return regFuture;
    }
initAndRegister() 可以分为三步:
接下来我们一步步进行拆解分析。
首先看下创建 Channel 的过程,直接跟进 channelFactory.newChannel() 的源码。
易错点总结:

通过上节课的学习,我们知道 EventLoop 可以说是 Netty 的调度中心,负责监听多种事件类型:I/O 事件、信号事件、定时事件等,然而实际的业务处理逻辑则是由 ChannelPipeline 中所定义的 ChannelHandler 完成的,ChannelPipeline 和 ChannelHandler 也是我们在平时应用开发的过程中打交道最多的组件。Netty 服务编排层的核心组件 ChannelPipeline 和 ChannelHandler 为用户提供了 I/O 事件的全部控制权。今天这节课我们便一起深入学习 Netty 是如何利用这两个组件,将数据玩转起来。
在学习这节课之前,我先抛出几个问题。
希望你在学习完本课时后,可以找到问题的答案。
Pipeline 的字面意思是管道、流水线。它在 Netty 中起到的作用,和一个工厂的流水线类似。原始的网络字节流经过 Pipeline ,被一步步加工包装,最后得到加工后的成品。经过前面课程核心组件的初步学习,我们已经对 ChannelPipeline 有了初步的印象:它是 Netty 的核心处理链,用以实现网络事件的动态编排和有序传播。
今天我们将从以下几个方面一起探讨 ChannelPipeline 的实现原理:
首先我们要理清楚 ChannelPipeline 的内部结构是什么样子,这样才能理解 ChannelPipeline 的处理流程。ChannelPipeline 作为 Netty 的核心编排组件,负责调度各种类型的 ChannelHandler,实际数据的加工处理操作则是由 ChannelHandler 完成的。
ChannelPipeline 可以看作是 ChannelHandler 的容器载体,它是由一组 ChannelHandler 实例组成的,内部通过双向链表将不同的 ChannelHandler 链接在一起,如下图所示。当有 I/O 读写事件触发时,ChannelPipeline 会依次调用 ChannelHandler 列表对 Channel 的数据进行拦截和处理。

由上图可知,每个 Channel 会绑定一个 ChannelPipeline,每一个 ChannelPipeline 都包含多个 ChannelHandlerContext,所有 ChannelHandlerContext 之间组成了双向链表。又因为每个 ChannelHandler 都对应一个 ChannelHandlerContext,所以实际上 ChannelPipeline 维护的是它与 ChannelHandlerContext 的关系。那么你可能会有疑问,为什么这里会多一层 ChannelHandlerContext 的封装呢?
其实这是一种比较常用的编程**。ChannelHandlerContext 用于保存 ChannelHandler 上下文;ChannelHandlerContext 则包含了 ChannelHandler 生命周期的所有事件,如 connect、bind、read、flush、write、close 等。可以试想一下,如果没有 ChannelHandlerContext 的这层封装,那么我们在做 ChannelHandler 之间传递的时候,前置后置的通用逻辑就要在每个 ChannelHandler 里都实现一份。这样虽然能解决问题,但是代码结构的耦合,会非常不优雅。
根据网络数据的流向,ChannelPipeline 分为入站 ChannelInboundHandler 和出站 ChannelOutboundHandler 两种处理器。在客户端与服务端通信的过程中,数据从客户端发向服务端的过程叫出站,反之称为入站。数据先由一系列 InboundHandler 处理后入站,然后再由相反方向的 OutboundHandler 处理完成后出站,如下图所示。我们经常使用的解码器 Decoder 就是入站操作,编码器 Encoder 就是出站操作。服务端接收到客户端数据需要先经过 Decoder 入站处理后,再通过 Encoder 出站通知客户端。

接下来我们详细分析下 ChannelPipeline 双向链表的构造,ChannelPipeline 的双向链表分别维护了 HeadContext 和 TailContext 的头尾节点。我们自定义的 ChannelHandler 会插入到 Head 和 Tail 之间,这两个节点在 Netty 中已经默认实现了,它们在 ChannelPipeline 中起到了至关重要的作用。
package io.netty.channel;

public class DefaultChannelPipeline implements ChannelPipeline {

    final AbstractChannelHandlerContext head;
    final AbstractChannelHandlerContext tail;

    private final Channel channel;
    private final ChannelFuture succeededFuture;
    private final VoidChannelPromise voidPromise;

    protected DefaultChannelPipeline(Channel channel) {
        this.channel = ObjectUtil.checkNotNull(channel, "channel");
        succeededFuture = new SucceededChannelFuture(channel, null);
        voidPromise =  new VoidChannelPromise(channel, true);

        tail = new TailContext(this);
        head = new HeadContext(this);

        head.next = tail;
        tail.prev = head;
    }
}
HeadContext 既是 Inbound 处理器,也是 Outbound 处理器。它分别实现了 ChannelInboundHandler 和 ChannelOutboundHandler。网络数据写入操作的入口就是由 HeadContext 节点完成的。HeadContext 作为 Pipeline 的头结点负责读取数据并开始传递 InBound 事件,当数据处理完成后,数据会反方向经过 Outbound 处理器,最终传递到 HeadContext,所以 HeadContext 又是处理 Outbound 事件的最后一站。此外 HeadContext 在传递事件之前,还会执行一些前置操作。
    final class HeadContext extends AbstractChannelHandlerContext
            implements ChannelOutboundHandler, ChannelInboundHandler {

        private final Unsafe unsafe;

        HeadContext(DefaultChannelPipeline pipeline) {
            super(pipeline, null, HEAD_NAME, HeadContext.class);
            unsafe = pipeline.channel().unsafe();
            setAddComplete();
        }
}
TailContext 只实现了 ChannelInboundHandler 接口。它会在 ChannelInboundHandler 调用链路的最后一步执行,主要用于终止 Inbound 事件传播,例如释放 Message 数据资源等。TailContext 节点作为 OutBound 事件传播的第一站,仅仅是将 OutBound 事件传递给上一个节点。
    // A special catch-all handler that handles both bytes and messages.
    final class TailContext extends AbstractChannelHandlerContext implements ChannelInboundHandler {

        TailContext(DefaultChannelPipeline pipeline) {
            super(pipeline, null, TAIL_NAME, TailContext.class);
            setAddComplete();
        }

        @Override
        public ChannelHandler handler() {
            return this;
        }
}
从整个 ChannelPipeline 调用链路来看,如果由 Channel 直接触发事件传播,那么调用链路将贯穿整个 ChannelPipeline。然而也可以在其中某一个 ChannelHandlerContext 触发同样的方法,这样只会从当前的 ChannelHandler 开始执行事件传播,该过程不会从头贯穿到尾,在一定场景下,可以提高程序性能。
Inbound 事件和 Outbound 事件的传播方向是不一样的。Inbound 事件的传播方向为 Head -> Tail,而 Outbound 事件传播方向是 Tail -> Head,两者恰恰相反。在 Netty 应用编程中一定要理清楚事件传播的顺序。推荐你在系统设计时模拟客户端和服务端的场景画出 ChannelPipeline 的内部结构图,以避免搞混调用关系。
在学习 ChannelPipeline 事件传播机制之前,我们需要了解 I/O 事件的生命周期。整个 ChannelHandler 是围绕 I/O 事件的生命周期所设计的,例如建立连接、读数据、写数据、连接销毁等。ChannelHandler 有两个重要的子接口:ChannelInboundHandler和ChannelOutboundHandler,分别拦截入站和出站的各种 I/O 事件。
| 事件回调方法 | 触发时机 |
|---|---|
| channelRegistered | Channel 被注册到 EventLoop |
| channelUnregistered | Channel 从 EventLoop 中取消注册 |
| channelActive | Channel 处于就绪状态,可以被读写 |
| channelInactive | Channel 处于非就绪状态Channel 可以从远端读取到数据 |
| channelRead | Channel 可以从远端读取到数据 |
| channelReadComplete | Channel 读取数据完成 |
| userEventTriggered | 用户事件触发时 |
| channelWritabilityChanged | Channel 的写状态发生变化 |
ChannelOutboundHandler 的事件回调方法非常清晰,直接通过 ChannelOutboundHandler 的接口列表可以看到每种操作所对应的回调方法,如下图所示。这里每个回调方法都是在相应操作执行之前触发,在此就不多做赘述了。此外 ChannelOutboundHandler 中绝大部分接口都包含ChannelPromise 参数,以便于在操作完成时能够及时获得通知。

在上文中我们介绍了 ChannelPipeline 可分为入站 ChannelInboundHandler 和出站 ChannelOutboundHandler 两种处理器,与此对应传输的事件类型可以分为Inbound 事件和Outbound 事件。
我们通过一个代码示例,一起体验下 ChannelPipeline 的事件传播机制。
serverBootstrap.childHandler(new ChannelInitializer<SocketChannel>() {

    @Override

    public void initChannel(SocketChannel ch) {

        ch.pipeline()

                .addLast(new SampleInBoundHandler("SampleInBoundHandlerA", false))

                .addLast(new SampleInBoundHandler("SampleInBoundHandlerB", false))

                .addLast(new SampleInBoundHandler("SampleInBoundHandlerC", true));

        ch.pipeline()

                .addLast(new SampleOutBoundHandler("SampleOutBoundHandlerA"))

                .addLast(new SampleOutBoundHandler("SampleOutBoundHandlerB"))

                .addLast(new SampleOutBoundHandler("SampleOutBoundHandlerC"));


    }

}

public class SampleInBoundHandler extends ChannelInboundHandlerAdapter {

    private final String name;

    private final boolean flush;

    public SampleInBoundHandler(String name, boolean flush) {

        this.name = name;

        this.flush = flush;

    }

    @Override

    public void channelRead(ChannelHandlerContext ctx, Object msg) throws Exception {

        System.out.println("InBoundHandler: " + name);

        if (flush) {

            ctx.channel().writeAndFlush(msg);

        } else {

            super.channelRead(ctx, msg);

        }

    }

}


public class SampleOutBoundHandler extends ChannelOutboundHandlerAdapter {

    private final String name;

    public SampleOutBoundHandler(String name) {

        this.name = name;

    }

    @Override

    public void write(ChannelHandlerContext ctx, Object msg, ChannelPromise promise) throws Exception {

        System.out.println("OutBoundHandler: " + name);

        super.write(ctx, msg, promise);

    }

}
通过 Pipeline 的 addLast 方法分别添加了三个 InboundHandler 和 OutboundHandler,添加顺序都是 A -> B -> C,下图可以表示初始化后 ChannelPipeline 的内部结构。

当客户端向服务端发送请求时,会触发 SampleInBoundHandler 调用链的 channelRead 事件。经过 SampleInBoundHandler 调用链处理完成后,在 SampleInBoundHandlerC 中会调用 writeAndFlush 方法向客户端写回数据,此时会触发 SampleOutBoundHandler 调用链的 write 事件。最后我们看下代码示例的控制台输出:

由此可见,Inbound 事件和 Outbound 事件的传播方向是不一样的。Inbound 事件的传播方向为 Head -> Tail,而 Outbound 事件传播方向是 Tail -> Head,两者恰恰相反。在 Netty 应用编程中一定要理清楚事件传播的顺序。推荐你在系统设计时模拟客户端和服务端的场景画出 ChannelPipeline 的内部结构图,以避免搞混调用关系。
ChannelPipeline 事件传播的实现采用了经典的责任链模式,调用链路环环相扣。那么如果有一个节点处理逻辑异常会出现什么现象呢?我们通过修改 SampleInBoundHandler 的实现来模拟业务逻辑异常:
public class SampleInBoundHandler extends ChannelInboundHandlerAdapter {

    private final String name;

    private final boolean flush;

    public SampleInBoundHandler(String name, boolean flush) {

        this.name = name;

        this.flush = flush;

    }

    @Override

    public void channelRead(ChannelHandlerContext ctx, Object msg) {

        System.out.println("InBoundHandler: " + name);

        if (flush) {

            ctx.channel().writeAndFlush(msg);

        } else {

            throw new RuntimeException("InBoundHandler: " + name);

        }

    }

    @Override

    public void exceptionCaught(ChannelHandlerContext ctx, Throwable cause) {

        System.out.println("InBoundHandlerException: " + name);

        ctx.fireExceptionCaught(cause);

    }

}
在 channelRead 事件处理中,第一个 A 节点就会抛出 RuntimeException。同时我们重写了 ChannelInboundHandlerAdapter 中的 exceptionCaught 方法,只是在开头加上了控制台输出,方便观察异常传播的行为。下面看一下代码运行的控制台输出结果:

由输出结果可以看出 ctx.fireExceptionCaugh 会将异常按顺序从 Head 节点传播到 Tail 节点。如果用户没有对异常进行拦截处理,最后将由 Tail 节点统一处理,在 TailContext 源码中可以找到具体实现:
    // A special catch-all handler that handles both bytes and messages.
    final class TailContext extends AbstractChannelHandlerContext implements ChannelInboundHandler {

        TailContext(DefaultChannelPipeline pipeline) {
            super(pipeline, null, TAIL_NAME, TailContext.class);
            setAddComplete();
        }

        @Override
        public void exceptionCaught(ChannelHandlerContext ctx, Throwable cause) {
            onUnhandledInboundException(cause);
        }

    protected void onUnhandledInboundException(Throwable cause) {
        try {
            logger.warn(
                    "An exceptionCaught() event was fired, and it reached at the tail of the pipeline. " +
                            "It usually means the last handler in the pipeline did not handle the exception.",
                    cause);
        } finally {
            ReferenceCountUtil.release(cause);
        }
    }
}
虽然 Netty 中 TailContext 提供了兜底的异常处理逻辑,但是在很多场景下,并不能满足我们的需求。假如你需要拦截指定的异常类型,并做出相应的异常处理,应该如何实现呢?我们接着往下看。
在 Netty 应用开发的过程中,良好的异常处理机制会让排查问题的过程事半功倍。所以推荐用户对异常进行统一拦截,然后根据实际业务场景实现更加完善的异常处理机制。通过异常传播机制的学习,我们应该可以想到最好的方法是在 ChannelPipeline 自定义处理器的末端添加统一的异常处理器,此时 ChannelPipeline 的内部结构如下图所示。

用户自定义的异常处理器代码示例如下:
public class ExceptionHandler extends ChannelDuplexHandler {

    @Override

    public void exceptionCaught(ChannelHandlerContext ctx, Throwable cause) {

        if (cause instanceof RuntimeException) {

            System.out.println("Handle Business Exception Success.");

        }

    }

}
加入统一的异常处理器后,可以看到异常已经被优雅地拦截并处理掉了。这也是 Netty 推荐的最佳异常处理实践。
netty自行封装了FastThreadLocal 以替换jdk提供的ThreadLocal,结合封装的FastThreadLocalThread在多线程环境下的变量提高了ThreadLocal对象的查询以及更新效率。
关于ThreadLocal 介绍请参考 jdk源码剖析 - ThreadLocal
注:本文Netty版本为 4.1.50.Final,不同版本源码可能略有不同。
FastThreadLocal 对JDK中ThreadLocal进行了优化,由于ThreadLocal底层存储数据是一个ThreadLocalMap 结构,是一个数组结构,通过threadLocalHashCode查找在数组中的元素Entry, 当hash冲突时,继续向前检测查找(又叫 线性探测), 所以当Hash冲突时,检索的效率就会降低,具体可查看ThreadLocal#get 与ThreadLocal.ThreadLocalMap#getEntry 方法。而FastThreadLocal则正是处理了这个问题,使其时间复杂度一直为O(1)。
这里多提一嘴,哈希冲突的处理方法有2种:开放定址法(线性探测、二次探测) 和 链地址法,ThreadLocal 采用的是 开放定址法,HashMap采用的是 链地址法。
FastThredLocal 需配合 FastThreadLocalThread一起使用,它内部使用 InternalThreadLocalMap,而 InternalThreadLocalMap 继承自 UnpaddedInternalThreadLocalMap类,如下:
class UnpaddedInternalThreadLocalMap {
    //对非FastThreadLocalThread线程做兼容,从中获取InternalThreadLocalMap
    static final ThreadLocal<InternalThreadLocalMap> slowThreadLocalMap = new ThreadLocal<InternalThreadLocalMap>();
    static final AtomicInteger nextIndex = new AtomicInteger();

    /** Used by {@link FastThreadLocal} */
    Object[] indexedVariables;

    UnpaddedInternalThreadLocalMap(Object[] indexedVariables) {
        this.indexedVariables = indexedVariables;
    }
}
我们再来看看 InternalThreadLocalMap类,如下:
public final class InternalThreadLocalMap extends UnpaddedInternalThreadLocalMap {

    public static final Object UNSET = new Object();

    // Cache line padding (must be public)
    // With CompressedOops enabled, an instance of this class should occupy at least 128 bytes.
    public long rp1, rp2, rp3, rp4, rp5, rp6, rp7, rp8, rp9;

    //构造方法
    private InternalThreadLocalMap() {
        super(newIndexedVariableTable());
    }

    private static Object[] newIndexedVariableTable() {
        Object[] array = new Object[INDEXED_VARIABLE_TABLE_INITIAL_SIZE];
        Arrays.fill(array, UNSET);
        return array;
    }

    public static InternalThreadLocalMap getIfSet() {
        Thread thread = Thread.currentThread();
        if (thread instanceof FastThreadLocalThread) {
            return ((FastThreadLocalThread) thread).threadLocalMap();
        }
        return slowThreadLocalMap.get();
    }

    //获取当前线程的InternalThreadLocalMap,没有则创建
    public static InternalThreadLocalMap get() {
        Thread thread = Thread.currentThread();
        if (thread instanceof FastThreadLocalThread) {
            return fastGet((FastThreadLocalThread) thread);
        } else {
            return slowGet();
        }
    }

    private static InternalThreadLocalMap fastGet(FastThreadLocalThread thread) {
        InternalThreadLocalMap threadLocalMap = thread.threadLocalMap();
        if (threadLocalMap == null) {
            thread.setThreadLocalMap(threadLocalMap = new InternalThreadLocalMap());
        }
        return threadLocalMap;
    }

    //对于非FastThreadLocalThread 线程,从ThreadLocal中获取
    private static InternalThreadLocalMap slowGet() {
        ThreadLocal<InternalThreadLocalMap> slowThreadLocalMap = UnpaddedInternalThreadLocalMap.slowThreadLocalMap;
        InternalThreadLocalMap ret = slowThreadLocalMap.get();
        if (ret == null) {
            ret = new InternalThreadLocalMap();
            slowThreadLocalMap.set(ret);
        }
        return ret;
    }
}
首先,看一下 InternalThreadLocalMap 的构造方法:
    private InternalThreadLocalMap() {
        super(newIndexedVariableTable());
    }

    private static Object[] newIndexedVariableTable() {
        Object[] array = new Object[INDEXED_VARIABLE_TABLE_INITIAL_SIZE];
        Arrays.fill(array, UNSET);
        return array;
    }
它对 indexedVariables 数组进行赋值,indexedVariables 是用来保存FastThreadLocal#set方法传递进来的对象。
很容易看出,对于FastThreadLocalThread,都会有一个InternalThreadLocalMap的引用,可直接获取。非FastThreadLocalThread直接从UnpaddedInternalThreadLocalMap.slowThreadLocalMap中获取,
FastThreadLocalThread如下:
/**
 * A special {@link Thread} that provides fast access to {@link FastThreadLocal} variables.
 */
public class FastThreadLocalThread extends Thread {
    // This will be set to true if we have a chance to wrap the Runnable.
    private final boolean cleanupFastThreadLocals;

    private InternalThreadLocalMap threadLocalMap;

    public FastThreadLocalThread() {
        cleanupFastThreadLocals = false;
    }
}
首先,我们来看看 FastThreadLocal 的构造方法,如下:
public class FastThreadLocal<V> {

    private static final int variablesToRemoveIndex = InternalThreadLocalMap.nextVariableIndex();

    private final int index;

    public FastThreadLocal() {
        index = InternalThreadLocalMap.nextVariableIndex();
    }
}
FastThreadLocal 有一个 index成员变量,在创建FastThreadLocal对象时被赋值为 InternalThreadLocalMap.nextVariableIndex();,它保证了index的唯一性,InternalThreadLocalMap#nextVariableIndex方法如下:
    public static int nextVariableIndex() {
        int index = nextIndex.getAndIncrement();
        if (index < 0) {
            nextIndex.decrementAndGet();
            throw new IllegalStateException("too many thread-local indexed variables");
        }
        return index;
    }
index表示UnpaddedInternalThreadLocalMap属性indexedVariables数组的下标, 从而获取到保存在indexedVariables中的数据。
FastThreadLocal#set方法如下:
    /**
     * Set the value for the current thread.
     */
    public final void set(V value) {
        if (value != InternalThreadLocalMap.UNSET) {
            InternalThreadLocalMap threadLocalMap = InternalThreadLocalMap.get();
            setKnownNotUnset(threadLocalMap, value);
        } else {
            remove();
        }
    }

    /**
     * Set the value for the specified thread local map. The specified thread local map must be for the current thread.
     */
    public final void set(InternalThreadLocalMap threadLocalMap, V value) {
        if (value != InternalThreadLocalMap.UNSET) {
            setKnownNotUnset(threadLocalMap, value);
        } else {
            remove(threadLocalMap);
        }
    }
其中,InternalThreadLocalMap.get() 在上一个章节说过了,就是获取当前线程绑定的InternalThreadLocalMap对象,重点看一下 setKnownNotUnset方法,如下:
    /**
     * @return see {@link InternalThreadLocalMap#setIndexedVariable(int, Object)}.
     */
    private void setKnownNotUnset(InternalThreadLocalMap threadLocalMap, V value) {
        if (threadLocalMap.setIndexedVariable(index, value)) {
            addToVariablesToRemove(threadLocalMap, this);
        }
    }
FastThreadLocal#get方法 代码如下:
    public final V get() {
        InternalThreadLocalMap threadLocalMap = InternalThreadLocalMap.get();
        Object v = threadLocalMap.indexedVariable(index);
        if (v != InternalThreadLocalMap.UNSET) {
            return (V) v;
        }

        return initialize(threadLocalMap);
    }

    public final V getIfExists() {
        InternalThreadLocalMap threadLocalMap = InternalThreadLocalMap.getIfSet();
        if (threadLocalMap != null) {
            Object v = threadLocalMap.indexedVariable(index);
            if (v != InternalThreadLocalMap.UNSET) {
                return (V) v;
            }
        }
        return null;
    }

    public final V get(InternalThreadLocalMap threadLocalMap) {
        Object v = threadLocalMap.indexedVariable(index);
        if (v != InternalThreadLocalMap.UNSET) {
            return (V) v;
        }

        return initialize(threadLocalMap);
    }

    private V initialize(InternalThreadLocalMap threadLocalMap) {
        V v = null;
        try {
            v = initialValue();
        } catch (Exception e) {
            PlatformDependent.throwException(e);
        }

        threadLocalMap.setIndexedVariable(index, v);
        addToVariablesToRemove(threadLocalMap, this);
        return v;
    }

    /**
     * Returns the initial value for this thread-local variable.
     */
    protected V initialValue() throws Exception {
        return null;
    }
通过前面两节源码课程的学习,我们知道 Netty 在服务端启动时会为创建 NioServerSocketChannel,当客户端新连接接入时又会创建 NioSocketChannel,不管是服务端还是客户端 Channel,在创建时都会初始化自己的 ChannelPipeline。如果把 Netty 比作成一个生产车间,那么 Reactor 线程无疑是车间的**管控系统,ChannelPipeline 可以看作是车间的流水线,将原材料按顺序进行一步步加工,然后形成一个完整的产品。本节课我将带你完整梳理一遍网络请求在 Netty 中的处理流程,从而加深对前两节课内容的理解,并着重讲解 ChannelPipeline 的工作原理。
说明:本文参考的 Netty 源码版本为 4.1.42.Final。
首先我们以服务端接入客户端新连接为例,并结合前两节源码课学习的知识点,一起复习下 Netty 的事件处理流程,如下图所示。

Netty 服务端启动后,BossEventLoopGroup 会负责监听客户端的 Accept 事件。当有客户端新连接接入时,BossEventLoopGroup 中的 NioEventLoop 首先会新建客户端 Channel,然后在 NioServerSocketChannel 中触发 channelRead 事件传播,NioServerSocketChannel 中包含了一种特殊的处理器 ServerBootstrapAcceptor,最终通过 ServerBootstrapAcceptor 的 channelRead() 方法将新建的客户端 Channel 分配到 WorkerEventLoopGroup 中。WorkerEventLoopGroup 中包含多个 NioEventLoop,它会选择其中一个 NioEventLoop 与新建的客户端 Channel 绑定。
完成客户端连接注册之后,就可以接收客户端的请求数据了。当客户端向服务端发送数据时,NioEventLoop 会监听到 OP_READ 事件,然后分配 ByteBuf 并读取数据,读取完成后将数据传递给 Pipeline 进行处理。一般来说,数据会从 ChannelPipeline 的第一个 ChannelHandler 开始传播,将加工处理后的消息传递给下一个 ChannelHandler,整个过程是串行化执行。
在前面两节课中,我们介绍了服务端如何接收客户端新连接,以及 NioEventLoop 的工作流程,接下来我们重点介绍 ChannelPipeline 是如何实现 Netty 事件驱动的,这样 Netty 整个事件处理流程已经可以串成一条主线。
我们知道 ChannelPipeline 是在创建 Channel 时被创建的,它是 Channel 中非常重要的一个成员变量。回到 AbstractChannel 的构造函数,以此为切入点,我们一起看下 ChannelPipeline 是如何一步步被构造出来的。
// AbstractChannel

protected AbstractChannel(Channel parent) {

    this.parent = parent;

    id = newId();

    unsafe = newUnsafe();

    pipeline = newChannelPipeline();

}

// AbstractChannel#newChannelPipeline

protected DefaultChannelPipeline newChannelPipeline() {

    return new DefaultChannelPipeline(this);

}

// DefaultChannelPipeline

protected DefaultChannelPipeline(Channel channel) {

    this.channel = ObjectUtil.checkNotNull(channel, "channel");

    succeededFuture = new SucceededChannelFuture(channel, null);

    voidPromise =  new VoidChannelPromise(channel, true);

    tail = new TailContext(this);

    head = new HeadContext(this);

    head.next = tail;

    tail.prev = head;

}
当 ChannelPipeline 初始化完成后,会构成一个由 ChannelHandlerContext 对象组成的双向链表,默认 ChannelPipeline 初始化状态的最小结构仅包含 HeadContext 和 TailContext 两个节点,如下图所示。

HeadContext 和 TailContext 属于 ChannelPipeline 中两个特殊的节点,它们都继承自 AbstractChannelHandlerContext,根据源码看下 AbstractChannelHandlerContext 有哪些实现类,如下图所示。除了 HeadContext 和 TailContext,还有一个默认实现类 DefaultChannelHandlerContext,我们可以猜到 DefaultChannelHandlerContext 封装的是用户在 Netty 启动配置类中添加的自定义业务处理器,DefaultChannelHandlerContext 会插入到 HeadContext 和 TailContext 之间。

接着我们比较一下上述三种 AbstractChannelHandlerContext 实现类的内部结构,发现它们都包含当前 ChannelPipeline 的引用、处理器 ChannelHandler。有一点不同的是 HeadContext 节点还包含了用于操作底层数据读写的 unsafe 对象。对于 Inbound 事件,会先从 HeadContext 节点开始传播,所以 unsafe 可以看作是 Inbound 事件的发起者;对于 Outbound 事件,数据最后又会经过 HeadContext 节点返回给客户端,此时 unsafe 可以看作是 Outbound 事件的处理者。
接下来我们继续看下用户自定义的处理器是如何加入 ChannelPipeline 的双向链表的。
在 Netty 客户端或者服务端启动时,就需要用户配置自定义实现的业务处理器。我们先看一段服务端启动类的代码片段:
ServerBootstrap b = new ServerBootstrap();

b.group(bossGroup, workerGroup)

        .channel(NioServerSocketChannel.class)

        .childHandler(new ChannelInitializer<SocketChannel>() {

            @Override

            public void initChannel(SocketChannel ch) {

                ch.pipeline().addLast(new SampleInboundA());

                ch.pipeline().addLast(new SampleInboundB());

                ch.pipeline().addLast(new SampleOutboundA());

                ch.pipeline().addLast(new SampleOutboundB());

            }

        });
我们知道 ChannelPipeline 分为入站 ChannelInboundHandler 和出站 ChannelOutboundHandler 两种处理器,它们都会被 ChannelHandlerContext 封装,不管是哪种处理器,最终都是通过双向链表连接,代码示例中构成的 ChannelPipeline 的结构如下。

那么 ChannelPipeline 在添加 Handler 时是如何区分 Inbound 和 Outbound 类型的呢?我们一起跟进 ch.pipeline().addLast() 方法源码,定位到核心代码如下。
public final ChannelPipeline addLast(EventExecutorGroup group, String name, ChannelHandler handler) {

    final AbstractChannelHandlerContext newCtx;

    synchronized (this) {

        // 1. 检查是否重复添加 Handler

        checkMultiplicity(handler);

        // 2. 创建新的 DefaultChannelHandlerContext 节点

        newCtx = newContext(group, filterName(name, handler), handler);

        // 3. 添加新的 DefaultChannelHandlerContext 节点到 ChannelPipeline

         addLast0(newCtx);

        // 省略其他代码

    }

    // 4. 回调用户方法

    callHandlerAdded0(newCtx);

    return this;

}
addLast() 主要做了以下四件事:
前三个步骤通过 synchronized 加锁完成的,为了防止多线程并发操作 ChannelPipeline 底层双向链表。下面我们一步步进行拆解介绍。
首先在添加 Handler 时,ChannelPipeline 会检查该 Handler 有没有被添加过。如果一个非线程安全的 Handler 被添加到 ChannelPipeline 中,那么当多线程访问时会造成线程安全问题。Netty 具体检查重复性的逻辑由 checkMultiplicity() 方法实现:
private static void checkMultiplicity(ChannelHandler handler) {

    if (handler instanceof ChannelHandlerAdapter) {

        ChannelHandlerAdapter h = (ChannelHandlerAdapter) handler;

        if (!h.isSharable() && h.added) {

            throw new ChannelPipelineException(

                    h.getClass().getName() +

                    " is not a @Sharable handler, so can't be added or removed multiple times.");

        }

        h.added = true;

    }

}
用户自定义实现的处理一般都继承于 ChannelHandlerAdapter,ChannelHandlerAdapter 中使用 added 变量标识该 Handler 是否被添加过。如果当前添加的 Handler 是非共享且已被添加过,那么就会抛出异常,否则将当前 Handler 标记为已添加。
h.isSharable() 用于判断 Handler 是否是共享的,所谓共享就是这个 Handler 可以被重复添加到不同的 ChannelPipeline 中,共享的 Handler 必须要确保是线程安全的。如果我们想实现一个共享的 Handler,只需要在 Handler 中添加 @sharable 注解即可,如下所示:
@ChannelHandler.Sharable

public class SampleInBoundHandler extends ChannelInboundHandlerAdapter {}
接下来我们分析 addLast() 的第二步,创建新的 DefaultChannelHandlerContext 节点。在执行 newContext() 方法之前,会通过 filterName() 为 Handler 创建一个唯一的名称,一起先看下 Netty 生成名称的策略是怎样的。
private String filterName(String name, ChannelHandler handler) {

    if (name == null) {

        return generateName(handler);

    }

    checkDuplicateName(name);

    return name;

}

private String generateName(ChannelHandler handler) {

    Map<Class<?>, String> cache = nameCaches.get();

    Class<?> handlerType = handler.getClass();

    String name = cache.get(handlerType);

    if (name == null) {

        name = generateName0(handlerType);

        cache.put(handlerType, name);

    }

    if (context0(name) != null) {

        String baseName = name.substring(0, name.length() - 1);

        for (int i = 1;; i ++) {

            String newName = baseName + i;

            if (context0(newName) == null) {

                name = newName;

                break;

            }

        }

    }

    return name;

}

private static String generateName0(Class<?> handlerType) {

    return StringUtil.simpleClassName(handlerType) + "#0";

}
Netty 会使用 FastThreadLocal 缓存 Handler 和名称的映射关系,在为 Handler 生成默认名称的之前,会先从缓存中查找是否已经存在,如果不存在,会调用 generateName0() 方法生成默认名称后,并加入缓存。可以看出 Netty 生成名称的默认规则是 “简单类名#0”,例如 HeadContext 的默认名称为 “DefaultChannelPipeline$HeadContext#0”。
为 Handler 生成完默认名称之后,还会通过 context0() 方法检查生成的名称是否和 ChannelPipeline 已有的名称出现冲突,查重的过程很简单,就是对双向链表进行线性搜索。如果存在冲突现象,Netty 会将名称最后的序列号截取出来,一直递增直至生成不冲突的名称为止,例如 “简单类名#1” “简单类名#2” “简单类名#3” 等等。
接下来回到 newContext() 创建节点的流程,可以定位到 AbstractChannelHandlerContext 的构造函数:
AbstractChannelHandlerContext(DefaultChannelPipeline pipeline, EventExecutor executor,

                              String name, Class<? extends ChannelHandler> handlerClass) {

    this.name = ObjectUtil.checkNotNull(name, "name");

    this.pipeline = pipeline;

    this.executor = executor;

    this.executionMask = mask(handlerClass);

    ordered = executor == null || executor instanceof OrderedEventExecutor;

}
AbstractChannelHandlerContext 中有一个 executionMask 属性并不是很好理解,它其实是一种常用的掩码运算操作,看下 mask() 方法是如何生成掩码的呢?
private static int mask0(Class<? extends ChannelHandler> handlerType) {

    int mask = MASK_EXCEPTION_CAUGHT;

    try {

        if (ChannelInboundHandler.class.isAssignableFrom(handlerType)) {

            // 如果是 ChannelInboundHandler 实例,所有 Inbound 事件置为 1

            mask |= MASK_ALL_INBOUND;

            // 排除 Handler 不感兴趣的 Inbound 事件

            if (isSkippable(handlerType, "channelRegistered", ChannelHandlerContext.class)) {

                mask &= ~MASK_CHANNEL_REGISTERED;

            }

            if (isSkippable(handlerType, "channelUnregistered", ChannelHandlerContext.class)) {

                mask &= ~MASK_CHANNEL_UNREGISTERED;

            }

            if (isSkippable(handlerType, "channelActive", ChannelHandlerContext.class)) {

                mask &= ~MASK_CHANNEL_ACTIVE;

            }

            if (isSkippable(handlerType, "channelInactive", ChannelHandlerContext.class)) {

                mask &= ~MASK_CHANNEL_INACTIVE;

            }

            if (isSkippable(handlerType, "channelRead", ChannelHandlerContext.class, Object.class)) {

                mask &= ~MASK_CHANNEL_READ;

            }

            if (isSkippable(handlerType, "channelReadComplete", ChannelHandlerContext.class)) {

                mask &= ~MASK_CHANNEL_READ_COMPLETE;

            }

            if (isSkippable(handlerType, "channelWritabilityChanged", ChannelHandlerContext.class)) {

                mask &= ~MASK_CHANNEL_WRITABILITY_CHANGED;

            }

            if (isSkippable(handlerType, "userEventTriggered", ChannelHandlerContext.class, Object.class)) {

                mask &= ~MASK_USER_EVENT_TRIGGERED;

            }

        }

        if (ChannelOutboundHandler.class.isAssignableFrom(handlerType)) {

            // 如果是 ChannelOutboundHandler 实例,所有 Outbound 事件置为 1

            mask |= MASK_ALL_OUTBOUND;

            // 排除 Handler 不感兴趣的 Outbound 事件

            if (isSkippable(handlerType, "bind", ChannelHandlerContext.class,

                    SocketAddress.class, ChannelPromise.class)) {

                mask &= ~MASK_BIND;

            }

            if (isSkippable(handlerType, "connect", ChannelHandlerContext.class, SocketAddress.class,

                    SocketAddress.class, ChannelPromise.class)) {

                mask &= ~MASK_CONNECT;

            }

            if (isSkippable(handlerType, "disconnect", ChannelHandlerContext.class, ChannelPromise.class)) {

                mask &= ~MASK_DISCONNECT;

            }

            if (isSkippable(handlerType, "close", ChannelHandlerContext.class, ChannelPromise.class)) {

                mask &= ~MASK_CLOSE;

            }

            if (isSkippable(handlerType, "deregister", ChannelHandlerContext.class, ChannelPromise.class)) {

                mask &= ~MASK_DEREGISTER;

            }

            if (isSkippable(handlerType, "read", ChannelHandlerContext.class)) {

                mask &= ~MASK_READ;

            }

            if (isSkippable(handlerType, "write", ChannelHandlerContext.class,

                    Object.class, ChannelPromise.class)) {

                mask &= ~MASK_WRITE;

            }

            if (isSkippable(handlerType, "flush", ChannelHandlerContext.class)) {

                mask &= ~MASK_FLUSH;

            }

        }

        if (isSkippable(handlerType, "exceptionCaught", ChannelHandlerContext.class, Throwable.class)) {

            mask &= ~MASK_EXCEPTION_CAUGHT;

        }

    } catch (Exception e) {

        PlatformDependent.throwException(e);

    }

    return mask;

}
Netty 中分别有多种 Inbound 事件和 Outbound 事件,如 Inbound 事件有 channelRegistered、channelActive、channelRead 等等。Netty 会判断 Handler 的类型是否是 ChannelInboundHandler 的实例,如果是会把所有 Inbound 事件先置为 1,然后排除 Handler 不感兴趣的方法。同理,Handler 类型如果是 ChannelOutboundHandler,也是这么实现的。
那么如何排除 Handler 不感兴趣的事件呢?Handler 对应事件的方法上如果有 @Skip 注解,Netty 认为该事件是需要排除的。大部分情况下,用户自定义实现的 Handler 只需要关心个别事件,那么剩余不关心的方法都需要加上 @Skip 注解吗?Netty 其实已经在 ChannelHandlerAdapter 中默认都添加好了,所以用户如果继承了 ChannelHandlerAdapter,默认没有重写的方法都是加上 @Skip 的,只有用户重写的方法才是 Handler 关心的事件。
回到 addLast() 的主流程,接着需要将新创建的 DefaultChannelHandlerContext 节点添加到 ChannelPipeline 中,跟进 addLast0() 方法的源码。
private void addLast0(AbstractChannelHandlerContext newCtx) {

    AbstractChannelHandlerContext prev = tail.prev;

    newCtx.prev = prev;

    newCtx.next = tail;

    prev.next = newCtx;

    tail.prev = newCtx;

}
addLast0() 非常简单,就是向 ChannelPipeline 中双向链表的尾部插入新的节点,其中 HeadContext 和 TailContext 一直是链表的头和尾,新的节点被插入到 HeadContext 和 TailContext 之间。例如代码示例中 SampleOutboundA 被添加时,双向链表的结构变化如下所示。

最后,添加完节点后,就到了回调用户方法,定位到 callHandlerAdded() 的核心源码:
final void callHandlerAdded() throws Exception {

    if (setAddComplete()) {

        handler().handlerAdded(this);

    }

}

final boolean setAddComplete() {

    for (;;) {

        int oldState = handlerState;

        if (oldState == REMOVE_COMPLETE) {

            return false;

        }


        if (HANDLER_STATE_UPDATER.compareAndSet(this, oldState, ADD_COMPLETE)) {

            return true;

        }

    }

}
Netty 会通过 CAS 修改节点的状态直至 REMOVE_COMPLETE 或者 ADD_COMPLETE,如果修改节点为 ADD_COMPLETE 状态,表示节点已经添加成功,然后会回调用户 Handler 中实现的 handlerAdded() 方法。
至此,Pipeline 添加 Handler 的实现原理我们已经讲完了,下面接着看下 Pipeline 删除 Handler 的场景。
在《源码篇:从 Linux 出发深入剖析服务端启动流程》的课程中我们介绍了一种特殊的处理器 ChannelInitializer,ChannelInitializer 在服务端 Channel 注册完成之后会从 Pipeline 的双向链表中移除,我们一起回顾下这段代码:
private boolean initChannel(ChannelHandlerContext ctx) throws Exception {

    if (initMap.add(ctx)) {

        try {

            initChannel((C) ctx.channel()); // 调用 ChannelInitializer 实现的 initChannel() 方法

        } catch (Throwable cause) {

            exceptionCaught(ctx, cause);

        } finally {

            ChannelPipeline pipeline = ctx.pipeline();

            if (pipeline.context(this) != null) {

                pipeline.remove(this); // 将 ChannelInitializer 自身从 Pipeline 中移出

            }

        }

        return true;

    }

    return false;

}
继续跟进 pipeline.remove() 的源码。
@Override

public final ChannelPipeline remove(ChannelHandler handler) {

    // 1. getContextOrDie 用于查找需要删除的节点

    remove(getContextOrDie(handler));

    return this;

}

private AbstractChannelHandlerContext remove(final AbstractChannelHandlerContext ctx) {

    assert ctx != head && ctx != tail;

    synchronized (this) {

        // 删除双向链表中的 Handler 节点

        atomicRemoveFromHandlerList(ctx);

        if (!registered) {

            callHandlerCallbackLater(ctx, false);

            return ctx;

        }

        EventExecutor executor = ctx.executor();

        if (!executor.inEventLoop()) {

            executor.execute(new Runnable() {

                @Override

                public void run() {

                    callHandlerRemoved0(ctx);

                }

            });

            return ctx;

        }

    }

    // 3. 回调用户函数

    callHandlerRemoved0(ctx);

    return ctx;

}
整个删除 Handler 的过程可以分为三步,分别为:
我们对每一步逐一进行拆解。
第一步查找需要删除的 Handler 节点,我们自然可以想到通过遍历双向链表实现。一起看下 getContextOrDie() 方法的源码:
private AbstractChannelHandlerContext getContextOrDie(ChannelHandler handler) {

    AbstractChannelHandlerContext ctx = (AbstractChannelHandlerContext) context(handler);

    if (ctx == null) {

        throw new NoSuchElementException(handler.getClass().getName());

    } else {

        return ctx;

    }

}

public final ChannelHandlerContext context(ChannelHandler handler) {

    if (handler == null) {

        throw new NullPointerException("handler");

    }

    // 遍历双向链表查找

    AbstractChannelHandlerContext ctx = head.next;

    for (;;) {

        if (ctx == null) {

            return null;

        }

        // 如果 Handler 相同,返回当前的 Context 节点

        if (ctx.handler() == handler) {

            return ctx;

        }

        ctx = ctx.next;

    }

}
Netty 确实是从双向链表的头结点开始依次遍历,如果当前 Context 节点的 Handler 要被删除的 Handler 相同,那么便找到了要删除的 Handler,然后返回当前 Context 节点。
找到需要删除的 Handler 节点之后,接下来就是将节点从双向链表中删除,再跟进atomicRemoveFromHandlerList() 方法的源码:
private synchronized void atomicRemoveFromHandlerList(AbstractChannelHandlerContext ctx) {

    AbstractChannelHandlerContext prev = ctx.prev;

    AbstractChannelHandlerContext next = ctx.next;

    prev.next = next;

    next.prev = prev;

}
删除节点和添加节点类似,都是基本的链表操作,通过调整双向链表的指针即可实现。假设现在需要删除 SampleOutboundA 节点,我们以一幅图来表示删除时指针的变化过程,如下所示。

删除完节点之后,最后 Netty 会回调用户自定义实现的 handlerRemoved() 方法,回调的实现过程与添加节点时是类似的,在这里我就不赘述了。
到此为止,我们已经学会了 ChannelPipeline 内部结构的基本操作,只需要基本的链表操作就可以实现 Handler 节点的添加和删除,添加时通过掩码运算的方式排出 Handler 不关心的事件。 ChannelPipeline 是如何调度 Handler 的呢?接下来我们继续学习。
我们知道,根据数据的流向,ChannelPipeline 分为入站 ChannelInboundHandler 和出站 ChannelOutboundHandler 两种处理器。Inbound 事件和 Outbound 事件的传播方向相反,Inbound 事件的传播方向为 Head -> Tail,而 Outbound 事件传播方向是 Tail -> Head。今天我们就以客户端和服务端请求-响应的场景,深入研究 ChannelPipeline 的事件传播机制。
当客户端向服务端发送数据时,服务端是如何接收的呢?回顾下之前我们所学习的 Netty Reactor 线程模型,首先 NioEventLoop 会不断轮询 OP_ACCEPT 和 OP_READ 事件,当事件就绪时,NioEventLoop 会及时响应。首先定位到 NioEventLoop 中源码的入口:
// NioEventLoop#processSelectedKey

if ((readyOps & (SelectionKey.OP_READ | SelectionKey.OP_ACCEPT)) != 0 || readyOps == 0) {

    unsafe.read();

}
可以看出 unsafe.read() 会触发后续事件的处理,有一点需要避免混淆,在服务端 Channel 和客户端 Channel 中绑定的 unsafe 对象是不一样的,因为服务端 Channel 只关心如何接收客户端连接,而客户端 Channel 需要关心数据的读写。这里我们重点分析一下客户端 Channel 读取数据的过程,跟进 unsafe.read() 的源码:
public final void read() {

    final ChannelConfig config = config();

    // 省略其他代码

    final ChannelPipeline pipeline = pipeline();

    final ByteBufAllocator allocator = config.getAllocator();

    final RecvByteBufAllocator.Handle allocHandle = recvBufAllocHandle();

    allocHandle.reset(config);

    ByteBuf byteBuf = null;

    boolean close = false;

    try {

        do {

            byteBuf = allocHandle.allocate(allocator); // 分配 ByteBuf

            allocHandle.lastBytesRead(doReadBytes(byteBuf)); // 将 Channel 中的数据读到 ByteBuf 中

            if (allocHandle.lastBytesRead() <= 0) {

                byteBuf.release();

                byteBuf = null;

                close = allocHandle.lastBytesRead() < 0;

                if (close) {

                    readPending = false;

                }

                break;

            }

            allocHandle.incMessagesRead(1);

            readPending = false;

            pipeline.fireChannelRead(byteBuf); // 传播 ChannelRead 事件

            byteBuf = null;

        } while (allocHandle.continueReading());

        allocHandle.readComplete();

        pipeline.fireChannelReadComplete(); // 传播 readComplete 事件

        if (close) {

            closeOnRead(pipeline);

        }

    } catch (Throwable t) {

        handleReadException(pipeline, byteBuf, t, close, allocHandle);

    } finally {

        if (!readPending && !config.isAutoRead()) {

            removeReadOp();

        }

    }

}
Netty 会不断从 Channel 中读取数据到分配的 ByteBuf 中,然后通过 pipeline.fireChannelRead() 方法触发 ChannelRead 事件的传播,fireChannelRead() 是我们需要重点分析的对象。
// DefaultChannelPipeline

public final ChannelPipeline fireChannelRead(Object msg) {

    AbstractChannelHandlerContext.invokeChannelRead(head, msg);

    return this;

}

// AbstractChannelHandlerContext

static void invokeChannelRead(final AbstractChannelHandlerContext next, Object msg) {

    final Object m = next.pipeline.touch(ObjectUtil.checkNotNull(msg, "msg"), next);

    EventExecutor executor = next.executor();

    if (executor.inEventLoop()) { // 当前在 Reactor 线程内部,直接执行

        next.invokeChannelRead(m);

    } else {

        executor.execute(new Runnable() { // 如果是外部线程,则提交给异步任务队列

            @Override

            public void run() {

                next.invokeChannelRead(m);

            }

        });

    }

}
Netty 首先会以 Head 节点为入参,直接调用一个静态方法 invokeChannelRead()。如果当前是在 Reactor 线程内部,会直接执行 next.invokeChannelRead() 方法。如果是外部线程发起的调用,Netty 会把 next.invokeChannelRead() 调用封装成异步任务提交到任务队列。通过之前对 NioEventLoop 源码的学习,我们知道这样可以保证执行流程全部控制在当前 NioEventLoop 线程内部串行化执行,确保线程安全性。我们抓住核心逻辑 next.invokeChannelRead() 继续跟进。
// AbstractChannelHandlerContext

private void invokeChannelRead(Object msg) {

    if (invokeHandler()) {

        try {

            ((ChannelInboundHandler) handler()).channelRead(this, msg);

        } catch (Throwable t) {

            notifyHandlerException(t);

        }

    } else {

        fireChannelRead(msg);

    }

}
可以看出,当前 ChannelHandlerContext 节点会取出自身对应的 Handler,执行 Handler 的 channelRead 方法。此时当前节点是 HeadContext,所以 Inbound 事件是从 HeadContext 节点开始进行传播的,看下 HeadContext.channelRead() 是如何实现的。
// HeadContext

public void channelRead(ChannelHandlerContext ctx, Object msg) {

    ctx.fireChannelRead(msg);

}

// AbstractChannelHandlerContext

public ChannelHandlerContext fireChannelRead(final Object msg) {

    // 找到下一个节点,执行 invokeChannelRead

    invokeChannelRead(findContextInbound(MASK_CHANNEL_READ), msg);

    return this;

}
我们发现 HeadContext.channelRead() 并没有做什么特殊操作,而是直接通过 fireChannelRead() 方法继续将读事件继续传播下去。接下来 Netty 会通过 findContextInbound(MASK_CHANNEL_READ), msg) 找到 HeadContext 的下一个节点,然后继续执行我们之前介绍的静态方法 invokeChannelRead(),从而进入一个递归调用的过程,直至某个条件结束。以上 channelRead 的执行过程我们可以梳理成一幅流程图:

Netty 是如何判断 InboundHandler 是否关心 channelRead 事件呢?这就涉及findContextInbound(MASK_CHANNEL_READ), msg) 中的一个知识点,和上文中我们介绍的 executionMask 掩码运算是息息相关的。首先看下 findContextInbound() 的源码:
private AbstractChannelHandlerContext findContextInbound(int mask) {

    AbstractChannelHandlerContext ctx = this;

    do {

        ctx = ctx.next;

    } while ((ctx.executionMask & mask) == 0);

    return ctx;

}
MASK_CHANNEL_READ 的值为 1 << 5,表示 channelRead 事件所在的二进制位已被置为 1。在代码示例中,SampleInboundA 是我们添加的 Inbound 类型的自定义处理器,它所对应的 executionMask 掩码和 MASK_CHANNEL_READ 进行与运算的结果如果不为 0,表示 SampleInboundA 对 channelRead 事件感兴趣,需要触发执行 SampleInboundA 的 channelRead() 方法。
Inbound 事件在上述递归调用的流程中什么时候能够结束呢?有以下两种情况:
接下来,我们着重看下 TailContext 节点做了哪些工作。
public void channelRead(ChannelHandlerContext ctx, Object msg) {

    onUnhandledInboundMessage(ctx, msg);

}

protected void onUnhandledInboundMessage(Object msg) {

    try {

        logger.debug(

                "Discarded inbound message {} that reached at the tail of the pipeline. " +

                        "Please check your pipeline configuration.", msg);

    } finally {

        ReferenceCountUtil.release(msg);

    }

}
可以看出 TailContext 只是日志记录了丢弃的 Inbound 消息,并释放 ByteBuf 做一个兜底保护,防止内存泄漏。
到此为止,Inbound 事件的传播流程已经介绍完了,Inbound 事件在 ChannelPipeline 中的传播方向是 Head -> Tail。Netty 会从 ChannelPipeline 中找到对传播事件感兴趣的 Inbound 处理器,执行事件回调方法,然后继续向下一个节点传播,整个事件传播流程是一个递归调用的过程。
经常听到这么一句话:“网络编程只要你使用了 Netty 框架,你的程序性能基本就不会差。”这句话虽然有些绝对,但是也从侧面上反映了人们对 Netty 高性能的肯定。
实现高性能的网络应用框架离不开 I/O 模型问题,在了解 Netty 高性能原理之前我们需要先储备 I/O 模型的基本知识。
I/O 请求可以分为两个阶段,分别为调用阶段和执行阶段。
为了方便大家理解,可以看一下这张图:

接下来我们来回顾一下 Linux 的 5 种主要 I/O 模式,并看下各种 I/O 模式的优劣势都在哪里?

如上图所表现的那样,应用进程向内核发起 I/O 请求,发起调用的线程一直等待内核返回结果。一次完整的 I/O 请求称为BIO(Blocking IO,阻塞 I/O),所以 BIO 在实现异步操作时,只能使用多线程模型,一个请求对应一个线程。但是,线程的资源是有限且宝贵的,创建过多的线程会增加线程切换的开销。

在刚介绍完 BIO 的网络模型之后,NIO 自然就很好理解了。
如上图所示,应用进程向内核发起 I/O 请求后不再会同步等待结果,而是会立即返回,通过轮询的方式获取请求结果。NIO 相比 BIO 虽然大幅提升了性能,但是轮询过程中大量的系统调用导致上下文切换开销很大。所以,单独使用非阻塞 I/O 时效率并不高,而且随着并发量的提升,非阻塞 I/O 会存在严重的性能浪费。

多路复用实现了一个线程处理多个 I/O 句柄的操作。多路指的是多个数据通道,复用指的是使用一个或多个固定线程来处理每一个 Socket。select、poll、epoll 都是 I/O 多路复用的具体实现,线程一次 select 调用可以获取内核态中多个数据通道的数据状态。多路复用解决了同步阻塞 I/O 和同步非阻塞 I/O 的问题,是一种非常高效的 I/O 模型。

信号驱动 I/O 并不常用,它是一种半异步的 I/O 模型。在使用信号驱动 I/O 时,当数据准备就绪后,内核通过发送一个 SIGIO 信号通知应用进程,应用进程就可以开始读取数据了。

异步 I/O 最重要的一点是从内核缓冲区拷贝数据到用户态缓冲区的过程也是由系统异步完成,应用进程只需要在指定的数组中引用数据即可。异步 I/O 与信号驱动 I/O 这种半异步模式的主要区别:信号驱动 I/O 由内核通知何时可以开始一个 I/O 操作,而异步 I/O 由内核通知 I/O 操作何时已经完成。
了解了上述五种 I/O,我们再来看 Netty 如何实现自己的 I/O 模型。Netty 的 I/O 模型是基于非阻塞 I/O 实现的,底层依赖的是 JDK NIO 框架的多路复用器 Selector。一个多路复用器 Selector 可以同时轮询多个 Channel,采用 epoll 模式后,只需要一个线程负责 Selector 的轮询,就可以接入成千上万的客户端。
在 I/O 多路复用的场景下,当有数据处于就绪状态后,需要一个事件分发器(Event Dispather),它负责将读写事件分发给对应的读写事件处理器(Event Handler)。事件分发器有两种设计模式:Reactor 和 Proactor,Reactor 采用同步 I/O, Proactor 采用异步 I/O。
Reactor 实现相对简单,适合处理耗时短的场景,对于耗时长的 I/O 操作容易造成阻塞。Proactor 性能更高,但是实现逻辑非常复杂,目前主流的事件驱动模型还是依赖 select 或 epoll 来实现。

(摘自 Scalable IO in Java - Doug Lea's)
上图所描述的便是 Netty 所采用的主从 Reactor 多线程模型,所有的 I/O 事件都注册到一个 I/O 多路复用器上,当有 I/O 事件准备就绪后,I/O 多路复用器会将该 I/O 事件通过事件分发器分发到对应的事件处理器中。该线程模型避免了同步问题以及多线程切换带来的资源开销,真正做到高性能、低延迟。
在 JDK 1.4 投入使用之前,只有 BIO 一种模式。开发过程相对简单。新来一个连接就会创建一个新的线程处理。随着请求并发度的提升,BIO 很快遇到了性能瓶颈。JDK 1.4 以后开始引入了 NIO 技术,支持 select 和 poll;JDK 1.5 支持了 epoll;JDK 1.7 发布了 NIO2,支持 AIO 模型。Java 在网络领域取得了长足的进步。
既然 JDK NIO 性能已经非常优秀,为什么还要选择 Netty?这是因为 Netty 做了 JDK 该做的事,但是做得更加完备。我们一起看下 Netty 相比 JDK NIO 有哪些突出的优势。
可以参考这篇 使用keytool工具生成证书
关于keytool的官方说明:https://docs.oracle.com/javase/6/docs/technotes/tools/solaris/keytool.html
对于自签证书 需要在客户端进行导入,导入证书命令如下:
keytool -import -trustcacerts -alias netty -keystore $JAVA_HOME/jre/lib/security/cacerts -file nginx.crt -storepass changeit
例如:
RickydeMBP:netty-in-action apple$ sudo keytool -import -trustcacerts -alias netty -keystore /Library/Java/JavaVirtualMachines/jdk1.8.0_171.jdk/Contents/Home/jre/lib/security/cacerts -file /var/folders/_y/q3j1y2fn6996rzfd8_50xzjm0000gn/T/keyutil_example.com_2847488297227795850.crt -storepass changeit
会提示 是否信任此证书? 输入 y 即可。控制台输出如下:
所有者: CN=example.com
发布者: CN=example.com
序列号: 9ac1b92fa3e2812
有效期为 Sat Jun 01 10:58:41 CST 2019 至 Sat Jan 01 07:59:59 CST 10000
证书指纹:
	 MD5:  92:5C:7A:F6:56:F5:04:6C:AF:D3:AD:1D:09:B0:3E:E1
	 SHA1: 59:29:5E:19:BE:B7:9D:4F:FB:96:0B:5E:A8:F8:7F:1C:19:0F:BB:D3
	 SHA256: AC:7E:DB:8F:84:16:A5:49:CE:C2:BB:CD:A2:E9:C5:1B:F1:38:C6:9D:FA:51:E6:82:34:FB:66:52:35:9C:53:16
签名算法名称: SHA256withRSA
主体公共密钥算法: 2048 位 RSA 密钥
版本: 3
是否信任此证书? [否]:  y
证书已添加到密钥库中
删除:
keytool -delete -alias netty -keystore $JAVA_HOME/jre/lib/security/cacerts -storepass changeit
Netty中提供了io.netty.handler.ssl.SslHandler类,使用起来非常便捷。
本文中使用的Netty版本为 4.1.42.Final,不同版本可能略有不同。
代码如下:
    public void run() throws Exception {

        EventLoopGroup bossGroup = new NioEventLoopGroup(); // (1)
        EventLoopGroup workerGroup = new NioEventLoopGroup();

        UserAuthHandler userAuthHandler = new UserAuthHandler();

        //SSL
        SelfSignedCertificate ssc = new SelfSignedCertificate();
        System.out.println(ssc.certificate());
        System.out.println(ssc.privateKey());

        SslContext sslContext = SslContextBuilder.forServer(ssc.certificate(), ssc.privateKey())
                .build();

        try {
            ServerBootstrap b = new ServerBootstrap(); // (2)
            b.group(bossGroup, workerGroup)
                    .channel(NioServerSocketChannel.class) // (3)
                    .handler(new LoggingHandler(LogLevel.INFO)) //增加LOG
                    .option(ChannelOption.SO_BACKLOG, 128)
                    .childHandler(new ChannelInitializer<NioSocketChannel>() { // (4)
                        @Override
                        public void initChannel(NioSocketChannel ch) throws Exception {
                            //pipeline
                            ChannelPipeline pipeline = ch.pipeline();

                            //增加LOG
                            pipeline.addLast("loggingHandler", new LoggingHandler(LogLevel.INFO));

                            //空闲检测
                            pipeline.addLast("idleCheckHandler", new ServerIdleCheckHandler());

                            //SSL
                            SslHandler sslHandler = sslContext.newHandler(ch.alloc());
                            pipeline.addLast("sslHandler", sslHandler);

                            //注意:顺序不能错
                            //handler的顺序:读保证自上而下,写保证自下而上就行了,读与写之间其实顺序无所谓,但是一般为了好看对称,我们是一组一组写。
                            pipeline.addLast("orderFrameDecoder", new OrderFrameDecoder());
                            pipeline.addLast("orderFrameEncoder", new OrderFrameEncoder());

                            pipeline.addLast("orderProtocolEncoder", new OrderProtocolEncoder());
                            pipeline.addLast("orderProtocolDecoder", new OrderProtocolDecoder());

                            //用户身份鉴权
                            pipeline.addLast("userAuthHandler", userAuthHandler);

                            pipeline.addLast("orderProcessHandler", new OrderServerProcessHandler());
                        }
                    });

            // Bind and start to accept incoming connections.
            ChannelFuture f = b.bind(port).sync(); // (7)
            LOG.info("点餐系统-服务端, port:{} 启动完成", port);

            // Wait until the server socket is closed.
            // In this example, this does not happen, but you can do that to gracefully
            // shut down your server.
            f.channel().closeFuture().sync();
        } finally {
            workerGroup.shutdownGracefully();
            bossGroup.shutdownGracefully();
        }
    }
代码如下:
    public void run() throws Exception {
        EventLoopGroup workerGroup = new NioEventLoopGroup();

        //SSL
        SslContext sslContext = SslContextBuilder.forClient()
                .build();
        try {
            Bootstrap b = new Bootstrap(); // (1)
            b.group(workerGroup); // (2)
            b.channel(NioSocketChannel.class); // (3)
            b.option(ChannelOption.SO_KEEPALIVE, true); // (4)
            b.handler(new ChannelInitializer<SocketChannel>() {
                @Override
                public void initChannel(SocketChannel ch) throws Exception {
                    //pipeline
                    ChannelPipeline pipeline = ch.pipeline();

                    //增加LOG
                    pipeline.addLast("loggingHandler", new LoggingHandler(LogLevel.INFO));

                    //SSL
                    SslHandler sslHandler = sslContext.newHandler(ch.alloc());
                    pipeline.addLast("sslHandler", sslHandler);

                    //空闲检测
                    pipeline.addLast("idleStateHandler", new IdleStateHandler(0, 15, 0, TimeUnit.SECONDS));

                    //注意:顺序不能错
                    //handler的顺序:读保证自上而下,写保证自下而上就行了,读与写之间其实顺序无所谓,但是一般为了好看对称,我们是一组一组写。
                    pipeline.addLast("orderFrameDecoder", new OrderFrameDecoder());
                    pipeline.addLast("orderFrameEncoder", new OrderFrameEncoder());

                    pipeline.addLast("orderProtocolEncoder", new OrderProtocolEncoder());
                    pipeline.addLast("orderProtocolDecoder", new OrderProtocolDecoder());

                    //心跳检测
                    pipeline.addLast("keepLiveHandler", new ClientKeepLiveHandler());

                    //处理响应结果
                    pipeline.addLast("orderClientHandler", new OrderClientHandler());

                }
            });

            // Start the client.
            ChannelFuture f = b.connect(host, port).sync(); // (5)
            LOG.info("点餐系统-客户端, 连接服务器:{}:{}", host, port);

            //身份鉴权
            Command authCommand = new AuthCommand("admin", "admin");
            RpcRequest authRequest = new RpcRequest(IdUtils.nextRequestId(), authCommand);
            //发送
            f.channel().writeAndFlush(authRequest);

            //1.发送点餐请求
            Long requestId = IdUtils.nextRequestId();
            Command command = new OrderCommand(IdUtils.nextSeatId(), Arrays.asList("鱼香肉丝"));
            RpcRequest request = new RpcRequest(requestId, command);

            //2.写入
            f.channel().writeAndFlush(request);
            LOG.info("点餐系统-客户端, 向服务器:{}:{} 发送点餐请求requestId:{}, 请求报文:{}",
                    host, port, requestId, JsonUtils.toJson(request));

            //3.等待响应结果
            CommandResultFuture future = new CommandResultFuture();
            RequestPendingCenter.INSTANCE.add(requestId, future);

            //3.1 获取结果
            CommandResult result = future.get();
            LOG.info("点餐系统-客户端, 收到服务器:{}:{} 请求requestId:{} 响应结果:{}",
                    host, port, requestId, JsonUtils.toJson(result));

            // Wait until the connection is closed.
            f.channel().closeFuture().sync();
        } finally {
            workerGroup.shutdownGracefully();
        }
    }
基本上所有的网络处理程序都有以下基本的处理过程:
Read request
Decode request
Process service
Encode reply
Send reply

对于每一个请求都分发给一个线程,每个线程中都独自处理上面的流程。
这种模型由于IO在阻塞时会一直等待,因此在用户负载增加时,性能下降的非常快。
server导致阻塞的原因:
维基定位如下:
The reactor design pattern is an event handling pattern for handling service requests delivered concurrently by one or more inputs. The service handler then demultiplexes the incoming requests and dispatches them synchronously to associated request handlers.
从这个描述中,我们知道Reactor模式首先是事件驱动的,有一个或多个并发输入源,有一个Service Handler,有多个Request Handlers;这个Service Handler会同步的将输入的请求(Event)多路复用的分发给相应的Request Handler。
从结构上,这有点类似生产者消费者模式,即有一个或多个生产者将事件放入一个Queue中,而一个或多个消费者主动的从这个Queue中Poll事件来处理;而Reactor模式则并没有Queue来做缓冲,每当一个Event输入到Service Handler之后,该Service Handler会主动的根据不同的Event类型将其分发给对应的Request Handler来处理。
对于应用程序而言,CPU 的处理速度是远远快于 IO 的速度的。如果CPU为了IO操作(例如从Socket读取一段数据)而阻塞显然是不划算的。好一点的方法是分为多进程或者线程去进行处理,但是这样会带来一些进程切换的开销,试想一个进程一个数据读了500ms,期间进程切换到它3次,但是CPU却什么都不能干,就这么切换走了,是不是也不划算?
这时先驱们找到了事件驱动,或者叫回调的方式,来完成这件事情。这种方式就是,应用业务向一个中间人注册一个回调(event handler),当IO就绪后,就这个中间人产生一个事件,并通知此handler进行处理。这种回调的方式,也体现了“好莱坞原则”(Hollywood principle)-“Don’t call us, we’ll call you”,在我们熟悉的IoC中也有用到。看来软件开发真是互通的!
Reactor 核心是解决多请求问题。一般来说,Thread-Per-Connection 的应用场景并发量不是特别大,如果并发量过大,会导致线程资源瞬间耗尽,导致服务陷入阻塞,这个时候就需要 Reactor 模式来解决这个问题。Reactor 通过多路复用的**大大减少线程资源的使用。

简单来说,接收请求和处理请求是同一线程中处理。
Reactor为单个线程,需要处理accept连接,同时发送请求到处理器中。由于只有单个线程,所以处理器中的业务需要能够快速处理完。
对于一些小容量应用场景,可以使用单线程模型。但是对于高负载、大并发或大数据量的应用场景却不合适,主要原因如下:

将处理器的执行放入线程池,多线程进行业务处理。但Reactor仍为单个线程。
继续改进:对于多个CPU的机器,为充分利用系统资源,将Reactor拆分为两部分。

简单来说,接收请求和处理请求是不同线程中处理。
mainReactor负责监听连接,accept连接给subReactor处理(为什么要单独分一个Reactor来处理监听呢?因为像TCP这样需要经过3次握手才能建立连接,这个建立连接的过程也是要耗时间和资源的,单独分一个Reactor来处理,可以提高性能)。mainReactor 一般只有一个,主要负责接收客户端的连接并将其传递给 subReactor。
subReactor 一般会有多个,主要负责处理与客户端的通信。
注意:上图使用了Thread Pool来处理耗时的业务逻辑,提高Reactor线程的I/O响应,不至于因为一些耗时的业务逻辑而延迟对后面I/O请求的处理。
优点:
缺点:
A declarative, efficient, and flexible JavaScript library for building user interfaces.
🖖 Vue.js is a progressive, incrementally-adoptable JavaScript framework for building UI on the web.
TypeScript is a superset of JavaScript that compiles to clean JavaScript output.
An Open Source Machine Learning Framework for Everyone
The Web framework for perfectionists with deadlines.
A PHP framework for web artisans
Bring data to life with SVG, Canvas and HTML. 📊📈🎉
JavaScript (JS) is a lightweight interpreted programming language with first-class functions.
Some thing interesting about web. New door for the world.
A server is a program made to process requests and deliver data to clients.
Machine learning is a way of modeling and interpreting data that allows a piece of software to respond intelligently.
Some thing interesting about visualization, use data art
Some thing interesting about game, make everyone happy.
We are working to build community through open source technology. NB: members must have two-factor auth.
Open source projects and samples from Microsoft.
Google ❤️ Open Source for everyone.
Alibaba Open Source for everyone
Data-Driven Documents codes.
China tencent open source team.