This repository contains the code used in my presentation Make Smarter Automations - Not More Automations in the Home Assistant Conference 2020.
Make sure to also check out all the other awesome talks at the Home Assistant YouTube channel.
The presentation slides are in the pdf in this repository.
I spent a whole section of my talk explaining that you need to take special care for time interval conditions that span across midning.
THIS IS ENTIRELY UNTRUE! Home Assistant handles time intervals crossing midnight perfectly in the way intuition says it should, and the following condition will pass after 10 PM and before 4 AM:
condition: time
after: 22:00
before: 04:00
Things like appdaemon or node-red may work differently, though. I do not know.
The dollhouse was borrowed from my kids. It had two 3d-printed lamps, a magnetic door sensor and an LDR light detector. All connected to a single NodeMCU running ESP-home which made it a breeze to build and integrate in my demo Home Assistant instance running in a docker container.
Here's a video of my technology test run: https://www.youtube.com/watch?v=r4bDM6cE1ik
The ESP-home program is in porchlights.yaml in this repository.
Since I had planned to create all automations live, I also hacked in the ability to make an input_select act as the system clock so we wouldn't have to wait until 10 PM came around. The code for this is the worst mess of duct taped cr*p I ever McGyvered together, and will not be made public.
Here's the finished automation from my presentation. A bit cleaned up, and with some comments. I also replaced all device based automations that are oh-so-useful in the GUI with entity_id and service call based ones instead, because that looks better in yaml, but the principle should still be clear.
Alternatively, you can take a look at automations.yaml in this repository to see all of the GUI generated automations used in the demo.
There's also a blueprint available here.
alias: Right Light Automation

# The automation will do The Right Thing (TM) no matter when it's executed or what triggers it.
# So we can pretty much sprinkle in any trigger we can think of that MAY change any input state
# which our end state depends on.
# And also any trigger that indicate that the light MAY be in the wrong state.
trigger:
    # A state trigger with neither to or from specified will trigger on ANY state change for
    # that entity, i.e. both when it starts detecting and stops detecting sunlight.
  - platform: state
    entity_id: binary_sensor.sunlight
  - platform: state
    entity_id: binary_sensor.door
  - platform: time
    at: '04:00'
  - platform: time
    at: '22:00'

    # When Home Assistant starts up, the state of the light may be wrong or unknown, so we may
    # want to run the automation then too.
  - platform: homeassistant
    event: start

    # This is very useful for devices with bad connections. As soon as they become available the
    # automation runs and makes it assume the correct state.
  - platform: state
    entity_id: light.right_light
    from: unavailable


# For clarity in my demonstration I used no conditions.
# You may, however, want to check that e.g. the sunlight or door sensors actually have a defined
# state (as opposed to Undefined).
condition: []


action:
  - choose:
      # The most clearly defined case is if light outside. Then the lights should always be off.
      - conditions:
          - condition: state
            state: "on"
            entity_id: binary_sensor.sunlight
        sequence:
          - service: light.turn_off
            entity_id: light.right_light

      # Remember that the chooser runs the first branch which matches. That means anything below
      # here  will only happen if the condition above failed, i.e. if and only if it's dark
      # outside.

      # If the sun is down, the lights should be on IF it's not in the middle of the night,
      # so that's what's checked next.
      - conditions:
          - condition: time
            after: '04:00'
            before: '22:00'
        sequence:
          - service: light.turn_on
            entity_id: light.right_light

      # Again, the next case only happens if both of the above ones are not true. Here that
      # means if it's dark outside, and it IS in the middle of the night.
      # In that case we want the light to be on only if the door is open, so that's what we
      # check next.
      - conditions:
        - condition: state
          entity_id: binary_sensor.door
          state: "on"
        sequence:
          - service: light.turn_on
            entity_id: light.right_light

    # The default case runs only if no other case is true.
    # I chose the default case such that we can use that as the final state case (dark outside,
    # middle of the night, door closed) as well, but that may not be what you want. The default
    # case is also what you will get in any situation you have overlooked (like a sensor value
    # is undefined, perhaps?), and if that's not the same state as your last one, you need to
    # add a final check for your known case.
    default:
      - service: light.turn_off
        entity_id: light.right_light

    # Note that you can add actions after the chooser which will run regardless of which branch
    # was taken (unless that branch stops the automation).
# I didn't need that, so it's not included in the example.condition will check if a condition is true. If it is not, execution of the automation will stop.
choose will check a list of condition and run the set of actions associated to the first condition it encounters which is true.
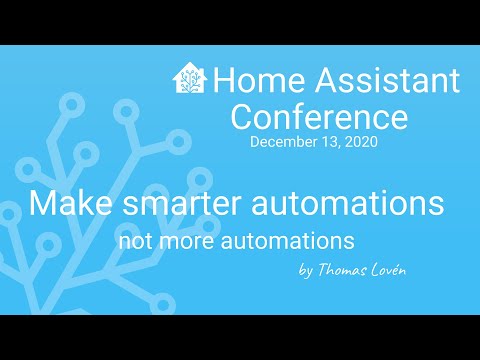
This top-secret preview of a work-in-progress alternative way of displaying automation flows shows the difference:
Starting from the top, you have a condition and then a choose with two options and a default branch. Only one will be picked.
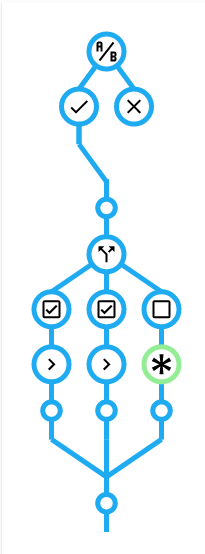
Also note that those can of course be nested indefinitely:
I mentioned at the end of the talk that adding e.g. the condition that the door should be closed for five minutes before the lights turn off is possible, but slightly more involved than in a trigger controlled automation. Basically, you need to add a separate trigger:
  - platform: state
    entity_id: binary_sensor.door
    to: "off"
    for: "00:05:00"
and also include the same condition in the condition:
      - conditions:
        - condition: state
          entity_id: binary_sensor.door
          state: "off"
          for: "00:05:00"
        sequence:
          - service: light.turn_off
entity_id: light.right_lightIn an answer to a question I mentioned pretty much halving the number of my automation the moment choose was introduced.
This is easy for things like a motion sensor turning a light on or off. In such simple cases, you don't even need to consider the delay twice (as above). Instead you add the motion sensor detecting motion as a trigger, and also the motion sensor not detecting motion for a set time.
Then in the chooser, you just look at the current state of the motion sensor. If it is currently triggered, turn the light on, otherwise off.
While my talk was about state controlled automations, there was a lot of focus on the choose action.
A neat trigger controlled automation trick with the chooser is controlling several lights with the same button.
I have my ESP-home desk light controlled by the Zigbee button which is directly paired to my ceiling lights in the office (the direct pairing means it communicates directly to the bulb, and will keep working even without Home Assistant). Despite the direct pairing, the button still sends events to Home Assistant which I can trigger on.
Another example of the chooser in an automation is setting the radio station and controlling volume with a Xiaomi Magic Cube (don't worry - you can bet I'll be making a blueprint for that...).
SlackerLabs on Youtube has a video titled Build Smarter Automations in Home Assistant Using Scripts. I found it after submitting my talk idea to the conference, but it was actually published five days before. It describes another way to simplify automations and reuse code. Take a look! Our two methods could definitely be combined for added benefit.
Several weeks later, I also found this video How to Build Smarter Home Assistant Automations With Choose from the same channel, which also employs the same techniques.