
Welcome back! This tutorial outlines the implementation of on-premises Active Directory within Azure Virtual Machines.
- Microsoft Azure (Virtual Machines/Compute)
- Remote Desktop
- Active Directory Domain Services
- PowerShell
- Windows Server 2022
- Windows 10 (22H2)
- Setup Resources In Azure
- Ensure Connection between Client and Domain Controller
- Install Active Directory and Admin Creation
- Create X-Amount of Client Users using PowerShell Script
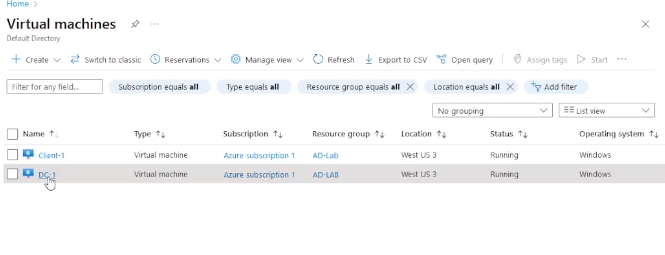
- Create the Domain Controller VM (Windows Server 2022) named “DC-1" Take note of the Resource Group and Virtual Network (Vnet) that get created at this time
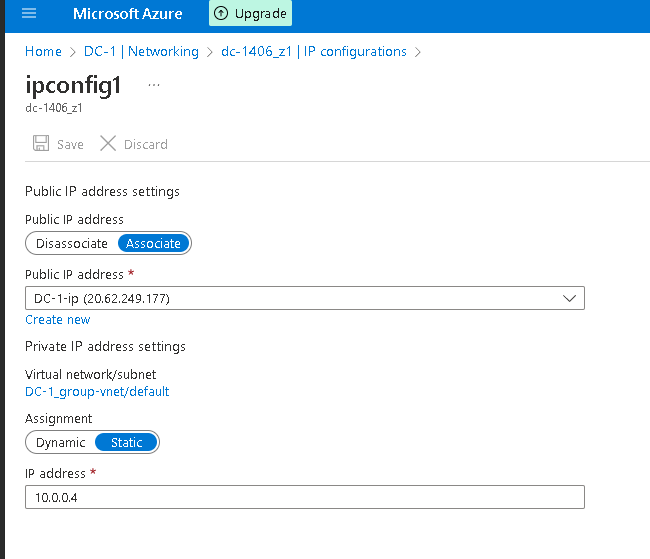
- Set Domain Controller’s NIC Private IP address to be static DC-1 > Networking > NIC > IP Configurations
- Create the Client VM (Windows 10) named “Client-1”. Use the same Resource Group and Vnet that was created in the DC-1 step.
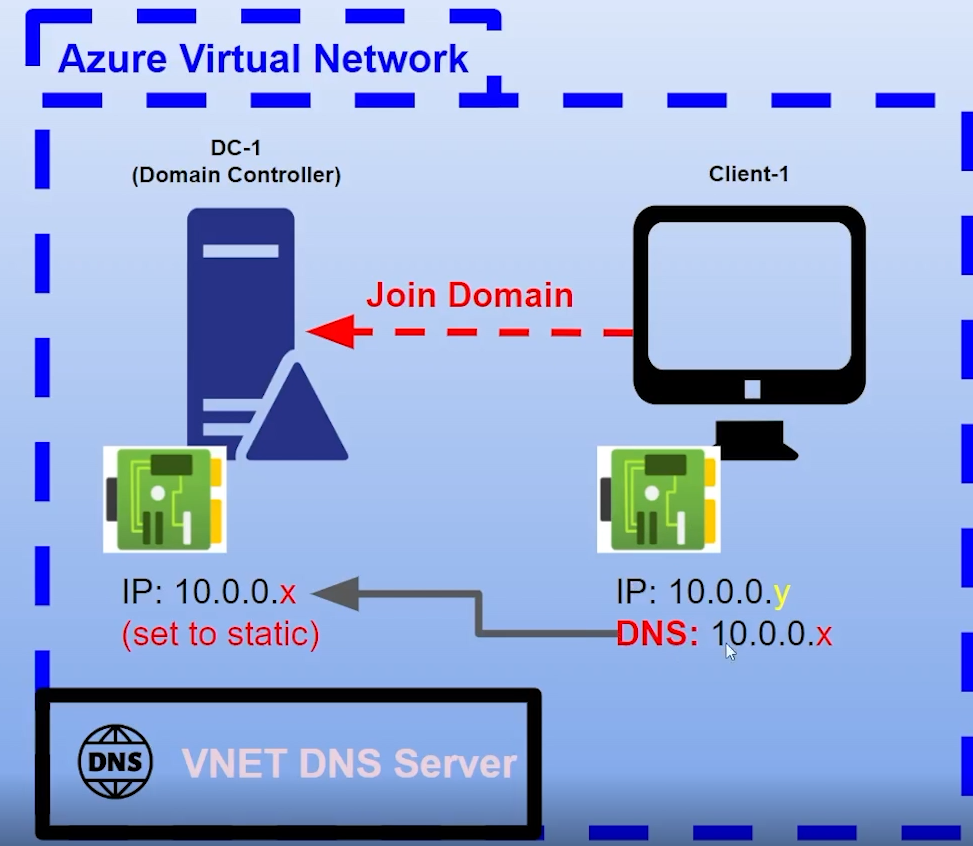
- Ensure that both VMs are in the same Vnet [you can check the topology with Network Watcher] Here is an illustration of what we are doing:
- Login to Client-1 with Remote Desktop and ping DC-1’s private IP address with ping -t (perpetual ping)
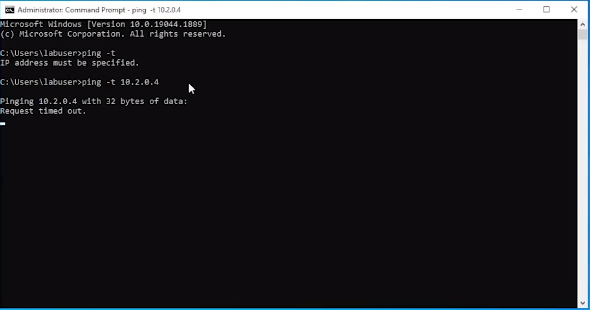
Oh! Notice we are getting a "Request timed out." Let us fix that.
- Login to the Domain Controller and enable ICMPv4 in on the local windows Firewall, keep client-1 instance open.
-
Start Menu > Windows Defender Firewall with Advanced Secruity programme > Inbound Rules > Sort by Porotocol >
-
Enable "Core Networking Diagnostics - ICMP Echo Request (ICMPv4-In) Private and Domain Profiles. 2 Inbound Rules.

- Check back at Client-1 to see the ping succeed
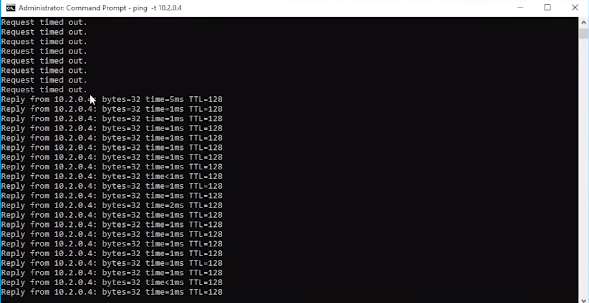
Look at that beautiful traffic. Now its time to ...
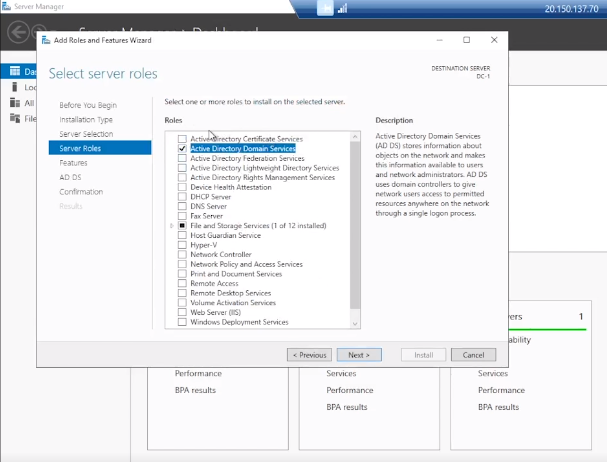
- Login to DC-1 and install Active Directory Domain Services
- Server Manager > "Add Roles and Features" > Check "Active Directory Domain Services"
- Promote as a DC: Setup a new forest as mydomain.com (can be anything, just remember what it is)


- Restart and then log back into DC-1 as user: mydomain.com\labuser

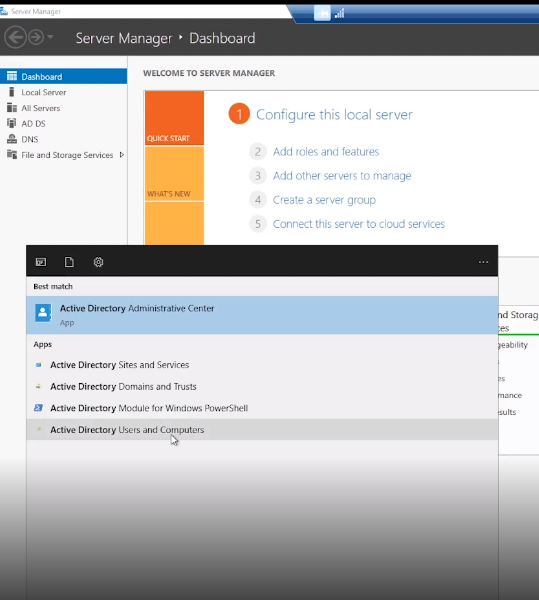
- In Active Directory Users and Computers (ADUC), create an Organizational Unit (OU) called “_EMPLOYEES"

- Create a new OU named “_ADMINS"
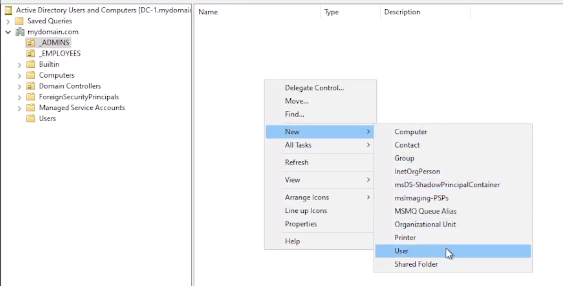
- Create a new employee named “Jane Doe” (same password) with the username of “jane_admin”
- Add jane_admin to the “Domain Admins” Security Group

- Log out/close the Remote Desktop connection to DC-1 and log back in as “mydomain.com\jane_admin"
- User jane_admin as your admin account from now on

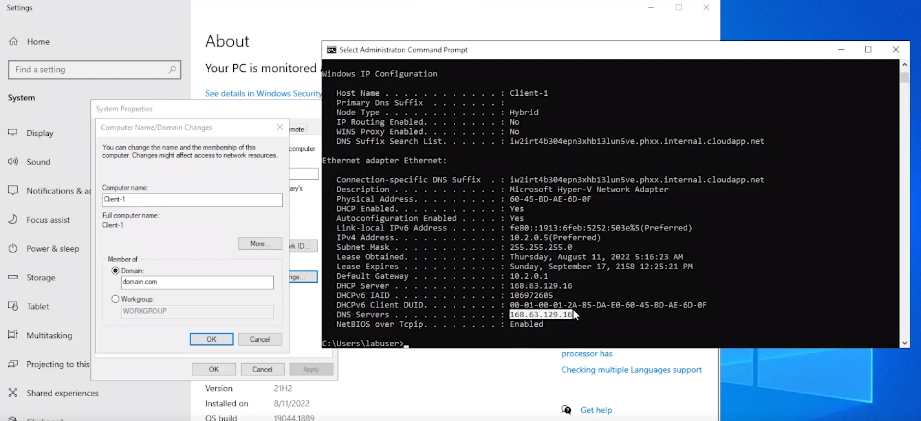
- From the Azure Portal, set Client-1’s DNS settings to the DC’s Private IP address
- From the Azure Portal, restart Client-1
- Login to Client-1 (Remote Desktop) as the original local admin (labuser) and join it to the domain (computer will restart)
- Login to the Domain Controller (Remote Desktop) and verify Client-1 shows up in Active Directory Users and Computers (ADUC) inside the “Computers” container on the root of the domain
- Create a new OU named “_CLIENTS” and drag Client-1 into there
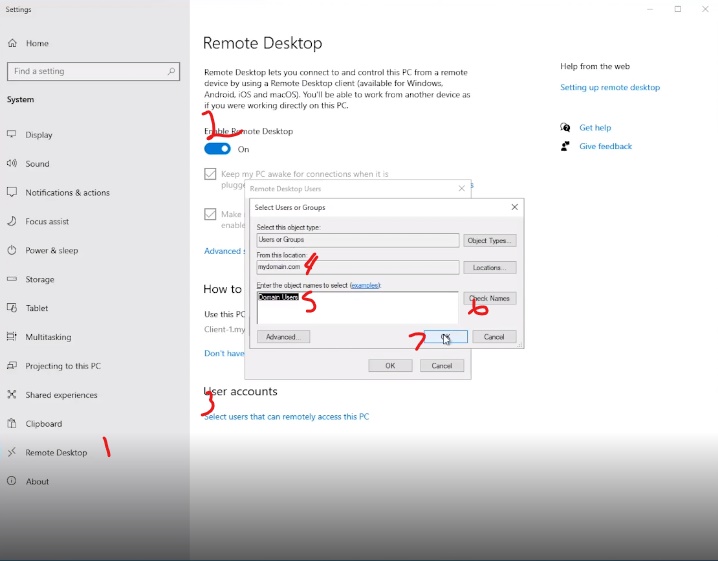
- Log into Client-1 as mydomain.com\jane_admin and open system properties
- Click “Remote Desktop”
- Allow “domain users” access to remote desktop
- You can now log into Client-1 as a normal, non-administrative user now
- Normally you’d want to do this with Group Policy that allows you to change MANY systems at once
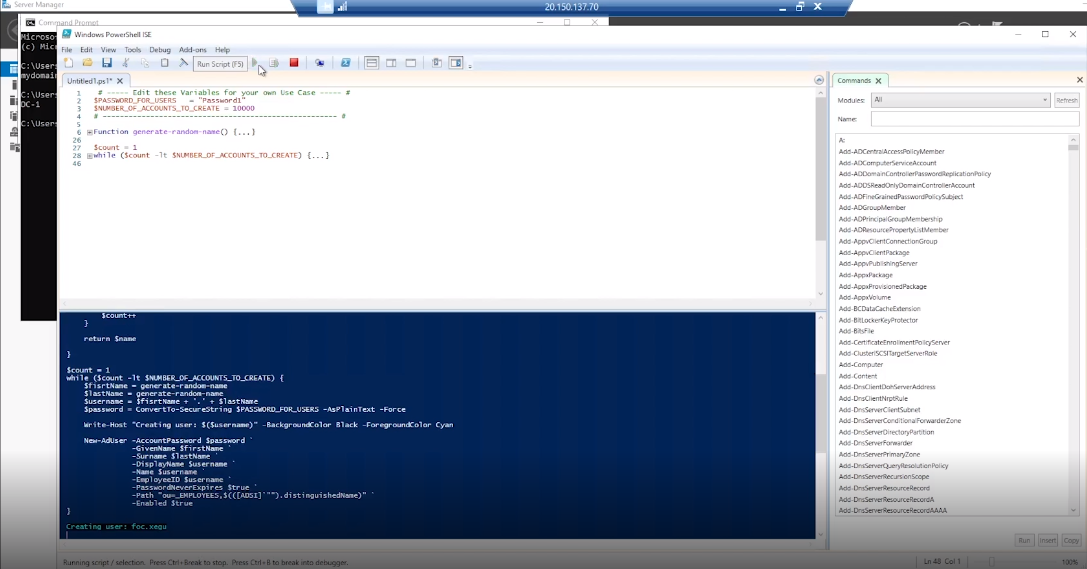
- Login to DC-1 as jane_admin
- Open PowerShell_ise as an administrator
- Create a new File and paste the contents of the [script] below:
'''Function generate-random-name() {
$consonants = @('b','c','d','f','g','h','j','k','l','m','n','p','q','r','s','t','v','w','x','z')
$vowels = @('a','e','i','o','u','y')
$nameLength = Get-Random -Minimum 3 -Maximum 7
$count = 0
$name = ""
while ($count -lt $nameLength) {
if ($($count % 2) -eq 0) {
$name += $consonants[$ (Get-Random -Minimum 0 -Maximum $($consonants.Count - 1))]
}
else {
$name += $vowels[$ (Get-Random -Minimum 0 -Maximum $($vowels.Count - 1))]
}
$count++
}
return $name
}
$count = 1
while ($count -lt $NUMBER_OF_ACCOUNTS_TO_CREATE) {
$fisrtName = generate-random-name
$lastName = generate-random-name
$username = $fisrtName + '.' + $lastName
$password = ConvertTo-SecureString $PASSWORD_FOR_USERS -AsPlainText -Force
Write-Host "Creating user: $($username)" -BackgroundColor Black -ForegroundColor Cyan
New-AdUser -AccountPassword $password -GivenName $firstName
-Surname $lastName -DisplayName $username
-Name $username -EmployeeID $username
-PasswordNeverExpires $true -Path "ou=_EMPLOYEES,$(([ADSI]"").distinguishedName)" `
-Enabled $true
$count++
}'''
'''Function generate-random-name() { $consonants = @('b','c','d','f','g','h','j','k','l','m','n','p','q','r','s','t','v','w','x','z') $vowels = @('a','e','i','o','u','y') $nameLength = Get-Random -Minimum 3 -Maximum 7 $count = 0 $name = ""
while ($count -lt $nameLength) {
if ($($count % 2) -eq 0) {
$name +=
return $name
}
$count = 1 while ($count -lt $NUMBER_OF_ACCOUNTS_TO_CREATE) { $fisrtName = generate-random-name $lastName = generate-random-name $username = $fisrtName + '.' + $lastName $password = ConvertTo-SecureString $PASSWORD_FOR_USERS -AsPlainText -Force
Write-Host "Creating user: $($username)" -BackgroundColor Black -ForegroundColor Cyan
New-AdUser -AccountPassword $password -GivenName $firstName
-Surname $lastName -DisplayName $username
-Name $username -EmployeeID $username
-PasswordNeverExpires $true -Path "ou=_EMPLOYEES,$(([ADSI]"").distinguishedName)" `
-Enabled $true
$count++
}'''
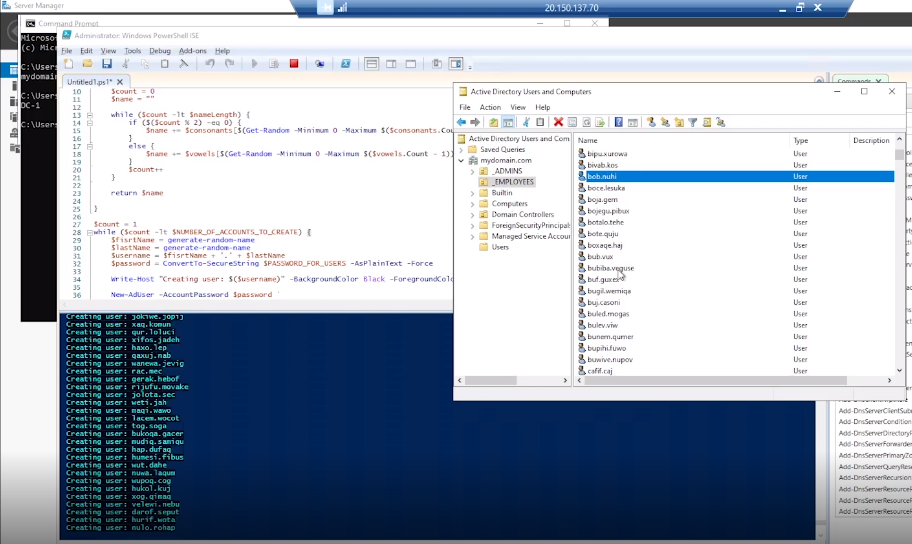
- Run the script and observe the accounts being created
- When finished, open ADUC and observe the accounts in the appropriate OU
- Attempt to log into Client-1 with one of the accounts (take note of the password in the script)
Thats is it ! In the next tutorial, we will go over various network traffic to and from Azure Virtual Machines with Wireshark as well as experiment with Network Security Groups.
