- Preparation of the track loading project
- Import the 3D model of the alignment into the project
- Adding core components
- Uploading the track to the workshop
- Supported Components
- Recommendations
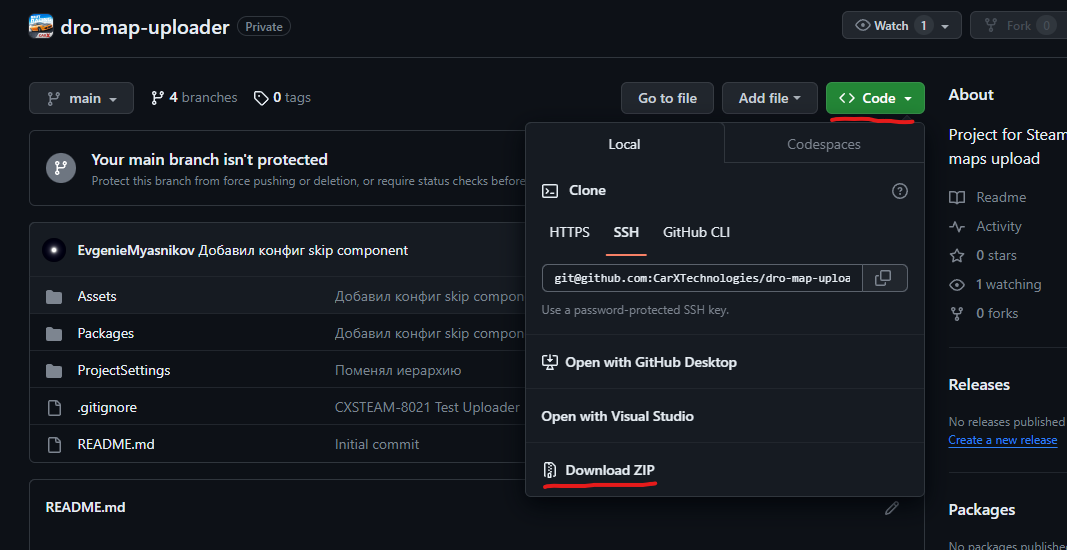
- To get started, you need to download the project archive. You can find the download link here: Project. Once you have downloaded the archive, extract it to any location on your computer (Code → Download ZIP).
- To open the project, you'll need to install the Unity Editor with version 2020.3.25 (available for 64-bit systems only). You can download it from the following link: Download link
- The next step is to launch Unity. Go to the File → Open Project menu, then choose the folder that contains the unpacked project (ensure this folder includes the Assets, Packages, etc. folders).
- When the project is set up, we can proceed to the next step.
- In the Assets/MapResources/ folder, create a folder with the working name of the map.
- Within the created folder, generate a scene through the "Assets → Create → Scene" menu.
- Next, you need to load .fbx/.obj/.dae Assets/MapResources/%your_folder%/ folder via Drag & Drop.
- If the materials are not set up within the models, create the materials using the "Assets → Create → Material" menu and configure them as shown below

- Open the created scene (step 2) and generate a GameObject by dragging the 3d model onto the scene.
- For the created GameObject, add the required components ( refer to section 3 ).
- To create a reusable object (Prefab), create the Assets/MapResources/%your_folder%/ Prefabs folder.
- Right-click on the object in the scene and choose "Prefab → Unpack Complete" from the menu.
- The next step is to drag the GameObject from the scene to the newly created "Prefabs" folder. This enables the object to be reused as many times as needed.

The project supports several types of components that are ported into the game. The main ones are:
- the point where the car appears on the map,
- Ambient Sounds
- Physical Materials of Surfaces
These components are assigned using the GameMarkerData helper.
To add a component to a GameObject or Prefab in the Inspector window, click the Add Component button and type the name GameMarkerData. There is also an option to add a mini-map.
- For the track object that representing the surface, choose the GameMarkerData Road component type, and in the dropdown, pick the material type that will be used in the game when interacting with this surface.

Please note that any GameObject/Prefab with collision must also have a Collider component (Box/Sphere/Capsule/Mesh Collider). This condition is necessary for collision accuracy.
- To assign a spawn point on the map, create an empty object: choose the GameObect → Create Empty menu item (or Ctrl+Shift+N). In the Transform component, set the coordinates of the point that is most suitable for the car to appear in the game. Add the GameMarkerData component, and choose the SpawnPoint type
Please note that only one vehicle spawn point should be placed on the map!

- To assign a spawn point on the map, select the GameObect → Create Empty menu item (or Ctrl+Shift+N). Add the GameMarkerData component, and select the Ambient type. Next, in the dropdown, select the sound type that is the best suitable on the map.

When adding an Ambient-type marker, you can use the DrawZoneBehaviour component. It's like a helper that shows where the sounds will be heard. For instance, for an Ambient marker, it draws a zone to indicate where the assigned sounds will be heard.

If you need another helper script, you can write it yourself and add your own at Assets/Resources/MapSkipComponent
- You can also include an optional minimap feature. To do this, create an empty object in the scene (as mentioned earlier) and add a Minimap component. Then, select the Minimap Layer. In the Textures field → Element 0, assign at least one texture - MainTexture. Additionally, while configuring the map, you can use auxiliary functions to create a template. You can upload this template to the graphical editor and design your own minimap based on it. Keep in mind that the map should be centered relative to zero coordinates.
- Bound center represents the minimap's offset relative to the center.
- Bound size indicates the map's size measured in world scale.

- Added component CaptureCamera for Camera GameObject.
- Set up your camera for your prototype.
- Open component contex menu, and press Capture.
- Save the prototype to disk.


-
To upload the track, you initially need to create a map configuration in the map folder.
-
Next, you should configure the settings in the configuration file.

- To do this, you need to:
-
*specify the name of the working scene. - *enter the map name that will be displayed in the workshop
-
add a map description that will be displayed in the workshop
-
*Set an Icon -the icon of the map that will be displayed in the list of workshop maps in the game itself (read/write enabled item required, png only)-
-
*Set a Large icon - map preview, which will be displayed in the workshop and when entering the map in the game itself(read/write enabled item required, png only)
-
Item Workshop Id - map id received when uploading to workshop (assigned automatically after publishing)
- Upload Steam Description - if enabled, the description on the workshop page will be updated.
- Upload Steam Name - if enabled, the map name on the workshop page will be updated.
-** Upload Steam Preview - If enabled, the map icon on the Workshop page will be updated
( * ) - required field

- To set the scene as a build on Steam, select the MapMetaConfig that you created earlier in Resources/MapManagerConfig

- Once everything is prepared, it's time to export the track to Steam. Open Steam and select the build options from the available items.

- Create - Simply assemble the map if there are no errors. Then the map is done correctly. It also creates an intermediate result in Asset/{MapName}
- Create and publication - Assemble the map and submit it to the workshop. If the map is successfully assembled and passes the publishing stage, there should be no errors in the console.
- Update exist publication - updates an existing publication that you have access to, the id of the last publication is specified in the Item Workshop Id field

- Physics - MeshCollider, BoxCollider, SphereCollider, CapsuleCollider, Rigidbody.
- Graphics - ReflectionProbe, Volume.
- Renderer - MeshRenderer, MeshFilter, Light, LODGroup, ParticleSystemRenderer.
- UI - Canvas, RawImage, TextMeshProUGUI.
- Avoid using multiple Directional light sources.
- Ensure the Steam preview does not exceed the limit of 1MB.
- Keep the Steam description within the character limit of 8000.
- Limit the map name to 128 characters for Steam.
- Use Latin alphabet when writing names.
- Ensure the maximum map size does not exceed 4GB.
- Ensure the maximum size of the meta does not exceed 24MB (including preview, icon, description, title).
- Limit the number of vertices to 30,000,000 per 100 units.
- Be mindful of component limitations.
- Non-convex MeshColider with non-kinematic Rigidbody is no longer supported
If the map is configured incorrectly, an error will be displayed during uploading that will need to address the causes on your own.
After completing these steps, the map will be published in the steam workshop. Initially, the visibility of the downloaded map will be "Private". For example, you can test the created map in the game, and it will be visible only to the author. To do this, you need to go to the Workshop → Track Workshop menu in the game. You can change the visibility to "Public" on the map page in the workshop.
Important note! The "Friends Only" visibility option is currently experiencing issues due to a problem with the external library used for Steam API integration. We plan to resolve this matter in upcoming releases.