wtfjun / chenxj-blog Goto Github PK
View Code? Open in Web Editor NEW一个使用react+redux+koa实现的开源的个人博客,欢迎star&fork
一个使用react+redux+koa实现的开源的个人博客,欢迎star&fork
本周相关的需求有
[WK] 影像水印使用canvas替代原有dom绘制
[WK] 企业贷支持追加授信业务
[WK] 添加“地址备注”字段需求
还有部分bug等
本周分享:
前端所能做的调用接口优化
悟空中获取影像集的接口需要传一个数组(编号数组),接口会将所包含的编号与表进行关联(不清楚关联了几个表,有可能是多表关联),关联表的操作join 是笛卡尔乘积,会导致表以乘法的倍数方法。在集成环境中,据说有60w+影像数据,导致当接口数组大小为10时,接口耗时已经达到20s。当数组大小超过30时,甚至会导致接口直接错误(超时等)。
其实我们可以把数组进行拆分,使用promise.all等待全部接口请求成功,得到结果。这样一来,表的大小降了一个数量级(取决于数组大小),后台接口返回便会快了很多(20s->6s)。这里有个问题,我们知道请求多,tcp的连接与断开就要不断重复,这里有一定的耗时。但是这个耗时相比关联表查询是小很多的,因此忽略。
使用cancas替代dom绘制水印
原有的解决方案是在一定区域绘制n个水印dom,随着系统功能的迭代跟变更,当图片放大的时候水印dom也需要增加。这样绘制水印不是比较友好的解决方案,如果使用cancas作为background,设置为repeat(重复),性能会比dom更好,感觉也顺畅很多。不过还可以做得更完善,比如监听dom的改变,避免用户控制台直接删掉水印,或者直接在图片上绘制水印也是可以的。
说明:
在管理系统中,涉及到很多根据查询条件,查出数据,然后使用表格展示的页面。
对于这种复用性极强的page,提供一个公共的组件是很必要的(样式统一、高效开发)。
主要切分为3个组件。
1、Filter
功能:搜索条件,搜索按钮
2、Table
功能:展示数据,列表内实现一些操作如:查看、编辑等
3、Pagination
功能:分页,控制页面大小,页面数
调用方式:
FilterTable(
    :list="list"
    :filters="filters"
    :tableList="tableList"
    :pageNum="pageNum"
    :pageSize="pageSize"
    :total="total"
    @listenHandleClickFilterButton="handleClickFilterButton"
    @listenHandleClickTableColumnHref="handleClickTableColumnHref"
    @listenHandleChangePaginationSize="handleChangePaginationSize"
    @listenHandleChangePaginationNum="handleChangePaginationNum"
)
一个list配置如下:
const list = {
    filterList: [
        {
            label: '座位号',
            key: 'id',
            type: 'input',
            span: 6
        },
        {
            label: '班级',
            key: 'class',
            type: 'select',
            options: [
                {
                    key: '1',
                    label: '一班',
                    val: '1'
                },
                {
                    key: '2',
                    label: '二班',
                    val: '2'
                }
            ],
            span: 6
        },
        {
            label: '入学日期',
            key: 'statPeriod',
            type: 'datePicker',
            span: 6,
            config: {
                type: 'date',
                placeholder: '选择日期'
            }
        },
        {
            label: '入校时长',
            key: 'backDate',
            type: 'datePicker',
            config: {
                type: 'daterange',
                rangeSeparator: '至',
                startPlaceholder: '开始日期',
                endPlaceholder: '结束日期'
            },
            span: 12
        },
        {
            label: '查询',
            key: 'search',
            type: 'button',
            config: {
                type: 'primary'
            },
            span: 2
        },
        {
            label: '重置',
            key: 'reset',
            type: 'button',
            config: {
                type: ''
            },
            span: 2
        },
        {
            label: '导出',
            key: 'export',
            type: 'button',
            config: {
                type: 'success'
            },
            span: 2
        }
    ],
    tableColumns: [
        {
            label: '状态',
            key: 'stateName'
        },
        {
            label: '编号',
            key: 'code'
        },
        {
            label: '姓名',
            key: 'name'
        },
        {
            label: '年龄',
            key: 'remark'
        },
        {
            label: '操作',
            key: 'edit',
            type: 'href',
            filter: () => '编辑'
        }
    ],
filterList 用于配置搜索框
对应的事件处理为:listenHandleClickFilterButton
tableColumns 用于配置表格字段
对应的事件处理为:listenHandleClickTableColumnHref
搜索结果,传入table的数据
分页需要的数据
对应的控制分页事件为:listenHandleChangePaginationSize、listenHandleChangePaginationNum
c-filter-table.vue完整代码:
<template lang="pug">
.c-table-container
    el-form.search-box
        el-row(:gutter="20")
            template(v-for="item in list.filterList")
                el-col(
                    v-if="item.type==='button'"
                    :span="item.span"
                    :key="item.key")
                    el-button(:type="item.config.type" @click="handleClickFilterButton(item.key)") {{ item.label }}
                el-col(
                    v-else
                    :span="item.span"
                    :key="item.key")
                    el-form-item(
                        :label="item.label"
                        :prop="item.key"
                        label-width="110px")
                        el-input(
                            v-if="item.type==='input'"
                            v-model="filters[item.key]")
                        el-select(
                            v-if="item.type==='select'"
                            v-model="filters[item.key]")
                            el-option(
                                v-for="option in item.options"
                                :key="option.key"
                                :value="option.val"
                                :label="option.label")
                        el-select(
                            v-if="item.type==='select-filterable'"
                            v-model="filters[item.key]"
                            filterable placeholder="请选择")
                            el-option(
                                v-for="option in item.options"
                                :key="option.key"
                                :value="option.val"
                                :label="option.label")
                        el-date-picker(
                            v-if="item.type==='datePicker'"
                            v-model="filters[item.key]"
                            :type="item.config.type"
                            :range-separator="item.config.rangeSeparator"
                            :start-placeholder="item.config.startPlaceholder"
                            :end-placeholder="item.config.endPlaceholder")

    el-table(:data="tableList" border)
        el-table-column(
            type="index"
            label="序号"
            align="center")
        el-table-column(
            v-for="item in list.tableColumns"
            :key="item.key"
            :label="item.label"
            :prop="item.key"
            align="center")
            template(slot-scope="scope")
                a(
                    v-if="item.type === 'href'"
                    class="blue"
                    @click="handleClickTableColumnHref(item.key, scope.row)"
                ) {{ item.filter(scope.row) }}

                span(v-else) {{ item.filter ? item.filter(scope.row) : scope.row[item.key] }}
    el-pagination(
        @size-change="handleChangePaginationSize"
        @current-change="handleChangePaginationNum"
        :page-sizes="[10, 20, 50, 100]"
        :current-page.sync="selfPageNum"
        :page-size="selfPageSize"
        layout="total, sizes, prev, pager, next, jumper"
        :total="total")
</template>

<script>
export default {
    props: [
        'list',
        'tableList',
        'total',
        'pageNum',
        'pageSize',
        'filters',
        'listenHandleClickFilterButton',
        'listenHandleClickTableColumnHref',
        'listenHandleChangePaginationSize',
        'listenHandleChangePaginationNum'
    ],
    data() {
        return {
            selfPageNum: this.pageNum,
            selfPageSize: this.pageSize
        }
    },
    methods: {
        handleClickFilterButton(filterKey) {
            this.$emit('listenHandleClickFilterButton', filterKey)
        },
        handleClickTableColumnHref(columnKey, row) {
            this.$emit('listenHandleClickTableColumnHref', columnKey, row)
        },
        handleChangePaginationSize(val) {
            this.selfPageNum = 1
            this.selfPageSize = val
            this.$emit('listenHandleChangePaginationSize', val)
        },
        handleChangePaginationNum(val) {
            this.selfPageNum = val
            this.$emit('listenHandleChangePaginationNum', val)
        }
    }
}
</script>

<style scoped lang="scss">
.el-row {
    margin-bottom: 20px;
    &:last-child {
        margin-bottom: 0;
    }
}
.el-col {
    border-radius: 4px;
}
.blue {
    color: #409eff;
}
.c-table-container {
    padding: 15px;
    min-height: 500px;
    .search-box.el-form {
        display: flex;
        flex-wrap: wrap;
        .el-form-item {
            .el-input {
                width: 160px;
            }
        }
    }
    .extand {
        .el-form-item {
            width: 25%;
        }
    }
    .el-pagination {
        text-align: right;
        padding: 10px;
    }
}
</style>
给定一个整数数组和一个目标值,找出数组中和为目标值的两个数。

你可以假设每个输入只对应一种答案,且同样的元素不能被重复利用。
给定 nums = [2, 7, 11, 15], target = 9

因为 nums[0] + nums[1] = 2 + 7 = 9

所以返回 [0, 1]
题目不难理解,首先一上来我们马上就能想到使用两个循环解决的办法。
遍历所有组合,找到符合要求的组合就行。
代码如下:
const twoSum = (nums, target) => {
    let arr = [];
    for(let i = 0; i < nums.length; i++) {
        for(let j = i + 1; j < nums.length; j++) {
            if (nums[i] + nums[j] === target) {
                arr = [i, j];
                break;
            }
        }
    }
    return arr;
};
两个循环,时间复杂度为O(N*N)。
leetCode测试数据如下:
17.42 % 的 javascript 提交记录。可以说,17.42 % 这个数据在我们意料之中,没关系,有办法优化。
在第二个循环中,我们只是要寻找目标值是否在数组里,因此可想到javascript中的一个方法----indexOf。
代码可改写如下:
const twoSum = (nums, target) => {
    let a, b;
    for(let i = 0; i < nums.length; i++) {
        b = nums.indexOf(target - nums[i]);
        if(b > -1 && b !== i) {
            a = i;
            break;
        }
    }
    return [a, b];
};
但是 Array 的 indexOf 方法实际上是对数组再遍历一次,虽然在写法上有优化,但是实际时间复杂度还是O(N*N)。
在时间复杂度上做优化,我们需要解决一个问题,如何快速地在数组中检索值?使用 indexOf 其实已经在数据中检索特定值的思路上了。只不过 indexOf 内部还是对数组进行循环检索,因此并没有达到更快的要求。在这方面, hash表 可以帮助到我们。
什么意思呢?比如我们有一个对象 obj = { ..., a: 1} ,当我们取值 Obj.a 时,是个直接寻址的过程,因此效率是很高的。回到题目,在这个思路上改进我们的代码:
const twoSum = (nums, target) => {
	let mapObj = {};
	let res = [];
	nums.forEach((e, i) => mapObj[e] = i);

	for(let i=0;i<nums.length;i++) {
		let j = mapObj[targer - nums[i]];
		if(j && j !== i) {
			res = [i, j];
			break;
		}
	}

	return res;
};
我们创建一个对象,并给它赋值,对象的键值是我们想要检索的值,对象的值是在数组中的索引。
虽然多了创建对象这一过程,但是我们少了一层循环。
然后我们来看执行效率:
我的提交执行用时已经战胜 86.24 % 的 javascript 提交记录。
从 17.42 % 到 86.24 %,可以说是个质的飞跃。
es6 中,给我们提供了一个新对象 Map,在这里就可以派上用途。
const twoSum = (nums, target) => {
	let map = new Map();
	let res = [];
	nums.forEach((e, i) => map.set(e, i));

	for(let i=0;i<nums.length;i++) {
		let j = map.get[targer - nums[i]];
		if(j && j !== i) {
			res = [i, j];
			break;
		}
	}

	return res;
};
最终使用 Map 优化的代码,让我们战胜了 97.21 % 的提交。
var addTwoNumbers = function(l1, l2) {
    let x = l1, y = l2;
    let carry = 0;
    let rootNode = new ListNode(-1);
    let reNode = rootNode;

    while(x || y) {
        let sum = (x ? x.val: 0) + (y ? y.val : 0) + carry;
        let node;

        if (sum >= 10) {
            carry = 1;
            node = new ListNode(sum - 10);
        } else {
            carry = 0;
            node = new ListNode(sum);
        }
        reNode.next = node;
        reNode = reNode.next;
    }

    if (carry === 1) {
        reNode.next = new ListNode(1)
    }

    return rootNode.next;
};
var jump = function(nums) {
    if (nums.length === 1) {
        return 0;
    }
    let jumpStep = 1;
    let n = 0;
    let i = 0;
    for(; i < nums.length; i++) {
        let next = 0;
        let max = 0;
        for (let j = 0; j < jumpStep; j++) {
            if (i + j + nums[i + j] > max) {
                next = i + j;
                max = i + j + nums[i + j];
            }
            if (i + j + nums[i + j] >= nums.length - 1) {
                next = nums.length - 1;
            }
        }
        i = next;
        n++;
        jumpStep = nums[i];
        if (jumpStep === 0) break;
    }
    return n;
};
cxj-react-image 用法如下:
yarn add cxj-react-image
// npm i cxj-react-image
import ImageModal from 'cxj-react-image';

<ImageModal
  src={imageList[currentImageIndex]}  {/* 当前图片路径 */}
  next={() => this.next()}            {/* 控制下一张 */}
  prev={() => this.prev()}            {/* 控制上一张 */}
  closeModal={() => this.closeImg()}  {/* 控制modal打开关闭 */}
  option={{
    move: true,                        {/* 控制拖动 */}
    waterMarkText: '多功能图片组件',    {/* 设置水印文字 */}
    rotate: true,                      {/* 控制旋转 */}
    zoom: true                         {/* 控制放大缩小 */}
  }}
/>
更详细的用法请参考 container.js文件
如有帮助,感谢star~~~ 如有问题,欢迎call me~~~
交流请加wx: c13266836563
以下为相关实现讲解
实现拖拽的思路是计算出dom最后的left跟top。
未移动前可以通过clientX跟offsetLeft拿到dom的x坐标和左边距,记为initX和offLeft。
移动的过程中可以通过clientX拿到元素的x坐标,记为moveX。
得到公式:left = moveX - initX + offLeft。
核心代码如下:
const move = (dv) => {
  // 获取元素
  let x = 0;
  let y = 0;
  let l = 0;
  let t = 0;
  let isDown = false;
  // 鼠标按下事件
  dv.onmousedown = function(e) {
    // 获取x坐标和y坐标
    x = e.clientX;
    y = e.clientY;

    // 获取左部和顶部的偏移量
    l = dv.offsetLeft;
    t = dv.offsetTop;

    handleMove();
  };
  // 鼠标移动
  // 再包一层是为了方便注册 避免被替换
  function handleMove() {
    onmousemove = function(e) {
      // 获取x和y
      let nx = e.clientX;
      let ny = e.clientY;

      // 计算移动后的左偏移量和顶部的偏移量
      let nl = nx - (x - l);
      let nt = ny - (y - t);

      dv.style.left = nl + 'px';
      dv.style.top = nt + 'px';
    };
  }
};
关于拖拽,有个情况还需要优化:页面上有两个modal,要保证最后点击的modal要覆盖之前点击的modal。
也就是zIndex要控制好,这里用localStorage来保存这个最大的zIndex
imageModalMaxzIndex = localStorage.getItem('imageModalMaxzIndex');
if (dv.style.zIndex != imageModalMaxzIndex) {
  dv.style.zIndex = +imageModalMaxzIndex + 1;
  localStorage.setItem('imageModalMaxzIndex', dv.style.zIndex);
}
前端实现水印,避免私密图片泄露
思路是使用canvas生成文字图片,然后利用以下的css:
background-image:url('${base64Url}');
background-repeat:repeat;
实现水印类:
/**
 * @overview: 水印组件
 */

export default class WaterMark {
  constructor(container, option) {
    this.container = container;
    this.option = {
      width: '200px',
      height: '150px',
      opacity: .7,
      fillStyle: 'rgba(47, 205, 227, 0.3)',
      font: '20px microsoft yahei',
      textBaseline: 'middle',
      textAlign: 'center',
      fillText: '水印',
      ...option
    };
  }

  draw() {
    const {
      container,
      option: {
        width,
        height,
        opacity,
        fillStyle,
        font,
        textBaseline,
        textAlign,
        fillText,
        scrollHeight
      }
    } = this;
    const canvas = document.createElement('canvas');
    canvas.setAttribute('width', width);
    canvas.setAttribute('height', height);
    canvas.setAttribute('opacity', opacity);
    const ctx = canvas.getContext('2d');

    ctx.textAlign = textAlign;
    ctx.textBaseline = textBaseline;
    ctx.font = font;
    ctx.fillStyle = fillStyle;
    ctx.rotate(Math.PI / 180 * 30);
    ctx.fillText(fillText, 80, 10);

    var base64Url = canvas.toDataURL();
    const watermarkDiv = document.createElement('div');
    watermarkDiv.setAttribute('style', `
          position:absolute;
          top:0;
          left:0;
          width:100%;
          height:${scrollHeight || '100%'};
          z-index:1000;
          pointer-events:none;
          background-repeat:repeat;
          background-image:url('${base64Url}')`);

    if (typeof container === 'object') {
      container.style.position = 'relative';
      container.insertBefore(watermarkDiv, container.firstChild);
    }
  }
}
这里有一篇文章总结了几种前端水印的方案,推荐给大家 文章
缩放的话,监听鼠标滚动事件。向上滚动放大,向下滚动缩小;这里要注意控制最小缩放值。
还要注意的是图片在边界的缩放,不然图片可能会移动在屏幕外。
需要做的处理是判断左边界跟图片的宽度。
代码实现:
// 控制滚轮缩放

const zoom = (onWheelEvent, dom) => {
  let e = onWheelEvent;
  let imageModalWidth = parseInt(dom.style.width);
  let modalLeft = parseInt(dom.style.left);

  // 计算缩放后的大小 每一次滚轮 100px
  let calcWidth = imageModalWidth - e.deltaY;

  // 限制最小 width = 400
  if (calcWidth <= 300) {
    return;
  }

  // 不让modal由于缩小消失在视野中
  if (modalLeft + calcWidth < 50) {
    return;
  }

  dom.style.width = `${calcWidth}px`;
};
给定一个非负整数数组,你最初位于数组的第一个位置。

数组中的每个元素代表你在该位置可以跳跃的最大长度。

判断你是否能够到达最后一个位置。

示例 1:

输入: [2,3,1,1,4]
输出: true
解释: 从位置 0 到 1 跳 1 步, 然后跳 3 步到达最后一个位置。
示例 2:

输入: [3,2,1,0,4]
输出: false
解释: 无论怎样,你总会到达索引为 3 的位置。但该位置的最大跳跃长度是 0 , 所以你永远不可能到达最后一个位置。
var canJump = function(nums) {
    let jumpStep = 1;
    let i = 0;
    for(; i < nums.length; i++) {
        let next = 0;
        let max = 0;
        for (let j = 0; j < jumpStep; j++) {
            if (i + j + nums[i + j] > max) {
                next = i + j;
                max = i + j + nums[i + j];
            }
        }
        i = next;
        console.log(i);
        jumpStep = nums[i];
        if (jumpStep === 0) break;
    }
    if (i < nums.length - 1) {
        console.log(false)
        return false;
    }
    console.log(true)
    return true;
};
本周相关的需求有
[WK] 用表格形式展示保单爬数结果的需求(SIT)
[WK] 移动光标左右键 - 影像会动(UAT)
[WK] 在关联信息检测页面,如果打开征信报告时,页面样式会跟着变化(UAT)
[WK] html人行报告变色(UAT)
[WK] 用表格形式展示保单爬数结果的需求(SIT)
[APM] 异常数据 -》选定某个项目--》进去详情页面,需要把具体的项目名称显示出来(已解决)
[APM] 数据查询 页面,“更多条件”点击后仍然显示更多条件,干脆把这个功能去掉吧,占用的宽度也不是很多(已解决)
[APM] 超时接口的详情页面里面客户端信息及接口信息都是空的,可以去掉(已解决)
还有部分bug等
在完成需求的同时
主要想分享2个内容:
1.函数反抖与节流
2.动态规划求解 leetcode55.跳跃游戏
防抖和节流是前端开发中使用很多的处理,是个必要的技能。针对一些会频繁触发的事件如click、keyup等,如果正常绑定事件处理函数的话,有可能在很短的时间内多次连续触发事件,十分影响性能、并且会导致一些奇怪的问题。针对这类事件要适当地做一些处理。
所谓的防抖、节流只是一个代名词,他们所要达到的效果就是一个时间指定的时间段内只让一个事件执行一次,防止一个事件在预期内发生了数次。
防抖的原理就是维护一个timer(setTimeout变量),将事件放入timer,利用clearTimeout,如果在指定时间内事件再次发生,则清除timer,重新计时。
通常的防抖,在javascript的实现如下:
// 将会包装事件的 debounce 函数
function debounce(fn, delay) {
  // 维护一个 timer
  let timer = null;

  return function() {
    // 通过 ‘this’ 和 ‘arguments’ 获取函数的作用域和变量
    let context = this;
    let args = arguments;

    clearTimeout(timer);
    timer = setTimeout(function() {
      fn.apply(context, args);
    }, delay);
  }
}
节流的原理是获取两次事件发生的时间戳,如果间隔大于指定的时间段,则执行。
通常的节流,在javascript的实现如下:
var throttle = function(func,delay){
    var prev = Date.now();
    return function(){
        var context = this;
        var args = arguments;
        var now = Date.now();
        if(now-prev>=delay){
            func.apply(context,args);
            prev = Date.now();
        }
    }
}
我在需求中,使用了节流去控制键盘快速点击事件。
部分关键代码如下:
if (event.keyCode == 39 || event.keyCode == 37) {
    for (let i = 0; i < dom.children.length; i++) {
        if (event.keyCode == 39 && dom.children[i].id === 'right-icon') {
            this.nowTime = new Date();
            (this.nowTime - this.prevTime > 500) && dom.children[i].click();
            this.prevTime = new Date();
            break;
        }
        if (event.keyCode == 37 && dom.children[i].id === 'left-icon') {
            this.nowTime = new Date();
            (this.nowTime - this.prevTime > 500) && dom.children[i].click();
            this.prevTime = new Date();
            break;
        }
    }
}
我用js做了个实现,写了自己的思路和代码,感兴趣的可以看看。
链接:55.跳跃游戏
二叉树大家都知道,二叉搜索树满足以下特征:
节点的左子树只包含小于当前节点的数
节点的右子树只包含大于当前节点的数
所有左子树和右子树自身必须也是二叉搜索树
相关题目:leetcode 108.将有序数组转换为二叉搜索树 [中等]
那么如何将一个有序数组转换为一颗二叉搜索树?
二叉搜索树的每一个分支的根节点都是他的中间值。根据这个特征,用二分法来将有序数组转换为一颗二叉搜索树。
const sortedArrayToBST = nums => {
    // 边界条件
    if (nums.length === 0) {
        return null;
    }
    if (nums.length === 1) {
        return new TreeNode(nums[0]);
    }
    // 向下取整得到中间值
    let mid = Math.floor(nums.length / 2);
    let root = new TreeNode(nums[mid]);
    // 递归 二分法
    root.left =  sortedArrayToBST(nums.slice(0, mid));
    root.right =  sortedArrayToBST(nums.slice(mid + 1));
    return root;
};
接下来我们验证下一棵树是否满足二叉搜索树。
相关题目:leetcode 98.验证二叉搜索树 [中等]
思路就是,中序遍历如果满足递增的就行。
用一个max作为验证值的变量,用中序遍历前面的值和后面的值作比较,一直递增则满足二叉搜索树。
const isValidBST = root => {
    let isValidBSTFlag = true;
    let max = -Number.MAX_VALUE;
    const orderSearch = root => {
        if (root) {
            orderSearch(root.left);
            if (root.val > max) {
                max = root.val;
            } else {
                isValidBSTFlag = false;
            }
            orderSearch(root.right);
        }
    }
    orderSearch(root);
    return isValidBSTFlag;
};
上一个非递归解法。
非递归中序遍历的思路就是使用栈,将节点的左子树压入直到叶节点,然后操作完左子树跟根节点后再操作右子树。
循环反复,直到栈空。
const isValidBST = root => {
    if(!root) return true;
    let stack = [];
    let isValidBSTFlag = true;
    let max = -Number.MAX_VALUE;
    while (1) {
        while(root != null){
            stack.push(root);
            root = root.left;
        }
        if (stack.length === 0) break;
        let node = stack.pop();
        if (node.val > max) {
            max = node.val;
        } else {
            isValidBSTFlag = false;
            break;
        }
        root = node.right;
    }
    return isValidBSTFlag;
}
相关题目:leetcode 701.二叉搜索树中的插入操作 [中等]
将值插入二叉搜索树,只要树在插入后仍保持为二叉搜索树即可。
思路:找到大于插入节点值的节点,将要插入的节点作为该节点的左子树。注意细节。
这里还是用中序遍历,中序遍历能很好地解决一种情况,就是要插入的节点值比树中的所有节点还大。
这种情况,找到树中最大值的节点,将插入的节点作为该节点的右节点。
没用递归,方便理解。
const insertIntoBST = (root, val) => {
    let stack = [];
    let r = root;
    let node = null;
    while (1) {
        while(root != null) {
            stack.push(root);
            root = root.left;
        }
        if (stack.length === 0) break;
        node = stack.pop();
        // 找到大于插入节点值的节点
        if (node.val > val) {
            let newNode = new TreeNode(val);
            newNode.left = node.left;
            // 这里是细节
            node.left = newNode;
            break;
        }
        root = node.right;
    }
    // 要插入的节点值比树中的所有节点还大
    if (val > node.val) {
        node.right = new TreeNode(val);
    }
    return r;
};
相关题目:leetcode 99.恢复二叉搜索树 [困难]
要求:二叉搜索树中的两个节点被错误地交换。请在不改变其结构的情况下,恢复这棵树。
思路:利用中序遍历找到错误的两个节点s1,s2。交换这两个节点。
用一个数组保存遍历的值,如果前一个节点大于后一个节点,则s1肯定是前一个节点,后一个节点不一定是s2,继续遍历寻找找到s2。
const recoverTree = root => {
    let res = [];
    let s1 = s2 = null;
    const orderSearch = root => {
        if (root) {
            orderSearch(root.left);
            if (res.length !== 0) {
                if (res[res.length - 1].val > root.val) {
                    // 第一个找到的才是s1
                    !s1 && (s1 = res[res.length - 1]);
                    // 若有第二次,第二次的才是s2
                    s2 = root;
                }
            }

            res.push(root)
            orderSearch(root.right);
        }
    }
    orderSearch(root);
    [s1.val, s2.val] = [s2.val, s1.val];
    return root;
};
二叉搜索树跟排序相关,总是围绕着中序遍历进行操作。
递归代码简洁但是不好理解,非递归相对容易理解一些,两者效率差不太大,看场景使用。
var lengthOfLongestSubstring = function(s) {
    let str = '';
    let max = 0;
    for (let i = 0; i < s.length;) {
        if (str.indexOf(s[i]) === -1) {
            str += s[i];
            max = str.length > max ? str.length : max;
            i++;
        } else {
            str = str.substring(str.indexOf(s[i]) + 1);
        }
    }
    return max;
}
思路:中序遍历,记录出问题的两个节点。然后交换它们的值。
const recoverTree = root => {
    let res = [];
    let s1 = s2 = null;
    const orderSearch = root => {
        if (root) {
            orderSearch(root.left);
            if (res.length !== 0) {
                if (res[res.length - 1].val > root.val) {
                    !s1 && (s1 = res[res.length - 1]);
                    s2 = root;
                }
            }

            res.push(root)
            orderSearch(root.right);
        }
    }
    orderSearch(root);
    [s1.val, s2.val] = [s2.val, s1.val];
    // console.log(s1, s2)
    return root;
};

recoverTree(root);
先说个题外话,很多人在学redux(react管理状态流的一种**)的时候,查了各种资料都不能真正懂redux是个什么东西,怎么实现的,只能停留在仅仅懂用的地步。
redux是很难,但是我们也要换个角度想,是不是自身水平有限,才看不懂呢?
至少在我自己看来,我还有很多**,很多js的知识点还没掌握,等我的基础足够扎实,不断积累与沉淀,才能真正理解建立在这些**和知识上的技术吧。
说这些,是自己的一些反思,也是因为redux中也小用到函数柯里化。
直接上代码:

好了进入正题,说一下函数柯里化。
关于Currying,英文好的同学可以看看维基上十分全面(相当专业)的解释----维基Currying(然后我默默地点击了翻译)。
简单总结一下:Currying是一种产生一系列函数的方法,每个函数都只有一个参数。这个建设是通过在另外一个新的Curry函数中隐藏一个参数来实现的,而这个函数的作用是返回剩余参数的函数。类似一种分解的**吧,把一个堆积的东西分解出来,逐个解决。
啥意思呢?
就是我现在定义一个函数:const add = (a, b, c, d) => { console.log(a+b+c+d) },有一个要求,如果想要执行这个函数,必须要把4个参数都传递进去。这种**在中间件里其实也可以运用,把所有注册的事件当作参数就行。

下面我们实现一下curry函数:

这里有个难理解的地方是function f2(){}()这种写法,举个例子方便理解:

然后我们把上面es5的写法写成es6的写法:

继续代码缩减:

最后,有一道curry的题大家可以做做:curry 函数
<!DOCTYPE html>
<html lang="en">
<head>
    <meta charset="UTF-8">
    <title>简易版React</title>
</head>
<body>
    <div id="root"></div>
<script>

/**
 * ReactDOMComponent类
 * 用于渲染成真实dom
 */
class ReactDOMComponent {
    constructor(element) {
        this._currentElement = element;
    }

    mountComponent(container) {
        // 创建dom元素
        const domElement = document.createElement(this._currentElement.type);
        const textNode = document.createTextNode(this._currentElement.props.children);

        domElement.appendChild(textNode);
        container.appendChild(domElement);

        this._hostNode = domElement;
        return domElement;
    }

    receiveComponent(nextElement) {
        const prevElement = this._currentElement;
        this.updateComponent(prevElement, nextElement);
    }

    updateComponent(prevElement, nextElement) {
        const lastProps = prevElement.props;
        const nextProps = nextElement.props;

        this._updateDOMChildren(lastProps, nextProps);
    }

    _updateDOMChildren(lastProps, nextProps) {
        const lastContent = lastProps.children;
        const nextContent = nextProps.children;
        this.updateTextContent(nextContent);
    }

    updateTextContent(content) {
        const node = this._hostNode;
        node.textContent = content;
        node.textContent = content;
    }
}

/**
 * ReactCompositeComponentWrapper类
 * React自定义组件容器
 */
class ReactCompositeComponentWrapper {
    constructor(element) {
            this._element = element;
    }

    mountComponent(container) {
        // 第一次this._element.type == TopLevelWrapper
        // 第二次this._element.type == createClass的Constructor函数
        const Component = this._element.type;
        const componentInstance = new Component(this._element.props);

        console.log(componentInstance)

        this._instance = componentInstance;

        // 让构造函数的实例的__reactComponentInstance指向它的ReactCompositeComponentWrapper
        componentInstance.__reactComponentInstance = this

        if (componentInstance.componentWillMount) {
            componentInstance.componentWillMount();
        }

        const markup = this.performInitialMount(container);

        if (componentInstance.componentDidMount) {
            componentInstance.componentDidMount();
        }

        return markup;
    }

    performInitialMount(container) {

        // render()返回的就是props对象,我们知道ReactElement曾经被wrapperElement当作props包起来
        const renderedElement = this._instance.render();

        // 根据ReactElement的type的不同实例化
        const child = instantiateReactComponent(renderedElement);

        this._renderedComponent = child;

        // 这里其实是递归调用,实例化了父组件,还要接着实例化子组件
        // 如果child还是一个React自定义组件(ReactCompositeComponent)的话,继续递归
        // 如果child是ReactDOMComponent的话,执行ReactDOMComponent.mountComponent,结束递归
        return ReactReconciler.mountComponent(child, container);
    }

    receiveComponent(nextElement) {
        const prevElement = this._currentElement;
        this.updateComponent(prevElement, nextElement);
    }

    updateComponent(prevElement, nextElement) {
        const nextProps = nextElement.props;
        const inst = this._instance;

        // componentWillReceiveProps生命周期在这里执行
        if (inst.componentWillReceiveProps) {
            inst.componentWillReceiveProps(nextProps);
        }

        let shouldUpdate = true;

        if (inst.shouldComponentUpdate) {
            shouldUpdate = inst.shouldComponentUpdate(nextProps);
        }

        // 根据 shouldComponentUpdate 的返回结果 判断是否需要更新
        if (shouldUpdate) {
            this._performComponentUpdate(nextElement, nextProps);
        } else {
            inst.props = nextProps;
        }
    }

    _performComponentUpdate(nextElement, nextProps) {
        this._currentElement = nextElement;
        const inst = this._instance;

        inst.props = nextProps;

        this._updateRenderedComponent();
    }

    _updateRenderedComponent() {
        const prevComponentInstance = this._renderedComponent;
        const inst = this._instance;
        const nextRenderedElement = inst.render();

        ReactReconciler.receiveComponent(prevComponentInstance, nextRenderedElement);
    }
}

// 给顶层element的Wrapper
const TopLevelWrapper = function(props) {
        this.props = props;
};

// 这个Wrapper的render返回它的element
TopLevelWrapper.prototype.render = function() {
    return this.props;
};

// 根据 element 的type的不同返回不同的ReactComponent
// ReactComponent一般分4类:
// 1. ReactDOMEmptyComponent:空对象
// 2. ReactDOMComponent:DOM原生对象
// 3. ReactCompositeComponent:React自定义对象
// 4. ReactDOMTextComponent:文本对象
// 这里只实现2类
function instantiateReactComponent(element) {
    if (typeof element.type === 'string') {
        // 返回DOM原生对象直接渲染
        return new ReactDOMComponent(element);
    } else if (typeof element.type === 'function') {
        return new ReactCompositeComponentWrapper(element);
    }
}

const ReactReconciler = {
    mountComponent(ReactComponent, container) {
        // 执行 ReactComponent 的 mountComponent方法
        // 不同的ReactComponent,mountComponent方法定义不一样
        return ReactComponent.mountComponent(container);
    },

    receiveComponent(ReactComponent, nextElement) {
        ReactComponent.receiveComponent(nextElement);
    }
};

const React = {
    createElement(type, props, children) {
        const element = {
            type,
            props: props || {}
        };

        if (children) {
            element.props.children = children;
        }

        return element;
    },

    createClass(spec) {
        function Constructor(props) {
            this.props = props;
            if (this.getInitialState) {
                this.getInitialState()
            }
        }

        // 构造函数的原型对象增加我们createClass时定义的方法
        Constructor.prototype = new ReactComponent()
        Object.assign(Constructor.prototype, spec);
        Constructor.prototype.constructor = Constructor;

        if (spec.getDefaultProps) {
            Constructor.defaultProps = spec.getDefaultProps();
        }

        // 返回构造函数
        return Constructor;
    },

};

function ReactComponent(props) {
    this.props = props
}

const ReactDom = {
    render(element, container) {
        const prevComponent = getTopLevelComponentInContainer(container);

        // 首次渲染 prevComponent 并不存在
        if (prevComponent) {
            return updateRootComponent(prevComponent, element);
        } else {
            return renderNewRootComponent(element, container);
        }
    }
}

function getTopLevelComponentInContainer(container) {
    return container.__reactComponentInstance;
}

function renderNewRootComponent(element, container) {
    // 这里为什么要把element再包一层?
    // 在ReactCompositeComponentWrapper的performInitialMount方法里,
    // 我们取得renderedElement是通过组件的render()得来的,
    // 而最顶层的ReactElement不是通过render()得来的,因此我们只能给他包一层TopLevelWrapper
    const wrapperElement = React.createElement(TopLevelWrapper, element);
    const componentInstance = new ReactCompositeComponentWrapper(wrapperElement);

    const markUp = ReactReconciler.mountComponent(componentInstance, container);

    // _renderedComponent是根据ReactElement的type的不同,生存的ReactComponent
    container.__reactComponentInstance = componentInstance._renderedComponent;
    return markUp;
}

function updateRootComponent(prevComponent, nextElement) {
    ReactReconciler.receiveComponent(prevComponent, nextElement);
}

const HelloWorld = React.createClass({
    getDefaultProps() {
        console.log('getDefaultProps')
        return {
            data: 'props'
        }
    },

    getInitialState() {
        console.log('getInitialState')
        this.state = {
            data: 'state'
        }
    },

    componentWillMount() {
        console.log('componentWillMount');
    },

    componentDidMount() {
        console.log('componentDidMount');
    },

    componentWillReceiveProps(nextProps) {
        console.log('componentWillReceiveProps')
    },

    shouldComponentUpdate(nextProps) {
        console.log('shouldComponentUpdate')
        return true
    },

    render() {
        console.log('render')
        return React.createElement('h1', null, `${this.props.data}`);
    }
});


ReactDom.render(
    React.createElement(
        HelloWorld,
        {
            data: 'Hello World'
        }
    ),
    document.getElementById('root')
);

setTimeout(() => {
    ReactDom.render(
        React.createElement(
            HelloWorld,
            {
                data: 'Hello MingYuan'
            }
        ),
        document.getElementById('root')
    );
}, 1000)


</script>
</body>
</html>
基于 github page 和 github api 搭建的单页面静态博客,页面风格仿照 ECMAScript 6 入门
开源代码请点击这里: github地址
$ node -v
v6.9.5

$ npm -v
4.5.0$ cd chenxj-blog
$ npm install"scripts": {
"dev": "cross-env NODE_ENV=development webpack-dev-server --host 127.0.0.1 --port 8080 --hot --inline",
"build": "cross-env NODE_ENV=production webpack"
},// 开发
$ npm run dev
// 打包
$ npm run buildlodash源码中推荐的文章,为了学习(英语),翻译了一下~
作者:DAVID CORBACHO
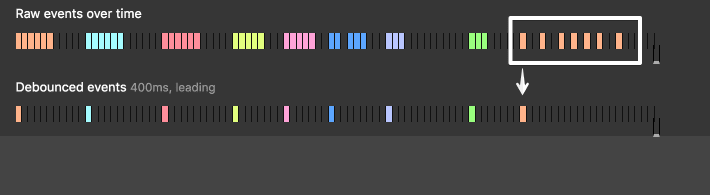
本文来自一位伦敦前端工程师DAVID CORBACHO的技术投稿。我们在之前讨论过这个话题(关于防抖与节流),但这次,DAVID CORBACHO通过生动的演示会将它们讲的十分清晰,通俗易懂。
Debounce和throttle是两个相似(但实现原理不一样)的技术手段,用于控制一个函数在一段时间内执行几次。
当我们的函数附着在dom事件上时,使用Debounce和throttle去处理这个函数是十分有用的。为什么呢?因为我们在事件和执行函数之间加了一个控制层。需要注意的是,这里并不是去控制dom事件发生的频率。
我们来看一个滑动事件的例子:
当我们使用触控板、滚轮、或者是拉动滑动条,事件可能每秒仅仅触发了30次左右。但如果我们滑的比较慢,他可能触发100次。对于这些不一致的数据,你在处理的时候是否考虑到了?
2011年的时候,推特网上出现了一个问题:当你缓慢地在推特上往下滚动时,网站开始变得卡顿甚至没有反应。John Resig针对该问题发了一条博客learning-from-twitter,他觉得在scroll事件上附着复杂的函数处理是十分糟糕的。
John给出的解决方案是在scroll事件结束后,每250毫秒做循环执行(感兴趣的可以去看上面那篇博客,此时应该是Debounce得雏形)。这种处理耦合度低,而且避免了破坏用户体验。
如今处理事件的方式复杂了不少,下面向你们介绍Debounce, Throttle,对应的也举一些例子。
Debounce将一个组的多次调用处理为只调用一次。
想象你正在电梯里,电梯门准备关闭,这时候有个人同时进电梯,此时电梯并没有开始上升(下降),而是电梯门再次打开。如果不断地有人进来,电梯将延迟他上升(或下降)的函数,从而达到资源优化的目标。
你可以自己试试,点击或者将鼠标放在按钮上。
可以看到debounce将多次连续的事件整理成单次的事件。
你可能发现防抖事件在等待触发事件执行,直到事件都结束后它才执行。为什么不让事件一开始就执行,从而达到跟我们最初的设想一样的效果呢?但是短时间内不能连续执行。
你可以看看这个,这是个"leading" debounce的例子。
在underscore.js中,该配置项叫immediate而不是leading。
你可以试试:
我第一次看到debounce的实现是在John Hann(term之父)的博客中,当时还是2009年。一年过后Jeremy Ashkenas将它加入了underscore.js。debounce最近才加入到Lodash中。
这三种实现方式内部有些不同,但他们的接口十分相似。
曾经有一段时间underscore采用了debounce中debounce/throttle 的实现,知道2013年我在_.debounce中发现了一个bug,从那之后,他们分道扬镳。
Lodash加了很多特征在_.debounce 和 _.throttle中。原来的immediate标识被替换成leading和trailing。你可以配置一项,或者都配置。默认生效的是trailing。
我在本文中不会讨论新的配置项maxWait,虽然我不讨论他,但是他很有用。事实上throttle的实现就是在debounce中使用了maxWait,你可以在这里看到。
当我们在调整浏览器窗口时,会触发Resize事件。
看下面的demo:
可以看到,我们在resize事件中使用默认配置trailing,因为我们在调整窗口大小后只去最后一次的值。
我们做的处理是当用户在输入时,每50毫秒向后台发送一次ajax请求。这时使用_.debounce能帮我们避免许多额外的消耗,我们仅仅在用户停止输入后发送一次请求。
这里使用leading是没有意义的,我们需要等待用户最后一个字符敲下。
类似此场景的一个例子是进行输入验证,比如用户在注册时提示“密码不足6位”。
许多人往往更倾向于写自己的debounce/throttle函数,或者ctrlC ctrlV别人博客里的代码。我的建议是正确的去使用underscore 和 Lodash。如果你仅仅需要_.debounce 和 _.throttle方法,你可以使用lodash-cli生成指定函数的js,使用方法如下:(webpack等打包工具的出现我觉得不必考虑此问题)
npm i -g lodash-cli
lodash include = debounce, throttle
简单使用:
// WRONG
$(window).on('scroll', function() {
   _.debounce(doSomething, 300);
});

// RIGHT
$(window).on('scroll', _.debounce(doSomething, 200));

// or
var debounced_version = _.debounce(doSomething, 200);
$(window).on('scroll', debounced_version);

// If you need it
debounced_version.cancel();
Throttle的作用是确保我们的函数在每一个毫秒区间只执行一次。
Throttle和debounce主要的不同在于,监听的事件一直在发生,Throttle能确保我们执行的函数在一个毫秒区间内至少执行一次。这里可能一时难以理解,但看了下面的例子之后,也许你就会茅塞顿开。
一个常见的场景,用户在下拉页面,你需要去监测用户离底部多远,如果接近底部时,发送一个ajax请求获取更多内容,然后再拼接到页面上。
讨巧的debounce在这个场景下一点办法都没有,它只会在用户停止滑动动作后触发。我们需要的是用户在接近底部时发送请求,此时用户可能正在下拉滑动条。
有了throttle我们可以经常计算用户离底部的距离。
如有帮助,感谢点赞!
运用你所掌握的数据结构,设计和实现一个  LRU (最近最少使用) 缓存机制。它应该支持以下操作: 获取数据 get 和 写入数据 put 。

获取数据 get(key) - 如果密钥 (key) 存在于缓存中,则获取密钥的值(总是正数),否则返回 -1。
写入数据 put(key, value) - 如果密钥不存在,则写入其数据值。当缓存容量达到上限时,它应该在写入新数据之前删除最近最少使用的数据值,从而为新的数据值留出空间。

进阶:

你是否可以在 O(1) 时间复杂度内完成这两种操作?

示例:

LRUCache cache = new LRUCache( 2 /* 缓存容量 */ );

cache.put(1, 1);
cache.put(2, 2);
cache.get(1);       // 返回  1
cache.put(3, 3);    // 该操作会使得密钥 2 作废
cache.get(2);       // 返回 -1 (未找到)
cache.put(4, 4);    // 该操作会使得密钥 1 作废
cache.get(1);       // 返回 -1 (未找到)
cache.get(3);       // 返回  3
cache.get(4);       // 返回  4
分为两种情况:
1.缓存不满
命中缓存(缓存中存在该值),则缓存无任何变化
未命中缓存(缓存中不存在该值),缓存中加入该值
2.缓存已满
命中缓存,缓存无变化
未命中缓存,删掉缓存末尾的值,之后缓存中加入该值
从以上分析,要想找到缓存末尾的值,我想到两个办法。
(1)将缓存有序化(有序化涉及到排序,增加算法复杂度,所以我不用这个方法)
(2)设置一个指针从内存第一个数开始跟踪缓存末尾的值
也是两种情况
1.内存中不存在该值(新数据)
直接将该值置于内存首部
2.内存中已经存在该值(旧数据)
更新内存中值的顺序,规则是将改值的前一个节点的下一个节点设置为该值的下一个节点,然后该值置于内存首部(基本链表操作)
这里需要考虑部分特殊情况,比如内存为空的情况下连续执行以下操作
put(1, 1);
put(1, 1);
所以更新的规则要兼容以上情况
执行get的时候,如果缓存中存在get的数据,则更新缓存顺序,跟以上一样。
let LRUCache = function(capacity) {
    this.cacheSize = capacity;
    // 缓存计数器
    this.cacheIndex = 0;
    this.cacheSet = new Set();
    // 内存头节点
    this.head = null;
    // 缓存尾节点
    this.cacheShift = null;
    this.memory = {};
};

LRUCache.prototype.get = function(key) {
    let val;
    const { cacheSet, memory } = this;
    if (cacheSet.has(key)) {
        val = memory[key].value;
        console.log(memory[key].value)
        // get 最后一个节点
        if (memory[key].next == null) {
            return val;
        }
        if (memory.cacheShift === memory[key] && memory.cacheShift.next) {
            memory.cacheShift = memory.cacheShift.next;
        }
        this.memorySort(key);
    } else {
        val = -1;
        console.log(-1);
    }

    return val;
};

LRUCache.prototype.put = function(key, value) {
    const { cacheSet, memory } = this;

    if (this.cacheIndex < this.cacheSize) {
        !cacheSet.has(key) && this.cacheIndex++;
        cacheSet.add(key)
    } else {
        if (!cacheSet.has(key)) {
            cacheSet.delete(memory.cacheShift.key);
            memory.cacheShift.next && (memory.cacheShift = memory.cacheShift.next);
            cacheSet.add(key);
        }
    }

    // 内存中有值
    if (memory.head) {
        // 内存中不存在该节点
        if (!memory[key]) {
            memory[key] = {
                prev: memory.head,
                next: null
            }
            memory.head.next = memory[key];
            memory.head = memory[key];
        } else { // 内存中存在节点
            if (memory.cacheShift === memory[key] && memory.cacheShift.next) {
                memory.cacheShift = memory[key].next;
            }
            this.memorySort(key);
        }
    } else {  // 内存为空,该节点为第一个节点
        memory[key] = {
            prev: null,
            next: null
        };
        memory.cacheShift = memory.head = memory[key];
    }

    memory[key].key = key;
    memory[key].value = value;
};

LRUCache.prototype.memorySort = function(key) {
    const { memory } = this;
    // get 的不是最后一个节点
    if (memory[key].next != null) {
        if (memory[key].prev != null) {
            memory[key].prev.next = memory[key].next;
        } else {    // 第一个节点
            memory[key].next.prev = null;
        }
        memory[key].next.prev = memory[key].prev;
        memory[key].prev = memory.head;
        memory[key].next = null;
        memory.head.next = memory[key];
        memory.head = memory[key];
    }
}
思路:中序遍历如果是递增的,就是搜索二叉树。
const isValidBST = root => {
    let isValidBSTFlag = true;
    let max = -Number.MAX_VALUE;
    const orderSearch = root => {
        if (root) {
            orderSearch(root.left);
            if (root.val > max) {
                max = root.val;
            } else {
                isValidBSTFlag = false;
            }
            orderSearch(root.right);
        }
    }
    orderSearch(root);
    return isValidBSTFlag;
};
const isValidBST = root => {
    if(!root) return true;
    let stack = [];
    let isValidBSTFlag = true;
    let max = -Number.MAX_VALUE;
    while (1) {
        while(root != null){
            stack.push(root);
            root = root.left;
        }
        if (stack.length === 0) break;
        let node = stack.pop();
        if (node.val > max) {
            max = node.val;
        } else {
            isValidBSTFlag = false;
            break;
        }
        root = node.right;
    }
    return isValidBSTFlag;
}
先上一张经典图:
连接时将ACK和SYN同时发送,断开时先发送ACK再发送FIN。这就是为什么常说连接时3次,断开时4次。
那么就有个问题,为什么断开时要将ACK和FIN分发?而不是一起发?难道是命运的安排?
《TCP/IP详解卷一:协议》中给出的解释是:
“这由T C P的半关闭(half-close)造成的。”
那么半关闭是什么意思:
“TCP提供了连接的一端在结束它的发送后还能接收来自另一端数据的能力。这就是所谓的半关闭。”
客户端发送FIN后,表示他结束了数据的发送(这里的数据指复杂数据,标志位、信号位比如图中data的ACK等可以发送),但不代表不能接受数据。
所以客户端依旧能接收服务端发来的data并且返回一个标志位ACK,告诉服务端我已经接受到你的数据。
在这之后,服务端想要结束连接,于是他发送了FIN。
之所以FIN延迟发送,是因为服务端还有数据没有处理完,当服务端处理完数据后他再关闭。
1、(你没话说了)“我要挂了”
2、(对方意犹未尽)“那微信聊”
3、(你一脸高冷)“行”
4、(对方小开心)“好的,微信见,挂啦。”
继续回到我们的问题,TCP的断开不能是3次吗?
任何程序的设计,只有更好的方案,没有绝对的方案。
对于大部分的场景,4次握手断开连接是友好的方案。但你真的想3次断开,也是可以的。
四个红框表示断开连接的四次挥手:
1、 client发送FIN
2、 server回复ACK
3、 server发送FIN
4、 client回复ACK
1、 client发送FIN
2、 server回复ACK+FIN
3、 client回复ACK
参考资料:
《TCP/IP详解卷一:协议》
请保持高冷,别点赞。
/**
 * @param {string} s
 * @param {number} numRows
 * @return {string}
 */

/**
 * 思路:
 * flag标志位标志当前是竖的还是斜的
 * 竖的下标为 (i + addNum) % numRows
 * 斜的下标为 numRows - 1 - (i + addNum) % numRows
 */
var convert = function(s, numRows) {
    let arr = (new Array(numRows)).fill('');
    let flag = -1;
    let addNum = 0;
    for (let i = 0; i < s.length; i++) {
        let arrIndex = (i + addNum) % numRows;
        if (flag === 1) {
            arrIndex = numRows - 1 - arrIndex;
        }
        arr[arrIndex] += s[i];
        if (arrIndex === 0 || arrIndex === numRows - 1) {

            if (arrIndex === 0 && flag !== -1) {
                flag = 0;
                addNum++;
            }
            if (arrIndex === numRows - 1) {
                flag = 1;
                addNum++;
            }
        }
    }
    // console.log(arr.join(''));
    return arr.join('');
};

convert('PAYPALISHIRING', 4)
完整代码可查看github,这里截取的代码不影响理解就行。
页面效果可查看gitPage
首先编写一下我们的公共组件
goodsItem.js
// 单个商品
import React from 'react';
const GoodsItem = props => {
  const { goods: {name, num, price}, handleSub, handleAdd } = props;
  return <div className="goods-item">
    {name}
    <button onClick={() => handleSub()}>-</button>
    <span>{num}</span>
    <button onClick={() => handleAdd()}>+</button>
    价格:{price}
  </div>
};
export default GoodsItem;
goodList.js
// 商品列表

import React from 'react';
import GoodsItem from './goodsItem';
class GoodsList extends React.Component {
  constructor(props) {
    super(props);
    this.state = {
      goodsData: []
    }
  }
  componentDidMount() {
    const { goodsData } = this.props;
    this.setState({ goodsData: goodsData});
  }
  handleAddorSub(id, type) {
    let { goodsData } = this.state;
    let newGoods = goodsData.reduce((newData, goods) => {
      if (goods.id === id) {
        goods.num = type === '+' ? goods.num + 1 : goods.num - 1;
      }
      newData.push(goods);
      return newData;
    }, [])
    this.setState({ goodsData: newGoods })
  }
  render() {
    const { goodsData } = this.state;
    return (
      <div className="goods-list">
        {goodsData.map(goods =>
          <GoodsItem
            key={goods.id}
            goods={goods}
            handleAdd={() => this.handleAddorSub(goods.id, '+')}
            handleSub={() => this.handleAddorSub(goods.id, '-')}
          />
        )}
      </div>
    );
  }
};

export default GoodsList;
我们一般编写组件,都会这么去做,list包裹item,循环展示item。数据放在list组件中,item作为一个无状态组件,只做他的展示。
数据交互通过props传递,点击+-会改变购物车里的数据。
现在需求来了,双12来了(就在昨日),所有商品8折优惠。
这意味着我们需要修改goodsData中所有商品的价格。
这并不难,我叶良辰有100种方法可以修改商品数据。找个可行的生命周期,比如componentDidMount中修改list组件state.goodsData就行了。
如果每次修改都直接修改goodList组件,也是可以的,大不了多传几个props来判断需要打折还是修改商品名称等等。
但是有些需求是交叉的,如果一直这样写,久而久之组件会变得越来越臃肿,最后爆炸。
好的解决方案应该是goodsList不去动他,外加一层来进行包装,实现我们的逻辑。
这样既保证了goodsList的纯,又能实现逻辑的复用。可谓一箭双雕。
用两种组件设计模式可以帮助到我们。
renderProps其实是利用组件的props.children api,将函数当成组件的一种写法。
我们调用公共组件的方法如下:
<GoodsList goodsData={goodsData} />
我们用renderProps模式实现打折商品组件:
<DiscountedGoodsList goodsData={goodsData}>
  {(data) => <GoodsList goodsData={(data)} />}
</DiscountedGoodsList>
可以看到,DiscountedGoodsList的子组件是一个函数,那么一个函数是怎么渲染成组件的?
再来看看DiscountedGoodsList组件的代码:
const DiscountedGoodsList = props => {
  // 8折优惠逻辑
  const setRenderPropsData = (data) => {
    let renderPropsData = data.reduce((array, goods) => {
      let obj = {};
      for (let k in goods) {
        obj[k] = k === 'price' ? (goods[k] * .9).toFixed(2) : goods[k];
      }
      array.push(obj);
      return array;
    }, []);
    return renderPropsData;
  }

  let goodsData = setRenderPropsData(props.goodsData);

  return (
    <React.Fragment>
      {props.children(goodsData)}
    </React.Fragment>
  );
}
setRenderPropsData的作用是实现8折优惠逻辑,将所有商品价格调整。
然后调用props.children这个api,得到在上面我们编写的函数。
props.children也就是函数(data) => <GoodsList goodsData={(data)} />的引用。
将处理后的数据goodsData作为参数执行,最终返回<GoodsList />组件,这就是renderProps模式。
以后我们需要调用价格优惠的商品列表组件,直接调用DiscountedGoodsList即可。
renderProps的模式实现了逻辑的共用,且对GoodsList组件毫无副作用,从而达到我们的目的。
所谓的高阶组件,其实就是一个函数,该接受component为参数,返回一个处理后的component。
编写我们的高阶组件如下:
const BrandGoodsList = (Component, goodsData) => {
  // 8折优惠逻辑
  const setRenderPropsData = (data) => {
    let renderPropsData = data.reduce((array, goods) => {
      let obj = {};
      for (let k in goods) {
        obj[k] = k === 'name' ? goods[k] + '【品牌】' : goods[k];
      }
      array.push(obj);
      return array;
    }, []);
    return renderPropsData;
  }

  let brandGoodsData = setRenderPropsData(goodsData);
  return <Component goodsData={brandGoodsData} />
}
BrandGoodsList组件的逻辑就是给商品名称加上【品牌】的标示,区分商品。
高阶组件的调用比较简单:{BrandGoodsList(GoodsList, goodsData)} 直接执行返回组件,然后渲染。
实现了两种模式,现在我们将他们一起用,实现一个既打折,又是品牌商品的组件。
<DiscountedGoodsList goodsData={goodsData}>
  {(data) => BrandGoodsList(GoodsList, data)}
</DiscountedGoodsList>
挺舒服的吧,随时分离,随时结合。正是高内聚、低耦合本人啊。
最后,完整的调用看一下:
<div className="App">
    基本商品列表组件:
    <GoodsList goodsData={goodsData} />
    <br />

    打8折商品列表组件(renderProps模式实现):
    <DiscountedGoodsList goodsData={goodsData}>
      {(data) => <GoodsList goodsData={(data)} />}
    </DiscountedGoodsList>
    <br />

    品牌商品列表组件(高阶组件模式实现):
    {BrandGoodsList(GoodsList, goodsData)}
    <br />

    既是打折商品,又是品牌商品(两种模式复用)
    <DiscountedGoodsList goodsData={goodsData}>
      {(data) => BrandGoodsList(GoodsList, data)}
    </DiscountedGoodsList>
  </div>
觉得有帮助的点个赞,甚至可以关注一波哦~
源码:git仓库 欢迎star & fork ~~
做过校验需求的小伙伴们都知道,校验其实是个麻烦事。
规则多,需要校验的字段多,都给我们前端带来巨大的工作量。
一个不小心,代码里就出现了不少if else等不可维护的代码。
因此,我觉得一个团队或者是一个项目,需要一个校验工具,简化我们的工作。
首先,参考一下 Joi。只看这一小段代码:
Joi.string().alphanum().min(3).max(30).required()
我希望我的校验工具Coi也是链式调用,链式调用可以极大的简化代码。
校验呢,其实主要就3个入参:需要校验的数据,提示的错误信息,校验规则。
哎 直接把代码贴出来吧,反正就一百行,一目了然:
export default class Coi {
    constructor(prop) {
        this.input = prop
        this.errorMessage = '通过校验' // 错误信息
        this.pass = true // 校验是否通过
    }

    // 数据输入
    data(input) {
        if (!this.pass) return this

        this.input = input
        return this
    }

    // 必填,不能为空
    isRequired(message) {
        if (!this.pass) return this

        if (
            /^\s*$/g.test(this.input) ||
            this.input === null ||
            this.input === undefined
        ) {
            this.errorMessage = message
            this.pass = false
        }
        return this
    }

    // 最小长度
    minLength(length, message) {
        if (!this.pass) return this

        if (this.input.length < length) {
            this.errorMessage = message
            this.pass = false
        }
        return this
    }

    // 最大长度
    maxLength(length, message) {
        if (!this.pass) return this

        if (this.input.length > length) {
            this.errorMessage = message
            this.pass = false
        }
        return this
    }

    // 需要的格式 number: 数字, letter: 字母, chinese: 中文
    requireFormat(formatArray, message) {
        if (!this.pass) return this
        let formatMap = {
            number: 0,
            letter: 0,
            chinese: 0
        }

        Object.keys(formatMap).forEach(key => {
            if (formatArray.includes(key)) formatMap[key] = 1
        })

        let formatReg = new RegExp(
            `^[${formatMap.number ? '0-9' : ''}${
                formatMap.letter ? 'a-zA-Z' : ''
            }${formatMap.chinese ? '\u4e00-\u9fa5' : ''}]*$`
        )

        if (!formatReg.test(this.input)) {
            this.errorMessage = message
            this.pass = false
        }
        return this
    }

    // 邮箱校验
    isEmail(message) {
        if (!this.pass) return this

        const emailReg = /^[a-z0-9]+([._\\-]*[a-z0-9])*@([a-z0-9]+[-a-z0-9]*[a-z0-9]+.){1,63}[a-z0-9]+$/
        if (!emailReg.test(this.input)) {
            this.errorMessage = message
            this.pass = false
        }
        return this
    }

    // ulr校验
    isURL(message) {
        if (!this.pass) return this

        const urlReg = new RegExp(
            '^(?!mailto:)(?:(?:http|https|ftp)://|//)(?:\\S+(?::\\S*)?@)?(?:(?:(?:[1-9]\\d?|1\\d\\d|2[01]\\d|22[0-3])(?:\\.(?:1?\\d{1,2}|2[0-4]\\d|25[0-5])){2}(?:\\.(?:[0-9]\\d?|1\\d\\d|2[0-4]\\d|25[0-4]))|(?:(?:[a-z\\u00a1-\\uffff0-9]+-?)*[a-z\\u00a1-\\uffff0-9]+)(?:\\.(?:[a-z\\u00a1-\\uffff0-9]+-?)*[a-z\\u00a1-\\uffff0-9]+)*(?:\\.(?:[a-z\\u00a1-\\uffff]{2,})))|localhost)(?::\\d{2,5})?(?:(/|\\?|#)[^\\s]*)?$',
            'i'
        )
        if (!urlReg.test(this.input)) {
            this.errorMessage = message
            this.pass = false
        }
        return this
    }

    // 自定义正则校验
    requireRegexp(reg, message) {
        if (!this.pass) return this

        if (!reg.test(this.input)) {
            this.errorMessage = message
            this.pass = false
        }
        return this
    }
}
使用姿势如下:
import Coi from 'js-coi'

const validCoi = new Coi()
validCoi
    .data('1234')
    .isRequired('id不能为空')
    .minLength(3, 'id不能少于3位')
    .maxLength(5, 'id不能多于5位')

    .data('1234@qq.')
    .isRequired('邮箱不能为空')
    .isEmail('邮箱格式不正确')

    .data('http:dwd')
    .isRequired('url不能为空')
    .isUrl('url格式不正确')

if (!validCoi.pass) {
    this.$message.error(validCoi.errorMessage)
    return
}
当然你只校验一个字段的话也可以这么使用:
import Coi from 'js-coi'

const idCoi = new Coi('1234')
idCoi
    .isRequired('id不能为空')
    .minLength(3, 'id不能少于3位')
    .maxLength(5, 'id不能多于5位')
    .isEmail('id邮箱格式不正确')
    .isUrl('id格式不正确')
    .requireFormat(['number', 'letter', 'chinese'], 'id格式不正确')
    .requireRegexp(/012345/, 'id格式不正确')

if (!idCoi.pass) {
    this.$message.error(idCoi.errorMessage)
    return
}
一般进入终端你会输的第一条命令是什么?是 cd、ls 还是 pwd?都有可能。cd 表示进入某个目录,ls 表示查看当前目录下的所有文件和文件夹,pwd 则显示当前的目录。
$ ~ cd Documents
$ Documents ls
$ Documents pwd
/Users/cobish/Documents
接下来的简单操作基本都是对文件进行操作,其中主要有两个参数。-r 参数表示对文件夹进行操作,如果没有这个参数则只能对文件进行操作。-f 参数表示无需确认,一般复制粘贴如果有相同文件名的文件的话会需要确认,如果加上 -f 参数则直接覆盖,不用确认。下面的操作基本都会带上 -rf 参数,对文件和文件夹都能起到作用。
首先使用 mkdir 创建一个目录 demo,然后进入 demo 目录,然后再使用 vi 命令创建一个 index.txt 文件。
$ ~ mkdir demo
$ ~ cd demo
$ demo vi index.txt
键盘输入 i 进入 insert 状态,表示编辑。随意输入一行 Hello World。编辑完成,按 esc,输入 :wq 保存退出。这样我们就成功地用命令创建了一个 index.txt 文件。如果你还想修改 index.txt 文件的话,可以再次使用 vi 命令,键盘输入 / 进入搜索状态,比如 /World 表示搜索 World 这个单词,按 n 表示搜索下一个 World。再按下 i 进行编辑,编辑完成,再次按 esc 和输入 :wq 保存退出。
现在我们创建了一个 demo 文件夹,里面还有一个有内容的 index.txt,这时我们尝试将整个目录复制到 Documents 目录下。cp 命令表示复制 copy 的意思,命令后面先带上要复制的文件或文件夹,后面带上要复制到哪一个目录下。
$ demo cd ..
$ ~ cp -rf demo Documents
$ ~ cd Documents
$ Documents ls
demo
复制成功,这时我想把 index.txt 剪切到 Documents 目录下来,则可以是用 mv 命令。mv 命令有两种用法,第一种用法则是剪切,第二种用法则是重命名。我们先把 index.txt 剪切到 Documents 目录下,然后将它的文件名修改为 hello.txt。
$ Documents cd demo
$ demo mv index.txt ../
$ demo cd ..
$ Documents mv index.txt hello.txt
$ Documents ls
demo hello.txt
剪切完成,你会发现现在 demo 目录下已经没有文件了,我们可以尝试删除它。删除使用的是 rm 命令。
$ Documents rm demo
rm: demo: is a directory
$ Documents rm -r demo
上面我故意没带上 -r 参数,是为了提醒大家,对目录的操作都是要带上 -r 参数的,千万别忘了。到这里,我们已经都接触了复制 cp 命令、剪切 mv 命令 和删除 rm 命令。接下来要介绍的是远程服务器的两个命令。分别是 ssh 和 scp。
ssh 命令表示连接远程服务器,比如你所在的局域网有一台服务器,IP 地址为 192.168.203.221,账号为 root,密码为 123456。你想远程它去进行一些操作,则可以使用 ssh 命令。
$ ~ ssh [email protected]
连接成功,你可以在上面进行复制、剪切、删除。输入 exit 即可退出。
scp 命令则有两个功能,一个是上传本地文件,一个是下载服务器文件。如果是上传本地文件,则将本地的文件目录放置前面。如果是文件夹需加 -r 参数。冒号后面表示上传到服务器的具体目录下。
$ ~ scp demo.zip [email protected]:/home/backup
下载文件,跟上传文件类似,只不过把顺序调换了一下。
$ ~ scp [email protected]:/home/backup/demo.zip Documents
至此,上面所提及到的命令基本能够胜任日常的使用。日常生活中人们基本使用图形操作取代了命令行,唯独我们这一群创造者依然在享受它的便利,致敬。
本周在做的需求有
用表格形式展示保单爬数结果的需求
移动光标左右键 - 影像会动
在关联信息检测页面,如果打开征信报告时,页面样式会跟着变化
新网银行业务影像类型
还有部分bug等
在完成需求的同时
主要想分享3个内容:
影像组件优化设计,统一管理
正则过滤html,解决css污染问题
前端homework课外思考,温习数据结构与算法
在悟空系统中,影像modal多次被调用,包括影像展示、各类报告、聊天图片等,为了优化客户体验,影像modal加入了可打开多个、移动时透明、按键盘左右可切换、增加水印等功能。
这些功能需要操作、监听页面中真实的dom节点,并且对每一个打开的影像modal,都要记录其当前的状态,为了满足需求,每一个影像modal,都需要一个唯一标示(id),无论何时,只
要页面不关闭,都可以通过这个id对影像modal进行管理。
这里将组件状态提升到reducer,用openImageModals记录当前打开的影像modal,用currentImageModal记录当前正在操作的影像modal,同时用一个自增index来做
唯一标示id。
需求背景:在悟空系统中,查看征信报告、企查查、上海资信等操作中,内评会返回一个html文档,然后悟空将该html文档展示出来。
问题:如果将返回的html未做任何处理就将他嵌入我们的系统然后进行展示,会产生css注入问题,css注入是xss攻击的一种,会影响到页面dom结构的变化,导致页面混乱等问题。
解决方案:为了让引入的css样式不影响到其他dom,在所有引入的css样式上包裹一层指定的class。
<style></style>里的内容匹配规则:/<style.*>(\n|\r|.)*<\/style>/gi
<style.*>这里有一个.*是因为有可能是<style type="text/css">这种写法;
\n匹配换行符;
\r匹配回车符;
.匹配单个字符,除了换行和行结束符;
{前面的css选择器们考虑到其中涉及到的众多特殊符号,匹配规则为:/(\.|,|:|>|-|_|\[|\]|[a-z]|\d|( ))*( )*{/gi
,分割符,还要做个处理字符串通过,分割为数组,每一个元素面前加上我们的类名,最后展开
className = className.split(',').map(e => e = '.myClass ' + e).join(',')
最终es6代码如下:
html = html.replace(
    /<style.*>(\n|\r|.)*<\/style>/gi,
    styleCode =>
        styleCode.replace(
        /(\.|,|:|>|-|_|\[|\]|[a-z]|\d|( ))*( )*{/gi,
        className =>
            className.split(',').map(e => e = '.myClass ' + e).join(',')
    )
)
三、前端homework课外思考,温习数据结构与算法
这是我们前端小组的homework课后题、每周五布置、周末抽空完成。
是一道关于LRU (最近最少使用) 缓存机制的题目。难度在于要求O(1)的复杂度,使用到了链表的操作。
我用js做了个实现,写了自己的思路和代码,感兴趣的可以看看。
/**
 * 利用eval打印出多重循环
 * 优点:理解简单
 * 缺点:执行效率低下
 */
const letterCombinations = digits => {
    let cycles = '';
    let digitsMap = {
        '2': 'abc',
        '3': 'def',
        '4': 'ghi',
        '5': 'jkl',
        '6': 'mno',
        '7': 'pqrs',
        '8': 'tuv',
        '9': 'wxyz'
    }
    cycles += `(function () {let result = [];`
    for (let i = 0; i < digits.length; i++) {
        let digit = digits[i];
        let digitStr = digitsMap[digit];
        let len = digitStr.length;
        let iN = `i${i}`;
        cycles += `for (let i${i} = 0; ${iN} < ${len}; ${iN}++) {
                    let var${i} = '${digitStr}'[${iN}];`
    }
    let one = '';
    for (let i = 0; i < digits.length; i++) {
        one += `var${i}+`;
    }
    one = one.substr(0, one.length - 1);
    cycles += `result.push(${one});`

    for (let i = 0; i < digits.length; i++) {
        cycles += '}'
    }
    cycles += 'return result}())'
    // console.log(cycles);
    console.log(eval(cycles))
    return eval(cycles);
};

/**
 * 逐层增加组合,3层循环
 * 优点:效率较高
 */
const letterCombinations = digits => {
    if (digits.length === 0) return [];
    let digitsMap = {
        '2': 'abc',
        '3': 'def',
        '4': 'ghi',
        '5': 'jkl',
        '6': 'mno',
        '7': 'pqrs',
        '8': 'tuv',
        '9': 'wxyz'
    }
    let digitsObjTree = {
        0: digitsMap[digits[0]].split('')
    };
    for (let i = 1, len = digits.length; i < len; i++) {
        digitsObjTree[i] = [];
        for (let j = 0, lastArray = digitsObjTree[i - 1]; j < lastArray.length; j++) {
            for (let k = 0; k < digitsMap[digits[i]].length; k++) {
                let compose = lastArray[j] + digitsMap[digits[i]][k];
                digitsObjTree[i].push(compose)
            }
        }
    }
    // console.log(digitsObjTree[digits.length - 1])
    return digitsObjTree[digits.length - 1];
}

letterCombinations('234')
引言:
用React有一段时间了,一个东西当你觉得用了一段时间之后,就会想弄明白他的内部机理。最近一直在看React源码(15.6.3版本),想搞明白一个React组件从创建到渲染经历了哪些过程,生命周期函数对应在哪执行,以及创建后一旦状态发生改变,React又是怎样去比较、所谓的diff是如何执行从而完成更新的,为什么说他高效,和vue的diff又有哪些不同。
现在我们要实现的功能是:
接下来,按照编写习惯先写好我们的组件:
class HelloWorld extends Component {
  static defaultProps = {
    data: 'props'
  }

  constructor(props) {
    super(props);
    this.state = {
      data: 'state'
    }
  }

  componentWillMount() {
    console.log('componentWillMount’);
  }

  componentDidMount() {
    console.log('componentDidMount’);
  }

  componentWillReceiveProps() {
    console.log('componentWillReceiveProps’);
  }

  shouldComponentUpdate() {
    console.log('shouldComponentUpdate’);
    return true;
  }

  render() {
    return (
      <h1>
        `${this.props.data}`
      </h1>
    );
  }
}
然后执行:
ReactDOM.render(
    <HelloWorld data={'Hello World'} />,
    document.getElementById('root')
);
setTimeout(() => {
    ReactDOM.render(
        <HelloWorld data={'Hello MingYuan'} />,
        document.getElementById('root')
    );
}, 2000)
我们要的效果是页面上先渲染出’Hello World’,2秒后变成‘Hello MingYuan’。
打开控制台,依次输出:
这里有两个问题要注意:
第一个问题:
这里之所以能<HelloWorld />,其实是因为JSX的功劳,关于JSX如果你不太清楚,看一看这里JSX介绍。
这里我们当然不会去实现一个JSX语法解析器,这不是本文的重点。我们分析他解析后的样子。
ReactDOM.render(
    React.createElement(HelloWorld, {data: ‘Hello World’}),
    document.getElementById('root')
);
第二个问题:
class Hello World extends Component{}这种写法实际上是会调用React.createClass。
所以以上我们编写的组件其实长这样:
const HelloWorld = React.createClass({
    getDefaultProps() {
        console.log('getDefaultProps')
        return {
            props: 'props'
        }
    },

    getInitialState() {
        console.log('getInitialState')
        this.state = {
            state: 'state'
        }
    },

    componentWillMount() {
        console.log('componentWillMount');
    },

    componentDidMount() {
        console.log('componentDidMount');
    },

    componentWillReceiveProps(nextProps) {
        console.log('componentWillReceiveProps')
    },

    shouldComponentUpdate(nextProps) {
        console.log('shouldComponentUpdate')
        return true
    },

    render() {
        return React.createElement('h1', null, `${this.props.data}`);
    }
});
了解了这两个问题,我们就知道怎么入手了,接下来我们实现createElement和createClass方法。
const React = {
    createElement(type, props, children) {
        const element = {
            type,
            props: props || {}
        };

        if (children) {
            element.props.children = children;
        }

        return element;
    },

    createClass(spec) {
        function Constructor(props) {
            this.props = props;
            if (this.getInitialState) {
                this.getInitialState()
            }
        }

        // 构造函数的原型对象增加我们createClass时定义的方法
        Object.assign(Constructor.prototype, spec);

        if (spec.getDefaultProps) {
            Constructor.defaultProps = spec.getDefaultProps();
        }

        // 返回构造函数
        return Constructor;
    },
};
得到一个ReactElement React.createElement(HelloWorld)和一个Containerdocument.getElementById('root')后,把他们作为参数传入ReactDom.render函数。
首先我们看container是否已经挂载了我们的组件,如果没有,就是首次实例化渲染,有的话就仅仅执行更新。
const ReactDom = {
    render(element, container) {
        const prevComponent = getTopLevelComponentInContainer(container);

        // 首次渲染 prevComponent 并不存在
        if (prevComponent) {
            return updateRootComponent(prevComponent, element);
        } else {
            return renderNewRootComponent(element, container);
        }
    }
}
function getTopLevelComponentInContainer(container) {
    return container.__reactComponentInstance;
}
renderNewRootComponent就比较复杂了。
function renderNewRootComponent(element, container) {
    const wrapperElement = React.createElement(TopLevelWrapper, element);

    const componentInstance = new ReactCompositeComponentWrapper(wrapperElement);

    const markUp = ReactReconciler.mountComponent(componentInstance, container);

    // _renderedComponent是根据ReactElement的type的不同,生存的ReactComponent
    container.__reactComponentInstance = componentInstance._renderedComponent;

    return markUp;
}
先来分析wrapperElement,我们之前createElement的实现,第一个参数是type,第二个参数是props。这里为什么要把顶层的ReactElement当作props,重新生成一个wrapperElement呢?
可以这样想,一个父亲ReactElement都有一个render方法,render返回一个子ReactElement,如果层级很多,就要不断的render取得子孙辈的ReactElement,然后才能操作渲染。而作为最顶层的祖先,他不是任何一个ReactElement的render方法得来的,一个很好的解决办法就是人工给他造一个父亲,wrapperElement就是人工造的父亲。
const TopLevelWrapper = function(props) {
        this.props = props;
};

TopLevelWrapper.prototype.render = function() {
  return this.props;
};
接下来就是包装了许多方法的ReactCompositeComponentWrapper了,先看它的构造函数。
class ReactCompositeComponentWrapper {
    constructor(element) {
            this._element = element;
    }
}
const ReactReconciler = {
    mountComponent(ReactComponent, container) {
        return ReactComponent.mountComponent(container);
    }
};
这里只是进入了 ReactCompositeComponentWrapper的mountComponent方法:
class ReactCompositeComponentWrapper {
    mountComponent(container) {
        // 第一次this._element.type == TopLevelWrapper
        // 第二次this._element.type == createClass的Constructor函数
        const Component = this._element.type;
        const componentInstance = new Component(this._element.props);

        this._instance = componentInstance;

        // 让构造函数的实例的__reactComponentInstance指向它的ReactCompositeComponentWrapper
        componentInstance.__reactComponentInstance = this

        if (componentInstance.componentWillMount) {
            componentInstance.componentWillMount();
        }

        const markup = this.performInitialMount(container);

        if (componentInstance.componentDidMount) {
            componentInstance.componentDidMount();
        }

        return markup;
    }
}
我们在const componentInstance = new ReactCompositeComponentWrapper(wrapperElement);的时候调用了构造函数,所以第一次进来的时候this._element为wrapperElement,将wrapperElement的type作为构造函数得到一个componentInstance实例,此时componentInstance实例没有任何钩子函数。接下来执行performInitialMount。
class ReactCompositeComponentWrapper {
    performInitialMount(container) {

        // render()返回的就是props对象,我们知道ReactElement曾经被wrapperElement当作props包起来
        const renderedElement = this._instance.render();

        // 根据ReactElement的type的不同实例化
        const child = instantiateReactComponent(renderedElement);

        this._renderedComponent = child;

        // 这里其实是递归调用,实例化了父组件,还要接着实例化子组件
        // 如果child还是一个React自定义组件(ReactCompositeComponent)的话,继续递归
        // 如果child是ReactDOMComponent的话,执行ReactDOMComponent.mountComponent,结束递归
        return ReactReconciler.mountComponent(child, container);
    }
}
在performInitialMount里,this._instance的props保存了我们的顶层ReactElement,通过this._instance的原型方法render得到这个顶层ReactElement。
这其实是做了一个统一,在之后this._instance保存的就是createClass里的Constructor了。
得到renderedElement之后,又继续递归回到mountComponent、 performInitialMount,终止条件为ReactElement不再有render,也就是ReactElement是最后一代。
回到mountComponent之后,还是把代码放出来对着看:
class ReactCompositeComponentWrapper {
    mountComponent(container) {
        // 第一次this._element.type == TopLevelWrapper
        // 第二次this._element.type == createClass的Constructor函数
        const Component = this._element.type;
        const componentInstance = new Component(this._element.props);

        this._instance = componentInstance;

        // 让构造函数的实例的__reactComponentInstance指向它的ReactCompositeComponentWrapper
        componentInstance.__reactComponentInstance = this

        if (componentInstance.componentWillMount) {
            componentInstance.componentWillMount();
        }

        const markup = this.performInitialMount(container);

        if (componentInstance.componentDidMount) {
            componentInstance.componentDidMount();
        }

        return markup;
    }
}
这个时候componentInstance已经能在原型对象上找到componentWillMount了,所以执行componentWillMount。
之后再次进入performInitialMount,这时renderedElement已经是末代(element.type === 'string')了,无力会天,进入ReactDOMComponent直接渲染。之后返回执行componentWillMount方法。
ReactDOMComponent就是负责真实的渲染。
class ReactDOMComponent {
    constructor(element) {
        this._currentElement = element;
    }

    mountComponent(container) {
        // 创建dom元素
        const domElement = document.createElement(this._currentElement.type);
        const textNode = document.createTextNode(this._currentElement.props.children);

        domElement.appendChild(textNode);
        container.appendChild(domElement);

        this._hostNode = domElement;
        return domElement;
    }
}
首次实例化渲染已经模拟完成,接下来就是简单模拟实现组件的更新。
我们在renderNewRootComponent的时候已经把__reactComponentInstance保存在container里了,所以进入到updateRootComponent,在ReactCompositeComponentWrapper里receiveComponent后updateComponent。
class ReactCompositeComponentWrapper {
    updateComponent(prevElement, nextElement) {
        const nextProps = nextElement.props;
        const inst = this._instance;

        // componentWillReceiveProps生命周期在这里执行
        if (inst.componentWillReceiveProps) {
            inst.componentWillReceiveProps(nextProps);
        }

        let shouldUpdate = true;

        if (inst.shouldComponentUpdate) {
            shouldUpdate = inst.shouldComponentUpdate(nextProps);
        }

        // 根据 shouldComponentUpdate 的返回结果 判断是否需要更新
        if (shouldUpdate) {
            this._performComponentUpdate(nextElement, nextProps);
        } else {
            inst.props = nextProps;
        }
    }
}
之后其实就是直接进入render渲染了。
完整代码:git地址
接下来就是研究setState了,然后完善了。
其实react.memo的实现很简单,就几行代码。
export default function memo<Props>(
  type: React$ElementType,
  compare?: (oldProps: Props, newProps: Props) => boolean,
) {
  if (__DEV__) {
    if (!isValidElementType(type)) {
      warningWithoutStack(
        false,
        'memo: The first argument must be a component. Instead ' +
          'received: %s',
        type === null ? 'null' : typeof type,
      );
    }
  }
  return {
    $$typeof: REACT_MEMO_TYPE,
    type,
    compare: compare === undefined ? null : compare,
  };
}
可以看到,最终返回的是一个对象,这个对象带有一些标志属性,在react Fiber的过程中会做相应的处理。
在ReactFiberBeginWork.js中可以看到:
if (updateExpirationTime < renderExpirationTime) {
    // This will be the props with resolved defaultProps,
    // unlike current.memoizedProps which will be the unresolved ones.
    const prevProps = currentChild.memoizedProps;
    // Default to shallow comparison
    let compare = Component.compare;
    compare = compare !== null ? compare : shallowEqual;
    if (compare(prevProps, nextProps) && current.ref === workInProgress.ref) {
      return bailoutOnAlreadyFinishedWork(
        current,
        workInProgress,
        renderExpirationTime,
      );
    }
  }
根据传入的compare函数比较prevProps和nextProps,最终决定生成对象,并影响渲染效果。
其实在这之前,早已经有一个生命周期函数实现了相同的功能。他就是shouldComponentUpdate。
之所以再增加这个memo,也是react团队一直在秉承的信念。那就是让一切变得更加函数式。
通过一个例子来看看memo如何使用。
先创建一个简单组件SubComponent。
const SubComponent = props =>
  <>
    i am {props.name}. hi~
  </>
调用React.memo创建memo组件
const Memo = React.memo(SubComponent, (prevProps, nextProps) =>
  prevProps.name === nextProps.name
);
在页面上调用memo
<div className="App">
  <Memo name={name} />
</div>
memo接收两个参数,一个是组件,一个是函数。这个函数就是定义了memo需不需要render的钩子。
比较前一次的props跟当前props,返回true表示不需要render。
也就是传给Memo的name不变时,不会触发SubComponent的render函数。
当前页面上的SubComponent还是之前的,并没有重新渲染。这也是为啥叫memo的原因吧。
React.lazy 用于做Code-Splitting,代码拆分。类似于按需加载,渲染的时候才加载代码。
用法如下:
import React, {lazy} from 'react';
const OtherComponent = lazy(() => import('./OtherComponent'));

function MyComponent() {
  return (
    <div>
      <OtherComponent />
    </div>
  );
}
lazy(() => import('./OtherComponent'))使用es6的import()返回一个promise,类似于:
lazy(() => new Promise(resolve =>
  setTimeout(() =>
    resolve(
      // 模拟ES Module
      {
        // 模拟export default
        default: function render() {
          return <div>Other Component</div>
        }
      }
    ),
    3000
  )
));
React.lazy的提出是一种更优雅的条件渲染解决方案。
之所以说他更优雅,是因为他将条件渲染的优化提升到了框架层。
这里我们引出suspense。
当我们组件未渲染完成,需要loading时,可以这么写:
const OtherComponent = React.lazy(() => import('./OtherComponent'));

function MyComponent() {
  return (
    <div>
      <Suspense fallback={<div>Loading...</div>}>
        <OtherComponent />
      </Suspense>
    </div>
  );
}
在我们的业务场景中,OtherComponent可以代表多个条件渲染组件,我们全部加载完成才取消loding。
只要promise没执行到resolve,suspense都会返回fallback中的loading。
代码简洁,loading可提升至祖先组件,易聚合。相当优雅的解决了条件渲染。
关于suspense的异步渲染原理有篇文章写的很好,感兴趣的在文末查看。
hooks提出有一段时间了,dan也一直在推广,并且表示很快加入react正式版本。
关于一些介绍,直接看官网会更好。
hooks常用api有:useState、useEffect、useContext、useReducer、useRef等。
主要操作一下useEffect,用处很大。举一反三。
当all is function,没了component,自然也没了各种生命周期函数,此时useEffect登场。
下面通过一个组件实例来说明。
影像组件,功能有:前端加水印、实现拖拽。
大致实现如下:
class ImageModal extends Component {
  constructor(props) {
    ...
  }

  componentDidMount() {
    // 画水印、注册拖拽事件逻辑
    // 以及其他的image处理相关逻辑
  }

  componentDidUpdate(nextProps, prevProps) {
    if (nextProps.cur !== prevProps.cur) {
      // 切换时重置状态(比如 旋转角度、大小等)逻辑
      // image特有逻辑
    }
  }

  render() {
    return <>
      ...
      <img ... />
    </img>
  }
}
ImageModal负责渲染图片modal,现在有另一个modal用来渲染html模板。
命名为HtmlModal,HtmlModal接受后端返回的html,经过处理后内嵌在网页中。
同样要求加水印、拖拽的功能等。
也就是image跟html有部分逻辑相同有部分不相同。
基于这个考虑,再写一个组件。
同理实现如下:
class HtmlModal extends Component {
  constructor(props) {
    ...
  }

  componentDidMount() {
    // 画水印、注册拖拽事件逻辑
    // 以及其他的html处理相关逻辑
  }

  componentDidUpdate(nextProps, prevProps) {
    if (nextProps.cur !== prevProps.cur) {
      // 切换时重置状态(比如 旋转角度、大小等)逻辑
      // html特有逻辑
    }
  }

  render() {
    return <>
      ...
      <div dangerouslySetInnerHTML={{ __html: ... }}></div>
    </img>
  }
}
可以看到HtmlModal和ImageModal在componentDidMount和componentDidUpdate周期中有不少逻辑是相同的。
如果我们使用useEffect的话,可以怎么实现这个复用和分离呢?来看看。
export function useMoveEffect() {
  // 第二个参数传了固定值 []
  // 相当于 componentDidMount
  useEffect(() => {
    // 实现拖拽逻辑
  }, []);
}

export function useDrawMarkEffect(cur) {
  useEffect(() => {
    // 实现水印逻辑
  }, []);
}

export function useResetEffect(cur); {
  // 第二个参数传了固定值 [ cur ]
  // 相当于 componentDidUpdate 比较 cur
  useEffect(() => {
    // 实现重置逻辑
  }, [ cur ]);
}

function useOtherImageEffect(...) {
  useEffect(() => {
    // 实现image特有逻辑
  }, [ ... ]);
}

function ImageModal (props) {
  // 细分 Effect,方便复用
  useMoveEffect();
  useDrawMarkEffect();
  useResetEffect(props.cur);
  ...

  useOtherImageEffect(...);

  return <>
    ...
    <img ... />
  </img>

}
ok,有了上面的梳理和useEffect重构,我们来编写HtmlModal:
import { useMoveEffect, useDrawMarkEffect, useResetEffect } from './imageModal'

function useOtherHtmlEffect(...) {
  useEffect(() => {
    // 实现html特有逻辑
  }, [ ... ]);
}

function HtmlModal (props) {
  // 细分 Effect,方便复用
  useMoveEffect();
  useDrawMarkEffect();
  useResetEffect(props.cur);
  ...

  useOtherHtmlEffect(...);

  return <>
    ...
    <img ... />
  </img>

}
以上,实现了生命周期中重复逻辑的复用。以后无论新增什么modal,都可以复用逻辑,摆脱了 ctr c/ ctr v。
从而组件变得更小、代码变得简洁,提升编程体验。
React v16.6.0: lazy, memo and contextType(官网)
Making Sense of React Hooks(dan)
React Suspense(中文)
简单介绍一下中间件:
中间件模式(middleware)是一种很常见、也很强大的模式,被广泛应用在 Express、Koa、Redux 等类库和框架当中。如果你能在自己的代码中也使用灵活这种模式能给你的程序带来更大的便利性和灵活性。
简单来说,中间件就是在调用目标函数之前,你可以随意插入其他函数预先对数据进行处理、过滤,在这个过程里面你可以打印数据、或者停止往下执行中间件等。数据就像水流一样经过中间件的层层的处理、过滤,最终到达目标函数。
最近经常活跃在一个Web 前端开发评测OJ网站,上面有这么一个题目:scriptoj.com/problems/52
中间件他是想实现这么个效果:

然后我用两种方法实现了下:
刚开始,我上网查资料,看到有人用指针和递归的**实现了中间件,于是我思考了下,实现了下面这种办法:

可以看到这种办法十分复杂,别说,写完我都不忍直视。。
后来跟高手交流了下,于是第二种更简单实现的方法出来了:

很多新手小白跟我一样,总是能听到单页面应用或者SPA这个词,感觉熟悉又陌生,你有没有十分认真的想过,到底什么是单页面应用呢?
要想明白什么是单页面应用,必须要弄清楚三个东西:传统的web应用、桌面应用程序、单页面应用SPA。
传统的web应用,大家都不会陌生吧?几乎每一个响应动作都会刷新整个页面,一个词总结就是“牵一发而动全身”,需要体验传统web应用的可以打开某学校网站或者某政府网站。
而桌面应用程序刚好是相对web应用来说的,主要区别在于应用程序自身与它的用户界面之间的相对位置不同。在桌面应用程序中,它的每一个消息传递都只在操作系统中,这里只涉及到一台机器,不存在网络。正因为如此,桌面应用程序的反应是不存在网络加载延迟的,不多说,就是快。
看到了传统web应用的慢和桌面应用的快,作为web开发程序猿的一些领头猿就不服了,于是单页面应用SPA就这样被创造了出来。
一个单页的应用程序(Single-page application)即SPA是一个Web应用程序或网站,SPA的用户体验类似与桌面应用程序。在SPA中,通常一开始就会加载所有必需的代码(HTML,JavaScript和CSS),有时候考虑到首屏加载太慢会按需加载。这样一来,以后用户的每一个动作都不会重新加载页面,取而代之的是利用 JavaScript 动态的变换HTML的内容,从而实现UI与用户的交互。这样看来,SPA的体验就十分接近了桌面应用。
作为一个新手,我也只能这么肤浅的解释了。
A declarative, efficient, and flexible JavaScript library for building user interfaces.
🖖 Vue.js is a progressive, incrementally-adoptable JavaScript framework for building UI on the web.
TypeScript is a superset of JavaScript that compiles to clean JavaScript output.
An Open Source Machine Learning Framework for Everyone
The Web framework for perfectionists with deadlines.
A PHP framework for web artisans
Bring data to life with SVG, Canvas and HTML. 📊📈🎉
JavaScript (JS) is a lightweight interpreted programming language with first-class functions.
Some thing interesting about web. New door for the world.
A server is a program made to process requests and deliver data to clients.
Machine learning is a way of modeling and interpreting data that allows a piece of software to respond intelligently.
Some thing interesting about visualization, use data art
Some thing interesting about game, make everyone happy.
We are working to build community through open source technology. NB: members must have two-factor auth.
Open source projects and samples from Microsoft.
Google ❤️ Open Source for everyone.
Alibaba Open Source for everyone
Data-Driven Documents codes.
China tencent open source team.