GithubHelp home page GithubHelp logo

bert-train2deploy's Introduction

BERT模型从训练到部署全流程

Tag: BERT 训练 部署

缘起

在群里看到许多朋友在使用BERT模型,网上多数文章只提到了模型的训练方法,后面的生产部署及调用并没有说明。 这段时间使用BERT模型完成了从数据准备到生产部署的全流程,在这里整理出来,方便大家参考。

在下面我将以一个“手机评论的情感分类”为例子,简要说明从训练到部署的全部流程。最终完成后可以使用一个网页进行交互,实时地对输入的评论语句进行分类判断。

基本架构

基本架构为:

graph LR
A(BERT模型服务端) --> B(API服务端)
B-->A
B --> C(应用端)
C-->B
Loading
+-------------------+
|   应用端(HTML)    | 
+-------------------+
         ^^
         ||
         VV
+-------------------+
|     API服务端     | 
+-------------------+
         ^^
         ||
         VV
+-------------------+
|  BERT模型服务端   | 
+-------------------+

架构说明: BERT模型服务端 加载模型,进行实时预测的服务; 使用的是 BERT-BiLSTM-CRF-NER

API服务端 调用实时预测服务,为应用提供API接口的服务,用flask编写;

应用端 最终的应用端; 我这里使用一个HTML网页来实现;

本项目完整源码地址:BERT从训练到部署git源码 项目博客地址: BERT从训练到部署

附件: 本例中训练完成的模型文件.ckpt格式及.pb格式文件,由于比较大,已放到网盘提供下载:

链接:https://pan.baidu.com/s/1DgVjRK7zicbTlAAkFp7nWw 
提取码:8iaw 

如果你想跳过前面模型的训练过程,可以直接使用训练好的模型,来完成后面的部署。

关键节点

主要包括以下关键节点:

  • 数据准备
  • 模型训练
  • 模型格式转化
  • 服务端部署与启动
  • API服务编写与部署
  • 客户端(网页端的编写与部署)

数据准备

这里用的数据是手机的评论,数据比较简单,三个分类: -1,0,1 表示负面,中性与正面情感 数据格式如下:

1	手机很好,漂亮时尚,赠品一般
1	手机很好。包装也很完美,赠品也是收到货后马上就发货了
1	第一次在第三方买的手机 开始很担心 不过查一下是正品 很满意
1	很不错 续航好 系统流畅
1	不知道真假,相信店家吧
1	快递挺快的,荣耀10手感还是不错的,玩了会王者还不错,就是前后玻璃,
1	流很快,手机到手感觉很酷,白色适合女士,很惊艳!常好,运行速度快,流畅!
1	用了一天才来评价,都还可以,很满意
1	幻影蓝很好看啊,炫彩系列时尚时尚最时尚,速度快,配送运行?做活动优惠买的,开心?
1	快递速度快,很赞!软件更新到最新版。安装上软胶保护套拿手上不容易滑落。
0	手机出厂贴膜好薄啊,感觉像塑料膜。其他不能发表
0	用了一段时间,除了手机续航其它还不错。
0	做工一般
1	挺好的,赞一个,手机很好,很喜欢
0	手机还行,但是手机刚开箱时屏幕和背面有很多指纹痕迹,手机壳跟**在地上磨过似的,好几条印子。要不是看在能把这些痕迹擦掉,和闲退货麻烦,就给退了。就不能规规矩矩做生意么。还有送的都是什么吊东西,运动手环垃圾一比,贴在手机后面的固定手环还**是塑料的渡了一层银色,耳机也和图片描述不符,碎屏险已经注册,不知道怎么样。讲真的,要不就别送或者少送,要不,就规规矩矩的,不然到最后还让人觉得不舒服。其他没什么。
-1	手机整体还可以,拍照也很清楚,也很流畅支持华为。给一星是因为有缺陷,送的耳机是坏的!评论区好评太多,需要一些差评来提醒下,以后更加注意细节,提升质量。
0	前天刚买的,  看着还行, 指纹解锁反应不错。
1	高端大气上档次。
-1	各位小主,注意啦,耳机是没有的,需要单独买
0	外观不错,感觉很耗电啊,在使用段时间评价
1	手机非常好,很好用
-1	没有发票,图片与实物不一致
1	习惯在京东采购物品,方便快捷,及时开票进行报销,配送员服务也很周到!就是手机收到时没有电,感觉不大正常
1	高端大气上档次啊!看电影玩游戏估计很爽!屏幕够大!

数据总共8097条,按6:2:2的比例拆分成train.tsv,test.tsv ,dev.tsv三个数据文件

模型训练

训练模型就直接使用BERT的分类方法,把原来的run_classifier.py 复制出来并修改为 run_mobile.py。关于训练的代码网上很多,就不展开说明了,主要有以下方法:

#-----------------------------------------
#手机评论情感分类数据处理 2019/3/12 
#labels: -1负面 0中性 1正面
class SetimentProcessor(DataProcessor):
  def get_train_examples(self, data_dir):
    """See base class."""
    return self._create_examples(
        self._read_tsv(os.path.join(data_dir, "train.tsv")), "train")

  def get_dev_examples(self, data_dir):
    """See base class."""
    return self._create_examples(
        self._read_tsv(os.path.join(data_dir, "dev.tsv")), "dev")

  def get_test_examples(self, data_dir):
    """See base class."""
    return self._create_examples(
        self._read_tsv(os.path.join(data_dir, "test.tsv")), "test")

  def get_labels(self):
    """See base class."""

    """
    if not os.path.exists(os.path.join(FLAGS.output_dir, 'label_list.pkl')):
        with codecs.open(os.path.join(FLAGS.output_dir, 'label_list.pkl'), 'wb') as fd:
            pickle.dump(self.labels, fd)
    """
    return ["-1", "0", "1"]

  def _create_examples(self, lines, set_type):
    """Creates examples for the training and dev sets."""
    examples = []
    for (i, line) in enumerate(lines):
      if i == 0: 
        continue
      guid = "%s-%s" % (set_type, i)

      #debug (by xmxoxo)
      #print("read line: No.%d" % i)

      text_a = tokenization.convert_to_unicode(line[1])
      if set_type == "test":
        label = "0"
      else:
        label = tokenization.convert_to_unicode(line[0])
      examples.append(
          InputExample(guid=guid, text_a=text_a, label=label))
    return examples
#-----------------------------------------

然后添加一个方法:

  processors = {
      "cola": ColaProcessor,
      "mnli": MnliProcessor,
      "mrpc": MrpcProcessor,
      "xnli": XnliProcessor,
      "setiment": SetimentProcessor, #2019/3/27 add by Echo
  }

特别说明,这里有一点要注意,在后期部署的时候,需要一个label2id的字典,所以要在训练的时候就保存起来,在convert_single_example这个方法里增加一段:

  #--- save label2id.pkl ---
  #在这里输出label2id.pkl , add by xmxoxo 2019/2/27
  output_label2id_file = os.path.join(FLAGS.output_dir, "label2id.pkl")
  if not os.path.exists(output_label2id_file):
    with open(output_label2id_file,'wb') as w:
      pickle.dump(label_map,w)

  #--- Add end ---

这样训练后就会生成这个文件了。

使用以下命令训练模型,目录参数请根据各自的情况修改:

cd /mnt/sda1/transdat/bert-demo/bert/
export BERT_BASE_DIR=/mnt/sda1/transdat/bert-demo/bert/chinese_L-12_H-768_A-12
export GLUE_DIR=/mnt/sda1/transdat/bert-demo/bert/data
export TRAINED_CLASSIFIER=/mnt/sda1/transdat/bert-demo/bert/output
export EXP_NAME=mobile_0

sudo python run_mobile.py \
  --task_name=setiment \
  --do_train=true \
  --do_eval=true \
  --data_dir=$GLUE_DIR/$EXP_NAME \
  --vocab_file=$BERT_BASE_DIR/vocab.txt \
  --bert_config_file=$BERT_BASE_DIR/bert_config.json \
  --init_checkpoint=$BERT_BASE_DIR/bert_model.ckpt \
  --max_seq_length=128 \
  --train_batch_size=32 \
  --learning_rate=2e-5 \
  --num_train_epochs=5.0 \
  --output_dir=$TRAINED_CLASSIFIER/$EXP_NAME

由于数据比较小,训练是比较快的,训练完成后,可以在输出目录得到模型文件,这里的模型文件格式是.ckpt的。 训练结果:

eval_accuracy = 0.861643
eval_f1 = 0.9536328
eval_loss = 0.56324786
eval_precision = 0.9491279
eval_recall = 0.9581805
global_step = 759
loss = 0.5615213

可以使用以下语句来进行预测:

sudo python run_mobile.py \
  --task_name=setiment \
  --do_predict=true \
  --data_dir=$GLUE_DIR/$EXP_NAME \
  --vocab_file=$BERT_BASE_DIR/vocab.txt \
  --bert_config_file=$BERT_BASE_DIR/bert_config.json \
  --init_checkpoint=$TRAINED_CLASSIFIER/$EXP_NAME \
  --max_seq_length=128 \
  --output_dir=$TRAINED_CLASSIFIER/$EXP_NAME

模型格式转化

到这里我们已经训练得到了模型,但这个模型是.ckpt的文件格式,文件比较大,并且有三个文件:

-rw-r--r-- 1 root root 1227239468 Apr 15 17:46 model.ckpt-759.data-00000-of-00001
-rw-r--r-- 1 root root      22717 Apr 15 17:46 model.ckpt-759.index
-rw-r--r-- 1 root root    3948381 Apr 15 17:46 model.ckpt-759.meta

可以看到,模板文件非常大,大约有1.17G。 后面使用的模型服务端,使用的是.pb格式的模型文件,所以需要把生成的ckpt格式模型文件转换成.pb格式的模型文件。 我这里提供了一个转换工具:freeze_graph.py,使用如下:

usage: freeze_graph.py [-h] -bert_model_dir BERT_MODEL_DIR -model_dir
                       MODEL_DIR [-model_pb_dir MODEL_PB_DIR]
                       [-max_seq_len MAX_SEQ_LEN] [-num_labels NUM_LABELS]
                       [-verbose]

这里要注意的参数是:

  • model_dir 就是训练好的.ckpt文件所在的目录
  • max_seq_len 要与原来一致;
  • num_labels 是分类标签的个数,本例中是3个
python freeze_graph.py \
    -bert_model_dir $BERT_BASE_DIR \
    -model_dir $TRAINED_CLASSIFIER/$EXP_NAME \
    -max_seq_len 128 \
    -num_labels 3

执行成功后可以看到在model_dir目录会生成一个classification_model.pb 文件。 转为.pb格式的模型文件,同时也可以缩小模型文件的大小,可以看到转化后的模型文件大约是390M。

-rw-rw-r-- 1 hexi hexi 409326375 Apr 15 17:58 classification_model.pb

服务端部署与启动

现在可以安装服务端了,使用的是 bert-base, 来自于项目BERT-BiLSTM-CRF-NER, 服务端只是该项目中的一个部分。 项目地址:https://github.com/macanv/BERT-BiLSTM-CRF-NER ,感谢Macanv同学提供这么好的项目。

这里要说明一下,我们经常会看到bert-as-service 这个项目的介绍,它只能加载BERT的预训练模型,输出文本向量化的结果。 而如果要加载fine-turing后的模型,就要用到 bert-base 了,详请请见: 基于BERT预训练的中文命名实体识别TensorFlow实现

下载代码并安装 :

pip install bert-base==0.0.7 -i https://pypi.python.org/simple

或者

git clone https://github.com/macanv/BERT-BiLSTM-CRF-NER
cd BERT-BiLSTM-CRF-NER/
python3 setup.py install

使用 bert-base 有三种运行模式,分别支持三种模型,使用参数-mode 来指定:

  • NER 序列标注类型,比如命名实体识别;
  • CLASS 分类模型,就是本文中使用的模型
  • BERT 这个就是跟bert-as-service 一样的模式了

之所以要分成不同的运行模式,是因为不同模型对输入内容的预处理是不同的,命名实体识别NER是要进行序列标注; 而分类模型只要返回label就可以了。

安装完后运行服务,同时指定监听 HTTP 8091端口,并使用GPU 1来跑;

cd /mnt/sda1/transdat/bert-demo/bert/bert_svr

export BERT_BASE_DIR=/mnt/sda1/transdat/bert-demo/bert/chinese_L-12_H-768_A-12
export TRAINED_CLASSIFIER=/mnt/sda1/transdat/bert-demo/bert/output
export EXP_NAME=mobile_0

bert-base-serving-start \
    -model_dir $TRAINED_CLASSIFIER/$EXP_NAME \
    -bert_model_dir $BERT_BASE_DIR \
    -model_pb_dir $TRAINED_CLASSIFIER/$EXP_NAME \
    -mode CLASS \
    -max_seq_len 128 \
    -http_port 8091 \
    -port 5575 \
    -port_out 5576 \
    -device_map 1 

注意:port 和 port_out 这两个参数是API调用的端口号, 默认是5555和5556,如果你准备部署多个模型服务实例,那一定要指定自己的端口号,避免冲突。 我这里是改为: 5575 和 5576

如果报错没运行起来,可能是有些模块没装上,都是 bert_base/server/http.py里引用的,装上就好了:

sudo pip install flask 
sudo pip install flask_compress
sudo pip install flask_cors
sudo pip install flask_json

我这里的配置是2个GTX 1080 Ti,这个时候双卡的优势终于发挥出来了,GPU 1用于预测,GPU 0还可以继续训练模型。

运行服务后会自动生成很多临时的目录和文件,为了方便管理与启动,可建立一个工作目录,并把启动命令写成一个shell脚本。 这里创建的是mobile_svr\bertsvr.sh ,这样可以比较方便地设置服务器启动时自动启动服务,另外增加了每次启动时自动清除临时文件

代码如下:

#!/bin/bash
#chkconfig: 2345 80 90
#description: 启动BERT分类模型 

echo '正在启动 BERT mobile svr...'
cd /mnt/sda1/transdat/bert-demo/bert/mobile_svr
sudo rm -rf tmp*

export BERT_BASE_DIR=/mnt/sda1/transdat/bert-demo/bert/chinese_L-12_H-768_A-12
export TRAINED_CLASSIFIER=/mnt/sda1/transdat/bert-demo/bert/output
export EXP_NAME=mobile_0

bert-base-serving-start \
    -model_dir $TRAINED_CLASSIFIER/$EXP_NAME \
    -bert_model_dir $BERT_BASE_DIR \
    -model_pb_dir $TRAINED_CLASSIFIER/$EXP_NAME \
    -mode CLASS \
    -max_seq_len 128 \
    -http_port 8091 \
    -port 5575 \
    -port_out 5576 \
    -device_map 1 

补充说明一下内存的使用情况: BERT在训练时需要加载完整的模型数据,要用的内存是比较多的,差不多要10G,我这里用的是GTX 1080 Ti 11G。 但在训练完后,按上面的方式部署加载pb模型文件时,就不需要那么大了,上面也可以看到pb模型文件就是390M。 其实只要你使用的是BERT base 预训练模型,最终的得到的pb文件大小都是差不多的。

还有同学问到能不能用CPU来部署,我这里没尝试过,但我想肯定是可以的,只是在计算速度上跟GPU会有差别。

我这里使用GPU 1来实时预测,同时加载了2个BERT模型,截图如下:

GPU截图

端口测试

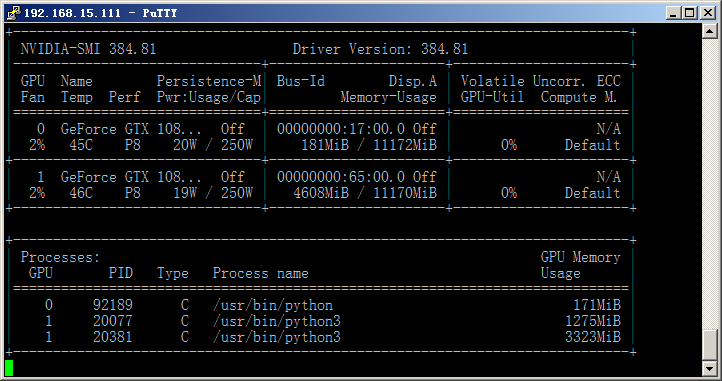
模型服务端部署完成了,可以使用curl命令来测试一下它的运行情况。

curl -X POST http://192.168.15.111:8091/encode \
  -H 'content-type: application/json' \
  -d '{"id": 111,"texts": ["总的来说,这款手机性价比是特别高的。","槽糕的售后服务!!!店大欺客"], "is_tokenized": false}'

执行结果:

>   -H 'content-type: application/json' \
>   -d '{"id": 111,"texts": ["总的来说,这款手机性价比是特别高的。","槽糕的售后服务!!!店大欺客"], "is_tokenized": false}'
{"id":111,"result":[{"pred_label":["1","-1"],"score":[0.9974544644355774,0.9961422085762024]}],"status":200}

可以看到对应的两个评论,预测结果一个是1,另一个是-1,计算的速度还是非常很快的。 通过这种方式来调用还是不太方便,知道了这个通讯方式,我们可以用flask编写一个API服务, 为所有的应用统一提供服务。

API服务编写与部署

为了方便客户端的调用,同时也为了可以对多个语句进行预测,我们用flask编写一个API服务端,使用更简洁的方式来与客户端(应用)来通讯。 整个API服务端放在独立目录/mobile_apisvr/目录下。

用flask创建服务端并调用主方法,命令行参数如下:

def main_cli ():
    pass
    parser = argparse.ArgumentParser(description='API demo server')
    parser.add_argument('-ip', type=str, default="0.0.0.0",
                        help='chinese google bert model serving')
    parser.add_argument('-port', type=int, default=8910,
                        help='listen port,default:8910')

    args = parser.parse_args()

    flask_server(args)

主方法里创建APP对象:

    app.run(
        host = args.ip,     #'0.0.0.0',
        port = args.port,   #8910,  
        debug = True 
    )

这里的接口简单规划为/api/v0.1/query, 使用POST方法,参数名为'text',使用JSON返回结果; 路由配置:

@app.route('/api/v0.1/query', methods=['POST'])

API服务端的核心方法,是与BERT-Serving进行通讯,需要创建一个客户端BertClient:

#对句子进行预测识别
def class_pred(list_text):
    #文本拆分成句子
    #list_text = cut_sent(text)
    print("total setance: %d" % (len(list_text)) )
    with BertClient(ip='192.168.15.111', port=5575, port_out=5576, show_server_config=False, check_version=False, check_length=False,timeout=10000 ,  mode='CLASS') as bc:
        start_t = time.perf_counter()
        rst = bc.encode(list_text)
        print('result:', rst)
        print('time used:{}'.format(time.perf_counter() - start_t))
    #返回结构为:
    # rst: [{'pred_label': ['0', '1', '0'], 'score': [0.9983683228492737, 0.9988993406295776, 0.9997349381446838]}]
    #抽取出标注结果
    pred_label = rst[0]["pred_label"]
    result_txt = [ [pred_label[i],list_text[i] ] for i in range(len(pred_label))]
    return result_txt

注意:这里的IP,端口要与服务端的对应。

运行API 服务端:

python api_service.py

在代码中的debug设置为True,这样只要更新文件,服务就会自动重新启动,比较方便调试。 运行截图如下:

API服务端

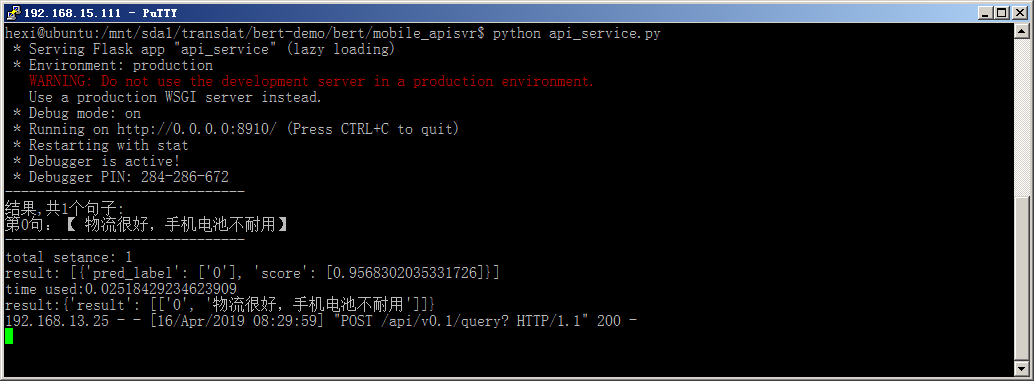
到这一步也可以使用curl或者其它工具进行测试,也可以等完成网页客户端后一并调试。 我这里使用chrome插件 API-debug来进行测试,如下图:

API测试

客户端(网页端)

这里使用一个HTML页面来模拟客户端,在实际项目中可能是具体的应用。 为了方便演示就把网页模板与API服务端合并在一起了,在网页端使用AJAX来与API服务端通讯。

创建模板目录templates,使用模板来加载一个HTML,模板文件名为index.html。 在HTML页面里使用AJAX来调用接口,由于是在同一个服务器,同一个端口,地址直接用/api/v0.1/query就可以了, 在实际项目中,客户应用端与API是分开的,则需要指定接口URL地址,同时还要注意数据安全性。 代码如下:

function UrlPOST(txt,myfun){
	if (txt=="")
	{
		return "error parm"; 
	}
	var httpurl = "/api/v0.1/query"; 
	$.ajax({
			type: "POST",
			data: "text="+txt,
			url: httpurl,
			//async:false,
			success: function(data)
			{   
				myfun(data);
			}
	});
}

启动API服务端后,可以使用IP+端口来访问了,这里的地址是http://192.168.15.111:8910/

运行界面截图如下:

运行界面截图

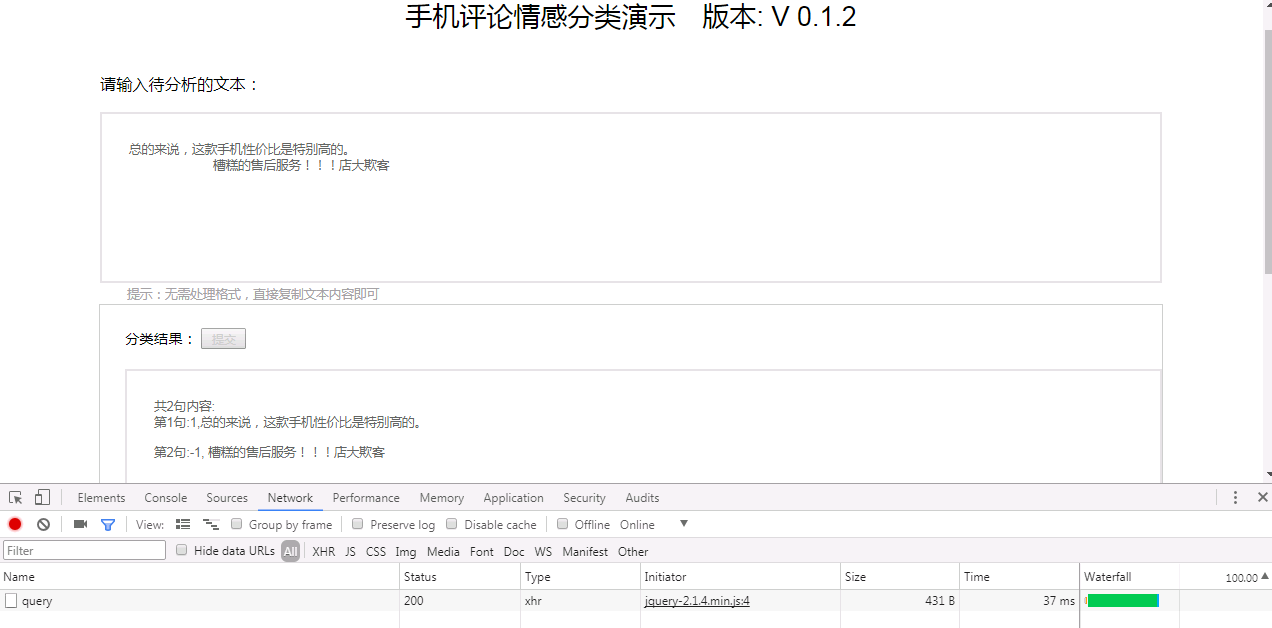
可以看到请求的用时时间为37ms,速度还是很快的,当然这个速度跟硬件配置有关。

参考资料:

欢迎批评指正,联系邮箱([email protected])

bert-train2deploy's People

Stargazers

 avatar  avatar  avatar  avatar  avatar  avatar  avatar  avatar  avatar  avatar  avatar  avatar  avatar  avatar  avatar  avatar  avatar  avatar  avatar  avatar  avatar  avatar  avatar  avatar  avatar  avatar  avatar  avatar  avatar  avatar  avatar  avatar  avatar  avatar  avatar  avatar  avatar  avatar  avatar  avatar  avatar  avatar  avatar  avatar  avatar  avatar  avatar  avatar  avatar  avatar  avatar  avatar  avatar  avatar  avatar  avatar  avatar  avatar  avatar  avatar  avatar  avatar  avatar  avatar  avatar  avatar  avatar  avatar  avatar  avatar  avatar  avatar  avatar  avatar  avatar  avatar  avatar  avatar  avatar  avatar  avatar  avatar  avatar  avatar  avatar  avatar  avatar  avatar  avatar  avatar  avatar  avatar  avatar  avatar  avatar  avatar  avatar  avatar  avatar  avatar

Watchers

 avatar  avatar  avatar  avatar  avatar  avatar  avatar  avatar  avatar  avatar  avatar  avatar  avatar  avatar  avatar

bert-train2deploy's Issues

用自己训练好的模型转换成pd文件后,启动ner服务报错

转换pd文件时成功完成,启动服务时报错
这是我的启动脚本

bert-base-serving-start -model_dir $TRAINED_CLASSIFIER/$EXP_NAME -bert_model_dir $BERT_BASE_DIR -model_pb_dir $TRAINED_CLASSIFIER/$EXP_NAME -mode NER -max_seq_len 128 -http_port 8091 -port 5575 -port_out 5576 -device_map 1

pd文件名:classification_model.pb
报错代码如下

E:NER_MODEL, Lodding...:[gra:opt:306]:fail to optimize the graph! float division by zero
Traceback (most recent call last):
  File "/root/anaconda3/lib/python3.7/site-packages/bert_base/server/graph.py", line 289, in optimize_ner_model
    labels=None, num_labels=num_labels, use_one_hot_embeddings=False, dropout_rate=1.0)
  File "/root/anaconda3/lib/python3.7/site-packages/bert_base/train/models.py", line 101, in create_model
    rst = blstm_crf.add_blstm_crf_layer(crf_only=True)
  File "/root/anaconda3/lib/python3.7/site-packages/bert_base/train/lstm_crf_layer.py", line 60, in add_blstm_crf_layer
    loss, trans = self.crf_layer(logits)
  File "/root/anaconda3/lib/python3.7/site-packages/bert_base/train/lstm_crf_layer.py", line 160, in crf_layer
    initializer=self.initializers.xavier_initializer())
  File "/root/anaconda3/lib/python3.7/site-packages/tensorflow/python/ops/variable_scope.py", line 1496, in get_variable
    aggregation=aggregation)
  File "/root/anaconda3/lib/python3.7/site-packages/tensorflow/python/ops/variable_scope.py", line 1239, in get_variable
    aggregation=aggregation)
  File "/root/anaconda3/lib/python3.7/site-packages/tensorflow/python/ops/variable_scope.py", line 562, in get_variable
    aggregation=aggregation)
  File "/root/anaconda3/lib/python3.7/site-packages/tensorflow/python/ops/variable_scope.py", line 514, in _true_getter
    aggregation=aggregation)
  File "/root/anaconda3/lib/python3.7/site-packages/tensorflow/python/ops/variable_scope.py", line 929, in _get_single_variable
    aggregation=aggregation)
  File "/root/anaconda3/lib/python3.7/site-packages/tensorflow/python/ops/variables.py", line 259, in __call__
    return cls._variable_v1_call(*args, **kwargs)
  File "/root/anaconda3/lib/python3.7/site-packages/tensorflow/python/ops/variables.py", line 220, in _variable_v1_call
    shape=shape)
  File "/root/anaconda3/lib/python3.7/site-packages/tensorflow/python/ops/variables.py", line 198, in <lambda>
    previous_getter = lambda **kwargs: default_variable_creator(None, **kwargs)
  File "/root/anaconda3/lib/python3.7/site-packages/tensorflow/python/ops/variable_scope.py", line 2511, in default_variable_creator
    shape=shape)
  File "/root/anaconda3/lib/python3.7/site-packages/tensorflow/python/ops/variables.py", line 263, in __call__
    return super(VariableMetaclass, cls).__call__(*args, **kwargs)
  File "/root/anaconda3/lib/python3.7/site-packages/tensorflow/python/ops/variables.py", line 1568, in __init__
    shape=shape)
  File "/root/anaconda3/lib/python3.7/site-packages/tensorflow/python/ops/variables.py", line 1698, in _init_from_args
    initial_value(), name="initial_value", dtype=dtype)
  File "/root/anaconda3/lib/python3.7/site-packages/tensorflow/python/ops/variable_scope.py", line 901, in <lambda>
    partition_info=partition_info)
  File "/root/anaconda3/lib/python3.7/site-packages/tensorflow/contrib/layers/python/layers/initializers.py", line 143, in _initializer
    limit = math.sqrt(3.0 * factor / n)
ZeroDivisionError: float division by zero
Traceback (most recent call last):
  File "/root/anaconda3/bin/bert-base-serving-start", line 10, in <module>
    sys.exit(start_server())
  File "/root/anaconda3/lib/python3.7/site-packages/bert_base/runs/__init__.py", line 17, in start_server
    server = BertServer(args)
  File "/root/anaconda3/lib/python3.7/site-packages/bert_base/server/__init__.py", line 102, in __init__
    raise FileNotFoundError('graph optimization fails and returns empty result')
FileNotFoundError: graph optimization fails and returns empty result

ImportError: No module named six

(tf) yang@yang-Precision-Tower-7810:/桌面/BERT-train2deploy-master$ cd /home/yang/桌面/BERT-train2deploy-master
(tf) yang@yang-Precision-Tower-7810:
/桌面/BERT-train2deploy-master$ export BERT_BASE_DIR=/home/yang/桌面/BERT-train2deploy-master/chinese_L-12_H-768_A-12
(tf) yang@yang-Precision-Tower-7810:/桌面/BERT-train2deploy-master$ export GLUE_DIR=/home/yang/桌面/BERT-train2deploy-master/data
(tf) yang@yang-Precision-Tower-7810:
/桌面/BERT-train2deploy-master$ export TRAINED_CLASSIFIER=/home/yang/桌面/BERT-train2deploy-master/output
(tf) yang@yang-Precision-Tower-7810:/桌面/BERT-train2deploy-master$ export EXP_NAME=mobile_0
(tf) yang@yang-Precision-Tower-7810:
/桌面/BERT-train2deploy-master$
(tf) yang@yang-Precision-Tower-7810:~/桌面/BERT-train2deploy-master$ sudo python run_mobile.py \

--task_name=setiment
--do_train=true
--do_eval=true
--data_dir=$GLUE_DIR/$EXP_NAME
--vocab_file=$BERT_BASE_DIR/vocab.txt
--bert_config_file=$BERT_BASE_DIR/bert_config.json
--init_checkpoint=$BERT_BASE_DIR/bert_model.ckpt
--max_seq_length=128
--train_batch_size=32
--learning_rate=2e-5
--num_train_epochs=5.0
--output_dir=$TRAINED_CLASSIFIER/$EXP_NAME
[sudo] yang 的密码:
Traceback (most recent call last):
File "run_mobile.py", line 24, in
import modeling
File "/home/yang/桌面/BERT-train2deploy-master/modeling.py", line 26, in
import six
ImportError: No module named six
我在pycharm的terminal中运行,按照楼主的步骤走的,six已经装好啦,还是报错。是怎么回事呢?麻烦大神解答下

没有出现“ready and listening”!

在本地可以起来服务,但包成docker后,一直无法出现“ready and listening”!的提示,说明接口服务没起来,能否帮忙查明原因
I:VENTILATOR:[__i:_ge:239]:get devices
I:VENTILATOR:[__i:_ge:271]:device map:
worker 0 -> cpu
I:SINK:[__i:_ru:317]:ready
I:VENTILATOR:[__i:_ru:180]:start http proxy
I:WORKER-0:[__i:_ru:497]:use device cpu, load graph from /usr/src/app/models/pbModelDir/classification_model.pb
I:VENTILATOR:[__i:_ru:199]:new config request req id: 0 client: b'e00184bb-7360-4fea-9c19-d9e3321bf9bb'
I:SINK:[__i:_ru:372]:send config client b'e00184bb-7360-4fea-9c19-d9e3321bf9bb'
I:VENTILATOR:[__i:_ru:199]:new config request req id: 0 client: b'a654003f-0eca-4e5c-ba56-30f8f07ac053'
I:SINK:[__i:_ru:372]:send config client b'a654003f-0eca-4e5c-ba56-30f8f07ac053'
I:VENTILATOR:[__i:_ru:199]:new config request req id: 0 client: b'9b5d0dfc-e3de-4ac7-8f54-f791ba56c3ea'
I:SINK:[__i:_ru:372]:send config client b'9b5d0dfc-e3de-4ac7-8f54-f791ba56c3ea'
I:VENTILATOR:[__i:_ru:199]:new config request req id: 0 client: b'0a23f5f7-b79c-4f2e-94b1-891ef5477618'
I:SINK:[__i:_ru:372]:send config client b'0a23f5f7-b79c-4f2e-94b1-891ef5477618'
I:VENTILATOR:[__i:_ru:199]:new config request req id: 0 client: b'60ba3b85-1538-414c-9425-915b057ae35d'
I:SINK:[__i:_ru:372]:send config client b'60ba3b85-1538-414c-9425-915b057ae35d'
I:VENTILATOR:[__i:_ru:199]:new config request req id: 0 client: b'bda5c53a-850f-419f-9c9e-9b907a31f99d'
I:SINK:[__i:_ru:372]:send config client b'bda5c53a-850f-419f-9c9e-9b907a31f99d'
I:VENTILATOR:[__i:_ru:199]:new config request req id: 0 client: b'c6f526e8-30eb-46a9-95b1-6a6b0ca3a887'
I:SINK:[__i:_ru:372]:send config client b'c6f526e8-30eb-46a9-95b1-6a6b0ca3a887'
I:VENTILATOR:[__i:_ru:199]:new config request req id: 0 client: b'2735bc9e-0eb5-4c68-b896-500e60c42e56'
I:SINK:[__i:_ru:372]:send config client b'2735bc9e-0eb5-4c68-b896-500e60c42e56'
I:VENTILATOR:[__i:_ru:199]:new config request req id: 0 client: b'0378aecd-e1e0-4304-9f44-4265098f6533'
I:SINK:[__i:_ru:372]:send config client b'0378aecd-e1e0-4304-9f44-4265098f6533'
I:VENTILATOR:[__i:_ru:199]:new config request req id: 0 client: b'f62f81bc-1f96-4ee0-93db-3bc530eecfb6'
I:SINK:[__i:_ru:372]:send config client b'f62f81bc-1f96-4ee0-93db-3bc530eecfb6'

  • Serving Flask app "bert_base.server.http" (lazy loading)
  • Environment: production
    WARNING: Do not use the development server in a production environment.
    Use a production WSGI server instead.
  • Debug mode: off
  • Running on http://0.0.0.0:8091/ (Press CTRL+C to quit)

运行bert_base_serving_start时出错

I:?[35mVENTILATOR?[0m:lodding classification predict, could take a while...
I:?[35mVENTILATOR?[0m:contain 0 labels:dict_values(['0', '1'])
2020-01-14 21:09:35.241239: I tensorflow/stream_executor/platform/default/dso_loader.cc:44] Successfully opened dynamic lib
rary cudart64_100.dll
pb_file exits F:\学习资料\毕设\code\bert-master\bert-master\output\classification_model.pb
I:?[35mVENTILATOR?[0m:optimized graph is stored at: F:\学习资料\毕设\code\bert-master\bert-master\output\classification_mod
el.pb
I:?[35mVENTILATOR?[0m:bind all sockets
I:?[35mVENTILATOR?[0m:open 8 ventilator-worker sockets, tcp://127.0.0.1:64609,tcp://127.0.0.1:64610,tcp://127.0.0.1:64611,t
cp://127.0.0.1:64612,tcp://127.0.0.1:64613,tcp://127.0.0.1:64614,tcp://127.0.0.1:64615,tcp://127.0.0.1:64616
I:?[35mVENTILATOR?[0m:start the sink
2020-01-14 21:09:37.534152: I tensorflow/stream_executor/platform/default/dso_loader.cc:44] Successfully opened dynamic lib
rary cudart64_100.dll
I:?[32mSINK?[0m:ready
I:?[35mVENTILATOR?[0m:get devices
I:?[35mVENTILATOR?[0m:device map:
worker 0 -> gpu 0
2020-01-14 21:09:39.903511: I tensorflow/stream_executor/platform/default/dso_loader.cc:44] Successfully opened dynamic lib
rary cudart64_100.dll
I:?[33mWORKER-0?[0m:use device gpu: 0, load graph from F:\学习资料\毕设\code\bert-master\bert-master\output\classification_
model.pb
WARNING:tensorflow:From d:\anaconda\lib\site-packages\bert_base-0.0.9-py3.7.egg\bert_base\server\helper.py:161: The name tf
.logging.set_verbosity is deprecated. Please use tf.compat.v1.logging.set_verbosity instead.

WARNING:tensorflow:From d:\anaconda\lib\site-packages\bert_base-0.0.9-py3.7.egg\bert_base\server\helper.py:161: The name tf
.logging.ERROR is deprecated. Please use tf.compat.v1.logging.ERROR instead.
Process BertWorker-3:
Traceback (most recent call last):
File "D:\Anaconda\lib\multiprocessing\process.py", line 297, in bootstrap
self.run()
File "d:\anaconda\lib\site-packages\bert_base-0.0.9-py3.7.egg\bert_base\server_init
.py", line 490, in run
self.run()
File "d:\anaconda\lib\site-packages\zmq\decorators.py", line 75, in wrapper
return func(*args, **kwargs)
File "d:\anaconda\lib\site-packages\bert_base-0.0.9-py3.7.egg\bert_base\server\zmq_decor.py", line 27, in wrapper
return func(*args, **kwargs)
File "d:\anaconda\lib\site-packages\bert_base-0.0.9-py3.7.egg\bert_base\server_init
.py", line 508, in _run
for r in estimator.predict(input_fn=self.input_fn_builder(receivers, tf), yield_single_examples=False):
File "d:\anaconda\lib\site-packages\tensorflow_estimator\python\estimator\estimator.py", line 622, in predict
features, None, ModeKeys.PREDICT, self.config)
File "d:\anaconda\lib\site-packages\tensorflow_estimator\python\estimator\estimator.py", line 1149, in call_model_fn
model_fn_results = self.model_fn(features=features, **kwargs)
File "d:\anaconda\lib\site-packages\bert_base-0.0.9-py3.7.egg\bert_base\server_init
.py", line 466, in classification

model_fn
pred_probs = tf.import_graph_def(graph_def, name='', input_map=input_map, return_elements=['pred_prob:0'])
File "d:\anaconda\lib\site-packages\tensorflow_core\python\util\deprecation.py", line 507, in new_func
return func(*args, **kwargs)
File "d:\anaconda\lib\site-packages\tensorflow_core\python\framework\importer.py", line 405, in import_graph_def
producer_op_list=producer_op_list)
File "d:\anaconda\lib\site-packages\tensorflow_core\python\framework\importer.py", line 535, in _import_graph_def_interna
l
', '.join(missing_unused_input_keys))
ValueError: Attempted to map inputs that were not found in graph_def: [segment_ids:0]

freeze_graph.py的问题2

195行的latest_checkpoint = tf.train.latest_checkpoint(args.model_dir)
参数应该是 args.bert_model_dir

服务端接受数据后无处理结果反馈

  • Serving Flask app "bert_base.server.http" (lazy loading)
  • Environment: production
    WARNING: This is a development server. Do not use it in a production deployment.
    Use a production WSGI server instead.
  • Debug mode: off
  • Running on http://0.0.0.0:8091/ (Press CTRL+C to quit)
    I:WORKER-0:[__i:gen:537]:ready and listening!
    I:PROXY:[htt:enc: 47]:new request from 172.17.0.1
    {'id': 111, 'texts': ['总的来说,这款手机性价比是特别高的。', '槽糕的售后服务!!!店大欺客'], 'is_tokenized': False}
    I:VENTILATOR:[__i:_ru:215]:new encode request req id: 1 size: 2 client: b'ddbf9d19-b839-4ba6-96c7-330586777d17'
    I:SINK:[__i:_ru:369]:job register size: 2 job id: b'ddbf9d19-b839-4ba6-96c7-330586777d17#1'
    I:WORKER-0:[__i:gen:545]:new job

评测代码是有问题的

使用提供的评测数据,得到的评测结果有问题。

eval_accuracy = 0.86040765
eval_f1 = 0.9527646
eval_loss = 0.5360181
eval_precision = 0.9510234
eval_recall = 0.95451

在precision和recall均在0.95时,accuracy理论上也在0.95左右
作者给出的评测代码对于多分类情况同样也是有问题的。
另外,因为tensorflow的tf.metrics实现的问题,在评测数据量较大时计算也会有问题。

ModuleNotFoundError: No module named 'optimization'

使用以下命令训练模型,目录参数请根据各自的情况修改:

cd /mnt/sda1/transdat/bert-demo/bert/
export BERT_BASE_DIR=/mnt/sda1/transdat/bert-demo/bert/chinese_L-12_H-768_A-12
export GLUE_DIR=/mnt/sda1/transdat/bert-demo/bert/data
export TRAINED_CLASSIFIER=/mnt/sda1/transdat/bert-demo/bert/output
export EXP_NAME=mobile_0

sudo python run_mobile.py
--task_name=setiment
--do_train=true
--do_eval=true
--data_dir=$GLUE_DIR/$EXP_NAME
--vocab_file=$BERT_BASE_DIR/vocab.txt
--bert_config_file=$BERT_BASE_DIR/bert_config.json
--init_checkpoint=$BERT_BASE_DIR/bert_model.ckpt
--max_seq_length=128
--train_batch_size=32
--learning_rate=2e-5
--num_train_epochs=5.0
--output_dir=$TRAINED_CLASSIFIER/$EXP_NAME

根据这个,我本地win10的运行命令如下:
python run_mobile.py --task_name=setiment --do_train=true --do_eval=true --data_dir=C:/Workspace/mnt/sda1/transdat/bert-demo/bert/data/mobile_0 --vocab_file=C:/Workspace/mnt/sda1/transdat/bert-demo/bert/chinese_L-12_H-768_A-12/vocab.txt --bert_config_file=C:/Workspace/mnt/sda1/transdat/bert-demo/bert/chinese_L-12_H-768_A-12/bert_config.json --init_checkpoint=C:/Workspace/mnt/sda1/transdat/bert-demo/bert/chinese_L-12_H-768_A-12/bert_model.ckpt --max_seq_length=80 --train_batch_size=16 --learning_rate=2e-5 --num_train_epochs=5.0 --output_dir=C:/Workspace/mnt/sda1/transdat/bert-demo/bert/output/mobile_0

运行目录如下:
rundirectory

报错:
mnt/sda1/transdat/bert-demo/bert/data/mobile_0 --vocab_file=C:/Workspace/mnt/sda1/transdat/bert-demo/bert/chinese_L-12_H-768_A-12/vocab.txt --bert_config_file=C:/Workspace/mnt/sda1/transdat/bert-demo/bert/chinese_L-12_H-768_A-12/bert_config.json --init_checkpoint=C:/Workspace/mnt/sda1/transdat/bert-demo/bert/chinese_L-12_H-768_A-12/bert_model.ckpt --max_seq_length=80 --train_batch_size=16 --learning_rate=2e-5 --num_train_epochs=5.0 --output_dir=C:/Workspace/mnt/sda1/transdat/bert-demo/bert/output/mobile_0
Traceback (most recent call last):
File "run_mobile.py", line 25, in
import optimization
ModuleNotFoundError: No module named 'optimization'

请问需要安装什么模块吗?谢谢

关于压缩pb

您好,在freeze_graph那一步中,您的line17 使用了import modeling,请问这个是项目提供的吗?为什么一直报找不到modeling

freeze_graph.py错误

optimize_class_model方法里调用create_classification_model时会传入num_labels,但是这个num_labels在前面没定义。
#############################################################

增加 从label2id.pkl中读取num_labels, 这样也可以不用指定num_labels参数; 2019/4/17

    if not args.num_labels:
        num_labels, label2id, id2label = init_predict_var(tmp_dir)

#############################################################
如果执行脚本时输入了num_labels参数,则上面这段代码就不会执行,这就导致没有定义num_labels变量。

请问下怎么设置CPU部署

服务端部署与启动
cd /mnt/sda1/transdat/bert-demo/bert/bert_svr

export BERT_BASE_DIR=/mnt/sda1/transdat/bert-demo/bert/chinese_L-12_H-768_A-12
export TRAINED_CLASSIFIER=/mnt/sda1/transdat/bert-demo/bert/output
export EXP_NAME=mobile_0
export CUDA_VISIBLE_DEVICES=-1
bert-base-serving-start
-model_dir $TRAINED_CLASSIFIER/$EXP_NAME
-bert_model_dir $BERT_BASE_DIR
-model_pb_dir $TRAINED_CLASSIFIER/$EXP_NAME
-mode CLASS
-max_seq_len 128
-http_port 8091
-port 5575
-port_out 5576
注释掉 -device_map 1

仍旧会使用GPU1

服务端接收请求后无响应

服务端:

 * Serving Flask app 'bert_base.server.http' (lazy loading)
 * Environment: production
   WARNING: This is a development server. Do not use it in a production deployment.
   Use a production WSGI server instead.
 * Debug mode: off
 * Running on all addresses.
   WARNING: This is a development server. Do not use it in a production deployment.
 * Running on http://127.0.0.1:8091/ (Press CTRL+C to quit)
Process BertWorker-3:
Traceback (most recent call last):
  File "/home/long/anaconda3/envs/py36/lib/python3.6/multiprocessing/process.py", line 258, in _bootstrap
    self.run()
  File "/home/long/anaconda3/envs/py36/lib/python3.6/site-packages/bert_base-0.0.9-py3.6.egg/bert_base/server/__init__.py", line 490, in run
    self._run()
  File "/home/long/anaconda3/envs/py36/lib/python3.6/site-packages/pyzmq-22.3.0-py3.6-linux-x86_64.egg/zmq/decorators.py", line 76, in wrapper
    return func(*args, **kwargs)
  File "/home/long/anaconda3/envs/py36/lib/python3.6/site-packages/bert_base-0.0.9-py3.6.egg/bert_base/server/zmq_decor.py", line 27, in wrapper
    return func(*args, **kwargs)
  File "/home/long/anaconda3/envs/py36/lib/python3.6/site-packages/bert_base-0.0.9-py3.6.egg/bert_base/server/__init__.py", line 508, in _run
    for r in estimator.predict(input_fn=self.input_fn_builder(receivers, tf), yield_single_examples=False):
  File "/home/long/anaconda3/envs/py36/lib/python3.6/site-packages/tensorflow_estimator/python/estimator/estimator.py", line 622, in predict
    features, None, ModeKeys.PREDICT, self.config)
  File "/home/long/anaconda3/envs/py36/lib/python3.6/site-packages/tensorflow_estimator/python/estimator/estimator.py", line 1149, in _call_model_fn
    model_fn_results = self._model_fn(features=features, **kwargs)
  File "/home/long/anaconda3/envs/py36/lib/python3.6/site-packages/bert_base-0.0.9-py3.6.egg/bert_base/server/__init__.py", line 466, in classification_model_fn
    pred_probs = tf.import_graph_def(graph_def, name='', input_map=input_map, return_elements=['pred_prob:0'])
  File "/home/long/anaconda3/envs/py36/lib/python3.6/site-packages/tensorflow_core/python/util/deprecation.py", line 507, in new_func
    return func(*args, **kwargs)
  File "/home/long/anaconda3/envs/py36/lib/python3.6/site-packages/tensorflow_core/python/framework/importer.py", line 405, in import_graph_def
    producer_op_list=producer_op_list)
  File "/home/long/anaconda3/envs/py36/lib/python3.6/site-packages/tensorflow_core/python/framework/importer.py", line 535, in _import_graph_def_internal
    ', '.join(missing_unused_input_keys))
ValueError: Attempted to map inputs that were not found in graph_def: [segment_ids:0]
I:PROXY:[htt:enc: 47]:new request from 127.0.0.1
{'id': 111, 'texts': ['总的来说,这款手机性价比是特别高的。', '槽糕的售后服务!!!店大欺客'], 'is_tokenized': False}
I:VENTILATOR:[__i:_ru:215]:new encode request	req id: 1	size: 2	client: b'a70d9fe9-5fa6-487f-9e0d-6063053bd11b'
I:SINK:[__i:_ru:369]:job register	size: 2	job id: b'a70d9fe9-5fa6-487f-9e0d-6063053bd11b#1'

客户端:
curl -X POST http://127.0.0.1:8091/encode -H 'content-type: application/json' -d '{"id": 111,"texts": ["总的来说,这款手机性价比是特别高的。","槽糕的售后服务!!!店大欺客"], "is_tokenized": false}'

同一机器开启多个服务时卡住

请问有没有试过在一台机器上开启多个服务(设置不同的端口),有一台机器最多开启5个服务,后面再开就一直停留在load pb file最后一步,一直没有出现ready and listening。显存还有机器内存都还有很多空闲,不知道为什么。

我的是英文NER的BERT模型,东西大同小异,但是我在用freeze_.graph.py的时候出现了如下问题,想请教下您会吗

tensorflow.python.framework.errors_impl.NotFoundError: Restoring from checkpoint failed. This is most likely due to a Variable name or other graph key that is missing from the checkpoint. Please ensure that you have not altered the graph expected based on the checkpoint. Original error:

Key output_bias not found in checkpoint
[[node save/RestoreV2 (defined at freeze_graph.py:191) = RestoreV2[dtypes=[DT_FLOAT, DT_FLOAT, DT_FLOAT, DT_FLOAT, DT_FLOAT, ..., DT_FLOAT, DT_FLOAT, DT_FLOAT, DT_FLOAT, DT_FLOAT], _device="/job:localhost/replica:0/task:0/device:CPU:0"](_arg_save/Const_0_0, save/RestoreV2/tensor_names, save/RestoreV2/shape_and_slices)]]
[[{{node save/RestoreV2/_393}} = _Recvclient_terminated=false, recv_device="/job:localhost/replica:0/task:0/device:GPU:0", send_device="/job:localhost/replica:0/task:0/device:CPU:0", send_device_incarnation=1, tensor_name="edge_397_save/RestoreV2", tensor_type=DT_FLOAT, _device="/job:localhost/replica:0/task:0/device:GPU:0"]]

然后我打开了checkpoint的文件,文件如下:
model_checkpoint_path: "model.ckpt-1136"
all_model_checkpoint_paths: "model.ckpt-0"
all_model_checkpoint_paths: "model.ckpt-1000"
all_model_checkpoint_paths: "model.ckpt-1136"

这边有什么问题吗
他说偏置没找到,不应该在ckpt里面吗?

预测很慢

有人使用do_predict=True时,发现预测分类很慢吗,怎么解决?

some coding error

old:

def init_predict_var(path):
    label2id_file = os.path.join(path, 'label2id.pkl')
    if os.path.exists(label2id_file):
        with open(label2id_file, 'rb') as rf:
            label2id = pickle.load(rf)
            id2label = {value: key for key, value in label2id.items()}
            num_labels = len(label2id.items())
    return num_labels, label2id, id2label

new:

def init_predict_var(path):
    num_labels, label2id, id2label = [None]*3
    label2id_file = os.path.join(path, 'label2id.pkl')
    if os.path.exists(label2id_file):
        with open(label2id_file, 'rb') as rf:
            label2id = pickle.load(rf)
            id2label = {value: key for key, value in label2id.items()}
            num_labels = len(label2id.items())
    return num_labels, label2id, id2label

then your need to import pickle
import pickle

使用TensorFlow-gpu会报错,但使用TensorFlow-cpu不会

InternalError (see above for traceback): Blas GEMM launch failed : a.shape=(1024, 2), b.shape=(2, 768), m=1024, n=768, k=2
[[node bert/embeddings/MatMul (defined at D:\PycharmProjects\GitHubProjects\BERT-train2deploy-master\BERT-train2deploy-master\modeling.py:486) ]]
[[node mean/broadcast_weights/assert_broadcastable/is_valid_shape/has_valid_nonscalar_shape/has_invalid_dims/concat (defined at D:/PycharmProjects/GitHubProjects/BERT-train2deploy-master/BERT-train2deploy-master/run_mobile.py:756) ]]

Recommend Projects

  • React photo React

    A declarative, efficient, and flexible JavaScript library for building user interfaces.

  • Vue.js photo Vue.js

    🖖 Vue.js is a progressive, incrementally-adoptable JavaScript framework for building UI on the web.

  • Typescript photo Typescript

    TypeScript is a superset of JavaScript that compiles to clean JavaScript output.

  • TensorFlow photo TensorFlow

    An Open Source Machine Learning Framework for Everyone

  • Django photo Django

    The Web framework for perfectionists with deadlines.

  • D3 photo D3

    Bring data to life with SVG, Canvas and HTML. 📊📈🎉

Recommend Topics

  • javascript

    JavaScript (JS) is a lightweight interpreted programming language with first-class functions.

  • web

    Some thing interesting about web. New door for the world.

  • server

    A server is a program made to process requests and deliver data to clients.

  • Machine learning

    Machine learning is a way of modeling and interpreting data that allows a piece of software to respond intelligently.

  • Game

    Some thing interesting about game, make everyone happy.

Recommend Org

  • Facebook photo Facebook

    We are working to build community through open source technology. NB: members must have two-factor auth.

  • Microsoft photo Microsoft

    Open source projects and samples from Microsoft.

  • Google photo Google

    Google ❤️ Open Source for everyone.

  • D3 photo D3

    Data-Driven Documents codes.