GithubHelp home page GithubHelp logo

xreef / pcf8574_library Goto Github PK

View Code? Open in Web Editor NEW
195.0 9.0 61.0 39.54 MB

PCF8574 library. i2c digital expander for Arduino, Raspberry Pi Pico and rp2040 boards, esp32, SMT32 and ESP8266. Can read write digital values with only 2 wire. Very simple to use and encoder support.

License: Other

C++ 96.17% C 3.83%
digital esp8266 arduino library expander i2c pcf8574 esp-01 encoder arduino-library

pcf8574_library's Introduction

Support forum pcf8574 English
Forum supporto pcf8574 italiano

PCF8574 PCF8574AP digital input and output expander with i2c bus.

Complete documentation on my site: pcf8574 Article.

If you need more pins here you can find the pcf8575 16bit version of the IC.

Changelog

  • 01/02/2024: v2.3.7 Add the possibility to insert address at begin()
  • 10/07/2023: v2.3.6 Support for Arduino UNO R4
  • 08/02/2023: v2.3.5 Fix STM32 support and add support for Raspberry Pi Pico and other rp2040 boards
  • 10/08/2022: v2.3.4 Add support for custom SERCOM interface of Arduino SAMD devices. Force SDA SCL to use GPIO numeration for STM32 bug (https://www.mischianti.org/forums/topic/compatible-with-stm32duino/).
  • 28/07/2022: v2.3.3 Force SDA SCL to use GPIO numeration (https://www.mischianti.org/forums/topic/cannot-set-sda-clk-on-esp8266/).
  • 28/07/2022: v2.3.2 Fix the SDA SCL type #58 and add basic support for SAMD device.
  • 26/04/2022: v2.3.1 Fix example for esp32 and double begin issue #56.
  • 06/04/2022: v2.3.0 Fix package size
  • 30/12/2021: v2.2.4 Minor fix and remove deprecated declaration
  • 23/11/2020: v2.2.2 Add multiple implementation for encoder management (you can enable by uncomment relative define)

I try to simplify the use of this IC, with a minimal set of operations.

Tested with esp8266, esp32, Arduino, Arduino SAMD (Nano 33 IoT, MKR etc.), STM32 and rp2040 (Raspberry Pi Pico and similar)

PCF8574P address map 0x20-0x27 PCF8574AP address map 0x38-0x3f

Constructor: Pass the address of I2C (to check the address use this guide I2cScanner)

	PCF8574(uint8_t address);

For ESP8266 if you want to specify SDA and SCL pins use this:

	PCF8574(uint8_t address, uint8_t sda, uint8_t scl);

You must set input/output mode:

	pcf8574.pinMode(P0, OUTPUT);
	pcf8574.pinMode(P1, INPUT);
	pcf8574.pinMode(P2, INPUT);

then IC as you can see in the image has 8 digital input/output ports:

PCF8574 schema

To read all analog input in one trasmission you can do (even if I use a 10millis debounce time to prevent too much read from i2c):

	PCF8574::DigitalInput di = PCF8574.digitalReadAll();
	Serial.print(di.p0);
	Serial.print(" - ");
	Serial.print(di.p1);
	Serial.print(" - ");
	Serial.print(di.p2);
	Serial.print(" - ");
	Serial.println(di.p3);

To follow a request (you can see It on issue #5) I create a define variable to work with low memory devices, if you uncomment this line in the .h file of the library:

// #define PCF8574_LOW_MEMORY

Enable low memory props and gain about 7 bytes of memory, and you must use the method to read all like so:

   byte di = pcf8574.digitalReadAll();
   Serial.print("READ VALUE FROM PCF: ");
   Serial.println(di, BIN);

where di is a byte like 1110001, so you must do a bitwise operation to get the data, operation that I already do in the "normal" mode. For example:

   p0 = ((di & bit(0))>0)?HIGH:LOW;
   p1 = ((di & bit(1))>0)?HIGH:LOW;
   p2 = ((di & bit(2))>0)?HIGH:LOW;
   p3 = ((di & bit(3))>0)?HIGH:LOW;
   p4 = ((di & bit(4))>0)?HIGH:LOW;
   p5 = ((di & bit(5))>0)?HIGH:LOW;
   p6 = ((di & bit(6))>0)?HIGH:LOW;
   p7 = ((di & bit(7))>0)?HIGH:LOW;

if you want to read a single input:

	int p1Digital = PCF8574.digitalRead(P1); // read P1

If you want to write a digital value:

	PCF8574.digitalWrite(P1, HIGH);

or:

	PCF8574.digitalWrite(P1, LOW);

You can also use an interrupt pin: You must initialize the pin and the function to call when interrupt raised from PCF8574

// Function interrupt
void keyPressedOnPCF8574();

// Set i2c address
PCF8574 pcf8574(0x39, ARDUINO_UNO_INTERRUPT_PIN, keyPressedOnPCF8574);

Remember you can't use Serial or Wire on an interrupt function.

It's better to only set a variable to read on loop:

void keyPressedOnPCF8574(){
	// Interrupt called (No Serial no read no wire in this function, and DEBUG disabled on PCF library)
	 keyPressed = true;
}

For the examples I use this wire schema on breadboard: Breadboard

https://downloads.arduino.cc/libraries/logs/github.com/xreef/PCF8574_library/

pcf8574_library's People

Contributors

bvp avatar clonetv avatar mwreef avatar per1234 avatar thijstriemstra avatar xreef avatar

Stargazers

 avatar  avatar  avatar  avatar  avatar  avatar  avatar  avatar  avatar  avatar  avatar  avatar  avatar  avatar  avatar  avatar  avatar  avatar  avatar  avatar  avatar  avatar  avatar  avatar  avatar  avatar  avatar  avatar  avatar  avatar  avatar  avatar  avatar  avatar  avatar  avatar  avatar  avatar  avatar  avatar  avatar  avatar  avatar  avatar  avatar  avatar  avatar  avatar  avatar  avatar  avatar  avatar  avatar  avatar  avatar  avatar  avatar  avatar  avatar  avatar  avatar  avatar  avatar  avatar  avatar  avatar  avatar  avatar  avatar  avatar  avatar  avatar  avatar  avatar  avatar  avatar  avatar  avatar  avatar  avatar  avatar  avatar  avatar  avatar  avatar  avatar  avatar  avatar  avatar  avatar  avatar  avatar  avatar  avatar  avatar  avatar  avatar  avatar  avatar  avatar

Watchers

 avatar  avatar  avatar  avatar  avatar  avatar  avatar  avatar  avatar

pcf8574_library's Issues

Won't compile with ESP8266 DevKit 1

Hello.

I can't seem to get any of your examples to compile using the Arduino IDE. I'm using and ESP8266 Node MCU dev kit 1 board and when I attempt to compile any of your given examples I get the following error:

c:\Users\jsmwr\Documents\Arduino\libraries\PCF8574\PCF8574.cpp: In member function 'bool PCF8574::begin()': c:\Users\jsmwr\Documents\Arduino\libraries\PCF8574\PCF8574.cpp:195:36: error: no matching function for call to 'TwoWire::begin(int, int)' 195 | _wire->begin((int)_sda, (int)_scl);

Any assistance would be appreciated. Thank you!
Ron.

The digitalRead() does not work

I try digitalRead(P1) but does not work, result always LOW.
Using digitalReadAll(); the P1 result is HIGH (this is correct because I put 5V to P1).

How to Prevent Bouncing / Debounce mode

Helo @xreef ,

Is that any Function or config to Prevent bounce?,
I've try your example , but I have problem with bounce
I used ESP32 Dev Module with Arduino IDE 1.8.12.

Could you give and example sketch ?
I Use Pin 0 - 7 as input and also use INT pin to be external ISR for ESP32.

I also implemented your Interrupt Wemos Example but went the button is pressed It is not exact same condition time to time..

Thanks

class PCF8574' has no member named 'pinMode'

Hi, I got this error message (class PCF8574' has no member named 'pinMode') every time I try to use any example from the library. I´m using an MH ET LIVE ESP32Mini Kit processor with Arduine IDE version 1.8.19 and Windows 11.

Oslaf

PCF8575 integration

Hi, if I want to use both PCF8574 & PCF8575 in my project, what will be the best way do to?
It seems like PCF8574 library is the most up-to-date with encoder function supported, is there a way we can combine these two library into one? Or have to use them separately?

Thanks!

using on esp32 doit Devkit V1

Hello.
I'am trying to use your lib on a esp32 devkit.
It does compile but I can't see the right values of the Inputs.
I have 4 pcs of PCF8574AN connected to the bus and get the Adresses 0x38, 0x39, 0x3A and 0x3B when I try to scan the bus for devices.

Could you imagine what's the problem is?
thanks & kind regards

Got digitalReadAll to work, but digitalRead is not?

After a bit of fumbling around (hardware engineer, not software), I finally got digitalReadAll to work to read 4 button inputs, but immediately trying to do digitialRead on those 4 pins returns nothing.
Code is over 1600 lines long, so here is some snippets of the pcf code:

#define pcfButtonLeft   5          //SYSTEM PARAMETER - PCF8574 pin for button left
#define pcfButtonRight  4          //SYSTEM PARAMETER - PCF8574 pin for button right
#define pcfButtonBack   6          //SYSTEM PARAMETER - PCF8574 pin for button back
#define pcfButtonSelect 7          //SYSTEM PARAMETER - PCF8574 pin for button select
#define pcfBuzzer       0          //SYSTEM PARAMETER - PCF8574 pin for buzzer, active low
#define pcfLedRed       1          //SYSTEM PARAMETER - PCF8574 pin for Red LED, active low
#define pcfLedGreen     2          //SYSTEM PARAMETER - PCF8574 pin for Green LED, active low
#define pcfLedBlue      3          //SYSTEM PARAMETER - PCF8574 pin for Blue LED, active low
#define PCF8574_INTERRUPT_PIN    19          //SYSTEM PARAMETER - Button Interrupt Pin (PCF8574)
#include "PCF8574.h"                // https://github.com/xreef/PCF8574_library for I2C expander
void keyPressedOnPCF8574();          // for use with interrupt
PCF8574 pcf8574(0x20, PCF8574_INTERRUPT_PIN, keyPressedOnPCF8574);  // initialize with I2C address

In setup

//PCF8574 INITALIZATION
  pcf8574.pinMode(pcfBuzzer, OUTPUT, HIGH);       // Buzzer
  pcf8574.pinMode(pcfLedRed, OUTPUT, HIGH);       // Red of RGB LED
  pcf8574.pinMode(pcfLedGreen, OUTPUT, HIGH);     // Green of RGB LED
  pcf8574.pinMode(pcfLedBlue, OUTPUT, HIGH);      // Blue of RGB LED

  pcf8574.pinMode(pcfButtonSelect, INPUT);        // SELECT button
  pcf8574.pinMode(pcfButtonBack, INPUT);          // BACK button
  pcf8574.pinMode(pcfButtonLeft, INPUT);          // LEFT button
  pcf8574.pinMode(pcfButtonRight, INPUT);         // RIGHT button

  Serial.print("Init pcf8574...");
  if (pcf8574.begin()){
    Serial.println("OK");
  }else{
    Serial.println("NOT OK");
  }

The code in question:

      PCF8574::DigitalInput pcfData = pcf8574.digitalReadAll();
      Serial.print(" PCFa:");   Serial.print(pcfData.p7);Serial.print(pcfData.p6);Serial.print(pcfData.p5);Serial.print(pcfData.p4);
      uint8_t val7 = pcf8574.digitalRead(P7);
      uint8_t val6 = pcf8574.digitalRead(P6);
      uint8_t val5 = pcf8574.digitalRead(P5);
      uint8_t val4 = pcf8574.digitalRead(P4);      
      Serial.print(" PCFr:");  Serial.print(val7);   Serial.print(val6);  Serial.print(val5);  Serial.print(val4);

Buttons have pullups, and the PCF pins will read zero/ground when buttons are pressed. This is running in a loop, and here are the results, initially with no buttons pressed, then pressing all of them, and then releasing all of them. You can see that the digitalReadAll ("PCFa") values do go low when I press the buttons, but the digitalRead ("PCFr") values are stuck at 0's.

 PCFa:1111 PCFr:0000
 PCFa:1111 PCFr:0000
 PCFa:0111 PCFr:0000
 PCFa:0111 PCFr:0000
 PCFa:0101 PCFr:0000
 PCFa:0000 PCFr:0000
 PCFa:0000 PCFr:0000
 PCFa:0000 PCFr:0000
 PCFa:0000 PCFr:0000
 PCFa:0000 PCFr:0000
 PCFa:0000 PCFr:0000
 PCFa:0000 PCFr:0000
 PCFa:0000 PCFr:0000
 PCFa:1111 PCFr:0000
 PCFa:1111 PCFr:0000
 PCFa:1111 PCFr:0000
 PCFa:1111 PCFr:0000

Missing every other click of hw-040 rotary encoder.

I'm having the problem of every other notch of the encoder getting lost, with the encoderValue only changing every 2 notch clicks when using a hw-040 rotary encoder.

This happens when using pcf8574.readEncoderValue(encoderPinA, encoderPinB, &encoderValue); and when using the example code within encoderWithBasicLibraryFunction example.

As a way of debugging I added
Serial.print("IRQ ");
at the start of the void updateEncoder(). This seems to get called twice per notch, which seems wrong to me.

Any ideas?

Reading from multiple encoders

First of all, want to thank you for creating this great library!
I'm trying to get two encoders to work, with following setups:

int encoderPinA = P0;
int encoderPinB = P1;
int encoderPinC = P2;
int encoderPinD = P3;
pcf8574.encoder(encoderPinA, encoderPinB);
pcf8574.encoder(encoderPinC, encoderPinD);

And read values by calling these functions:

pcf8574.readEncoderValue(encoderPinA, encoderPinB, &encoderValue1)
pcf8574.readEncoderValue(encoderPinC, encoderPinD, &encoderValue2)

However, the encoderValue1 and encoderValue2 can only goes up, no matter which direction I turn, but if with only one encoder, it works fine (clockwise +1 & counter -1)

Wondering if you could give some suggestions what I can implement this?

Cheers!

No constructor for "only declaring" available

Hey!

I'd like to use this library for an project where I need to have the PCF8574 object as a attribute / property of a class, so something like

class myClass {
  public:
    PCF8574* getMyPCF();
    void setMyPCF();

  private:
    PCF8574 myPCF;
};

Unfortunately something like this would throw an error because there's no "empty" constructor for the PCF8574 library available. I want to be able to set the address of the myPCF object afterwards. Is there a way to do that without changing the librarys code? Otherwise I could start a pull request adding something like setAddress(uint8_t addr)...

Lockup on PCF8574::begin() on ESP32 due to unpaired beginTransmission() call

When compiling and running a sketch under arduino-esp32 v1.0.6, the library works OK. However, when using v2.0.2 or later, the sketch locks up completely inside the PCF8574::begin() call.

By digging into the code, I found out that there is an unpaired beginTransmission() call on the _wire ptr, that is, a beginTransmission not paired with a corresponding endTransmission() call on the same instance:

The two conflicting calls to beginTransmission() are:

_wire->beginTransmission(_address);

_wire->beginTransmission(_address);

The single call to endTransmission():

this->transmissionStatus = _wire->endTransmission();

In context:

PCF8574_library/PCF8574.cpp

Lines 198 to 220 in 59cf47c

if (writeMode>0 || readMode>0){
DEBUG_PRINTLN("Set write mode");
_wire->beginTransmission(_address);
DEBUG_PRINT("resetInitial pin ");
#ifdef PCF8574_SOFT_INITIALIZATION
resetInitial = writeModeUp | readModePullUp;
#else
resetInitial = writeModeUp | readMode;
#endif
DEBUG_PRINTLN( resetInitial, BIN);
_wire->beginTransmission(_address);
_wire->write(resetInitial);
initialBuffer = writeModeUp | readModePullUp;
byteBuffered = initialBuffer;
writeByteBuffered = writeModeUp;
DEBUG_PRINTLN("Start end trasmission if stop here check pullup resistor.");
this->transmissionStatus = _wire->endTransmission();
}

If one of the two calls is removed (I chose the one at line 211), the sketch no longer locks up.

Incorrect address?

The example encoderWithBasicLibraryFunction.ino has the following:
// initialize library PCF8574 pcf8574(0x38, INTERRUPTED_PIN, updateEncoder);

What is the 0x38 value? I can't see how the PCF8574 can be set to that address.

OK / KO on initialization (code examples)

I just started to use the library and stumbled upon the

	Serial.print("Init pcf8574...");
	if (pcf8574.begin()){
		Serial.println("OK");
	}else{
		Serial.println("KO");
	}

used in many of the code examples.

Since this always prints "KO" for my circuit, I had a look in the library code and the Arduino documentation. Assuming that I did not miss something here and as far as I was able to investigate, the pcf8574.begin() function just references the default Wire.begin() function.

However, according to the docs, Wire.begin() returns None, so the if statement used in the examples will always evaluate to False and in turn state a KO status regardless of proper initialization.

If my findings are correct, I suggest removing the if statements and the KO/OK print statements from the code examples in order to reduce any worries for upcoming beginners.

Buzzing motor usign L298n

Hello,
I'm currently trying to use your library for my project but when data are read from the expander board a buzzing sound come from one of the motor connected to eh L298n.
I'm using a NodeMCU V3, two L298n connected through D1 to D8 and a PCF8574 board connected on Rx and Tx (because it was added after the motors).
The issue only occurs when the PCF8574 is used (Read or Write).
Do you think the issue come from me or others things ?
Could it be because the real I2C pins are connected to the inputs of the L298N ?
Thanks for reading and wish you can help me.
Powablocks

Missing same documentation

I missing same documentation:

  1. PCF8574::pinMode: the mode INPUT_PULLUP is not mentioned

  2. PCF8574::digitalRead: forceReadNow is not described

  3. PCF8574::readEncoderValue: what do this public method?

Using Arduino_STM32 Core

I tried with Arduino_STM32 Core.

I made alterations a little.

PCF8574.h

private:
uint8_t _address;
// uint8_t _sda = SDA;
// uint8_t _scl = SCL;
uint8_t _sda;
uint8_t _scl;

PCF8574.cpp

void PCF8574::begin(){
#ifndef __AVR
#if defined(STM32F1)
Wire.begin();
#else
Wire.begin(_sda, _scl);
#endif
#else
// Default pin for AVR some problem on software emulation
// #define SCL_PIN _scl
// #define SDA_PIN _sda
Wire.begin();
#endif

Thank you for useful library.

More than one expander

Could you please provide an example for initializing a few (let's say 4) gpio expanders ?
I was thinking on having an array, in order to be able to do something like this: gpioExpander[3].digitalWrite(7, HIGH);

Is that possible ?

Thanks in advance!

Wont compile at all esp32

/Users/shawn/.platformio/lib/PCF8574 library/examples/ledEsp32OnTheSecondI2C/ledEsp32OnTheSecondI2C.ino:38:30: error: invalid conversion from 'TwoWire*' to 'uint8_t {aka unsigned char}' [-fpermissive]
 PCF8574 pcf8574(&I2Ctwo, 0x20);
                              ^
In file included from /Users/shawn/.platformio/lib/PCF8574 library/examples/ledEsp32OnTheSecondI2C/ledEsp32OnTheSecondI2C.ino:30:0:
/Users/shawn/.platformio/lib/PCF8574/PCF8574.h:34:12: note:   initializing argument 1 of 'PCF8574::PCF8574(uint8_t, TwoWire*)'
   explicit PCF8574(const uint8_t deviceAddress, TwoWire *wire = &Wire);
            ^
/Users/shawn/.platformio/lib/PCF8574 library/examples/ledEsp32OnTheSecondI2C/ledEsp32OnTheSecondI2C.ino:38:30: error: invalid conversion from 'int' to 'TwoWire*' [-fpermissive]
 PCF8574 pcf8574(&I2Ctwo, 0x20);
                              ^
In file included from /Users/shawn/.platformio/lib/PCF8574 library/examples/ledEsp32OnTheSecondI2C/ledEsp32OnTheSecondI2C.ino:30:0:
/Users/shawn/.platformio/lib/PCF8574/PCF8574.h:34:12: note:   initializing argument 2 of 'PCF8574::PCF8574(uint8_t, TwoWire*)'
   explicit PCF8574(const uint8_t deviceAddress, TwoWire *wire = &Wire);
            ^
/Users/shawn/.platformio/lib/PCF8574 library/examples/ledEsp32OnTheSecondI2C/ledEsp32OnTheSecondI2C.ino: In function 'void setup()':
/Users/shawn/.platformio/lib/PCF8574 library/examples/ledEsp32OnTheSecondI2C/ledEsp32OnTheSecondI2C.ino:52:13: error: 'class PCF8574' has no member named 'pinMode'
     pcf8574.pinMode(i, OUTPUT);
             ^
/Users/shawn/.platformio/lib/PCF8574 library/examples/ledEsp32OnTheSecondI2C/ledEsp32OnTheSecondI2C.ino: In function 'void loop()':
/Users/shawn/.platformio/lib/PCF8574 library/examples/ledEsp32OnTheSecondI2C/ledEsp32OnTheSecondI2C.ino:66:11: error: 'class PCF8574' has no member named 'digitalWrite'
   pcf8574.digitalWrite(pin, HIGH);
           ^
/Users/shawn/.platformio/lib/PCF8574 library/examples/ledEsp32OnTheSecondI2C/ledEsp32OnTheSecondI2C.ino:68:11: error: 'class PCF8574' has no member named 'digitalWrite'
   pcf8574.digitalWrite(pin, LOW);

manage multi pcf574

Hello, very good bookstore, I am grateful. I would like to know if I can handle two pcf8474 at the same time? if yes. Do you have any example of how to do it?

Drive a mosfet or BJT from PCF8574

Hi @xreef,

Thank you for this great library and all the effort you did.

I am having difficulties to drive a mosfet or bjt using the PCF8574 GPIO as a basic switch. My objective is to turn on and off audio lines using the mosfet or bjt driven by the expender.

I have basic understanding on the source and sink current. have complete working circuit running on opto coupler driven by the expender without any issue. but i not able to do a direct basic bjt or mos switching using the expender. led have anode and cathode but transistor only have one base. so i am missing on that part where to sink the current on the single base pin.

do you have experience on this regards? simple connection guide will do help me alot.
thank!

digital read not working on PCF8574T

Hello,

First of all, thank you for making this library available.

I purchased a couple IO expanders from amazon using the PCF8574T from phillips semi conductor.
I tried using this library to read the inputs, and could not return the correct result. I have 4 pins used as inputs and 4 as outputs driving LED's.

The datasheet states that pins used as inputs should be set to a high state.

In any case, I reworked your library and tested the inputs, which are working now. I also tested with using the interrupt pin.

I am using teensy3.2 which is Arduino compatible, similar to an Arduino NANO.

I removed the buffered IO code, as it seems there really is no need for it (maybe on ESP8266). The interface to this chip is simply sending 1 byte for to set the outputs, and reading 1 byte to get all the ports.

Also, I think there should be some note somewhere that this device can't really be used to drive outputs high. The drive current is much less than 1mA when the state is HIGH. The user must rely on strong External Pullups to drive any HIGH loads, and would have to override the output by driving the pull-up and the load low.

I have attached my changes to the library code.

PCF8574_cpp_h_changes_w_ex.zip

Thanks,

Brian

digitalWrite cause toggle on another pin

...
PCF8574 ioexp(0x3F, PIN_WIRE_SDA, PIN_WIRE_SCL);
...
void setup(){
ioexp.pinMode(P0, OUTPUT);
ioexp.pinMode(P1, OUTPUT);
ioexp.pinMode(P2, OUTPUT);
ioexp.pinMode(P3, OUTPUT);
ioexp.pinMode(P4, OUTPUT);
ioexp.pinMode(P5, OUTPUT);
ioexp.pinMode(P6, OUTPUT);
ioexp.pinMode(P7, OUTPUT);
ioexp.begin();
...
}

void loop(){
...
ioexp.digitalWrite(P0, HIGH);
//other pin will all LOW
....
ioexp.digitalWrite(P1, HIGH);
//other pin (include P0) change to LOW
....
}

How to set only 1 pin, and another pin not toggling

Not work on nodemcu v3 PCF8575ST

I try to test on nodemcu v3 but not working..
/*
Blink led on PIN0
by Mischianti Renzo http://www.mischianti.org

https://www.mischianti.org/2019/01/02/pcf8574-i2c-digital-i-o-expander-fast-easy-usage/
*/

#include "Arduino.h"
#include "PCF8574.h"

// Set i2c address
PCF8574 pcf8574(0x20);

void setup()
{
Serial.begin(115200);

// Set pinMode to OUTPUT
pcf8574.pinMode(P0, OUTPUT);

pcf8574.pinMode(P1, OUTPUT);
pcf8574.pinMode(P2, OUTPUT);
pcf8574.pinMode(P3, OUTPUT);
pcf8574.pinMode(P4, OUTPUT);
pcf8574.pinMode(P5, OUTPUT);
pcf8574.pinMode(P6, OUTPUT);
pcf8574.pinMode(P7, OUTPUT);
pcf8574.begin();
}

void loop()
{
int i;

pcf8574.digitalWrite(P0, HIGH);

pcf8574.digitalWrite(P1, HIGH);
pcf8574.digitalWrite(P2, HIGH);
pcf8574.digitalWrite(P3, HIGH);
pcf8574.digitalWrite(P4, HIGH);
pcf8574.digitalWrite(P5, HIGH);
pcf8574.digitalWrite(P6, HIGH);
pcf8574.digitalWrite(P7, HIGH);

delay(1000);

pcf8574.digitalWrite(P0, LOW);
pcf8574.digitalWrite(P1, LOW);
pcf8574.digitalWrite(P2, LOW);
pcf8574.digitalWrite(P3, LOW);
pcf8574.digitalWrite(P4, LOW);
pcf8574.digitalWrite(P5, LOW);
pcf8574.digitalWrite(P6, LOW);
pcf8574.digitalWrite(P7, LOW);

delay(1000);

}

pcf8574 and dht22

Hi
I want to read dht22 with pcf8574 and there is no luck in that until now !
I use adafruit library for dht, and this is my code :

#include "DHT.h"
#include "PCF8574.h"  // https://github.com/xreef/PCF8574_library

#define DHTPIN P4     // Digital pin connected to the DHT sensor
#define DHTTYPE DHT22   // DHT 22  (AM2302), AM2321

DHT dht(DHTPIN, DHTTYPE);
PCF8574 expander(0x20, 12, 13);  // esp8266 nodemcu and all Ax pins are Grounded


void setup() {
  Serial.begin(115200);
  Serial.println(F("DHTxx test!"));

  expander.pinMode(P4, INPUT_PULLUP);
  expander.begin();

  dht.begin();
}

void loop() {
  // Wait a few seconds between measurements.
  delay(2000);

  // Reading temperature or humidity takes about 250 milliseconds!
  // Sensor readings may also be up to 2 seconds 'old' (its a very slow sensor)
  float h = dht.readHumidity();
  // Read temperature as Celsius (the default)
  float t = dht.readTemperature();
  // Read temperature as Fahrenheit (isFahrenheit = true)
  float f = dht.readTemperature(true);

  // Check if any reads failed and exit early (to try again).
  if (isnan(h) || isnan(t) || isnan(f)) {
    Serial.println(F("Failed to read from DHT sensor!"));
    return;
  }

  // Compute heat index in Fahrenheit (the default)
  float hif = dht.computeHeatIndex(f, h);
  // Compute heat index in Celsius (isFahreheit = false)
  float hic = dht.computeHeatIndex(t, h, false);

  Serial.print(F("Humidity: "));
  Serial.print(h);
  Serial.print(F("%  Temperature: "));
  Serial.print(t);
  Serial.print(F("°C "));
  Serial.print(f);
  Serial.print(F("°F  Heat index: "));
  Serial.print(hic);
  Serial.print(F("°C "));
  Serial.print(hif);
  Serial.println(F("°F"));
}

Low memory Read All not working

I copied from an example and I get this:

ledWemos:51: error: cannot convert 'PCF8574::DigitalInput' to 'byte {aka unsigned char}' in initialization
   byte d = pcf8574.digitalReadAll();
                                   ^
exit status 1
cannot convert 'PCF8574::DigitalInput' to 'byte {aka unsigned char}' in initialization

I defined PCF8574_LOW_MEMORY too, this is the full code, run on a Wemos D1 Mini (esp8266):

/*
 * PCF8574 GPIO Port Expand
 * http://nopnop2002.webcrow.jp/WeMos/WeMos-25.html
 *
 * PCF8574    ----- WeMos
 * A0         ----- GRD
 * A1         ----- GRD
 * A2         ----- GRD
 * VSS        ----- GRD
 * VDD        ----- 5V/3.3V
 * SDA        ----- GPIO_4(PullUp)
 * SCL        ----- GPIO_5(PullUp)
 *
 * P0     ----------------- LED0
 * P1     ----------------- LED1
 * P2     ----------------- LED2
 * P3     ----------------- LED3
 * P4     ----------------- LED4
 * P5     ----------------- LED5
 * P6     ----------------- LED6
 * P7     ----------------- LED7
 *
 */

#include "Arduino.h"
#include "PCF8574.h"  // https://github.com/xreef/PCF8574_library

#define PCF8574_LOW_MEMORY

// Set i2c address
PCF8574 pcf8574(0x20);

void setup()
{
  Serial.begin(115200);
  delay(1000);

  for(int i=0;i<8;i++) {
    pcf8574.pinMode(i, INPUT);
  }
	Serial.print("Init pcf8574...");
	if (pcf8574.begin()){
		Serial.println("OK");
	} else {
		Serial.println("KO");
	}
}

void loop() {
  byte d = pcf8574.digitalReadAll();
  Serial.print("READ VALUE FROM PCF: ");
  Serial.println(d, BIN);
//  Serial.println(di);
  delay(1000);
}

WeMos-D1 Mini/Pro (LOLIN) problems using D0, D3, D4 as Interrupt Input

Hello,
I am working on a bigger project and have runout of Input/Output ports so tried your library, which in the beginning worked very well except for using the Interrupt.
There occur several problems when using D0, D3, D4 for this feature, depending on which one I use (probably because of the 10k PullUp of the Pcf INT line) as there are :

  • Not being able to program the device (timeout)
  • Not booting up the application after a Powerdown
  • Not starting the application after a reset.

I would like to use D0, D3 or D4 as an interrupt input, is this possible in any way ?

The connections of D5, D6, D7 and D8 are not possible to use because they are already in use for SPI for my CardReader (in the original application).

Also another strange thing happens which I was not able to explain :
The blinking of the leds got out of sync with each other after a couple of minutes ??

I made a Test application for it with comments to clarify my problems,

How can I solve these problems ?

Thanks in advance..

<Arduino IDE Source code>
`
/*

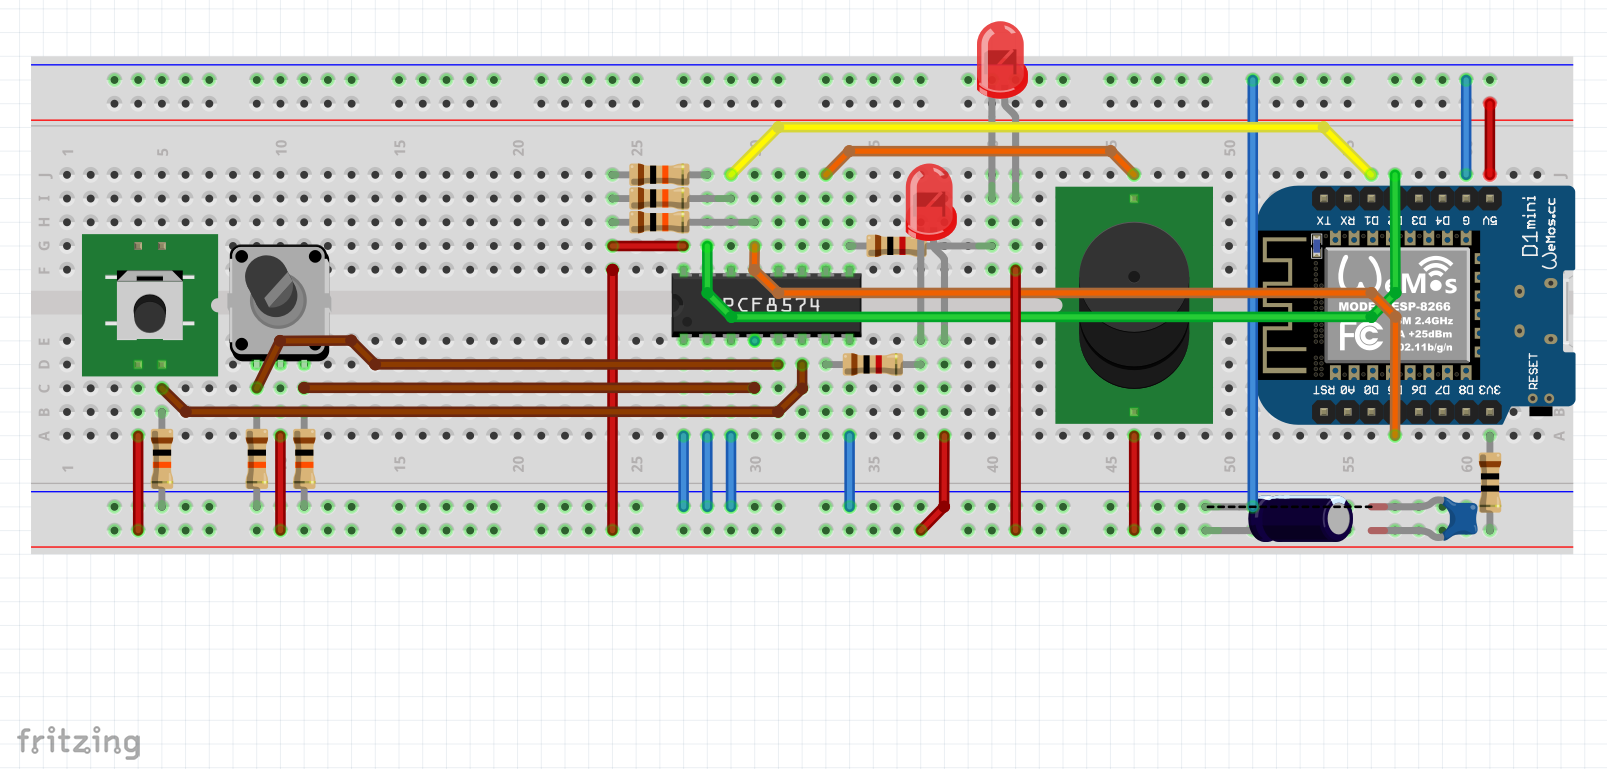
  • PCF8574 GPIO Port Expand for ESP8266_PCF8574_with_EC11_RotaryEncoder_Led_Beeper
  • PCF8574 ----- WeMos-D1 Mini/Pro (LOLIN)
  • A0 ----- GND
  • A1 ----- GND
  • A2 ----- GND
  • VSS ----- GND
  • VDD ----- 3.3V
  • SDA ----- GPIO_4 (D2)
  • SCL ----- GPIO_5 (D1)
  • INT ----- GPIO_14 (D5) (DO NOT USE D0, D3, D4 or D8 because of pull-Up !!, they will NOT WORK, or device is not possible to program, or does NOT start on PowerUp)
  •                           (ONLY USE D5, D6 or D7 !!!!)
    
  •    ----------------- LET OP is Negative logic !!!
    
  • P0 ----------------- RE_Kanaal-A (Input with Pull_Down 10k to GND, common connection to +3V3) (or 5v)
  • P1 ----------------- RE_Kanaal-B (Input with Pull_Down 10k to GND, common connection to +3V3) (or 5v)
  • P2 ----------------- RE_Switch (Input with Pull_Down 10k to GND, common connection to +3V3) (or 5v)
  • P3 ----------------- LED (Led1) (Output) LED via 1k to 3V3 (or 5V)
  • P4 ----------------- LED (Led2) (Output) LED via 1k to 3V3 (or 5V)
  • P5 ----------------- BEEPER (Output) Beeper to 3V3 (or 5V)
  • P6 ----------------- (NC)BUTTON OR OUTPUT
  • P7 ----------------- (NC)BUTTON OR OUTPUT

*/

#include "Arduino.h"
#include "PCF8574.h" // https://github.com/xreef/PCF8574_library

#define ESP8266_INTERRUPTED_PIN D5 // used Interrupt Pin on ESP8266

// Set PCF8574 i2c address
PCF8574 pcf8574(0x38);

// Function interrupt Flag from PCF8574
bool pcfInt = false;

// Output LED(s) on PCF8574
struct LED {
int ledPin; // Used PinOnPCF
unsigned long ledOnOffTime; // Time Led is ON and after that Time Led is OFF (2x value entered)
bool ledIsON = false; // Default at Create
unsigned long ledLastChanged = 0; // Default at Create
} ;

LED Led1; // Led #1
LED Led2; // Led #2

// Output LED(s) on PCF8574
struct BEEPER {
int beepPin; // Used PinOnPCF
int beepType; // NumBeeps (0 = Stop Beeping, 1..254 = NumBeeps, 255 = Continuous Beeps)
unsigned long highDuration; // Time the Beeper is OFF
unsigned long lowDuration; // Time the Beeper is ON
bool beeperIsON = false; // Default at Create
bool beepStatus = false; // Default at Create (Start/Stop Flag)
int beepCountDown = 0; // Default at Create (Value starts the same as NumBeeps (beepType), counts down to 0)
unsigned long beepLastChanged = 0; // Default at Create (Time of last change)
} ;

BEEPER Beep1; // Beeper #1

// Encoder EC11 on PCF
String EncoderSeq = ""; //LeftTurn=BABA, RightTurn=AABB, SwitchPress=SW
static unsigned long LastTimeSeqChanged = 0;

// Use here to prohibit when Blinking of the Leds is a problem to get out of Sync !!!
unsigned long currentTime;

void pcfInterruptOnPCF8574(){
pcfInt = true;
}

void setup()
{
// Setup of the Led(s)
Led1.ledPin = 3;
Led1.ledOnOffTime = 1000;

Led2.ledPin = 4;
Led2.ledOnOffTime = 500;

// Setup of the Beeper(s)
Beep1.beepPin = 5;

Serial.begin(115200);

while (!Serial) {
delay(500);
}
Serial.println();
Serial.println("Serial Port Ready");

// Instellen Interrupt for PCF8574
pinMode(ESP8266_INTERRUPTED_PIN, INPUT_PULLUP);
attachInterrupt(digitalPinToInterrupt(ESP8266_INTERRUPTED_PIN), pcfInterruptOnPCF8574, FALLING);

// Instellen ALL ports as Input on PCF8574
for(int i=0;i<8;i++) {
pcf8574.pinMode(i, INPUT);
}

// Instellen used "LED" as Output on PCF8574
pcf8574.pinMode(Led1.ledPin, OUTPUT);
pcf8574.pinMode(Led2.ledPin, OUTPUT);

// Instellen used "BEEPER" as Output on PCF8574
pcf8574.pinMode(Beep1.beepPin, OUTPUT);

pcf8574.begin();

Serial.println("Application has been started");

// Switch "LED" OFF on PCF8574
pcf8574.digitalWrite(Led1.ledPin,HIGH);
pcf8574.digitalWrite(Led2.ledPin,HIGH);

// Switch "Beeper" OFF on PCF8574
pcf8574.digitalWrite(Beep1.beepPin,HIGH);

// Delay before Start...
//delay(2000);
}

void LedBlink(LED &whichLed) {
// Check if the LED needs to be Switched (once every ledOnOffTime msec.)
if (currentTime - whichLed.ledLastChanged > whichLed.ledOnOffTime) { // Instead of Delay()

if (whichLed.ledIsON) {
  pcf8574.digitalWrite(whichLed.ledPin,HIGH);
  whichLed.ledIsON = false;
} else {
  pcf8574.digitalWrite(whichLed.ledPin,LOW);
  whichLed.ledIsON = true;
}

// Keep track of when we were here last (no more than every ledOnOffTime msec.)
whichLed.ledLastChanged = currentTime;

}
}

void Beep(BEEPER &whichBeep) {
if(whichBeep.beeperIsON == true) {
if (whichBeep.beepCountDown >= 0) {
if ((currentTime - whichBeep.beepLastChanged) >= whichBeep.lowDuration) {
whichBeep.beepLastChanged = currentTime;
pcf8574.digitalWrite(whichBeep.beepPin,HIGH);
whichBeep.beeperIsON = false;

    // For keeping track of counting beeps (1 full beep cycle finished)
    if ((whichBeep.beepType > 0) & (whichBeep.beepType < 255)) whichBeep.beepCountDown--;
  }
}

} else {
// First loop goes allway through here !!!
if ((currentTime - whichBeep.beepLastChanged) >= whichBeep.highDuration) {
whichBeep.beepLastChanged = currentTime;
pcf8574.digitalWrite(whichBeep.beepPin,LOW);
whichBeep.beeperIsON = true;
}
}

// Control the status of the beep loop
if (whichBeep.beepCountDown > 0) {
whichBeep.beepStatus = true;
} else {
if (whichBeep.beeperIsON == false) {
whichBeep.beepStatus = false;
}
}
}

void CheckRecvPcfSeq() {
unsigned long CheckTime = millis();

// Check if the Sequence needs to be handled (once every 50..100 ms, for debounce)
if (CheckTime - LastTimeSeqChanged > 50) { // Instead of Delay() after last Input char is received
// Handle the Sequence LeftTurn=BABA, RightTurn=AABB, SwitchPress=SW
if (EncoderSeq[0] == 'B') {
Serial.println("LeftTurn"); // OR DO ActionX
} else if (EncoderSeq[0] == 'A') {
Serial.println("RightTurn"); // OR DO ActionY
} else if (EncoderSeq[0] == 'S') {
Serial.println("SwitchPress"); // OR DO ActionZ
doBeeps();
} // else for adding more inputs

EncoderSeq = "";
LastTimeSeqChanged = 0;

}
}

void CheckPcfInputs() {
if (pcfInt){
//Serial.println("PCF Interrupt received !!");

PCF8574::DigitalInput val = pcf8574.digitalReadAll();
// Process read Encoder Inputs
if (val.p0==HIGH) {
  // Kan-A = High
  EncoderSeq += "A";
} 
if (val.p1==HIGH) {
  // Kan-B = High
  EncoderSeq += "B";
} 
if (val.p2==HIGH) {
  // Switch is Pressed
  EncoderSeq += "SW";
} 

// // Display Encoder Inputs
// Serial.print(val.p0);
// Serial.print(" - ");
// Serial.print(val.p1);
// Serial.print(" - ");
// Serial.println(val.p2);
//
// Serial.println(EncoderSeq);

// if (val.p3==HIGH) Serial.println("KEY3 PRESSED"); // In use as an Output LED #1
// if (val.p4==HIGH) Serial.println("KEY4 PRESSED"); // In use as an Output LED #2
// if (val.p5==HIGH) Serial.println("KEY5 PRESSED"); // In use as an Output BEEPER #1

// // Still FREE to USE
// if (val.p6==HIGH) Serial.println("KEY6 PRESSED"); // NOT USED YET
// if (val.p7==HIGH) Serial.println("KEY7 PRESSED"); // NOT USED YET

// Timer for processing every 50..100 msec.
LastTimeSeqChanged = millis();

pcfInt = false;

}
}

void doBeeps()
{
// Check (and SOUND) the BEEPER
if (Beep1.beepStatus == false) {
//Serial.println("Prepare new Start of the Beeper Loop");

// Setup of the Beeper(s)
Beep1.beepPin         = 5;    // Pin used        
Beep1.beepType        = 4;    // 0 = Stop Beeping, 1..254 = NumBeeps, 255 = Continuous Beeps
Beep1.beepCountDown   = 4;    // Starts the same as Num Beeps, counts down to 0 (if > 0 and < 255)
Beep1.highDuration    = 75;   // Time the Beeper is OFF
Beep1.lowDuration     = 75;   // Time the Beeper is ON
Beep1.beepLastChanged = 0;    // Time of last change
Beep1.beepStatus      = true; // Start running the above Set functionality of Beeps

}
}

void loop()
{
// use here to prohibit when Blinking of the Leds is a problem to get out of Sync !!!
currentTime = millis();

// Check (and CHANGE) the LED
LedBlink(Led1);
LedBlink(Led2);

// Only do Beep1 if told to run (in doBeeps(), for now triggered by pressing the EncoderSwitch)
if (Beep1.beepStatus == true) Beep(Beep1);

// Check the PCF Inputs
CheckPcfInputs();

CheckRecvPcfSeq();
}
`
Fritzing Project

Example interruptWemos crash

Hello,
Every time I try the example interruptWemos on my Wemos D1 Mini, it crashes. At the beginning I thought I connected something wrong, but with the example LedWemos everything works. I suspect that for some reason something is wrong with the interrupt pin, but what?

This is my error message:

User exception (panic/abort/assert)
--------------- CUT HERE FOR EXCEPTION DECODER ---------------

Abort called

stack>>>

ctx: cont
sp: 3ffffef0 end: 3fffffc0 offset: 0000
3ffffef0: feefeffe feefeffe feefeffe 00000100
3fffff00: 000000fe 00000000 00000000 00000000
3fffff10: 00000000 00000000 00000000 00ff0000
3fffff20: 5ffffe00 5ffffe00 3ffef31c 00000000
3fffff30: 00000002 0000000d 3ffee514 4020251a
3fffff40: 40100686 2bde5da7 ffffff00 4020252c
3fffff50: 40101a49 0004ea65 3ffee514 40203185
3fffff60: 00000000 3ffee65c 000003e8 3ffee554
3fffff70: 3fffdad0 3ffee65c 000003e8 3ffee554
3fffff80: 3fffdad0 3ffee4ec 3ffee514 40203234
3fffff90: 3fffdad0 3ffee4ec 3ffee514 40201075
3fffffa0: 3fffdad0 00000000 3ffee514 40202128
3fffffb0: feefeffe feefeffe 3ffe84e8 40100f85
<<<stack<<<

After I found a post with a different interrupt problem, I adjusted my code accordingly.
My change in the void keyPressedOnPCF8574() function

`/*

  • PCF8574 GPIO Port Expand
  • http://nopnop2002.webcrow.jp/WeMos/WeMos-25.html
  • PCF8574 ----- WeMos
  • A0 ----- GRD
  • A1 ----- GRD
  • A2 ----- GRD
  • VSS ----- GRD
  • VDD ----- 5V/3.3V
  • SDA ----- GPIO_4
  • SCL ----- GPIO_5
  • INT ----- GPIO_13
  • P0 ----------------- BUTTON0
  • P1 ----------------- BUTTON1
  • P2 ----------------- BUTTON2
  • P3 ----------------- BUTTON3
  • P4 ----------------- BUTTON4
  • P5 ----------------- BUTTON5
  • P6 ----------------- BUTTON6
  • P7 ----------------- BUTTON7

*/

#include "Arduino.h"
#include "PCF8574.h" // https://github.com/xreef/PCF8574_library

#define ESP8266_INTERRUPTED_PIN 13

// Set i2c address
PCF8574 pcf8574(0x20);

// Function interrupt
bool keyPressed = false;

void ICACHE_RAM_ATTR keyPressedOnPCF8574(){
// Serial.println("keyPressedOnPCF8574");
keyPressed = true;
}

void setup()
{
Serial.begin(9600);
delay(1000);

pinMode(ESP8266_INTERRUPTED_PIN, INPUT_PULLUP);
attachInterrupt(digitalPinToInterrupt(ESP8266_INTERRUPTED_PIN), keyPressedOnPCF8574, RISING);

for(int i=0;i<8;i++) {
pcf8574.pinMode(i, INPUT);
}
Serial.print("Init pcf8574...");
if (pcf8574.begin()){
Serial.println("OK");
}else{
Serial.println("KO");
}
}

void loop()
{
if (keyPressed){
PCF8574::DigitalInput val = pcf8574.digitalReadAll();
if (val.p0==HIGH) Serial.println("KEY0 PRESSED");
if (val.p1==HIGH) Serial.println("KEY1 PRESSED");
if (val.p2==HIGH) Serial.println("KEY2 PRESSED");
if (val.p3==HIGH) Serial.println("KEY3 PRESSED");
if (val.p4==HIGH) Serial.println("KEY4 PRESSED");
if (val.p5==HIGH) Serial.println("KEY5 PRESSED");
if (val.p6==HIGH) Serial.println("KEY6 PRESSED");
if (val.p7==HIGH) Serial.println("KEY7 PRESSED");
keyPressed= false;
}
}`

now I get no more error message, but understood why I have not and I'm not sure if it the Promgam now still works properly

digitalWrite(PIN, LOW) changes all pins to LOW

Below code changes all input pins to LOW. Arduino NANO, PCF8574 WaveShare. I'm using: #define PCF8574_LOW_MEMORY
And one more question, why in examples pcf.begin() is below pin mode definition in setup? It doesn't work properly, pin mode not change when pcf.begin() is below pin definition. Tested on Arduino NANO and PCF8574 WaveShare,

#include <Arduino.h>
#include <PCF8574.h>

#define intPin 2
void intBtnVoid();
bool keyPressed = false;
PCF8574 pcf(0x22, intPin, intBtnVoid);

void setup() {
// put your setup code here, to run once:
pcf.begin();
pcf.pinMode(P0, INPUT);
pcf.digitalWrite(P0, LOW); // <- change ALL INPUT pins to LOW
pcf.pinMode(P1, INPUT);
pcf.pinMode(P2, INPUT);
pcf.pinMode(P3, INPUT);
pcf.pinMode(P4, INPUT);
}

void loop() {
if(keyPressed)
{
//some code
}
}

void intBtnVoid(){
keyPressed = true;
}

Do library examples work with ESP32 2.02 ??

Tried ESP32-DevKit3, DOIT DevkitV1 and confirmed 0x20 I2C address, using default GPIO pins SDA 21 SCL 22

receiving "KO" messaged on pcf8574.begin(); which I have read is common,

Thanks in advance!

//----------------------------------------------
#include "Arduino.h"
#include "PCF8574.h"

// Set i2c address
PCF8574 pcf8574(0x20);

unsigned long timeElapsed;
void setup()
{
Serial.begin(115200);
delay(1000);

pcf8574.pinMode(P0, OUTPUT);
pcf8574.pinMode(P1, INPUT);

Serial.print("Init pcf8574...");
if (pcf8574.begin()){
Serial.println("OK");
}else{
Serial.println("KO");
}

}

void loop()
{
uint8_t val = pcf8574.digitalRead(P1);
if (val==HIGH) Serial.println("KEY PRESSED");
delay(50);
}

Design considerations

First of all thanks for this library. It used some macro's i haven't seen before.
I use library's like this on atmel 328. Those have 1024 bytes of ram. So i always try to limit the memory usage to as little as possible.

So i have some questions as i do not fully understand the bidirectional registry.
U can read and write only one byte to the register. If u write one byte u would read the same byte back. Because it would set a low powered pullup or down it's a in and output at the same time.

At startup all pins are high. Given no pins are grounded it will give 0xFF.
So i only think u need two bytes or memory. One for (last) readed value. One for last written value. If i request the status i would be interested in the difference between the two.
Maybe it could be useful to track if a pin was output or input. But on the other hand it does not matter for the device. So why spent a byte on it?

As for the status structure. Why use 8 bytes? 1 byte would do it?

It's not meant to criticize your work. I would like to learn from your considerations. And maybe mine can add something as well.

Teensy 3.2 not compiling

It would be great to be able to use the library with Teensy 3.2 (and other teensies too)
Thank you

latency and delay

Hi @xreef ,
thanks for the great library,

how the library getLatency() function work? is it calculating twowire latency to transmit in realtime or is just retrieving latency setting in twowire? normally should put delay based on the latency setting to retrieve output?

thanks!

if (pcf8574.begin()) is always ko !!!

Good morning
Everything works fine with this library .... there is only one problem the pcf8574.begin () function has always been "KO" answer even if it sees the pcf8574 and everything works!
Can you give me some help? that function would serve me to monitor the functioning of the i2c communication.
Greetings
David

Strange issue

Hi.
I have a strange behavier.
I have put all to output with led connected and it works, but when I start up my project all the leds are flashing 8 time with just a small light. Not full lightning.
This only happend when I put power to it the first time. If I disconnect the power and then put the power back it does the same thing.
All other things is working well.
Have I done something wrong??

Question: LED RGB

Hi, I need to use this library with an RGB led. So respectively P1, P2, P3 are RED, GREEN, BLUE
I should use analogWrite to set the light value.
How can I do? thanks

Error when compiling.

Hello. I'm using Esp32 and I used its library with the TwoWire example.

  • I didn't edit
  • I didn't make any changes
  • I didn't add anything.
  • Just opened the example and loaded it.

Got this error when compiling:

C:\Users\Tiago\Documents\Arduino\libraries\PCF8574_library-master\examples\ledEsp32OnTheSecondI2C\ledEsp32OnTheSecondI2C.ino: In function 'void setup()':
ledEsp32OnTheSecondI2C:47:28: error: call of overloaded 'begin(int, int, int)' is ambiguous
   I2Cone.begin(16,17,400000); // SDA pin 16, SCL pin 17, 400kHz frequency
                            ^
In file included from C:\Users\Tiago\Documents\Arduino\libraries\PCF8574_library-master/PCF8574.h:38,
                 from C:\Users\Tiago\Documents\Arduino\libraries\PCF8574_library-master\examples\ledEsp32OnTheSecondI2C\ledEsp32OnTheSecondI2C.ino:30:
C:\Users\Tiago\Documents\ArduinoData\packages\esp32\hardware\esp32\2.0.2\libraries\Wire\src/Wire.h:79:10: note: candidate: 'bool TwoWire::begin(int, int, uint32_t)'
     bool begin(int sda=-1, int scl=-1, uint32_t frequency=0); // returns true, if successful init of i2c bus
          ^~~~~
C:\Users\Tiago\Documents\ArduinoData\packages\esp32\hardware\esp32\2.0.2\libraries\Wire\src/Wire.h:80:10: note: candidate: 'bool TwoWire::begin(uint8_t, int, int, uint32_t)'
     bool begin(uint8_t slaveAddr, int sda=-1, int scl=-1, uint32_t frequency=0);
          ^~~~~
exit status 1
call of overloaded 'begin(int, int, int)' is ambiguous
`

PCF8575_library with Stepper.h library

Hello,

Thanks a lot for this library however, I'd like to use a PCF8574 chip to control some stepper motors. The problem I have encountered is when using the constructor of the stepper.h library, it's not exactly a problem with your library or the stepper library but I need to put the pins I'd like to use to control the stepper motor for example Stepper myStepper(stepsPerRevolution, 8, 9, 10, 11); where pins 8, 9, 10, 11 would instead be pins on the PCF8574 chip e.g. P0, P1, P2, P3 ect. However, with your library it appears you can only set a pin high or low and not parse them into the constructor for the stepper motor. Is there any way that this is possible or not or should I just not use the stepper.h library and write the code for this myself? Any help on this would be great. Thanks.

Regards,
ProRedCat.

use tm1637 with pcf8574 port expander

Hi
How can i use tm1637 7segment with pcf8574 port expander ?

PCF8574 expander(0x20, 4, 5); // esp8266 nodemcu and all Ax pins are Grounded
TM1637Display display(P4, P5);

and when i connect pins to 4 and 5 of esp8266 board its work !

Using read+write: After a write, no longer get interrupt to fire

Based off the example sketch: (redacted)

This works

#include "Arduino.h"
#include "PCF8574.h"
void keyPressedOnPCF8574();
PCF8574 pcf8574(0x20, 4, 5, 14, keyPressedOnPCF8574);
bool keyPressed = false;

void setup() {
 pcf8574.pinMode(P0, INPUT);
    pcf8574.pinMode(P1, INPUT);
    pcf8574.pinMode(P2, INPUT);
    pcf8574.pinMode(P3, INPUT);
    pcf8574.pinMode(P6, OUTPUT);
    pcf8574.pinMode(P7, OUTPUT);
    pcf8574.begin();
}

void loop() {
    if (keyPressed){
      Serial.print(pcf8574.digitalRead(P0));
      Serial.print(" / ");
      Serial.print(pcf8574.digitalRead(P1));
      Serial.print(" / ");
      Serial.print(pcf8574.digitalRead(P2));
      Serial.print(" / ");
      Serial.println(pcf8574.digitalRead(P3));
      keyPressed= false;
    }
}

void keyPressedOnPCF8574(){
  // Interrupt called (No Serial no read no wire in this function, and DEBUG disabled on PCF library)
   keyPressed = true;
}


#include "Arduino.h"
#include "PCF8574.h"
void keyPressedOnPCF8574();
PCF8574 pcf8574(0x20, 4, 5, 14, keyPressedOnPCF8574);
bool keyPressed = false;

void setup() {
 pcf8574.pinMode(P0, INPUT);
    pcf8574.pinMode(P1, INPUT);
    pcf8574.pinMode(P2, INPUT);
    pcf8574.pinMode(P3, INPUT);
    pcf8574.pinMode(P6, OUTPUT);
    pcf8574.pinMode(P7, OUTPUT);
    pcf8574.begin();
}

void loop() {
    if (keyPressed){
      pcf8574.digitalWrite(P6, LOW);  // turn on the LED on P6
      Serial.print(pcf8574.digitalRead(P0));
      Serial.print(" / ");
      Serial.print(pcf8574.digitalRead(P1));
      Serial.print(" / ");
      Serial.print(pcf8574.digitalRead(P2));
      Serial.print(" / ");
      Serial.println(pcf8574.digitalRead(P3));
      keyPressed= false;
      pcf8574.digitalWrite(P6, HIGH); // turn off the LED on P6
    }
}

void keyPressedOnPCF8574(){
  // Interrupt called (No Serial no read no wire in this function, and DEBUG disabled on PCF library)
   keyPressed = true;
}


The only difference is me trying to show a status LED on keyPressed

(Redacted version, in my real application i want to turn LED on at other times too.

Problem is, once the digitalWrite happened, the interrupt never fires again

Can we use multiple digital pins of Arduino?

Can we use multiple Digital pins of Arduino like if we are using pin 2 to connect 8 pcf8574. Similarly, can we use 8 pcf8574 with pin 3 together with pin 2 if yes please explain me how to do it

Outputs won't stay turned on for set amount of time

Hello, I am trying to control some track of a model railway.
I have two PCF8574 Modules connected to two 8-Channel Relay boards.

I am able to control the correct channels, but sometimes they won't turn on for the set amount of time of 700ms. They basically just bounce. I can barely see the LED Flashing on my Relay boards.

It happens to all channels on both boards at random. Sometimes it works flawless, most of the time it won't.

Here is a Video of my problem https://youtu.be/lHjU_x4Wy6U

This is my code

EDIT1: properly added the code
EDIT2: The PCF8574 Board I am using has 1k Pullup Resistors.

#include "Arduino.h"
#include "PCF8574.h"

// Set i2c address
PCF8574 Relais1(0x20);
PCF8574 Relais2(0x21);

const int Tschalt = 700; //Schaltdauer der einzelnen Elemente
const int gerade = 1;
const int umgelegt = 0;
const int geschlossen = 0;
const int offen = 1;
const int links = 0;
const int rechts = 2;


void setup() {
  Serial.begin(9600); //Aufbau Monitoring Verbindung
  delay(1000);
  for (int i = 0; i < 8; i++) { //Alle IO Extender als Outputs setzen
    Relais1.pinMode(i, OUTPUT);
    Relais2.pinMode(i, OUTPUT);
  }
  Serial.print("Init pcf8574...");
  if (Relais1.begin() && Relais2.begin()) { //Alle Relaisverbindungen prüfen
    Serial.println("Alle 3 Relais online");
    for (int i = 0; i<8; i++) //Alle Relais logisch High physikalisch Low setzen
    {
    Relais1.digitalWrite(i, HIGH);
    Relais2.digitalWrite(i, HIGH);
    }
  } else {
    Serial.println("Störung bei mindestens einem Relais"); //Störung an mindestens einem Relaisboard
  }
}


void loop() {
  Zug1();
  delay(3000);

  Signal(1,geschlossen);
  Zug2();
  delay(3000);

  Signal(2,geschlossen);
  Zug3();
  delay(3000);

  Signal(3,geschlossen);
}


void Zug1 () {
  Weiche(1,umgelegt);
  Weiche(2,umgelegt);
  Weiche(3,rechts);
  Signal(1,offen);
}


void Zug2() {
  Weiche(1,gerade);
  Weiche(2,umgelegt);
  Weiche(3,gerade);
  Signal(2,offen);
}


void Zug3() {
  Weiche(2,gerade);
  Weiche(3,rechts);
  Signal(3,offen);
}


void Weiche (int x, int y) { //Signalfunktion X ist die Signalnummer Y ist 
  if (x == 1) {
    if (y == 0) {
      Relais1.digitalWrite(0,LOW);
      Serial.println("Weiche 1 links");
      delay(Tschalt);
      Relais1.digitalWrite(0,HIGH);
    }

    if (y == 1) {
      Relais1.digitalWrite(1,LOW);
      Serial.println("Weiche 1 rechts");
      delay(Tschalt);
      Relais1.digitalWrite(1,HIGH);
    }
  }

  if (x == 2) {
    if (y == 0) {
      Relais1.digitalWrite(2,LOW);
      Serial.println("Weiche 2 gerade");
      delay(Tschalt);
      Relais1.digitalWrite(2,HIGH);
    }

    if (y == 1) {
      Relais1.digitalWrite(3,LOW);
      delay(Tschalt);
      Relais1.digitalWrite(3,HIGH);
    }
  }

  if (x == 3) {
    if (y == 0) {
      Relais2.digitalWrite(2,LOW);
      Relais2.digitalWrite(4,LOW);
      Serial.println("Weiche 3 links");
      delay(Tschalt);
      Relais2.digitalWrite(2,HIGH);
      Relais2.digitalWrite(4,HIGH);
    }

    if (y == 1) {
      Relais2.digitalWrite(2,LOW);
      Relais2.digitalWrite(5,LOW);
      Serial.println("Weiche 3 gerade");
      delay(Tschalt);
      Relais2.digitalWrite(2,HIGH);
      Relais2.digitalWrite(5,HIGH);
    }

    if (y == 2) {
      Relais2.digitalWrite(3,LOW);
      Relais2.digitalWrite(5,LOW);
      Serial.println("Weiche 3 rechts");
      delay(Tschalt);
      Relais2.digitalWrite(3,HIGH);
      Relais2.digitalWrite(5,HIGH);
    }
  }
}


void Signal (int x, int y) //Signalfunktion X ist die Signalnummer Y ist 
{
  if (x == 1) {
    if (y == 0) {
      Relais1.digitalWrite(4,LOW);
      delay(Tschalt);
      Relais1.digitalWrite(4,HIGH);
    }
    if (y == 1) {
      Relais1.digitalWrite(5,LOW);
      delay(Tschalt);
      Relais1.digitalWrite(5,HIGH);
    }
  }

  if (x == 2) {
    if (y == 0) {
      Relais1.digitalWrite(6,LOW);
      delay(Tschalt);
      Relais1.digitalWrite(6,HIGH);
    }
    if (y == 1) {
      Relais1.digitalWrite(7,LOW);
      delay(Tschalt);
      Relais1.digitalWrite(7,HIGH);
    }
  }

  if (x == 3) {
    if (y == 0) {
      Relais2.digitalWrite(0,LOW);
      delay(Tschalt);
      Relais2.digitalWrite(0,HIGH);
    }
    if (y == 1) {
      Relais2.digitalWrite(1,LOW);
      delay(Tschalt);
      Relais2.digitalWrite(1,HIGH);
    }
  }
}

PCF8574 output low active, init active

I use 8 relais modules with active low input, because the PCF8574 has active low outputs. On my init routine

pcf_out1.begin(); for (int i = 0; i < 8; i++) // Init PCF { pcf_out1.pinMode(i, OUTPUT); // 8 Ports init as output pcf_out1.digitalWrite(i, 1); }
With this code, all relais switch on at init for 100ms.

So i changed writeMode and writeByteBuffered in the library from private to public and set both to a new init value:

pcf_out1.writeMode = B11111111; pcf_out1.writeByteBuffered = B11111111; pcf_out1.begin(); for (int i = 0; i < 8; i++) // Init PCF { pcf_out1.pinMode(i, OUTPUT); // 8 Ports init as output pcf_out1.digitalWrite(i, 1); }
This shortens the output init time to 10ms active time, so the relais are not able to switch.

I do not understand the 10ms, a SSR will switch
Is it possible to init the PCF without any active time?

(I use an Wemos Lolin 32(ESP32) and #define PCF8574_LOW_MEMORY)

Interrupt Mode

Hi There ,

Just want to ask , is that any ability Interrupt mode in this library? like HIGH, LOW, CHANGE, FALLING, RAISING.
as description in Arduino IDE we can use the attachInterrupt() function, that accepts as arguments: the GPIO pin, the name of the function to be executed, and mode: attachInterrupt(digitalPinToInterrupt(GPIO), function, mode);

Thanks

Recommend Projects

  • React photo React

    A declarative, efficient, and flexible JavaScript library for building user interfaces.

  • Vue.js photo Vue.js

    🖖 Vue.js is a progressive, incrementally-adoptable JavaScript framework for building UI on the web.

  • Typescript photo Typescript

    TypeScript is a superset of JavaScript that compiles to clean JavaScript output.

  • TensorFlow photo TensorFlow

    An Open Source Machine Learning Framework for Everyone

  • Django photo Django

    The Web framework for perfectionists with deadlines.

  • D3 photo D3

    Bring data to life with SVG, Canvas and HTML. 📊📈🎉

Recommend Topics

  • javascript

    JavaScript (JS) is a lightweight interpreted programming language with first-class functions.

  • web

    Some thing interesting about web. New door for the world.

  • server

    A server is a program made to process requests and deliver data to clients.

  • Machine learning

    Machine learning is a way of modeling and interpreting data that allows a piece of software to respond intelligently.

  • Game

    Some thing interesting about game, make everyone happy.

Recommend Org

  • Facebook photo Facebook

    We are working to build community through open source technology. NB: members must have two-factor auth.

  • Microsoft photo Microsoft

    Open source projects and samples from Microsoft.

  • Google photo Google

    Google ❤️ Open Source for everyone.

  • D3 photo D3

    Data-Driven Documents codes.