yaoningvital / blog Goto Github PK
View Code? Open in Web Editor NEWmy blog
my blog


| Flag | Short Flag | Description |
|---|---|---|
| --gulpfile [path] | -f | Manually set path of gulpfile. Useful if you have multiple gulpfiles. This will set the CWD(current working directory) to the gulpfile directory as well. |
这个命令是gulp 命令,要去执行'packages/theme-chalk/gulpfile.js'这个文件。这个文件的内容如下:
'use strict';

var gulp = require('gulp');
var sass = require('gulp-sass');
var autoprefixer = require('gulp-autoprefixer');
var cssmin = require('gulp-cssmin');

gulp.task('compile', function() {
  return gulp.src('./src/*.scss')
    .pipe(sass.sync())
    .pipe(autoprefixer({
      browsers: ['ie > 9', 'last 2 versions'],
      cascade: false
    }))
    .pipe(cssmin())
    .pipe(gulp.dest('./lib'));
});

gulp.task('copyfont', function() {
  return gulp.src('./src/fonts/**')
    .pipe(cssmin())
    .pipe(gulp.dest('./lib/fonts'));
});

gulp.task('build', ['compile', 'copyfont']);
gulp.src(): Creates a stream for reading Vinyl objects from the file system. Vinyl is a metadata object that describes a file. The main properties of a Vinyl instance are path and contents - core aspects of a file on your file system. Vinyl objects can be used to describe files from many sources - on a local file system or any remote storage option.
var sass = require('gulp-sass');
...
sass.sync()
sass.sync(): this will compile your Sass files .
gulp-autoprefixer: 使用gulp-autoprefixer根据设置浏览器版本自动处理浏览器前缀。使用她我们可以很潇洒地写代码,不必考虑各浏览器兼容前缀。【特别是开发移动端页面时,就能充分体现它的优势。例如兼容性不太好的flex布局。】
last 2 versions: 主流浏览器的最新两个版本。
cascade: 是否美化属性值 。默认为 true .
'gulp-cssmin': Duplicate of gulp-minify-css .
使用gulp-minify-css压缩css文件,减小文件大小,并给引用url添加版本号避免缓存。重要:gulp-minify-css已经被废弃,请使用gulp-clean-css,用法一致。
gulp.dest(): Creates a stream for writing Vinyl objects to the file system.
dest(directory, [options])
| parameter | type | note |
|---|---|---|
| directory(required) | string function | The path of the output directory where files will be written. If a function is used, the function will be called with each Vinyl object and must return a string directory path. |
| options | object | Detailed in Options below. |
所以,第一个task的作用就是:找到 src 下面的所有.scss 文件,用'gulp-sass'插件将这些.scss文件转成.css文件,将这些css文件中对不同浏览器有不同css属性名的属性,插入针对不同浏览器的css前缀。然后将这些css文件进行压缩,最后把这些压缩后的.css文件写入到'./lib这个路径下。
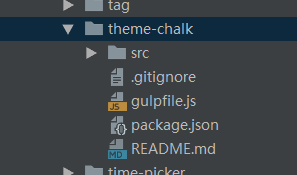
在执行这个文件之前,'packages/theme-chalk/'文件目录如下:
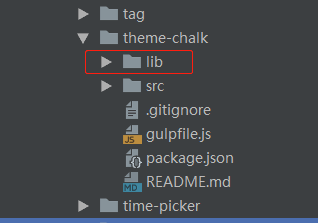
执行第一个task后,文件目录如下:
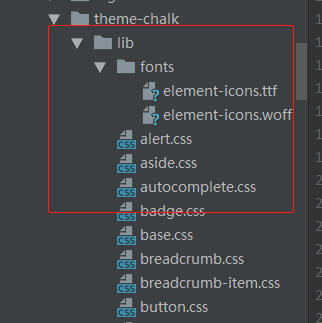
'copyfont'这个task的作用是:将'./src/fonts/**'这个目录下的所有字体文件,先用‘gulp-cssmin’进行压缩,然后放到'./lib/fonts'这个目录下。
最后 gulp.task('build', ['compile', 'copyfont']); 这一句就是去执行这两个task。
这个文件的作用就是:将'theme-chalk/src'下面的所有.scss文件,转成.css文件,进行必要的浏览器前缀插入,进行压缩,然后将生成的.css文件写入到'theme-chalk/lib'文件夹下。将src/fonts下面的字体文件,写入到'theme-chalk/lib'文件夹下。
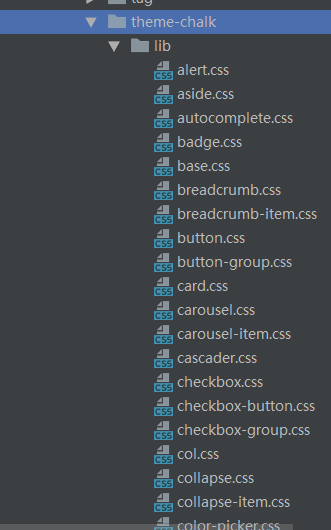
该文件执行后的文件目录如下:
Axios 是一个基于 promise 的 HTTP 库,可以工作于浏览器中,也可以在 node.js 中使用,提供了一个API用来处理 XMLHttpRequests 和 node 的 http 接口。
可能很多人会疑问:用 jquery 的 get/post 不就很好了,为什么要用 Axios?原因主要有:
Axios 支持 node.js,jquery 不支持
Axios 基于 promise 语法标准,jquery 在 3.0 版本中才全面支持
Axios 是一个小巧而专业的 HTTP 库,jquery 是一个大而全的库,如果有些场景不需要使用jquery的其他功能,只需要HTTP相关功能,这时使用 Axios 会更适合
下面了解下 Axios 的具体使用方式
axios.get('https://api.github.com/users/' + username)
  .then(function(response){
    console.log(response.data);
    console.log(response.status);
  });
axios.post('/save', { firstName: 'Marlon', lastName: 'Bernardes' })
  .then(function(response){
    console.log('saved successfully');
  })
  .catch(function (error) {
    console.log(error);
  });
除了 get/post,还可以请求 delete,head,put,patch
axios.all([
    axios.get('https://api.github.com/xxx/1'),
    axios.get('https://api.github.com/xxx/2')
  ])
  .then(axios.spread(function (userResp, reposResp) {
    // 上面两个请求都完成后,才执行这个回调方法
    console.log('User', userResp.data);
    console.log('Repositories', reposResp.data);
  }));
当所有的请求都完成后,会收到一个数组,包含着响应对象,其中的顺序和请求发送的顺序相同,可以使用 axios.spread 分割成多个单独的响应对象
var config = {
  essay-headers: {'X-My-Custom-Header': 'Header-Value'}
};

axios.get('https://api.github.com/users/xxx', config);
axios.post('/save', { firstName: 'Marlon' }, config);
可以在 then 或者 catch 之前对 requests/responses 进行拦截处理
var myInterceptor = axios.interceptors.request.use(function () {/*...*/});
axios.interceptors.request.eject(myInterceptor);
npm install axios
bower install axios
https://github.com/mzabriskie/axios/tree/master/dist
var axios = require('axios')
axios.get('https://api.github.com/users/xxx');
项目地址 https://github.com/mzabriskie/axios
原文章地址 http://chuansong.me/n/394228451820
下载了 element 的源码,先从 package.json 开始看。
package.json 文件从scripts 开始分析吧。 scripts 的内容如下:
"scripts": {
    "bootstrap": "yarn || npm i",
    "build:file": "node build/bin/iconInit.js & node build/bin/build-entry.js & node build/bin/i18n.js & node build/bin/version.js",
    "build:theme": "node build/bin/gen-cssfile && gulp build --gulpfile packages/theme-chalk/gulpfile.js && cp-cli packages/theme-chalk/lib lib/theme-chalk",
    "build:utils": "cross-env BABEL_ENV=utils babel src --out-dir lib --ignore src/index.js",
    "build:umd": "node build/bin/build-locale.js",
    "clean": "rimraf lib && rimraf packages/*/lib && rimraf test/**/coverage",
    "deploy:build": "npm run build:file && cross-env NODE_ENV=production webpack --config build/webpack.demo.js && echo element.eleme.io>>examples/element-ui/CNAME",
    "dev": "npm run bootstrap && npm run build:file && cross-env NODE_ENV=development webpack-dev-server --config build/webpack.demo.js & node build/bin/template.js",
    "dev:play": "npm run build:file && cross-env NODE_ENV=development PLAY_ENV=true webpack-dev-server --config build/webpack.demo.js",
    "dist": "npm run clean && npm run build:file && npm run lint && webpack --config build/webpack.conf.js && webpack --config build/webpack.common.js && webpack --config build/webpack.component.js && npm run build:utils && npm run build:umd && npm run build:theme",
    "i18n": "node build/bin/i18n.js",
    "lint": "eslint src/**/* test/**/* packages/**/* build/**/* --quiet",
    "pub": "npm run bootstrap && sh build/git-release.sh && sh build/release.sh && node build/bin/gen-indices.js && sh build/deploy-faas.sh",
    "test": "npm run lint && npm run build:theme && cross-env CI_ENV=/dev/ karma start test/unit/karma.conf.js --single-run",
    "test:watch": "npm run build:theme && karma start test/unit/karma.conf.js"
  },
build:file执行的脚本如下:
"build:file": "node build/bin/iconInit.js & node build/bin/build-entry.js & node build/bin/i18n.js & node build/bin/version.js"
iconInit.js文件内容如下:
'use strict';

var postcss = require('postcss');
var fs = require('fs');
var path = require('path');
var fontFile = fs.readFileSync(path.resolve(__dirname, '../../packages/theme-chalk/src/icon.scss'), 'utf8');
var nodes = postcss.parse(fontFile).nodes;
var classList = [];

nodes.forEach((node) => {
  var selector = node.selector || '';
  var reg = new RegExp(/\.el-icon-([^:]+):before/);
  var arr = selector.match(reg);

  if (arr && arr[1]) {
    classList.push(arr[1]);
  }
});

fs.writeFile(path.resolve(__dirname, '../../examples/icon.json'), JSON.stringify(classList), () => {
});
__dirname : 总是指向被执行 js 文件的绝对路径
path.resolve([...paths]) : The path.resolve() method resolves a sequence of paths or path segments into an absolute path.
fs.readFileSync : Returns the contents of the path. If the encoding option is specified then this function returns a string. Otherwise it returns a buffer. 这里拿到的 fontFile 是一个字符串。
postcss.parse(fontFile).nodes :
[ AtRule {
    raws: { before: '', between: '', afterName: ' ' },
    type: 'atrule',
    name: 'import',
    parent:
     Root {
       raws: [Object],
       type: 'root',
       nodes: [Circular],
       source: [Object] },
    source: { start: [Object], input: [Input], end: [Object] },
    params: '"common/var"' },
  AtRule {
    raws:
     { before: '\r\n\r\n',
       between: ' ',
       afterName: '',
       semicolon: false,
       after: '\r\n' },
    type: 'atrule',
    name: 'font-face',
    parent:
     Root {
       raws: [Object],
       type: 'root',
       nodes: [Circular],
       source: [Object] },
    source: { start: [Object], input: [Input], end: [Object] },
    params: '',
    nodes:
     [ [Declaration],
       [Declaration],
       [Comment],
       [Declaration],
       [Declaration] ] },
  Rule {
    raws:
     { before: '\r\n\r\n',
       between: ' ',
       semicolon: true,
       after: '\r\n' },
    type: 'rule',
    nodes:
     [ [Comment],
       [Declaration],
       [Declaration],
       [Declaration],
       [Declaration],
       [Declaration],
       [Declaration],
       [Declaration],
       [Declaration],
       [Declaration],
       [Comment],
       [Declaration],
       [Declaration] ],
    parent:
     Root {
       raws: [Object],
       type: 'root',
       nodes: [Circular],
       source: [Object] },
    source: { start: [Object], input: [Input], end: [Object] },
    selector: '[class^="el-icon-"], [class*=" el-icon-"]' },
  Rule {
    raws:
     { before: '\r\n\r\n', between: ' ', semicolon: true, after: ' ' },
    type: 'rule',
    nodes: [ [Declaration] ],
    parent:
     Root {
       raws: [Object],
       type: 'root',
       nodes: [Circular],
       source: [Object] },
    source: { start: [Object], input: [Input], end: [Object] },
    selector: '.el-icon-info:before' },
 ...
 ...
 ...
  Rule {
    raws:
     { before: '\r\n', between: ' ', semicolon: true, after: '\r\n' },
    type: 'rule',
    nodes: [ [Declaration] ],
    parent:
     Root {
       raws: [Object],
       type: 'root',
       nodes: [Circular],
       source: [Object] },
    source: { start: [Object], input: [Input], end: [Object] },
    selector: '.el-icon--left' },
  AtRule {
    raws:
     { before: '\r\n\r\n',
       between: ' ',
       afterName: ' ',
       semicolon: false,
       after: '\r\n' },
    type: 'atrule',
    name: 'keyframes',
    parent:
     Root {
       raws: [Object],
       type: 'root',
       nodes: [Circular],
       source: [Object] },
    source: { start: [Object], input: [Input], end: [Object] },
    params: 'rotating',
    nodes: [ [Rule], [Rule] ] } ]
selector :是 icon.scss 文件中所有选择器:
[class^="el-icon-"], [class*=" el-icon-"]
.el-icon-info:before
.el-icon-error:before
.el-icon-success:before
.el-icon-warning:before
.el-icon-question:before
.el-icon-back:before
.el-icon-arrow-left:before
.el-icon-arrow-down:before
.el-icon-arrow-right:before
.el-icon-arrow-up:before
.el-icon-caret-left:before
.el-icon-caret-bottom:before
.el-icon-caret-top:before
.el-icon-caret-right:before
.el-icon-d-arrow-left:before
.el-icon-d-arrow-right:before
.el-icon-minus:before
.el-icon-plus:before
.el-icon-remove:before
.el-icon-circle-plus:before
.el-icon-remove-outline:before
.el-icon-circle-plus-outline:before
.el-icon-close:before
.el-icon-check:before
.el-icon-circle-close:before
.el-icon-circle-check:before
.el-icon-circle-close-outline:before
.el-icon-circle-check-outline:before
.el-icon-zoom-out:before
.el-icon-zoom-in:before
.el-icon-d-caret:before
.el-icon-sort:before
.el-icon-sort-down:before
.el-icon-sort-up:before
.el-icon-tickets:before
.el-icon-document:before
.el-icon-goods:before
.el-icon-sold-out:before
.el-icon-news:before
.el-icon-message:before
.el-icon-date:before
.el-icon-printer:before
.el-icon-time:before
.el-icon-bell:before
.el-icon-mobile-phone:before
.el-icon-service:before
.el-icon-view:before
.el-icon-menu:before
.el-icon-more:before
.el-icon-more-outline:before
.el-icon-star-on:before
.el-icon-star-off:before
.el-icon-location:before
.el-icon-location-outline:before
.el-icon-phone:before
.el-icon-phone-outline:before
.el-icon-picture:before
.el-icon-picture-outline:before
.el-icon-delete:before
.el-icon-search:before
.el-icon-edit:before
.el-icon-edit-outline:before
.el-icon-rank:before
.el-icon-refresh:before
.el-icon-share:before
.el-icon-setting:before
.el-icon-upload:before
.el-icon-upload2:before
.el-icon-download:before
.el-icon-loading:before
.el-icon-loading
.el-icon--right
.el-icon--left
arr:
arr: null
arr: null
arr: null
arr: [ '.el-icon-info:before',
  'info',
  index: 0,
  input: '.el-icon-info:before',
  groups: undefined ]
arr: [ '.el-icon-error:before',
  'error',
  index: 0,
  input: '.el-icon-error:before',
  groups: undefined ]
arr: [ '.el-icon-success:before',
  'success',
  index: 0,
  input: '.el-icon-success:before',
  groups: undefined ]
arr: [ '.el-icon-warning:before',
  'warning',
  index: 0,
  input: '.el-icon-warning:before',
  groups: undefined ]
arr: [ '.el-icon-question:before',
  'question',
  index: 0,
  input: '.el-icon-question:before',
  groups: undefined ]
arr: [ '.el-icon-back:before',
  'back',
  index: 0,
  input: '.el-icon-back:before',
  groups: undefined ]
arr: [ '.el-icon-arrow-left:before',
  'arrow-left',
  index: 0,
  input: '.el-icon-arrow-left:before',
  groups: undefined ]
arr: [ '.el-icon-arrow-down:before',
  'arrow-down',
  index: 0,
  input: '.el-icon-arrow-down:before',
  groups: undefined ]
arr: [ '.el-icon-arrow-right:before',
  'arrow-right',
  index: 0,
  input: '.el-icon-arrow-right:before',
  groups: undefined ]
arr: [ '.el-icon-arrow-up:before',
  'arrow-up',
  index: 0,
  input: '.el-icon-arrow-up:before',
  groups: undefined ]
arr: [ '.el-icon-caret-left:before',
  'caret-left',
  index: 0,
  input: '.el-icon-caret-left:before',
  groups: undefined ]
arr: [ '.el-icon-caret-bottom:before',
  'caret-bottom',
  index: 0,
  input: '.el-icon-caret-bottom:before',
  groups: undefined ]
arr: [ '.el-icon-caret-top:before',
  'caret-top',
  index: 0,
  input: '.el-icon-caret-top:before',
  groups: undefined ]
arr: [ '.el-icon-caret-right:before',
  'caret-right',
  index: 0,
  input: '.el-icon-caret-right:before',
  groups: undefined ]
arr: [ '.el-icon-d-arrow-left:before',
  'd-arrow-left',
  index: 0,
  input: '.el-icon-d-arrow-left:before',
  groups: undefined ]
arr: [ '.el-icon-d-arrow-right:before',
  'd-arrow-right',
  index: 0,
  input: '.el-icon-d-arrow-right:before',
  groups: undefined ]
arr: [ '.el-icon-minus:before',
  'minus',
  index: 0,
  input: '.el-icon-minus:before',
  groups: undefined ]
arr: [ '.el-icon-plus:before',
  'plus',
  index: 0,
  input: '.el-icon-plus:before',
  groups: undefined ]
arr: [ '.el-icon-remove:before',
  'remove',
  index: 0,
  input: '.el-icon-remove:before',
  groups: undefined ]
arr: [ '.el-icon-circle-plus:before',
  'circle-plus',
  index: 0,
  input: '.el-icon-circle-plus:before',
  groups: undefined ]
arr: [ '.el-icon-remove-outline:before',
  'remove-outline',
  index: 0,
  input: '.el-icon-remove-outline:before',
  groups: undefined ]
arr: [ '.el-icon-circle-plus-outline:before',
  'circle-plus-outline',
  index: 0,
  input: '.el-icon-circle-plus-outline:before',
  groups: undefined ]
arr: [ '.el-icon-close:before',
  'close',
  index: 0,
  input: '.el-icon-close:before',
  groups: undefined ]
arr: [ '.el-icon-check:before',
  'check',
  index: 0,
  input: '.el-icon-check:before',
  groups: undefined ]
arr: [ '.el-icon-circle-close:before',
  'circle-close',
  index: 0,
  input: '.el-icon-circle-close:before',
  groups: undefined ]
arr: [ '.el-icon-circle-check:before',
  'circle-check',
  index: 0,
  input: '.el-icon-circle-check:before',
  groups: undefined ]
arr: [ '.el-icon-circle-close-outline:before',
  'circle-close-outline',
  index: 0,
  input: '.el-icon-circle-close-outline:before',
  groups: undefined ]
arr: [ '.el-icon-circle-check-outline:before',
  'circle-check-outline',
  index: 0,
  input: '.el-icon-circle-check-outline:before',
  groups: undefined ]
arr: [ '.el-icon-zoom-out:before',
  'zoom-out',
  index: 0,
  input: '.el-icon-zoom-out:before',
  groups: undefined ]
arr: [ '.el-icon-zoom-in:before',
  'zoom-in',
  index: 0,
  input: '.el-icon-zoom-in:before',
  groups: undefined ]
arr: [ '.el-icon-d-caret:before',
  'd-caret',
  index: 0,
  input: '.el-icon-d-caret:before',
  groups: undefined ]
arr: [ '.el-icon-sort:before',
  'sort',
  index: 0,
  input: '.el-icon-sort:before',
  groups: undefined ]
arr: [ '.el-icon-sort-down:before',
  'sort-down',
  index: 0,
  input: '.el-icon-sort-down:before',
  groups: undefined ]
arr: [ '.el-icon-sort-up:before',
  'sort-up',
  index: 0,
  input: '.el-icon-sort-up:before',
  groups: undefined ]
arr: [ '.el-icon-tickets:before',
  'tickets',
  index: 0,
  input: '.el-icon-tickets:before',
  groups: undefined ]
arr: [ '.el-icon-document:before',
  'document',
  index: 0,
  input: '.el-icon-document:before',
  groups: undefined ]
arr: [ '.el-icon-goods:before',
  'goods',
  index: 0,
  input: '.el-icon-goods:before',
  groups: undefined ]
arr: [ '.el-icon-sold-out:before',
  'sold-out',
  index: 0,
  input: '.el-icon-sold-out:before',
  groups: undefined ]
arr: [ '.el-icon-news:before',
  'news',
  index: 0,
  input: '.el-icon-news:before',
  groups: undefined ]
arr: [ '.el-icon-message:before',
  'message',
  index: 0,
  input: '.el-icon-message:before',
  groups: undefined ]
arr: [ '.el-icon-date:before',
  'date',
  index: 0,
  input: '.el-icon-date:before',
  groups: undefined ]
arr: [ '.el-icon-printer:before',
  'printer',
  index: 0,
  input: '.el-icon-printer:before',
  groups: undefined ]
arr: [ '.el-icon-time:before',
  'time',
  index: 0,
  input: '.el-icon-time:before',
  groups: undefined ]
arr: [ '.el-icon-bell:before',
  'bell',
  index: 0,
  input: '.el-icon-bell:before',
  groups: undefined ]
arr: [ '.el-icon-mobile-phone:before',
  'mobile-phone',
  index: 0,
  input: '.el-icon-mobile-phone:before',
  groups: undefined ]
arr: [ '.el-icon-service:before',
  'service',
  index: 0,
  input: '.el-icon-service:before',
  groups: undefined ]
arr: [ '.el-icon-view:before',
  'view',
  index: 0,
  input: '.el-icon-view:before',
  groups: undefined ]
arr: [ '.el-icon-menu:before',
  'menu',
  index: 0,
  input: '.el-icon-menu:before',
  groups: undefined ]
arr: [ '.el-icon-more:before',
  'more',
  index: 0,
  input: '.el-icon-more:before',
  groups: undefined ]
arr: [ '.el-icon-more-outline:before',
  'more-outline',
  index: 0,
  input: '.el-icon-more-outline:before',
  groups: undefined ]
arr: [ '.el-icon-star-on:before',
  'star-on',
  index: 0,
  input: '.el-icon-star-on:before',
  groups: undefined ]
arr: [ '.el-icon-star-off:before',
  'star-off',
  index: 0,
  input: '.el-icon-star-off:before',
  groups: undefined ]
arr: [ '.el-icon-location:before',
  'location',
  index: 0,
  input: '.el-icon-location:before',
  groups: undefined ]
arr: [ '.el-icon-location-outline:before',
  'location-outline',
  index: 0,
  input: '.el-icon-location-outline:before',
  groups: undefined ]
arr: [ '.el-icon-phone:before',
  'phone',
  index: 0,
  input: '.el-icon-phone:before',
  groups: undefined ]
arr: [ '.el-icon-phone-outline:before',
  'phone-outline',
  index: 0,
  input: '.el-icon-phone-outline:before',
  groups: undefined ]
arr: [ '.el-icon-picture:before',
  'picture',
  index: 0,
  input: '.el-icon-picture:before',
  groups: undefined ]
arr: [ '.el-icon-picture-outline:before',
  'picture-outline',
  index: 0,
  input: '.el-icon-picture-outline:before',
  groups: undefined ]
arr: [ '.el-icon-delete:before',
  'delete',
  index: 0,
  input: '.el-icon-delete:before',
  groups: undefined ]
arr: [ '.el-icon-search:before',
  'search',
  index: 0,
  input: '.el-icon-search:before',
  groups: undefined ]
arr: [ '.el-icon-edit:before',
  'edit',
  index: 0,
  input: '.el-icon-edit:before',
  groups: undefined ]
arr: [ '.el-icon-edit-outline:before',
  'edit-outline',
  index: 0,
  input: '.el-icon-edit-outline:before',
  groups: undefined ]
arr: [ '.el-icon-rank:before',
  'rank',
  index: 0,
  input: '.el-icon-rank:before',
  groups: undefined ]
arr: [ '.el-icon-refresh:before',
  'refresh',
  index: 0,
  input: '.el-icon-refresh:before',
  groups: undefined ]
arr: [ '.el-icon-share:before',
  'share',
  index: 0,
  input: '.el-icon-share:before',
  groups: undefined ]
arr: [ '.el-icon-setting:before',
  'setting',
  index: 0,
  input: '.el-icon-setting:before',
  groups: undefined ]
arr: [ '.el-icon-upload:before',
  'upload',
  index: 0,
  input: '.el-icon-upload:before',
  groups: undefined ]
arr: [ '.el-icon-upload2:before',
  'upload2',
  index: 0,
  input: '.el-icon-upload2:before',
  groups: undefined ]
arr: [ '.el-icon-download:before',
  'download',
  index: 0,
  input: '.el-icon-download:before',
  groups: undefined ]
arr: [ '.el-icon-loading:before',
  'loading',
  index: 0,
  input: '.el-icon-loading:before',
  groups: undefined ]
arr: null
arr: null
arr: null
arr: null
classList :
[ 'info',
  'error',
  'success',
  'warning',
  'question',
  'back',
  'arrow-left',
  'arrow-down',
  'arrow-right',
  'arrow-up',
  'caret-left',
  'caret-bottom',
  'caret-top',
  'caret-right',
  'd-arrow-left',
  'd-arrow-right',
  'minus',
  'plus',
  'remove',
  'circle-plus',
  'remove-outline',
  'circle-plus-outline',
  'close',
  'check',
  'circle-close',
  'circle-check',
  'circle-close-outline',
  'circle-check-outline',
  'zoom-out',
  'zoom-in',
  'd-caret',
  'sort',
  'sort-down',
  'sort-up',
  'tickets',
  'document',
  'goods',
  'sold-out',
  'news',
  'message',
  'date',
  'printer',
  'time',
  'bell',
  'mobile-phone',
  'service',
  'view',
  'menu',
  'more',
  'more-outline',
  'star-on',
  'star-off',
  'location',
  'location-outline',
  'phone',
  'phone-outline',
  'picture',
  'picture-outline',
  'delete',
  'search',
  'edit',
  'edit-outline',
  'rank',
  'refresh',
  'share',
  'setting',
  'upload',
  'upload2',
  'download',
  'loading' ]
fs.writeFile(file, data[, options], callback): Asynchronously writes data to a file, replacing the file if it already exists. data can be a string or a buffer.
fs.writeFile(path.resolve(__dirname, '../../examples/icon.json'), JSON.stringify(classList), () => {
});
这个代码执行的就是:将 classList 这个数组转成字符串,然后写入 ./examples/icon.json 这个文件中。
所以 iconInit.js 这个文件的作用就是:将./packages/theme-chalk/src/icon.scss'中的满足一定规则的(.el-icon-success:before)选择器的名字('success')组成一个数组,写入'./examples/icon.json'这个文件中。
现今的很多网页其实可以看做是功能丰富的应用,它们拥有着复杂的JavaScript代码和一大堆依赖包。为了简化开发的复杂度,前端社区涌现出了很多好的实践方法:
这些改进确实大大的提高了我们的开发效率,但是利用它们开发的文件往往需要进行额外的处理才能让浏览器识别,而手动处理又是非常繁琐的,这就为WebPack类的工具的出现提供了需求。
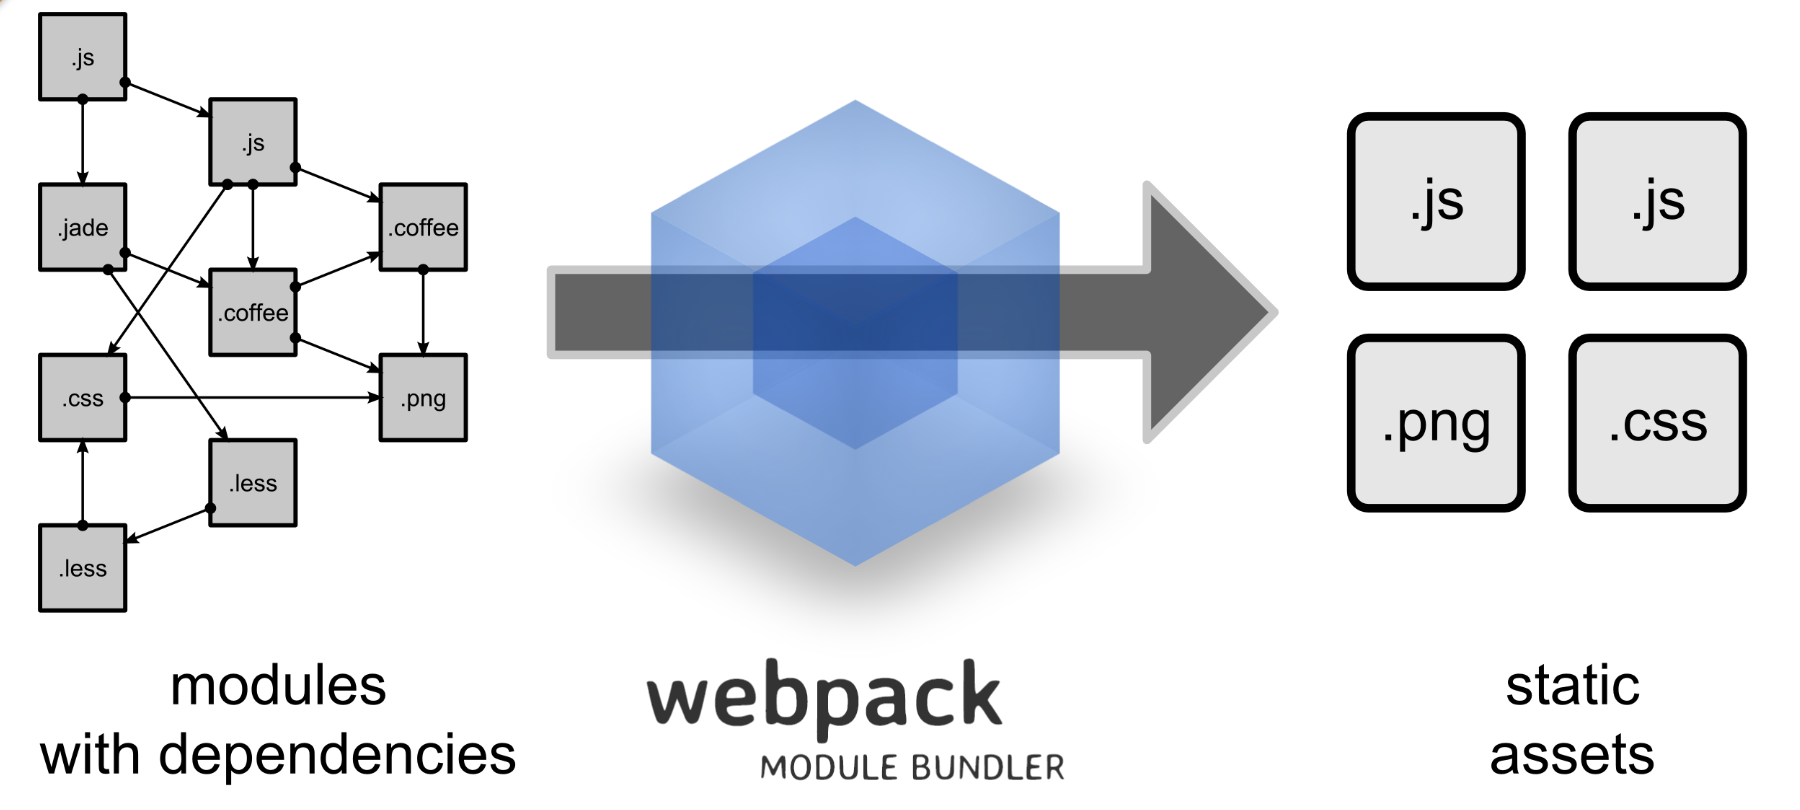
webpack是最能体现现代web组件化开发思路的基础框架。
webpack可以看做是模块打包器:它做的事情是,分析你的项目结构,找到JavaScript模块以及其它的一些浏览器不能直接运行的拓展语言(Scss,TypeScript等),并将其转换和打包为合适的格式供浏览器使用。
本质上,webpack 是一个现代 JavaScript 应用程序的静态模块打包器(module bundler)。当 webpack 处理应用程序时,它会递归地构建一个依赖关系图(dependency graph),其中包含应用程序需要的每个模块,然后将所有这些模块打包成一个或多个 bundle。
webpack和gulp两者所要达成的目标是一样的,那就是促进前端领域的自动化和工程化管理。webpack 发展到现在,已经非常强大了,强大到在构建方面 gulp 能做的事 webpack 基本上都可以胜任,gulp 做不了的 webpack 也能搞。同样的那些开发工作中痛苦又耗时的任务,gulp 和 webpack 都能解决,只是解决思路有天壤之别。
下表是从各个角度对 gulp 和 webpack 做的对比:
| Gulp | Webpack | |
|---|---|---|
| 定位 | 基于流的自动化构建工具 | 一个万能模块打包器 |
| 目标 | 自动化和优化开发工作流,为通用 website 开发而生 | 通用模块打包加载器,为移动端大型 SPA 应用而生 |
| 学习难度 | 易于学习,易于使用,api总共只有5个方法 | 有大量新的概念和api,不过好在有详尽的官方文档 |
| 适用场景 | 基于流的作业方式适合多页面应用开发 | 一切皆模块的特点适合单页面应用开发 |
| 作业方式 | 对输入(gulp.src)的 js,ts,scss,less 等源文件依次执行打包(bundle)、编译(compile)、压缩、重命名等处理后输出(gulp.dest)到指定目录中去,为了构建而打包 | 对入口文件(entry)递归解析生成依赖关系图,然后将所有依赖打包在一起,在打包之前会将所有依赖转译成可打包的 js 模块,为了打包而构建 |
| 使用方式 | 常规 js 开发,编写一系列构建任务(task)。 | 编辑各种 JSON 配置项 |
| 优点 | 适合多页面开发,易于学习,易于使用,接口优雅。 | 可以打包一切资源,适配各种模块系统 |
| 缺点 | 在单页面应用方面输出乏力,而且对流行的单页技术有些难以处理(比如 Vue 单文件组件,使用 gulp 处理就会很困难,而 webpack 一个 loader 就能轻松搞定) | 不适合多页应用开发,灵活度高但同时配置很繁琐复杂。“打包一切” 这个优点对于 HTTP/1.1 尤其重要,因为所有资源打包在一起能明显减少浏览器访问页面时的资源请求数量,从而减少应用程序必须等待的时间。但这个优点可能会随着 HTTP/2 的流行而变得不那么突出,因为 HTTP/2 的多路复用可以有效解决客户端并行请求时的瓶颈问题。 |
| 结论 | 浏览器多页应用(MPA)首选方案 | 浏览器单页应用(SPA)首选方案 |
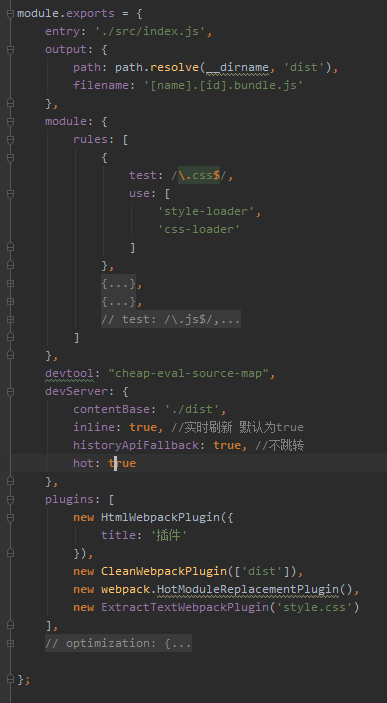
入口起点(entry point)指示 webpack 应该使用哪个模块,来作为构建其内部依赖图的开始。进入入口起点后,webpack 会找出有哪些模块和库是入口起点(直接和间接)依赖的。
每个依赖项随即被处理,最后输出到称之为 bundles 的文件中。
可以通过在 webpack 配置中配置 entry 属性,来指定一个入口起点(或多个入口起点)。默认值为 ./src。
output 属性告诉 webpack 在哪里输出它所创建的 bundles,以及如何命名这些文件,默认值为 ./dist。基本上,整个应用程序结构,都会被编译到你指定的输出路径的文件夹中。你可以通过在配置中指定一个 output 字段,来配置这些处理过程。
loader 让 webpack 能够去处理那些非 JavaScript 文件(webpack 自身只理解 JavaScript)。loader 可以将所有类型的文件转换为 webpack 能够处理的有效模块,然后你就可以利用 webpack 的打包能力,对它们进行处理。
本质上,webpack loader 将所有类型的文件,转换为应用程序的依赖图(和最终的 bundle)可以直接引用的模块。
loader 被用于转换某些类型的模块,而插件则可以用于执行范围更广的任务。插件的范围包括,从打包优化和压缩,一直到重新定义环境中的变量。插件接口功能极其强大,可以用来处理各种各样的任务。
通过选择 development 或 production 之中的一个,来设置 mode 参数,你可以启用相应模式下的 webpack 内置的优化。
在模块化编程中,开发者将程序分解成离散功能块(discrete chunks of functionality),并称之为模块。
webpack 模块用来表达它们之间的依赖关系的方式有:
任何时候,一个文件依赖于另一个文件,webpack 就把此视为文件之间有依赖关系。这使得 webpack 可以接收非代码资源(non-code asset)(例如图像或 web 字体),并且可以把它们作为_依赖_提供给你的应用程序。
webpack 从命令行或配置文件中定义的一个模块列表开始,处理你的应用程序。 从这些入口起点开始,webpack 递归地构建一个依赖图,这个依赖图包含着应用程序所需的每个模块,然后将所有这些模块打包为少量的 bundle - 通常只有一个 - 可由浏览器加载。
在使用 webpack 构建的典型应用程序或站点中,有三种主要的代码类型:
(1)你编写的源码。
(2)你的源码会依赖的任何第三方的 library 或 "vendor" 代码。
(3)webpack 的 runtime 和 manifest,管理所有模块的交互。

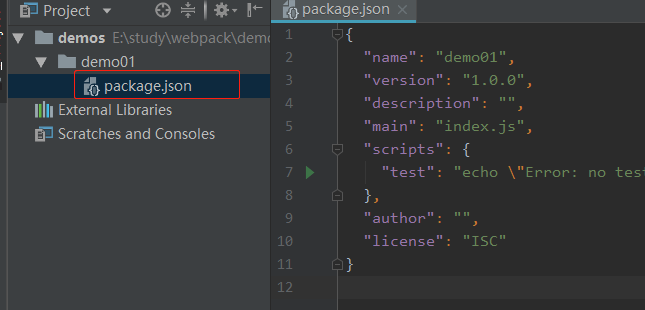
npm init命令执行后,会在目录下生成一个package.json文件,如下图所示:


安装完成后,附带生成的package-lock.json 文件的作用是:锁定安装时的包的版本号,并且需要上传到git,以保证其他人在npm install时大家的依赖能保证一致。
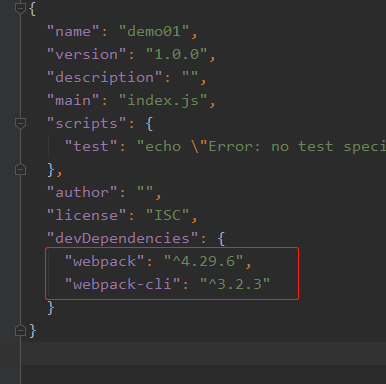
如果你使用 webpack 4+ 版本,你还需要安装 CLI。(此工具用于在命令行中运行 webpack)
src 文件夹,一个 dist文件夹。 src 文件夹中创建一个 index.js 文件, dist 文件夹中创建一个 index.html 文件。
index.js 文件内容如下:
import _ from 'lodash';

function component () {
  var ele = document.createElement('div');
  ele.innerHTML = _.join(['Hello', 'webpack'], ' ')
  return ele;
}

document.body.appendChild(component())
index.html 文件内容如下:
<!doctype html>
<html lang="en">
<head>
    <meta charset="UTF-8">
    <meta name="viewport"
          content="width=device-width, user-scalable=no, initial-scale=1.0, maximum-scale=1.0, minimum-scale=1.0">
    <meta http-equiv="X-UA-Compatible" content="ie=edge">
    <title>Document</title>
</head>
<body>
<script src="main.js"></script>
</body>
</html>
index.js 文件做的事情就是:
1)创建一个 div ;
2)给这个 div 插入一段内容:'Hello webpack';
3)将这个div 插入 body 中。
index.html 文件只是链接了一个同级目录下的 main.js 文件。
npx webpack 执行打包。
执行npx webpack,会将我们的脚本 src/index.js 作为 入口起点,也会生成 dist/main.js 作为 输出。Node 8.2/npm 5.2.0 以上版本提供的 npx 命令,可以运行在初始安装的 webpack 包(package)的 webpack 二进制文件(./node_modules/.bin/webpack)。
npx webpack 命令执行后,dist下将会生成一个 main.js文件:

也可以用 node_modules\.bin\webpack命令来执行默认的打包:

同样也会在 dist 目录下生成 main.js 文件。

这样,我们就实现了一个默认的打包。
下面用配置文件的方式来实现上面的打包。
先在项目根目录下创建一个webpack 配置文件:webpack.config.js,内容如下:
const path = require('path');

module.exports = {
  entry: './src/index.js',
  output: {
    path: path.resolve(__dirname, 'dist'),
    filename: 'bundle.js'
  }
}
设置了 webpack.config.js 这个配置文件之后,我们执行 node_modules.bin\webpack 命令,将会在 dist 文件夹下打包生成一个 bundle.js 的文件:


可以看到,虽然跟第3步用的是同一个命令,但是却不再是生成默认的 main.js 文件了,而是将按照 webpack.config.js 这个配置文件来进行打包了。
还可以使用下面的命令:


使用npm脚本命令替代CLI方式:


这时将index.html 文件中的main.js换成 bundle.js ,再在浏览器中运行index.html文件,仍然可以看到'Hello webpack',说明 bundle.js是正确打包了 index.js 文件中的内容。

备注:使用npm的scripts,它会自动先去找本地安装的npm包,如果没有找到,就会去全局环境中找。
当 webpack 打包源代码时,可能会很难追踪到错误和警告在源代码中的原始位置。例如,如果将三个源文件(a.js, b.js 和 c.js)打包到一个 bundle(bundle.js)中,而其中一个源文件包含一个错误,那么堆栈跟踪就会简单地指向到 bundle.js。这并通常没有太多帮助,因为你可能需要准确地知道错误来自于哪个源文件。
为了更容易地追踪错误和警告,JavaScript 提供了 source map 功能,将编译后的代码映射回原始源代码。如果一个错误来自于 b.js,source map 就会明确的告诉你。
在webpack的配置文件中配置source maps,需要配置devtool。它有很多种不同的配置选项,不同的值会明显影响到构建(build)和重新构建(rebuild)的速度。
未设置 devtool 时的 Sources 目录结构:

devtool设置为inline-source-map:

devtool设置为inline-source-map时的目录结构:

现在,让我们来做一些调试。
export default function printMe() {
  console.log('I get called from print.js!');
}
2、然后在index.js 文件中导入这个文件中的 printMe方法,并且执行这个方法:

3、打包,在浏览器中运行index.html文件,如下:
控制台中将打印信息'I get called from print.js!':

4 现在,我们在 print.js 文件中生成一个错误:
export default function printMe() {
  // console.log('I get called from print.js!');
  cosnole.error('I get called from print.js!')
}
运行 npm run build,就会编译为如下:

现在在浏览器打开最终生成的 index.html 文件,在控制台查看显示的错误。错误如下:

我们可以看到,此错误包含有发生错误的文件(printMe.js)和行号(3)的引用。这是非常有帮助的,因为现在我们知道了,所要解决的问题的确切位置。
每次要编译代码时,手动运行 npm run build 就会变得很麻烦。
webpack 中有几个不同的选项,可以帮助你在代码发生变化后自动编译代码:
webpack-dev-server 为你提供了一个简单的 web 服务器,并且能够实时重新加载(live reloading)。
1、安装 webpack-dev-server

2、配置文件中添加 devServer 选项的配置
| devServer的配置选项 | 功能描述 |
|---|---|
| contentBase | 默认webpack-dev-server会为根文件夹提供本地服务器,如果想为另外一个目录下的文件提供本地服务器,应该在这里设置其所在目录 |
| port | 设置默认监听端口,如果省略,默认为8080 |
| inline | 设置为true,当源文件改变时会自动刷新页面 |
| historyApiFallback | 在开发单页应用时非常有用,它依赖于HTML5 history API,如果设置为true,所有的跳转将指向index.html(任意的 404 响应都可能需要被替代为 index.html) |

3、在package.json中添加 start 命令:

4、执行 npm start 命令打包:

此时,程序已经运行在 localhost:8082 上,当改变源文件内容时,页面将自动更新,不必重新打包。

Loaders是webpack提供的最激动人心的功能之一。
loader 用于对模块的源代码进行转换。loader 可以使你在 import 或"加载"模块时预处理文件。因此,loader 类似于其他构建工具中“任务(task)”,并提供了处理前端构建步骤的强大方法。loader 可以将文件从不同的语言(如 TypeScript)转换为 JavaScript,或将内联图像转换为 data URL。loader 甚至允许你直接在 JavaScript 模块中 import CSS文件!
示例
例如,你可以使用 loader 告诉 webpack 加载 CSS 文件,或者将 TypeScript 转为 JavaScript。为此,首先安装相对应的 loader:
npm install --save-dev css-loader
npm install --save-dev ts-loader
然后指示 webpack 对每个 .css 使用 css-loader ,以及对所有 .ts 文件使用 ts-loader:
webpack.config.js

使用 loader
在你的应用程序中,有三种使用 loader 的方式:
配置[Configuration]
module.rules 允许你在 webpack 配置中指定多个 loader。 这是展示 loader 的一种简明方式,并且有助于使代码变得简洁。同时让你对各个 loader 有个全局概览:

Loaders的配置包括以下几方面:
(1)test:一个用以匹配loaders所处理文件的拓展名的正则表达式(必须)
(2)use:loader的名称(必须)
(3)include/exclude:手动添加必须处理的文件(文件夹)或屏蔽不需要处理的文件(文件夹)(可选);
webpack提供两个工具处理样式表,css-loader 和 style-loader,二者处理的任务不同,
二者组合在一起使你能够把样式表嵌入webpack打包后的JS文件中。
| 作用 | |
|---|---|
| css-loader | 加载.css文件 |
| style-loader | 配合css-loader使用 ,以<style></style>形式在html页面中插入css代码 |
| style-loader/url , 以link标签形式向html页面中插入代码,采用这种方式需要将css-loader变为file-loader,但这种方式不推荐,因为如果在一个js文件中引入多个css文件会生成多个link标签,而html每个link标签都会发送一次网络请求,所以这种方式并不建议。 |
1、 先安装 style-loader/css-loader

2、在配置文件webpack.config.js中进行配置:

3、在 /src 中添加 style.css 文件
style.css 文件的内容为:
div {
    background: red;
}
4、修改index.js文件,在index.js中导入 style.css ,index.js 文件的内容如下:

这时浏览器中的显示如下:

备注:loader 的加载顺序是从右往左。这里的编译顺序是先用 css-loader 将 css 代码进行编译,再交给 style-loader 插入到网页里面去。所以 css-loader 在右, style-loader 在左。否则会报错。
file-loader 和 url-loader 可以接收并加载任何文件,然后将其输出到构建目录。这就是说,我们可以将它们用于任何类型的文件,包括字体。
1、安装 file-loader

2、修改配置文件

3、引入图片
在 src 文件夹下新增logo.png 文件:

index.js 文件中新增一个 img 元素,将它插入 div 元素的后面,如下:

4、npm run build 打包
默认情况下,生成的文件的文件名就是文件内容的 MD5 哈希值并会保留所引用资源的原始扩展名。

页面效果如下:

url-loader 功能类似于 file-loader,但是在文件大小(单位 byte)低于指定的限制时,可以返回一个 DataURL。
1、安装 url-loader

2、修改配置文件

3、打包 npm run build,发现dist目录下并没有生成图片文件,在页面中查看,可以看到图片被转化为了DataURL(因为logo.png图片的大小<12288 12K)。


1、安装 xml-loader

2、修改配置文件

3、src 文件夹下添加 data.xml文件,内容如下:

<book>
    <name>JavaScript</name>
    <content>It's a perfect book.</content>
</book>
4、index.js 文件中引入 data.xml,将它的内容打印到控制台中:

5、打包之后,控制台中可以看到 xml 文件内容已经转成 js 对象:

插件(Plugins)是用来拓展Webpack功能的,它们会在整个构建过程中生效,执行相关的任务。
Loaders和Plugins常常被弄混,但是他们其实是完全不同的东西,可以这么来说,loaders是在打包构建过程中用来处理源文件的(JSX,Scss,Less..),一次处理一个,插件并不直接操作单个文件,它直接对整个构建过程起作用。
Webpack有很多内置插件,同时也有很多第三方插件,可以让我们完成更加丰富的功能。
这个插件的作用是依据一个简单的index.html模板,生成一个自动引用你打包后的JS文件的新index.html。这在每次生成的js文件名称不同时非常有用(比如添加了hash值)。
1、安装 html-webpack-plugin

2、修改配置文件


3、删除整个 dist 文件夹,或者删除 dist/index.html 文件
4、npm run build 打包。
打包之后,会自动生成一个dist文件夹,里面会自动生成 index.html 文件和 bundle.js文件。打开 index.html,你就会看到 HtmlWebpackPlugin 创建了一个全新的文件,所有的 bundle 会自动添加到 html 中。
由于过去的指南和代码示例遗留下来,导致我们的 /dist 文件夹相当杂乱。webpack 会生成文件,然后将这些文件放置在 /dist 文件夹中,但是 webpack 无法追踪到哪些文件是实际在项目中用到的。
通常,在每次构建前清理 /dist 文件夹,是比较推荐的做法,因此只会生成用到的文件。
1、安装clean-webpack-plugin

2、修改配置文件


3、重新打包,可以看到webpack会清理 /dist 文件夹,然后生成新的文件到/dist。
重新打包之前:

打包之后:

A modern JavaScript utility library delivering modularity, performance & extras.
这是一个具有一致接口、模块化、高性能等特性的 JavaScript 工具库。
参考网站:
最近,我们的im-h5升级到了V1.2.2,于是在微信公众号中嵌入的页面也需要进行升级。在项目测试的过程中,遇到了几个问题,现把这几个问题和它的解决方法记录一下,方便以后回忆。
如果“返回”按钮是自己页面的内容,这个很容易实现。问题是H5页面嵌入微信后,我们H5页面中所有的返回按钮全部去掉了,因为微信APP中有“返回”按钮,页面的后退就用微信APP提供的这个“返回”按钮。问题就出在这里,因为这个“返回”按钮它的逻辑就是简单的go(-1)。应该是从history对象中读取访问过的路径,每次点“返回”,就默认返回到history中记录的前一个路径。
比如我先添加了一份报告,这份报告是亲友报告,页面会跳转到亲友报告,然后我在亲友报告中将这份报告又解绑了,这个流程的页面流转路径如下:
reportHome
   ↓
addReport
   ↓ 添加一份报告到“亲友报告”
relativesAndFriendsReport
   ↓
reportContent
   ↓ 点“解绑”
relativesAndFriendsReport
   ↓ 点“返回”
上面的流程,QA期望是要返回到我的报告(reportHome)。而当时我的relativesAndFriendsReport.controller.js中监听路由的state变化是这么写的:
this.$scope.$on('$stateChangeStart', (()=> {
      if (this.$window.sessionStorage.getItem('readyBackToReportHome') == 1 && this.$window.sessionStorage.getItem('from') == 6 ) {
        this.$state.go('reportHome'); //从“亲友报告”回到“我的报告”
      }
    }));
写的是只要满足跳回reportHome的条件,$stateChangeStart触发时,就跳转回reportHome。
但实际情况是,在relativesAndFriendsReport页面点“返回”,返回到了addReport,并且控制台报错:
RangeError: Maximum call stack size exceeded
翻译过来就是:最大调用栈大小溢出。 也就是说出现了循环调用异常的错误。后来我跟踪了一下日志,发现问题出在我上面写的$stateChangeStart事件的监听上。
当我在亲友报告页面点“返回”,会触发$stateChangeStart这个事件,然后下面的条件满足,于是执行了this.$state.go('reportHome'); 这条语句,但是同时又会触发$stateChangeStart,然后下面的条件还是满足,于是又执行了this.$state.go('reportHome');,所以出现了循环调用,所以报出了上面的错误。
为了解决这个问题,我做了下面的改进:
this.emitStateChangeStartLimitCount = 1; //设置属性emitStateChangeStartLimitCount ,初始值为1
this.$scope.$on('$stateChangeStart', (()=> {
      if (this.$window.sessionStorage.getItem('readyBackToReportHome') == 1 && this.emitStateChangeStartLimitCount == 1 ) {
        this.emitStateChangeStartLimitCount--;
        this.$state.go('reportHome'); //从“亲友报告”回到“我的报告”
      }
    }));
进入controller时,先给this创建一个属性emitStateChangeStartLimitCount ,初始值为1;当点“返回”,$stateChangeStart 事件被触发,这时下面的条件是满足的,于是执行this.$state.go('reportHome')这条语句,同时this.emitStateChangeStartLimitCount自减1,变为了0. 然后$stateChangeStart 事件又被触发,但现在下面的条件中this.emitStateChangeStartLimitCount == 1 这个条件不满足了,于是这样就避免了循环调用循环触发的情况。
reportHome
   ↓
addReport
   ↓ 添加一份报告到“亲友报告”
relativesAndFriendsReport
   ↓
reportContent
   ↓ 点“解绑”
relativesAndFriendsReport
   ↓ 点“返回”
此时,不报循环调用的错误了。但是,在上面的流程中,在relativesAndFriendsReport中点“返回”还是返回不到reportHome,具体是跳到哪儿了,或者报什么错了,我不记得了。后来我做了下面的变动:
this.emitStateChangeStartLimitCount = 1;
this.$scope.$on('$stateChangeStart', ((ev, toState, toParams, fromState)=> {
      this.$log.debug('亲友报告=4=');
      this.$log.debug('ev', ev);
      this.$log.debug('toState', toState);
      this.$log.debug('toParams', toParams);
      this.$log.debug('fromState', fromState);
      if (this.$window.sessionStorage.getItem('readyBackToReportHome') == 1 && this.emitStateChangeStartLimitCount == 1 ) {
        this.$log.debug('亲友报告=5=');
        this.emitStateChangeStartLimitCount--;
        toState.url='/report/reportHome';
        toState.templateUrl='app/mine/report/reportHome/reportHome.html';
        toState.controller='ReportHomeController';
        toState.controllerAs='reportHome';
        toState.name='reportHome';
        this.$state.go('reportHome'); //从“亲友报告”回到“我的报告”
      }
    }));
通过打印出ev, toState, toParams, fromState,知道了这些对象的结构是怎样的,然后只要满足直接跳回reportHome的条件,就直接设置toState对象为reportHome的相关信息,这样,在relativesAndFriendsReport页面点“返回”确实可以返回到reportHome。
reportHome
   ↓
addReport
   ↓ 添加一份报告到“亲友报告”
relativesAndFriendsReport
   ↓
reportContent
   ↓ 点“解绑”
relativesAndFriendsReport
   ↓ 点“返回”
通过上面的修改,在relativesAndFriendsReport页面点“返回”确实可以返回到reportHome。但是,在reportHome再点进去relativesAndFriendsReport,然后再点“返回”,控制台就报错:No such state 'reportHome',并且页面停留在relativesAndFriendsReport,不发生跳转,再点“返回”,页面也不跳转,控制台也不报错,也不打印任何日志,再点“返回”,能跳回到reportHome,但再点“添加报告”,页面无反应,不能跳转到添加报告addReport页面去。这个流程如下:
reportHome
   ↓
addReport
   ↓ 添加一份报告到“亲友报告”
relativesAndFriendsReport
   ↓
reportContent
   ↓ 点“解绑”
relativesAndFriendsReport
   ↓ 点“返回”
**页面实际跳转到了reportHome,
但是url中的state是reportContent**
   ↓ 点“亲友报告”
relativesAndFriendsReport
   ↓ 点“返回”
页面停留在relativesAndFriendsReport,
控制台报错“No such state 'reportHome'”,
url中state变为reportContent
   ↓ 点“返回”
页面停留在relativesAndFriendsReport,
控制台不报错,无反应,也不打印日志,
url中state变为relativesAndFriendsReport
   ↓ 点“返回”
页面实际跳转到“我的报告”页面,
但url中state变为addReport
   ↓ 点“添加报告”
页面无反应,
url中state是addReport
   ↓ 点“找回报告”
页面实际跳转到getBackReport,
控制台报错:“No such state 'reportHome'”,
url中state为addReport
从上面的流程看,从第一次从relativesAndFriendsReport到reportHome开始,就开始了一系列的错误。我想是因为我强制设置了toState对象的值为reportHome的相关信息,而它本来包含的是关于reportContent的信息的。
而这个步骤的具体问题是,页面实际跳转到了reportHome,但是url中的state却是reportContent,具体来说这时的页面的url为:
http://uat.im-wechat.ikang.com/?code=001Lkxyn1H8SEl0KE7xn1i2Dyn1LkxyS&state=123#/report/reportContent
所以我想,应该从解决这个步骤的错误开始。我能不能手动地将这个地址变为reportHome?所以我做了如下改动:
this.emitStateChangeStartLimitCount = 1;
this.$scope.$on('$stateChangeStart', ((ev, toState, toParams, fromState)=> {
      this.$log.debug('亲友报告=4=');
      this.$log.debug('ev', ev); // {name: "$stateChangeStart", targetScope: m, defaultPrevented: false, currentScope: m}
      this.$log.debug('toState', toState); //{url: "/report/reportHome", templateUrl: "app/mine/report/reportHome/reportHome.html", controller: "ReportHomeController", controllerAs: "reportHome", name: "reportHome"}
      this.$log.debug('toParams', toParams); // {}
      this.$log.debug('fromState', fromState); // {url: "/report/relativesAndFriendsReport", templateUrl: "app/mine/report/relativesAndFriendsReport/relativesAndFriendsReport.html", controller: "RelativesAndFriendsReportController", controllerAs: "relativesAndFriendsReport", name: "relativesAndFriendsReport"}
      if (this.$window.sessionStorage.getItem('readyBackToReportHome') == 1 && this.emitStateChangeStartLimitCount == 1 ) {
        this.$log.debug('亲友报告=5=');
        this.emitStateChangeStartLimitCount--;
        toState.url='/report/reportHome';
        toState.templateUrl='app/mine/report/reportHome/reportHome.html';
        toState.controller='ReportHomeController';
        toState.controllerAs='reportHome';
        toState.name='reportHome';
     ** var hrefArr = this.$window.location.href.split('#');
        this.$log.debug('hrefArr[0]: ', hrefArr[0]);
        this.$log.debug('hrefArr[1]: ', hrefArr[1]);
        this.$window.location.href = hrefArr[0] + '#' + '/report/reportHome'; //从“亲友报告”回到“我的报告” **
      }
    }));
通过上面的设置,我手动地url变为了reportHome,然后再试后面的操作,实际页面和url中的state都对上了。我打印了toState,发现:
$stateChangeStart被触发
   ↓
'亲友报告=4='
toSate: reportContent
   ↓
'亲友报告=5='
   ↓
'亲友报告=4='
toSate: reportHome
然后我在想,对location.href的设置(设置成reportHome),能不能改变toState为包含reportHome的信息呢?能不能把对toState的显示设置去掉?所以我做了如下改动:
this.emitStateChangeStartLimitCount = 1;
this.$scope.$on('$stateChangeStart', ((ev, toState, toParams, fromState)=> {
      this.$log.debug('亲友报告=4=');
      this.$log.debug('ev', ev); // {name: "$stateChangeStart", targetScope: m, defaultPrevented: false, currentScope: m}
      this.$log.debug('toState', toState); //{url: "/report/reportHome", templateUrl: "app/mine/report/reportHome/reportHome.html", controller: "ReportHomeController", controllerAs: "reportHome", name: "reportHome"}
      this.$log.debug('toParams', toParams); // {}
      this.$log.debug('fromState', fromState); // {url: "/report/relativesAndFriendsReport", templateUrl: "app/mine/report/relativesAndFriendsReport/relativesAndFriendsReport.html", controller: "RelativesAndFriendsReportController", controllerAs: "relativesAndFriendsReport", name: "relativesAndFriendsReport"}
      if (this.$window.sessionStorage.getItem('readyBackToReportHome') == 1 && this.emitStateChangeStartLimitCount == 1 ) {
        this.$log.debug('亲友报告=5=');
        this.emitStateChangeStartLimitCount--;
     ** var hrefArr = this.$window.location.href.split('#');
        this.$log.debug('hrefArr[0]: ', hrefArr[0]);
        this.$log.debug('hrefArr[1]: ', hrefArr[1]);
        this.$window.location.href = hrefArr[0] + '#' + '/report/reportHome'; //从“亲友报告”回到“我的报告” **
      }
    }));
结果证明,是可以的。打印日志如下:
$stateChangeStart被触发
   ↓
'亲友报告=4='
toSate: reportContent
   ↓
'亲友报告=5='
   ↓
'亲友报告=4='
toSate: reportHome
也就是说,将location.href设置成reportHome后,toState也会发生变化,变为reportHome的相关信息。
在测试中发现,如果调接口后,接口返回session失效,code==2,此时,将会执行this.$state.reload(),而这个reload操作也会触发$stateChangeStart事件,从而导致循环跳转同一个页面,又循环触发 $stateChangeStart事件的问题。
为了解决这个问题,我在全局设置了一个标识符: this.globals.wechatParams.reloadAfterChangeSession ,当换取session成功之后,reload当前页面之前,将这个标识符设置为'true',即:
this.globals.wechatParams.reloadAfterChangeSession = 'true';
然后在判断跳转reportHome页面的条件是否满足时,给它加了一个判断条件,只有当 this.globals.wechatParams.reloadAfterChangeSession == 'false' 时,才能去执行跳转reportHome的操作。因为换取session成功之后是要重新加载当前页面(比如重载relativesAndFriendsReport),而不是要返回到reportHome。
所以最后的代码为:
this.emitStateChangeStartLimitCount = 1;
this.$scope.$on('$stateChangeStart', ((ev, toState, toParams, fromState)=> {
      this.$log.debug('亲友报告=4=');
      this.$log.debug('ev', ev); // {name: "$stateChangeStart", targetScope: m, defaultPrevented: false, currentScope: m}
      this.$log.debug('toState', toState); //{url: "/report/reportHome", templateUrl: "app/mine/report/reportHome/reportHome.html", controller: "ReportHomeController", controllerAs: "reportHome", name: "reportHome"}
      this.$log.debug('toParams', toParams); // {}
      this.$log.debug('fromState', fromState); // {url: "/report/relativesAndFriendsReport", templateUrl: "app/mine/report/relativesAndFriendsReport/relativesAndFriendsReport.html", controller: "RelativesAndFriendsReportController", controllerAs: "relativesAndFriendsReport", name: "relativesAndFriendsReport"}
      if (this.$window.sessionStorage.getItem('readyBackToReportHome') == 1 && this.emitStateChangeStartLimitCount == 1 && this.globals.wechatParams.reloadAfterChangeSession == 'false') {
        this.$log.debug('亲友报告=5=');
        this.emitStateChangeStartLimitCount--;
        var hrefArr = this.$window.location.href.split('#');
        this.$log.debug('hrefArr[0]: ', hrefArr[0]);
        this.$log.debug('hrefArr[1]: ', hrefArr[1]);
        this.$window.location.href = hrefArr[0] + '#' + '/report/reportHome'; //从“亲友报告”回到“我的报告”
      }
    }));
工作中做了一个微信开发的项目,即在我们公司的一个服务号中通过服务号的菜单嵌入我们自己的H5系统页面。从最开始的完全懵逼,到很懵逼,到最近几天终于好像把整个流程想清楚了,所以在这里记录一下,方便以后回忆。
首先,微信是一个APP,服务号是微信公众号的一种,它以微信好友的形式展现在微信中。服务号的所有者可以通过服务号向关注它的用户推送消息(每周一次),消息以消息列表的形式展现。
用户也可以与服务号进行交互,用户可以向服务号发送消息,就跟与一个微信好友聊天发送信息一样。服务号所有者可以通过公众平台,设置消息回复模板,也可以选择某一个用户向他发送消息。
点击服务号推送的消息可以看到具体内容。这个消息的网页是由微信提供的,服务号的所有者需要到公众号管理平台(公众平台)编辑推送消息的内容。也就是说这些消息的页面、服务器都是微信提供的。
如果你想让用户在你的服务号中看到你们自己的系统页面,要怎么办呢?因为微信APP中内嵌有浏览器的内核,所以在微信中浏览H5的页面是完全可以实现的。在浏览H5页面方面,你可以这样理解:**微信、微信web开发者工具、chrome本质上是一样的,它们都带有浏览器的内核。**它们向某一个服务器发送一个请求,请求一个页面,服务器接到请求后,将相关页面发送给微信、微信web开发者工具、chrome,然后浏览器内核对拿到的页面进行解析,然后进行展现。
所以你完全可以在微信中直接打开你们系统页面的网址,就可以看到自己系统的页面了(以下简称第三方页面)。当然,微信中没有让你可以输入网址的地址栏,但是如果你把第三方页面地址发到微信聊天窗口中,你就可以点击这个网址,就能打开这个页面了。或者你也可以将第三方页面地址配置到微信服务号底部菜单上,这样你点击菜单,就能打开第三方页面了。
既然这样,在微信中可以直接打开第三方系统的页面,那么我们要实现的目标,即在我们公司的服务号中嵌入我们系统的H5页面就很容易实现了。只要把我们H5页面的地址配到服务号底部菜单上,就一切OK了。这样做,确实可以实现。但是,我们的H5系统是一个需要用户登录的系统,如果调用需要登录的接口,但检测到用户还没有登录,就会跳到登录页面,让用户手动进行登录操作。但是,当把我们系统页面嵌入微信服务号中后,我们希望能实现用户免登录。因为每一个用户针对每一个服务号会产生一个唯一的open_id,我们希望通过这个open_id来自动为用户在我们的系统中创建账户,自动为用户生成用于我们系统登录的access_token。当session超时或者access_token超时时,我们自动为用户换取新的session和刷新access_token,这样就不会出现跳到登录页面让用户手动去登录的情况,即实现用户“免登录”。
如果简单地把我们系统的页面配置到服务号菜单上,显然是不能实现免登录的。因为这样会跟在浏览器中访问我们系统的页面一样,会跳转到登录页面。为了实现免登录,关键的一点就是:拿到用户针对这个服务号的open_id。
怎么拿到open_id?需要调微信的两个接口。第一个接口是由前端发起,拿到code;第二个接口是由server端发起,用code拿到open_id。所以,在服务号菜单上配置的地址是调微信服务器的第一个接口的地址,而不是我们系统页面的地址。第一个接口发起调用后,微信服务器会生成一个code,回调到第一个接口中配置的redirect_uri参数对应的地址,并将code带在后面。我设置的redirect_uri是wechatLoading页面,这样就会重定向到我的wechatLoading页面。
在wechatLoading页面中,我再调server端的一个接口,将拿到的code传给server端,server端调微信网页授权流程第二步中的接口,拿到open_id。然后将open_id传给统一用户端,统一用户端拿到以后就可以用它来为用户创建账户了。
所以,其实在微信中嵌入我们系统的页面和在浏览器中运行我们系统的页面没有本质上的差别,只是在微信中需要去调微信的两个接口,拿到open_id,为用户创建账户,实现免登录。
在我们的这个系统中,还有一个需求,就是使用微信支付。这也是两者之间的一个差别。在我们原来H5系统中,没有微信支付这一项。而在微信嵌入页面中,需要采用微信支付。
微信支付其实也就是多了这么几件事:
先引入一个JS-SDK;
通过wx的config接口注入权限验证配置;
支付时需要把数据进行加密,这个加密需要在server端进行,所以需要调一个server端的接口;
调一个统一用户端的接口,将支付需要的相关数据传给统一用户端,然后统一用户端将一些下一步调wx支付接口时需要的数据响应回来;
调wx的chooseWXPay接口,实现微信支付。
由此看出,其实在微信服务号中嵌入第三方网页和在浏览器中直接访问真的没有本质差别。只不过是前者多调了几个接口而已。
想要调微信的接口后,能正常回调到你设置的redirect_uri页面,要想正常调用微信开发的JS接口,比如调微信的支付接口、分享接口等等,我们还需要在公众平台里面做一些设置。
在公众平台的 公众号设置 --> 功能设置 --> 网页授权域名 里,设置你的网页授权域名。在菜单上配置的地址,即调的微信的获取code的接口中,有一个redirect_uri,也就是重定向页面地址,也可以叫回调页面地址,这个回调页面就必须在这个 网页授权域名 下,以确保安全可靠。网页授权域名只能设置一个,也就是说,比如我现在服务号的公众平台已经设置了一个a网页授权域名,现在已经上线了,我现在要更新一下系统的功能,在正式上线之前,我要做一下测试,那我就没办法用同一个公众号进行测试。测试我不能把测试页面放在正式环境下吧?那要放在别的域名下,这个域名又不能配置成网页授权域名。所以我的解决方案就是,新申请一个服务号,在这个服务号中,把网页授权域名 设置成测试的系统域名,用这个新服务号来做测试。
在公众平台的 公众号设置 --> 功能设置 --> JS接口安全域名 里,设置系统的域名为JS接口安全域名。JS接口安全域名的概念就是:公众号开发者可在该域名下调用微信开放的JS接口。因为我要调用微信支付的接口,所以我需要将系统的域名添加到这个里面,具体就是 im-wechat.ikang.com。这个域名可以设置三个。
在公众平台的 微信支付--> 开发配置 --> 支付授权目录 下,需要将你调用微信支付接口的页面所在的目录设置到这里。比如说我系统中微信支付的页面在 http://im-wechat.ikang.com/#/appointment/payStyle,那么这里我就需要设置成 http://im-wechat.ikang.com/#/appointment/。这个目录的概念也是为了安全起见,只有当你的支付页面在这个设置的目录下时,微信才允许你发起支付,否则不允许发起支付。这个目录也可以设置三个。在实际开发的过程中,我发现,对于IOS和Android系统,同一个支付页面需要在这个配置两个不同的目录。对于IOS系统,我需要配置成 http://im-wechat.ikang.com/#/thirdPart/,对于Android系统,我需要配置成http://im-wechat.ikang.com/#/appointment/。从2016年11月16日中午12点起,因为获取code的接口的回调地址发生了变化,由原来的http://im-wechat.ikang.com/#/thirdPart/wechatLoading?from=6&isappinstalled=0&targetState=packageList&code=XXXXXXXXXXXXXXXXXXXXXXXX&state=123,变为现在的http://im-wechat.ikang.com/?code=XXXXXXXXXXXXXXXXXXXXXXXX&state=123#/thirdPart/wechatLoading?from=6&isappinstalled=0&targetState=packageList 。因为这个回调地址发生了变化,所以这个支付授权目录也要发生变化,否则支付时就报错。现在支付授权目录改为http://im-wechat.ikang.com/#/appointment/和http://im-wechat.ikang.com/ 。
在测试中我还发现,我把A服务号下菜单的配置,原样配置到B服务号下,发现一样可以正常请求、预览、支付,跟在A服务号中一样。这个事实说明:拿open_id调的几个接口和为了实现微信支付调的几个接口只要是在微信环境中就都能正常运行,与在哪个服务号中调用没有关系。
在 微信服务号中嵌入第三方网页 和 在微信web开发者工具访问系统网页 和 在在浏览器中访问系统网页 本质上没有区别,它们都带有浏览器内核,本质上都是通过浏览器内核请求、解析、展现web页面。
以上三者之间的不同就是:前两者都是在微信环境,第三者不是微信环境;第二和第三者都有控制台,可以方便地看到发起的请求、拿到的响应、日志、报错、警告等信息,非常方便于开发,但是第一者没有控制台,利用它来直接开发非常不方便;所以 微信web开发者工具是非常理想的开发工具。
在 微信服务号中嵌入第三方网页只多了两件事:一是调两个微信的接口,拿到open_id,用于实现免登录;二是调微信JS-SDK,引入一个wx对象,调它的几个接口,再调server端和统一用户端的几个接口,实现微信支付。所以,在 微信服务号中嵌入第三方网页和在浏览器中访问系统网页 真没什么不同,说到底就只是前者多调了几个接口而已。
在公众平台中还需要做几个设置:
| 设置名称 | 设置地址 | 作用 | 可设置数量 |
|---|---|---|---|
| 网页授权目录 | 公众号设置-功能设置-网页授权域名 | redirect_uri中设置的页面必须在此域名下,以保证安全 | 1个 |
| JS接口安全域名 | 公众号设置-功能设置-JS接口安全域名 | 公众号开发者可在该域名下调用微信开放的JS接口 | 3个 |
| 支付授权目录 | 微信支付-开发配置-支付授权目录 | 支付请求的链接地址,必须在支付授权目录之下 | 5个 |
拿open_id调的几个接口和为了实现微信支付调的几个接口只要是在微信环境中就都能正常运行,与在哪个服务号中调用没有关系。
原地址:https://github.com/ElemeFE/mint-ui
Mobile UI elements for Vue 2.0
基于Vue 2.0的移动端UI组件库
主页(Homepage)
说明文档(Documentation)
npm i mint-ui -S

# for Vue 1.x
npm i mint-ui@1 -S
Import all components.
导入所有的组件。
import Vue from 'vue'
import Mint from 'mint-ui';

Vue.use(Mint);
Or import specified component. (Use babel-plugin-component)
或者导入指定的组件。(使用babel-plugin-component)
import { Cell , Checklist } from 'mint-ui';

Vue.component( Cell.name , Cell );
Vue.component( Checklist.name , Checklist );
Equals to
等价于
import Vue from 'vue';
import Mint from 'mint-ui';
import 'mint-ui/lib/style.css';

Vue.use(Mint);

//import specified component

import MtRadio from 'mint-ui/lib/radio';
import 'mint-ui/lib/radio/style.css';

Vue.component( MtRadio.name , MtRadio );
Auto import css file
Modular import component
自动导入css文件
模块化导入组件
Installation
安装
npm i babel-plugin-component -D
Usage
使用
.babelrc
{
    "plugins":["other-plugin",["component",[
        { "libraryName" : "mint-ui" , "style" : true }
    ]]]
}
RawGit
NPMCDN
npm run dev
Please make sure to read the Contributing Guide before making a pull request.
请确保在进行pull请求之前阅读贡献代码指南。
MIT
Vue provides an official CLI for quickly scaffolding ambitious Single Page Applications. It provides batteries-included build setups for a modern frontend workflow. It takes only a few minutes to get up and running with hot-reload, lint-on-save, and production-ready builds. See the Vue CLI docs for more details.
npm install -g @vue/cli
# OR
yarn global add @vue/cli
To create a new project, run:
vue create project-name
vue create demo01


cd demo01
npm run serve
Vue CLI >= 3 uses the same vue binary, so it overwrites Vue CLI 2 (vue-cli). If you still need the legacy vue init functionality, you can install a global bridge:
npm install -g @vue/cli-init
# vue init now works exactly the same as [email protected]
vue init webpack my-project
公司项目2.9.0版本中涉及到了增加微信支付方式:公众号支付和H5支付。现在把这段时间开发过程中遇到的问题,及相关思考总结记录一下。
公众号支付就是:商户已有H5商城网站,用户通过消息或扫描二维码在微信内打开网页时,调用微信支付完成下单购买的流程。
说白了就是:在微信浏览器中打开H5网站,调用微信浏览器中自带的微信对象的支付方法来完成支付。
(1)通过isInWeiXinAPP = $window.navigator.userAgent.toLowerCase().search(/MicroMessenger/i) > -1来判断web应用当前是否运行在微信环境中。
(2) 微信网页授权机制中“用户同意授权,获取code”的接口为:https://open.weixin.qq.com/connect/oauth2/authorize?appid=APPID&redirect_uri=REDIRECT_URI&response_type=code&scope=SCOPE&state=STATE#wechat_redirect。其中:
appid为你使用的公众号的appid。这个公众号需要是服务号,并且开通微信支付功能。在开通微信支付功能的时候,会需要你填写公司的相关信息,包括主体信息、银行账号等。开通成功后,会拿到一个商户号。最终通过公众号支付完成的支付,钱是进入了这个商户号对应的银行账号,也就是当时申请开通微信支付时填写的银行账号。
redirect_uri是回调页面地址。即,调完这个接口后,微信会回到这个页面地址,把code作为参数放到这个回调页面地址的url中。
response_type应该是取固定值code。
scope有两种取值:snsapi_base和snsapi_userinfo。
以snsapi_base为scope发起的网页授权,是用来获取进入页面的用户的openid的,并且是静默授权并自动跳转到回调页的。用户感知的就是直接进入了回调页(往往是业务页面)。
以snsapi_userinfo为scope发起的网页授权,是用来获取用户的基本信息的。但这种授权需要用户手动同意,并且由于用户同意过,所以无须关注,就可在授权后获取该用户的基本信息。
在项目中,我发起支付的页面是payStyle,在用户点击微信支付后,我就先判断当前是否运行在微信环境中,如果是,我就调上面的获取code的微信提供的接口,也就是直接将页面的url变为这个接口地址。接口中的回调页面地址redirect_uri我设定的还是payStyle。
微信回调回来的地址类似于: http://newuat.im.ikang.com/?code=011oqnmr1FMo8n0gycnr1PyDmr1oqnmk&state=123#/appointment/payStyle。我拿到code,然后调server端的一个接口,实际上server端是拿着我传给他的code去调用了微信的另一个接口,微信会将这个微信用户针对这个公众号的openid返回给server端,server端再把这个openid返给我。
 callpay() {
    if (typeof WeixinJSBridge == "undefined") { //eslint-disable-line no-undef, angular/module-getter, angular/di
      var self = this;
      if (this.$document[0].addEventListener) {
        this.$document[0].addEventListener('WeixinJSBridgeReady', self.jsApiCall, false);
      } else if (this.$document[0].attachEvent) {
        this.$document[0].attachEvent('WeixinJSBridgeReady', self.jsApiCall);
        this.$document[0].attachEvent('onWeixinJSBridgeReady', self.jsApiCall);
      }
    } else {
      this.jsApiCall();
    }
  }

  jsApiCall() {
    this.isLoading = false;
    var self = this;
    WeixinJSBridge.invoke( //eslint-disable-line no-undef, angular/module-getter, angular/di
      'getBrandWCPayRequest', {
        "appId": self.paramsObj.appId,     //公众号名称,由商户传入
        "timeStamp": self.paramsObj.timeStamp,         //时间戳,自1970年以来的秒数
        "nonceStr": self.paramsObj.nonceStr, //随机串
        "package": self.paramsObj.package,  // 订单详情扩展字符串,统一下单接口返回的prepay_id参数值,提交格式如:prepay_id=***
        "signType": self.paramsObj.signType,         //微信签名方式:
        "paySign": self.paramsObj.paySign //微信签名
      },
      function (res) {
        if (res.err_msg == "get_brand_wcpay_request:ok") { // 使用以上方式判断前端返回,微信团队郑重提示:res.err_msg将在用户支付成功后返回    ok,但并不保证它绝对可靠。
          self.$window.sessionStorage.setItem('payLeave', false);
          self.$state.go('paySuccess');
        }
      }
    );
  }
(1)为什么要延迟两秒才调用callpay?因为在开发中,最开始的时候我没有设置这个延时,拿到接口的相关参数后就直接调callpay,但是发现有的时候能发起支付成功,有的时候不能。后来发现是因为有的时候,执行callpay的时候,WeixinJSBridge对象还没加载完,在检测WeixinJSBridge对象时检测不到,typeof WeixinJSBridge=='undefined',然后会去检测this.$document[0].addEventListener是否存在,检测结果是存在的,于是就会执行this.$document[0].addEventListener('WeixinJSBridgeReady', self.jsApiCall, false);,即给document添加了一个事件'WeixinJSBridgeReady',当'WeixinJSBridgeReady'事件触发的时候,去执行jsApiCall。这个代码是微信官方提供的,我不知道当WeixinJSBridge对象加载完毕之后是否会触发document对象上的'WeixinJSBridgeReady'事件,但我实际测试的时候是没有触发这个'WeixinJSBridgeReady'事件,也没有执行jsApiCall这个方法的。所以,我采取的方法是直接延迟两秒钟后再调用callpay方法,它就会直接去调用jsApiCall方法。
关于这个问题,我在网上查了一下,发现有很多人踩过这个坑。有的人说公众号支付通过WeixinJSBridge这个对象来发起支付不是一个推荐的方法,建议用JS-SDK。这个就是我原来做微信支付时采用的方法。
(2)公众号支付调用的是WeixinJSBridge.invoke这个方法。
H5支付是指商户在微信客户端外的移动端网页展示商品或服务,用户在前述页面确认使用微信支付时,商户发起本服务呼起微信客户端进行支付。
主要用于触屏版的手机浏览器请求微信支付的场景。可以方便地从外部浏览器唤起微信支付。
提醒:H5支付不建议在APP端使用,如需要在APP中使用微信支付,请接APP支付。
登录商户平台-->产品中心-->我的产品-->支付产品-->H5支付
微信官方体验链接:http://wxpay.wxutil.com/mch/pay/h5.v2.php,请在微信外浏览器打开。
判断方法同前公众号支付。
在这个接口中,我会传给server端下面的参数:
this.getSignData = {
        appCode: this.globals.appCode, // 'ikapp-web-dev'
        orderNum: this.orderNum,
        payType: 'WEIXIN',
        terminalType: 'H5',
        redirectUrl: encodeURIComponent(this.$window.location.protocol + '//' + this.$window.location.host + '/#/appointment/payStyle?H5Redirect=1')
      };
其中appCode在统一支付端代表的是一个商户号。redirectUrl表示的是支付完成之后回调的页面地址。这里需要对redirect_url进行urlencode处理。在这里,这个回调地址我写的还是payStyle,也就是说支付完成后还是回到发起支付的这个页面,但是这时会弹出一个弹窗,让用户选择是否已经支付成功。也就是下面这一步。
为什么我这里不直接回调到paySuccess页面呢?因为微信这里回调的操作并不是发生在支付成功之后,这里回调指定页面的操作可能发生在:
1、微信支付中间页调起微信收银台后超过5秒;
2、用户点击“取消支付”或支付完成后点“完成”按钮。
也就是说,回调回来,有可能是已经支付成功了,也有可能是取消支付了,也可能是支付失败了,或者可能根本就没发起支付。比如说,我在PC上Chrome浏览器中模拟手机浏览器,我发起H5支付,因为PC上是不可能调起微信实现H5支付的,所以根本就没有发起支付,但是还是会最终回调到这个回调页面。
因此,无法保证页面回跳时,支付流程已结束,所以我这里设置的redirect_uri地址不能是paySuccess页面,而应该像下面的页面一样弹窗,让用户手动去选择。
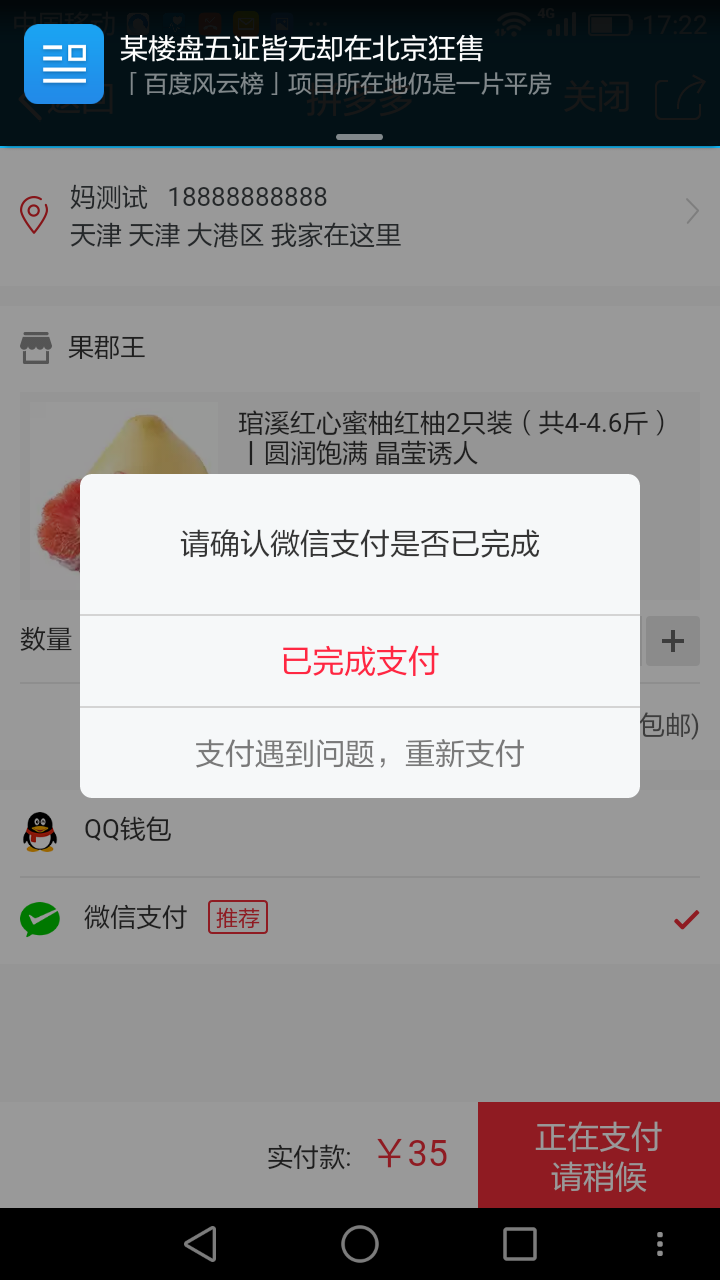
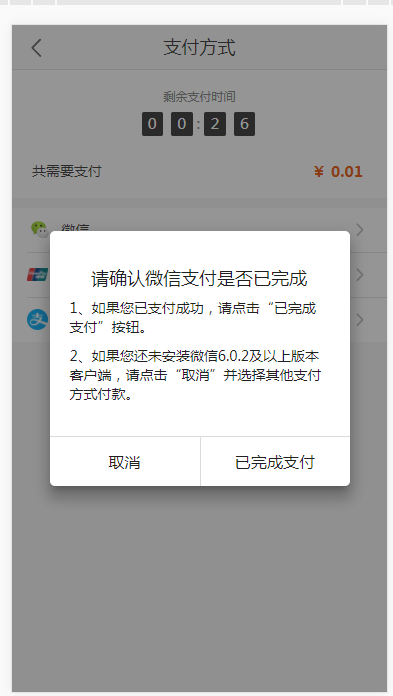
如果:
1、用户确实已经支付了,用户在弹窗中点击了“已完成支付”,用户点击“已完成支付”时,我会去调server端的一个判断当前订单是否已经支付的接口,如果接口告诉我这个订单已经支付,那么我就跳到paySuccess页面;
2、如果用户确实支付了,点击了“已完成支付”,我调server端接口返回的是还没有支付(可能会出现这种情况,因为状态可能会有延时),那么我会弹出一个提示“您的订单还未完成支付,如您已支付完成,请稍后查询。”,然后页面跳转到订单列表页。
3、如果用户没有支付,点击了“已完成支付”,后面的操作同上。
4、如果用户没有支付,点击了“取消”,那么还是留在payStyle页面,让用户可以选择其他的支付方式完成支付。
下面再来总结一下JS-SDK这个方法。
步骤一: 在公众号后台配置相关参数“网页授权域名”、“JS接口安全域名”,在商户后台配置“支付授权目录”。
| 参数名称 | 配置地址 | 意义 | 可配置个数 |
|---|---|---|---|
| 网页授权域名 | 公众号后台-公众号设置-功能设置 | 在获取code的接口中配置的redirect_uri必须在这个域名下 | 1个 |
| JS接口安全域名 | 公众号后台-公众号设置-功能设置 | 调用微信开放的JS接口的页面必须在此域名下 | 3个 |
| 支付授权目录 | 产品中心-开发配置-支付授权目录 | 调起微信支付的页面所在的目录 | 5个 |
步骤二:在需要调用JS接口的页面引入JS-SDK: <script src="https://res.wx.qq.com/open/js/jweixin-1.2.0.js"></script>。
步骤三:通过config接口注入权限验证配置。
所有需要使用JS-SDK的页面必须先注入配置信息,否则将无法调用(同一个url仅需调用一次,对于变化url的SPA的web app可在每次url变化时进行调用,目前Android微信客户端不支持pushState的H5新特性,所以使用pushState来实现web app的页面会导致签名失败,此问题会在Android6.2中修复)。
wx.config({
    debug: true, // 开启调试模式,调用的所有api的返回值会在客户端alert出来,若要查看传入的参数,可以在pc端打开,参数信息会通过log打出,仅在pc端时才会打印。
    appId: '', // 必填,公众号的唯一标识
    timestamp: , // 必填,生成签名的时间戳
    nonceStr: '', // 必填,生成签名的随机串
    signature: '',// 必填,签名
    jsApiList: [] // 必填,需要使用的JS接口列表
});
步骤四:通过ready接口处理成功验证。
          wx.ready(function () {
            wx.checkJsApi({
              jsApiList: ['chooseWXPay'], // 需要检测的JS接口列表,所有JS接口列表见附录2,
              success: function () {
                // 以键值对的形式返回,可用的api值true,不可用为false
                // 如:{"checkResult":{"chooseImage":true},"errMsg":"checkJsApi:ok"}
              }
            });
          });
config信息验证后会执行ready方法,所有接口调用都必须在config接口获得结果之后,config是一个客户端的异步操作,所以如果需要在页面加载时就调用相关接口,则须把相关接口放在ready函数中调用来确保正确执行。对于用户触发时才调用的接口,则可以直接调用,不需要放在ready函数中。
步骤五:通过error接口处理失败验证。
wx.error(function(res){
    // config信息验证失败会执行error函数,如签名过期导致验证失败,具体错误信息可以打开config的debug模式查看,也可以在返回的res参数中查看,对于SPA可以在这里更新签名。
});
最开始我用JS-SDK实现了微信支付的时候,公司就经常提出这样的需求:某一个web应用现在需要开通微信支付,能不能利用我之前的微信支付的代码来快速实现?当时我真的没想明白,有没有实现这种需求的可能性?今天结合最近做的公众号支付和H5支付好好思考了一下。
首先,我想做一个微信支付的公共模块,具体是一个怎样的应用场景?应该是有了一个web应用,比如说域名是m.abc.com,然后希望开通微信支付功能。
1、那么首先它一定是没有自己的服务号的。因为如果它有自己对应的服务号,那么就可以开通微信支付功能,就可以在自己公众号的后台配置“网页授权域名”等,完全可以自己开发,没必要用现有的我的这个微信支付模块。就是因为它没有自己的服务号,他们想用我的服务号来实现。
2、如果要复用我的微信支付模块,有一个前提是这个系统的微信支付需要支付到我现在的微信支付对应的商户号中。因为,由上一点,他们要复用我的服务号,因为一个服务号开通微信支付功能后会有一个商户号,一个商户号对应一个银行账号。也就是说,如果别的web应用要复用我的微信支付模块,钱是会打到跟我们同一个商户号中,同一个银行账号中。
3、既然是要用同一个公众号来实现微信支付,那么因为公众号后台中“网页授权域名”只能配置一个,网页授权域名的意义是当进行网页授权获取用户openid时,调微信接口获取code时的回调页面必须在这个域名下。也就是说,新的web应用发起微信支付的页面可以是在自己的系统中,在自己的域名下的页面,但是获得code后的回调页面必须是我的web应用中的页面,比如说我的域名是 m.publicModule.com,那么在我的公众号中“网页授权域名”就是m.publicModule.com,m.abc.com这个web应用的发起支付的页面可以在它自己的系统中,但是回调页面必须在m.publicModule.com下。所以说,我可以做一个公共的回调页面,假设这个公共的回调页面为m.publicModule.com/weiXinPay。那么在这个回调页面中需要做一些什么事情呢?下面先列举一下我的系统中这个页面做了哪些事情。(以公众号支付为例)
(1)从url中拿到code。
(2)调server端的接口getOpenIdForIkangGuoBin拿到该微信用户针对该公众号的openid。这个接口传参和响应如下:
| 传参 | 响应 |
|---|---|
| code | openid |
(3)调server端的支付接口getPaymentData,拿到调用微信对象的支付方法WeixinJSBridge.invoke需要的参数。这个接口传参和响应如下:
| 传参 | 值 |
|---|---|
| appCode | 'ikapp-web-dev' |
| orderNum | this.orderNum |
| payType | 'WEIXIN' |
| terminalType | 'WAP' |
| openid | data.results[0] |
| 响应 | 说明 |
|---|---|
| appId | //公众号名称,由商户传入 |
| timeStamp | //时间戳,自1970年以来的秒数 |
| nonceStr | //随机串 |
| package | // 订单详情扩展字符串,统一下单接口返回的prepay_id参数值,提交格式如:prepay_id=*** |
| signType | //微信签名方式 |
| paySign | //微信签名 |
(4)调用WeixinJSBridge.invoke,实现公众号支付。
WeixinJSBridge.invoke( //eslint-disable-line no-undef, angular/module-getter, angular/di
      'getBrandWCPayRequest', {
        "appId": self.paramsObj.appId,     //公众号名称,由商户传入
        "timeStamp": self.paramsObj.timeStamp,         //时间戳,自1970年以来的秒数
        "nonceStr": self.paramsObj.nonceStr, //随机串
        "package": self.paramsObj.package,  // 订单详情扩展字符串,统一下单接口返回的prepay_id参数值,提交格式如:prepay_id=***
        "signType": self.paramsObj.signType,         //微信签名方式:
        "paySign": self.paramsObj.paySign //微信签名
      },
      function (res) {
        if (res.err_msg == "get_brand_wcpay_request:ok") { // 使用以上方式判断前端返回,微信团队郑重提示:res.err_msg将在用户支付成功后返回    ok,但并不保证它绝对可靠。
          self.$window.sessionStorage.setItem('payLeave', false);
          self.$state.go('paySuccess');
        }
      }
    );
以上4个工作是我在我的回调页面中实现公众号支付所做的事情。
那么如果我把weiXinPay作为一个公用的回调页面的话,以上的工作中,有哪些工作是必须放在weiXinPay中做的?有哪些工作是应该放在各自的web应用中做的?
首先,第(1)个工作(从url中拿到code)肯定是在weiXinPay中完成的,拿到之后,可以跳转到别的web应用中,比如跳转到m.abc.com中的某个页面,将这个code作为url中的参数传过去。
第二,第(2)和第(3)个工作(调server端接口拿openid和调server端接口拿调微信支付接口所需参数)我觉得应该放在各自的系统中进行,不在公共模块中进行。比如说获取微信支付接口所需参数这个接口,里面有一些个性化的参数(如orderNum ),我觉得各个web应用系统是不能通用的,应放在各自的应用中处理。
第三,第(4)个工作(调用WeixinJSBridge.invoke,实现公众号支付)必须放在weiXinPay中完成。因为,这是调用了微信开放的JS接口,即微信支付接口,而微信规定调用微信开放的JS接口的页面的域名必须是“JS接口安全域名”中配置的域名。这个“JS接口安全域名”是在公众号后台配置的,最多配置3个。如果把这个工作放在各自的web应用系统中,那么最多配置3个web应用系统的域名,那就不能称之为公共模块了,为了能适用无数个web应用实现微信支付,这个工作必须在公共模块weiXinPay中完成。
另外还有一个原因:商户后台配置了一个“支付授权目录”,最多可以配置5个URL。微信规定,调用微信支付接口的页面必须在这个“支付授权目录”下。也就是说,如果要实现公用,可以同时让多个web应用都用这个公众号实现微信支付的话,这些web应用的调用微信支付接口的页面只能是一个,也就是weiXinPay。
由上可以看出,按这种设想的话,WeixinJSBridge.invoke方法需要的参数(appId、timeStamp、nonceStr、package、signType、paySign)需要由别的web应用页面跳转到公共页面weiXinPay时传过来。怎么传过来呢?目前我知道的只有通过url,作为url中的参数带过来。这里就有问题了,这些参数通过url传递安全吗?这些参数有时效性吗?
如果这些都没有问题的话,那么我觉得以上的设想,即多个不同域名的web应用通过一个公众号实现微信支付,支付到同一个微信公众号对应的商户号中理论上是可以实现的。
如果我想将我自己在vue项目中创建的组件上传到npm,然后别的项目中想使用同样的组件时,我就可以从npm下载,想要更新也可以很方便,将包的版本更新升级就可以了。那么具体怎么做呢?下面记录下我最近对这部分内容的研究情况。
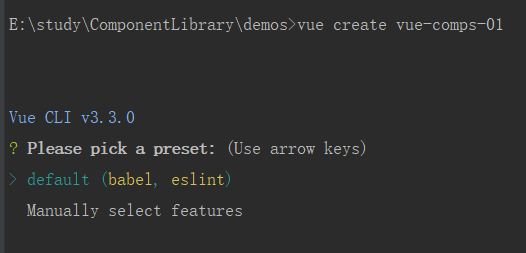
我开始是在网上找基于vue-cli 2的例子,并没有找到尝试成功的。然后看到了一个基于@vue/cli 3的例子,跟着做了以下,成功了。下面记录一下。
@vue/cli npm install @vue/cli -g
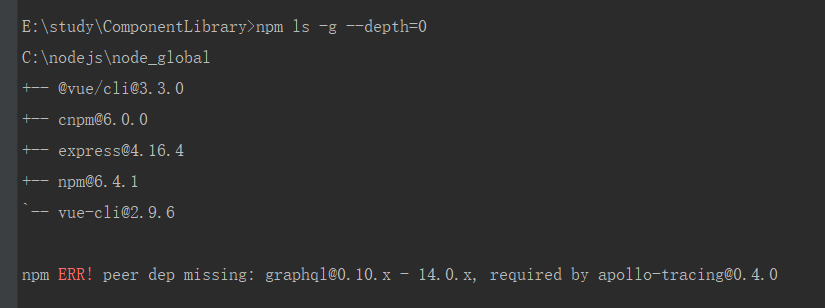
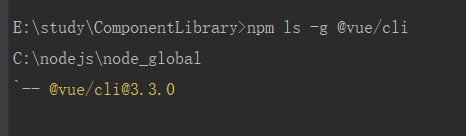
安装成功后,可以使用 npm ls -g --depth=0来查看全局安装的包都有哪些。可以使用npm ls -g @vue/cli来查看安装的@vue/cli的版本是多少。如下图所示:
vue create project-name
如下图所示:
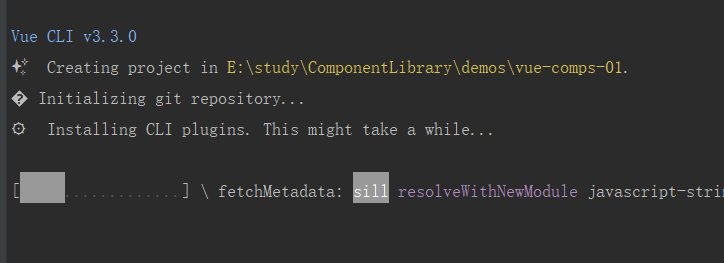
用vue create project-name命令创建脚手架:
脚手架创建中:
脚手架创建完成:
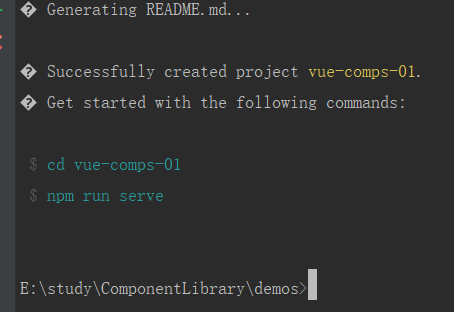
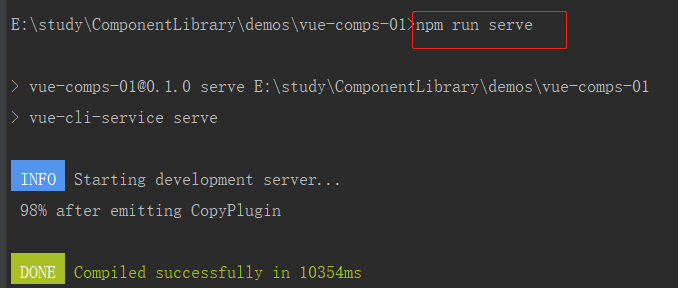
搭建完成之后切换到项目目录 cd vue-comps-01,然后npm run serve,项目运行起来,在8080端口。
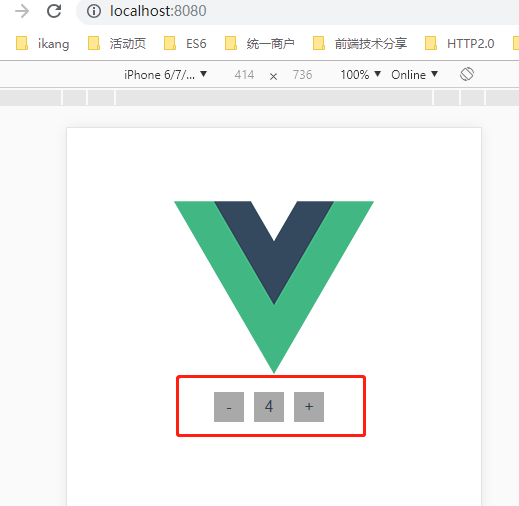
项目搭建好之后,在项目中创建一个自己的组件,比如我这里创建一个叫做Count的组件,实现数字的加减。
Count.vue组件的代码如下:
<template>
    <div class="count">
        <span @click="subtract">-</span>
        <span>{{num}}</span>
        <span @click="add">+</span>
    </div>
</template>

<script>
  export default {
    name: "Count",
    props: ['num'],
    methods: {
      subtract () {
        this.$emit('subtract')
      },
      add () {
        this.$emit('add')
      }
    }
  }
</script>

<style scoped>
    .count span {
        display: inline-block;
        width: 30px;
        height: 30px;
        background: darkgrey;
        text-align: center;
        line-height: 30px;
        margin-right: 10px;
    }

</style>
引用了Count.vue组件的App.vue的代码如下:
<template>
    <div id="app">
        <img alt="Vue logo" src="./assets/logo.png">
        <Count :num="num" @subtract="subtract" @add="add"></Count>
    </div>
</template>

<script>
  import Count from './components/Count.vue'

  export default {
    name: 'app',
    components: {
      Count
    },
    data () {
      return {
        num: 1
      }
    },
    methods: {
      subtract () {
        this.num = this.num - 1
      },
      add () {
        this.num = this.num + 1
      }
    }
  }
</script>

<style>
    #app {
        font-family: 'Avenir', Helvetica, Arial, sans-serif;
        -webkit-font-smoothing: antialiased;
        -moz-osx-font-smoothing: grayscale;
        text-align: center;
        color: #2c3e50;
        margin-top: 60px;
    }
</style>
由上可以看出,这个组件有一个属性num,还有两个方法@subtract和@add,分别对应中间显示的数值,和增加和减少这个值的两个方法。页面效果如下图:
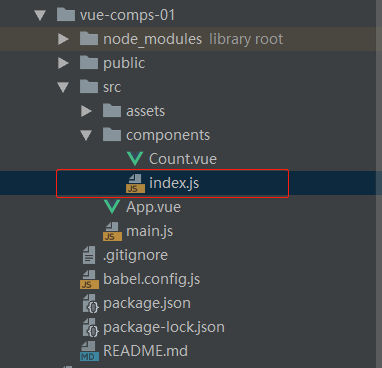
在Count组件的同级目录下创建index.js的入口文件,如下图所示:
index.js 代码如下:
import Vue from 'vue'
import Count from './Count'

const Components = {
  Count
};

Object.keys(Components).forEach(name => {
  Vue.component(name, Components[name])
});

export default Components;
它的作用大概是,将这个组件用Vue.component方法注册到组件中。
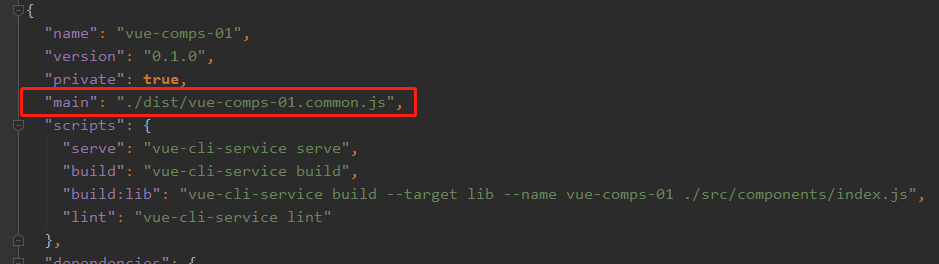
package.json 文件的配置为上传npm包,需要修改的配置项大概有下面几项:
scripts (需要增加打包组件库的脚本)main (用户在引入你的包后,默认引用哪个包文件)files (用户在下载你这个包之后,会有哪些文件夹及文件会被安装到node_modules目录下的包名称下)name (为了避免包名冲突,建议name前面加上 @npm账户名)private (如果是公开发布的包,要设置为 false)如下图所示:

vue-cli-service build --target lib --name vue-comps-01 ./src/components/index.js
这一行命令的意思是:
1)vue-cli-service build 要执行打包操作
2)--target lib 我要打包组件库
3)--name vue-comps-01 这个库的名字叫 vue-comps-01
4) ./src/components/index.js 入口文件是这个
配置完后,可以执行一下 npm run build:lib命令,看下执行结果。
用npm run build:lib打包库成功:
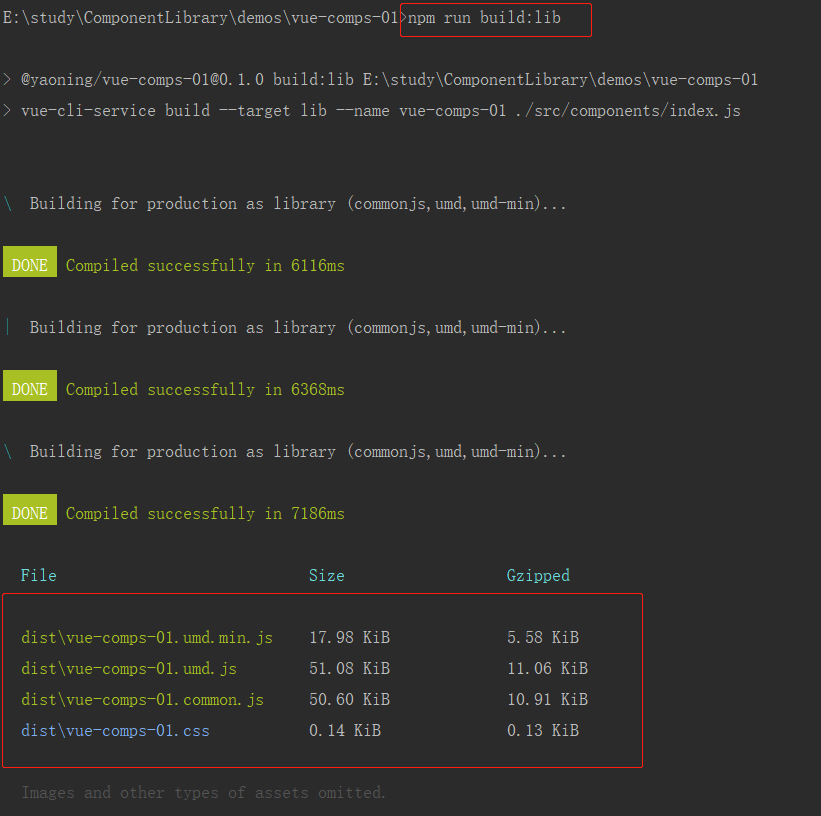
生成的库文件:
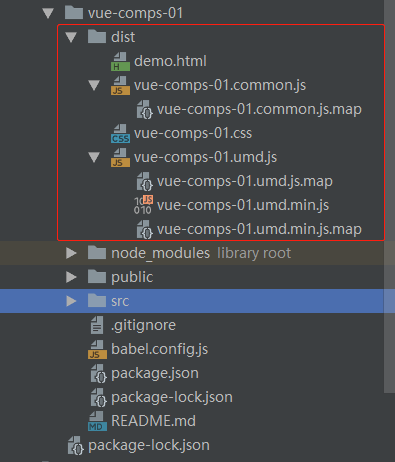
可以看到 build 生成了各种版本可以用于发布的js文件,这里我们选择默认发布我们的 *_.common.js_文件,所以我们在package.json中添加main属性。
指定该属性后,当我们引用该组件库时,会默认加载 main 中指定的文件。
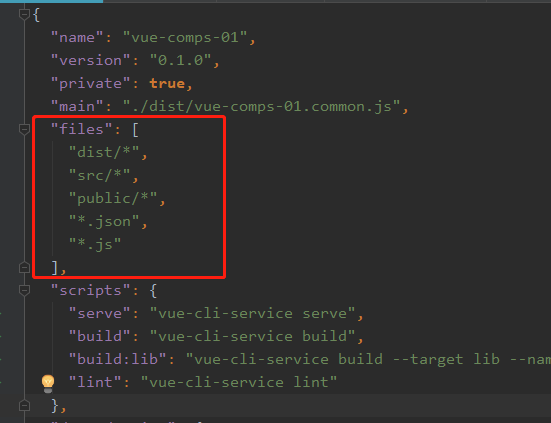
设置 files 属性,来配置我们想要发布到 npm 上的文件路径。
这里我们将用户引用我们的组件库可能用到的所有文件都放进来:
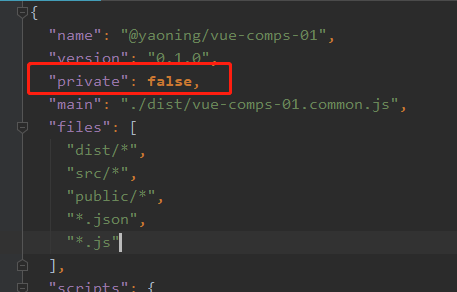
在发布之前,我们修改一下项目的名称(注意不要和已有项目名称冲突),推荐使用 @username/projectName 的命名方式。

如果 private 为 true,则该库是私有库,别人无法下载。
首先,要注册一个npm账号。可以到 npmjs.com 网站上进行注册。
有账号之后,可以使用 npm login登录注册号的状态。
登录后可以使用 npm whoami查看登录状态。
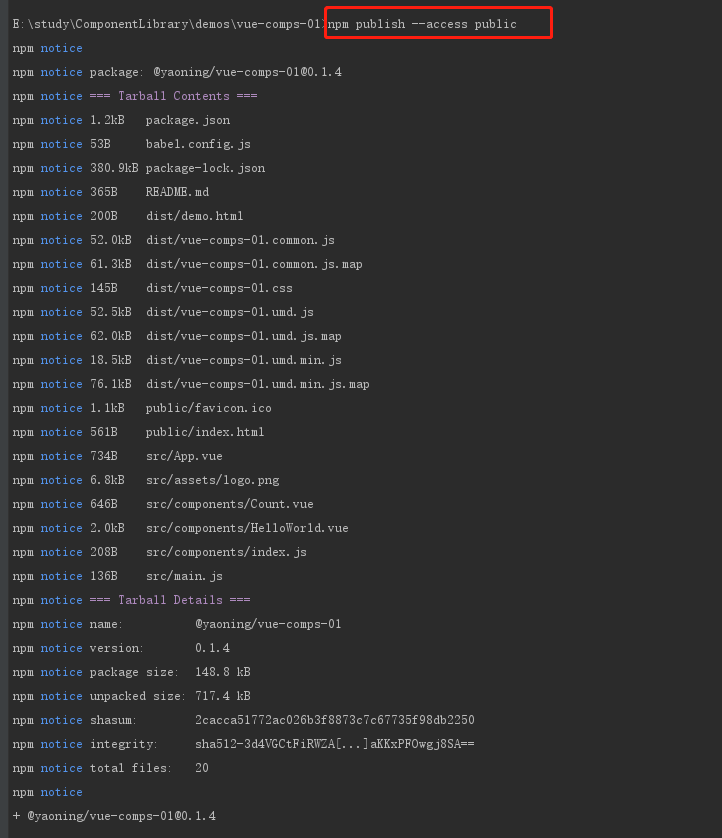
接下来就可以发布我们的UI组件库了,在发布之前,我们再编译一次,让build出的文件为我们最新的修改:
npm run build:lib
我们使用下面的命令发布我们的项目:
npm publish --access public
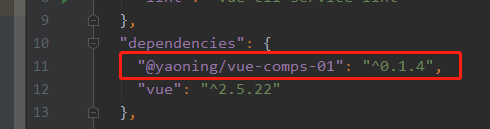
需要注意的是:package.json中指定的version属性:每次更新组件库,都需要更新一下version。
这样,我们就完成了我们的UI组件库的发布:
发布成功之后,可以在npm网站上看到我们发布的包:
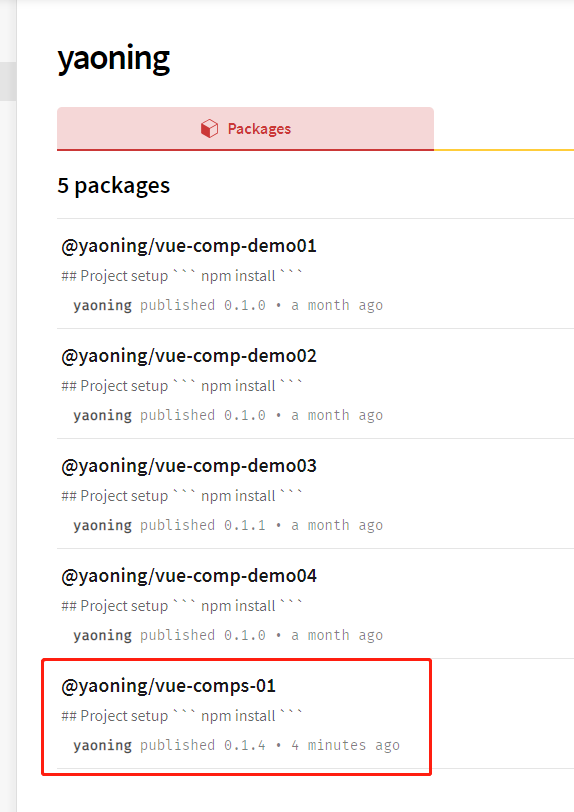
接下来,我们可以在任何需要使用到该组件库的项目中使用。
npm install --save @yaoning/vue-comps-01

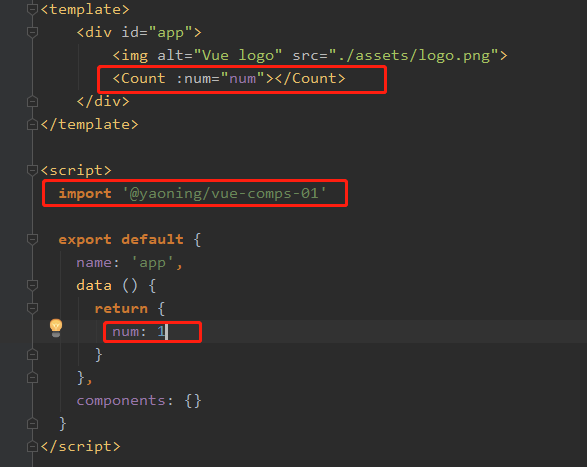
然后在index文件(如src/main.js)中引入该组件库:
import '@yaoning/vue-comps-01'
接下来,我们就可以在Vue的template中使用组件库中的Component了:
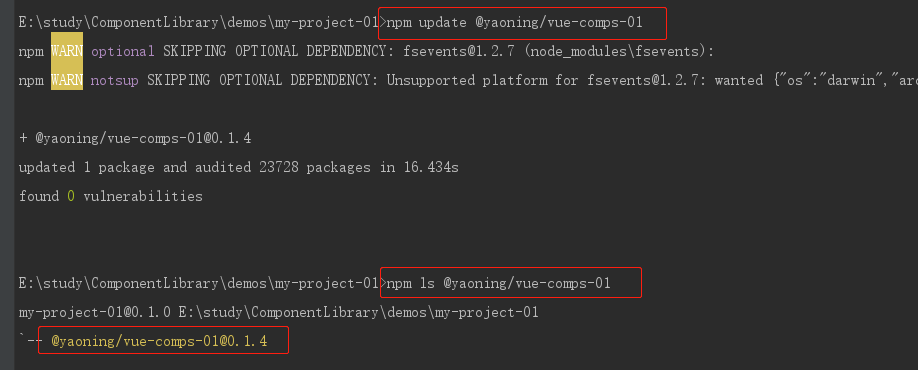
经过上面这些步骤后,我们就拥有了一个属于自己的组件库了,我们可以随时更新,发布自己新版的组件库。而依赖了该组件库的项目只需要使用简单的 npm 命令即可更新。
npm install package-name@latest
npm view package-name versions

npm ls package-name

npm update package-name
Mastering Web Application Development with AngularJS
使用AngularJS精通Web应用开发
Build single-page web applications using the power of AngularJS
利用AngularJS的强大能力建立单页面web应用
All rights reserved. No part of this book may be reproduced, stored in a retrieval system, or transmitted in any form or by any means, without the prior written permission of the publisher, except in the case of brief quotations embedded in critical articles or reviews.
保留所有权利。本书任何章节都不允许再版、不允许保存到检索系统中,
以前在项目中经常使用别的插件生成的promise,比如 http 请求时,调用 axios 插件,它会返回一个promise。
let promise = someHttpRequest();
promise.then((res)=>{
    ...
});
但是,自己没有手动创建过promise。在“财务看板”这个项目中,有几个需求需要手动去创建promise,下面记录一下使用情况。
下面以跳转到“收入情况页”为例说明。
跳转进入页面后,不能直接滚动页面响应的高度,因为此时,页面中的图表还没有渲染完成,页面此时的高度也不是最终的高度,假设本来是要向上滚动1000px的,但是此时页面高度还只有原始的100,那么页面最多也就滚动100,就不能滚动到1000的位置了。
所以,只能等到页面中的所有图表渲染完成之后,再执行页面滚动。
那么,就需要知道图表渲染完成的事件。百度的echarts对图表渲染完成定义了一个'finished'事件,即渲染完成事件。当渲染动画(参见 animation 相关配置)或者渐进渲染(参见 progressive 相关配置)停止时触发。
chart.on('finished', function () {
    // chart渲染完成
});
图表渲染完成的事件有了,当一个图表实例生成之后,就应该监听它的'finished'事件,为此创建一个promise 。
this.myChart_01 = echarts.init(document.getElementById('myChart_01')); // echarts实例生成
let promise_chart_01 = new Promise((resolve, reject) => {
     this.myChart_01.on('finished', ()=> {
         // this.myChart_01渲染完成,此时应该改变这个 promise 的状态为 resolved
        resolve()
     });
});
一个页面有多个图表,当这些图表的渲染完成的promise都生成后,将这些promise组成一个数组,用 Promise.all()方法,包装成一个新的promise。
this.myChart_01 = echarts.init(document.getElementById('myChart01')); // echarts实例生成
let promise_chart_01 = new Promise((resolve, reject) => {
     this.myChart_01.on('finished', ()=> {
         // this.myChart_01渲染完成,此时应该改变这个 promise 的状态为 resolved
        resolve()
     });
});
...
...
...
this.myChart_n = echarts.init(document.getElementById('myChart_n')); // echarts实例生成
let promise_chart_n = new Promise((resolve, reject) => {
     this.myChart_n.on('finished', ()=> {
         // this.myChart_n渲染完成,此时应该改变这个 promise 的状态为 resolved
        resolve()
     });
});

let pAll = Promise.all([promise_chart_01,promise_chart_02,......,promise_chart_n]);
pAll.then((res)=>{
    // 所有图表渲染完毕
    console.log(res);
    // 去执行页面滚动
},(err)=>{
    // 有图表渲染失败
})
每一个 xhr 请求都会返回一个promise,xhr 请求返回响应成功后,promise的状态会发生改变。将所有 xhr 请求的promise,用Promise.all()生成一个新的promise,可以监听所有接口调用成功的事件,触发相应的回调函数。
let promises=[];
let promise_01 = xhrReq01();
promise_01.then((res) => {
  // 接口01调用成功
});
this.handleCreatePromise(promise_01)

let promise_02 = xhrReq02();
promise_02.then((res) => {
  // 接口02调用成功
});
this.handleCreatePromise(promise_02)

let promise_03 = xhrReq03();
promise_03.then((res) => {
  // 接口03调用成功
});
this.handleCreatePromise(promise_03)


handleCreatePromise(p) {
    promises.push(p);
    if(promises.length === 1) {
        // 显示loading
    }
    if(promises.length===3) { // 该页面的所有 xhr 请求promise都放进来了
        let pAll_xhr = Promise.all(promises);
        pAll_xhr.then((res) => {
            // 所有接口调用成功
            // 隐藏loading
        });
    }
}
发起 xhr 请求的方法 getData 如下:
import axios from 'axios'
import queryString from 'query-string'

export const getData = function(url = '', data = {}, type = 'post') {
    url = global.hostServe[getPrefix()] + '/dash_board' + url;
    if(type === 'get' && Object.keys(data).length){
       let query = queryString.stringify(data);
       url = url + '?' + query
   }

   return axios({
       method: type,
       url: url,
       data: data
   })
}


let xhr_promise = getData('/IncomeGrowthAndBudget', data);
xhr_promise.then((res) => {
   // 拿到 xhr 请求的响应 res
});
这个项目的H5页面是以 webview 的方式嵌入到iOS APP中,考虑到安全性,所有的 xhr 请求不是由 H5 端发起,而是由 iOS APP 发起,iOS native 会将接口请求的数据进行加密,然后由 iOS native 发起 xhr 请求,iOS native 拿到接口响应的数据后,经过解密,再将结果返回给H5端。
所以就不是按上面的方式发起 xhr 请求了。但是有一点很明确,getData 方法仍然应该是要返回一个 promise ,所以初步写成这样:
export const getData = function(url = '', data = {}, type = 'post') {
    ...

   return new Promise(( resolve , reject ) => {

   })
}
因为执行 resolve() 方法后,这个 xhr 请求的 promise 的状态将由 pending 变为 resolved,并且会将 xhr 异步请求的结果经由 resolve 方法传递给 promise的回调函数。也就是说,应该在异步操作成功后执行 resolve() 方法,在异步操作失败后执行 reject() 方法。这里的异步操作就是 xhr 请求。 iOS 在拿到 xhr 请求的响应后,会调用浏览器端定义的回调函数 callback ,将响应传给浏览器端。
所以:
1、浏览器端应该定义一个回调函数 callback;
2、在 callback 中,应该触发一个事件,假设叫 'xhr_req_success' 事件;
3、当'xhr_req_success' 事件被触发时,表示 xhr 请求成功,这时应该执行 resolve() 方法。在上面代码的new Promise中,应该监听这个事件,在事件的回调函数中执行 resolve()。
所以,代码变成了下面这样:
window.callback = function(response) {
    // 创建事件 'xhr_req_success'
    let xhrReqSuccessEvent = new CustomEvent('xhr_req_success', {
      detail:{
         res: response // 将 xhr 响应的值传给事件触发时的回调函数
      }
   });

   // 异步操作成功,触发window上的这个事件'xhr_req_success'
   window.dispatchEvent(xhrReqSuccessEvent)
}

export const getData = function(url = '', data = {}, type = 'post') {
    ...

   return new Promise(( resolve , reject ) => {
       window.iOSMethod(url,  data, type, callback); // 调 iOS 的方法iOSMethod,由 iOS 端发起 xhr 请求
       // 让 window 监听 'xhr_req_success'事件
       window.addEventListener('xhr_req_success', (event) => {
              // xhr 请求成功,应该执行resolve()方法,改变promise的状态
              // 响应的数据在 event.detail.res 中,通过 resolve 方法,传递给 promise的回调函数
             resolve(event.detail.res)
       });
   })
}
当 xhr 请求失败时,应该触发失败的事件,在新建 xhr promise 时,监听这个事件,事件被触发后,执行 reject() 方法,改变 xhr promise 的状态,由 pending 变为 rejected。
新增监听 xhr 请求失败事件后的代码:
window.callback = function(response) {
   if(response && response.data && response.data.code === 200 && response.data.data) { // xhr 请求成功
       // 创建事件 'xhr_req_success'
       let xhrReqSuccessEvent = new CustomEvent('xhr_req_success', {
         detail:{
            res: response.data.data // 将 xhr 响应的值传给事件触发时的回调函数
         }
       });

       // 异步操作成功,触发window上的这个事件'xhr_req_success'
       window.dispatchEvent(xhrReqSuccessEvent)
   } else { // xhr 请求失败
       // 创建事件 'xhr_req_fail'
      let xhrReqFailEvent = new CustomEvent('xhr_req_fail',{
         detail:{ res: response.data }
      });

       // 异步操作失败,触发 window 上的这个事件 'xhr_req_fail'
      window.dispatchEvent(xhrReqFailEvent)
   }

}

export const getData = function(url = '', data = {}, type = 'post') {
    ...

   return new Promise(( resolve , reject ) => {
       window.iOSMethod(url,  data, type, callback); // 调 iOS 的方法iOSMethod,由 iOS 端发起 xhr 请求
       // 让 window 监听 'xhr_req_success'事件
       window.addEventListener('xhr_req_success', (event) => {
              // xhr 请求成功,应该执行resolve()方法,改变promise的状态
              // 响应的数据在 event.detail.res 中,通过 resolve 方法,传递给 promise的回调函数
             resolve(event.detail.res)
       });

       // 让 window 监听 'xhr_req_fail'事件
       window.addEventListener('xhr_req_fail', (event) => {
              //  xhr 请求失败,先给出 toast 提示
              Vue.$vux.toast.show({
                     type: 'cancel',
                     text: event.detail.res
              });
              //  执行reject()方法,改变promise的状态
              // 响应的数据在 event.detail.res 中,通过 reject 方法,传递给 promise的回调函数
             reject(event.detail.res);
       });
   })
}
按照上面的代码,假设发起了两个xhr请求: xhr1 和 xhr2 ,生成了两个 xhr promise: promise1 和 promise2 。
window 上添加了2次 ‘xhr_req_success’ 这个事件,有两个监听器。当 xhr1 的响应成功时,这两个监听器都会执行, xhr1 的响应数据 res1 会传给这两个监听器。所以此时,promise1 的状态会变为 resolved,传过去的响应数据是 res1, promise2 的状态也会变为 resolved,传过去的响应数据也是 res1 。
当 xhr2 的响应成功时,又是触发的 window 上的 'xhr_req_success' 这个事件,所以这两个监听器又都会执行,也就是会执行 resolve()方法,但是因为 xhr1 之前已经将 promise1 和 promise2 的状态都变为了 resolved,这里 promise1 和 promise2 的状态将不会发生改变(因为promise的状态一经改变,将永远不可能再变化)。
所以,也就是说,按照上面的写法,所有的 xhr promise 的状态都将在同一时间改变,接收到同样的数据,也就是第一个返回的接口的数据。后面返回的所有接口数据都没有用了。这明显不对。
应该让返回的数据和 xhr 请求一一对应起来。也就是让返回数据后触发的事件 和 发起xhr请求时 window监听的事件一一对应起来。xhr1 响应成功时,触发一个叫 'xhr1' 的事件,而在发起 xhr1 的请求时,window 上监听的也是这个事件 'xhr1' ,对应的监听器是 listener1 ;xhr2 响应成功时,触发一个叫 'xhr2' 的事件,而在发起 xhr2 的请求时,window 上监听的也是这个事件 'xhr2' ,对应的监听器是 listener2 ;这样,每个 xhr 请求对应不同的事件,对应不同的监听器。
可以把代码改进如下:
window.callback = function(response) {
   let arr = response.data.url.split('/');
   let urlFlag = arr[arr.length-1]; // urlFlag 的值是接口名,例如:'GetCityCode'
   if(response && response.data && response.data.code === 200 && response.data.data) { // xhr 请求成功
       // 创建事件 'xhr_req_success'
       let xhrReqSuccessEvent = new CustomEvent('xhr_req_success' + urlFlag, {
         detail:{
            res: response.data.data // 将 xhr 响应的值传给事件触发时的回调函数
         }
       });

       // 异步操作成功,触发window上的这个事件'xhr_req_success'
       window.dispatchEvent(xhrReqSuccessEvent)
   } else { // xhr 请求失败
       // 创建事件 'xhr_req_fail'
      let xhrReqFailEvent = new CustomEvent('xhr_req_fail' + urlFlag,{
         detail:{ res: response.data }
      });

       // 异步操作失败,触发 window 上的这个事件 'xhr_req_fail'
      window.dispatchEvent(xhrReqFailEvent)
   }

}

export const getData = function(url = '', data = {}, type = 'post') {
    let urlFlag = url.slice(1); // 例如: 'GetCityCode'
    ...

   return new Promise(( resolve , reject ) => {
       window.iOSMethod(url,  data, type, callback); // 调 iOS 的方法iOSMethod,由 iOS 端发起 xhr 请求
       // 让 window 监听 'xhr_req_success'事件
       window.addEventListener('xhr_req_success' + urlFlag , (event) => {
              // xhr 请求成功,应该执行resolve()方法,改变promise的状态
              // 响应的数据在 event.detail.res 中,通过 resolve 方法,传递给 promise的回调函数
             resolve(event.detail.res)
       });

       // 让 window 监听 'xhr_req_fail'事件
       window.addEventListener('xhr_req_fail' + urlFlag, (event) => {
              //  xhr 请求失败,先给出 toast 提示
              Vue.$vux.toast.show({
                     type: 'cancel',
                     text: event.detail.res
              });
              //  执行reject()方法,改变promise的状态
              // 响应的数据在 event.detail.res 中,通过 reject 方法,传递给 promise的回调函数
             reject(event.detail.res);
       });
   })
}
现在,再来分析一下。
假设现在,发起了两个请求 xhr1 和 xhr2 ,window 上添加了两个事件:‘event1’ 和 'event2' ,对应了两个监听器 listener1 和 listener2 ,生成了两个 xhr promise : promise1 和 promise2 。
这时,xhr1 的响应回来了,触发了 window 上的事件‘event1’,于是监听器listener1 会执行,于是 promise1 的状态会变为 'resolved',并把xhr1 响应的数据返给promise1的回调函数。
接着,xhr2 的响应回来了,触发了 window 上的事件'event2',于是监听器listener2 会执行,于是 promise2 的状态会变为 'resolved',并把xhr2 响应的数据返给promise2的回调函数。
这样,在callback中,我能知道是哪个接口返回的数据,根据这个,去触发 window 上跟这个接口对应的事件,而这个事件是唯一的,事件监听器也是唯一的,这样就能做到响应和 xhr promise 一一对应。
那就是:我现在只在window 上添加了某一个事件,没有移除这个事件,如果多次调用同一个xhr请求,就会给 window 的同一个事件生成多个事件监听器。当 window 上的这个事件触发时,这多个事件监听器都会执行,而除了第一个有用之外,其余的都并不起作用。所以,这里还需改进一下,在触发事件之后,再用removeEventListener将这个事件移除。
改进后的代码如下:
window.callback = function (response) {
  console.log('response:', response)
  let arr = response.data.data.url.split('/');
  let urlFlag = arr[arr.length - 1];

  if (response && response.data && response.data.code === 200 && response.data.data) { // xhr 请求成功
    let xhrReqSuccessEvent = new CustomEvent('xhr_req_success_' + urlFlag, {
      detail: {res: response.data.data},
    });
    window.dispatchEvent(xhrReqSuccessEvent);
    window.removeEventListener('xhr_req_success_' + urlFlag, window['listener' + urlFlag + 'Success']);

  } else { // xhr 请求失败
    let xhrReqFailEvent = new CustomEvent('xhr_req_fail_' + urlFlag, {
      detail: {
        res: response.data
      },
    });
    window.dispatchEvent(xhrReqFailEvent);
    window.removeEventListener('xhr_req_fail_' + urlFlag, window['listener' + urlFlag + 'Fail']);
  }

};


export const getData = function (url = '', data = {}, type = 'post') {
  let urlFlag = url.slice(1);
  url = global.hostServe[getPrefix()] + '/dash_board' + url;

  if (type === 'get' && Object.keys(data).length) {
    let query = queryString.stringify(data);
    url = url + '?' + query
  }

  // if (window.navigator.userAgent.includes('iOS')) { // 在iOS APP中
  if (window.navigator.userAgent) { // 在iOS APP中
    return new Promise((resolve, reject) => {
      // window.iOSMethod(url, data, type, callback);
      setTimeout(() => {
        callback({
          data: {code: 200, data: {url: url}}
        })
      }, 2000);

      window['listener' + urlFlag + 'Success'] = function (event) {
        console.log('event.detail.res:', event.detail.res);
        resolve(event.detail.res)
      };
      window.addEventListener('xhr_req_success_' + urlFlag, window['listener' + urlFlag + 'Success']);


      window['listener' + urlFlag + 'Fail'] = function (event) {
        console.log('event.detail.res:', event.detail.res);
        Vue.$vux.toast.show({
          type: 'cancel',
          text: event.detail.res
          // text: event.detail.res.code + event.detail.res.message
        });
        reject(event.detail.res)
      };
      window.addEventListener('xhr_req_fail_' + urlFlag, window['listener' + urlFlag + 'Fail']);
    });
  } else {
    return axios({
      method: type,
      url: url,
      data: data
    })
  }

}
如果在同一个页面,调了一次接口 api1,发起了请求 xhr1;响应还没回来的时候,又调同一个接口 api1,发起了第二个请求 xhr2。这个时候,两次请求在window上添加的事件名称是一样的(因为接口名称一样),这样在callback中就不能区分到底是哪一次请求的响应了。所以上面的代码还是有问题。
那么怎么解决这个问题呢?
因为是要求每一次 xhr 响应对应每一次对应的 xhr 请求,所以具有唯一性,所以可以用时间戳。
修改后的代码如下:
window.callback = function (signature, resiOS) {
  resiOS = JSON.parse(resiOS)

  if (resiOS && resiOS.status === 200 && resiOS.data) { // xhr 请求成功
    let xhrReqSuccessEvent = new CustomEvent('xhr_req_success_' + signature, {
      detail: {
        res: resiOS.data
      },
    });
    window.dispatchEvent(xhrReqSuccessEvent);
    window.removeEventListener('xhr_req_success_' + signature, window['listener' + signature + 'Success']);
  } else { // xhr 请求失败
    let xhrReqFailEvent = new CustomEvent('xhr_req_fail_' + signature, {
      detail: {
        res: resiOS
      },
    });
    window.dispatchEvent(xhrReqFailEvent);
    window.removeEventListener('xhr_req_fail_' + signature, window['listener' + signature + 'Fail']);
  }
};

export const getData = function (url = '', data = {}, type = 'post') {
  let signature = new Date().getTime(); // 时间戳,保证触发事件的唯一性
  let prefix = getPrefix();
  let urlNeedEncrypt = prefix === 'prod' ? 1 : 0;  // iOS端是否需要将url进行加密,1:需要(生产环境);0:不需要(非生产环境)

  url = global.hostServe[prefix] + '/dash_board' + url;
  if (type === 'get' && Object.keys(data).length) {
    let query = queryString.stringify(data);
    url = url + '?' + query
  }

  if (window.navigator.userAgent.includes('XXXXiOS')) { // 在iOS APP中
    return new Promise((resolve, reject) => {
      let obj = {
        url: url,
        data: data,
        type: type,
        signature: signature,
        callback: 'callback',
        urlNeedEncrypt: urlNeedEncrypt
      };
      window.webkit.messageHandlers.ObjcCallback.postMessage(JSON.stringify(obj));

      window['listener' + signature + 'Success'] = function (event) {
        console.log('event.detail.res:', event.detail.res);
        resolve(event.detail.res)
      };
      window.addEventListener('xhr_req_success_' + signature, window['listener' + signature + 'Success']);


      window['listener' + signature + 'Fail'] = function (event) {
        console.log('event.detail.res:', event.detail.res);
        if (event.detail.res.message.includes('timed out')) {
          Vue.$vux.toast.show({
            type: 'cancel',
            text: '网络请求超时'
          });
        } else {
          Vue.$vux.toast.show({
            type: 'cancel',
            text: '请求失败'
          });
        }
        reject(event.detail.res)
      };
      window.addEventListener('xhr_req_fail_' + signature, window['listener' + signature + 'Fail']);
    });
  } else {
    return axios({
      method: type,
      url: url,
      data: data
    })
  }
}
我认为,理论上JS是单线程的,两个接口不可能同时调getData,那么生成的signature也就不可能相同。但实际上,调iOS的方法时,经常出现不同的接口,但是签名 signature 是一样的。
所以,解决办法就是,在事件名称中加上了 时间戳 和接口名。代码如下:
window.callback = function (apiName, signature, resiOS) {
  // alert('signature:', signature)
  // alert('resiOS:', resiOS)
  resiOS = JSON.parse(resiOS)

  if (resiOS && resiOS.status === 200 && resiOS.data) { // xhr 请求成功
    let xhrReqSuccessEvent = new CustomEvent('xhr_req_success_' + apiName + signature, {
      detail: {
        res: resiOS.data
      },
    });
    window.dispatchEvent(xhrReqSuccessEvent);
    window.removeEventListener('xhr_req_success_' + apiName + signature, window['listener' + apiName + signature + 'Success']);

  } else { // xhr 请求失败
    let xhrReqFailEvent = new CustomEvent('xhr_req_fail_' + apiName + signature, {
      detail: {
        res: resiOS
      },
    });
    window.dispatchEvent(xhrReqFailEvent);
    window.removeEventListener('xhr_req_fail_' + apiName + signature, window['listener' + apiName + signature + 'Fail']);
  }

};
export const getData = function (url = '', data = {}, type = 'post') {
  if (window.navigator.userAgent.includes('iOS')) { // 在iOS APP中
    return new Promise((resolve, reject) => {
      let signature = new Date().getTime(); // 时间戳,保证触发事件的唯一性
      let apiName = url.slice(1, url.length);
      let obj = {
        url: apiName,
        data: data,
        type: type,
        signature: signature,
        callback: 'callback'
      };
      window.webkit.messageHandlers.ObjcCallback.postMessage(JSON.stringify(obj));

      window['listener' + apiName + signature + 'Success'] = function (event) {
        console.log('event.detail.res:', event.detail.res);
        resolve(event.detail.res)
      };
      window.addEventListener('xhr_req_success_' + apiName + signature, window['listener' + apiName + signature + 'Success']);


      window['listener' + apiName + signature + 'Fail'] = function (event) {
        console.log('event.detail.res:', event.detail.res);
        if (event.detail.res.message.includes('timed out')) {
          Vue.$vux.toast.show({
            type: 'cancel',
            text: '网络请求超时'
          });
        } else {
          Vue.$vux.toast.show({
            type: 'cancel',
            text: '请求失败'
          });
        }
        reject(event.detail.res)
      };
      window.addEventListener('xhr_req_fail_' + apiName + signature, window['listener' + apiName + signature + 'Fail']);

      // alert('发起 signature:' + signature);
    });
  }
  // H5 本地开发时将下面的注释打开
  else {
    let prefix = getPrefix();
    url = global.hostServe[prefix] + '/dash_board' + url;
    if (type === 'get' && Object.keys(data).length) {
      let query = queryString.stringify(data);
      url = url + '?' + query
    }

    return axios({
      method: type,
      url: url,
      data: data
    })
  }
}
build-entry.js 文件的内容如下:
var Components = require('../../components.json');
var fs = require('fs');
var render = require('json-templater/string');
var uppercamelcase = require('uppercamelcase');
var path = require('path');
var endOfLine = require('os').EOL;

var OUTPUT_PATH = path.join(__dirname, '../../src/index.js');
var IMPORT_TEMPLATE = 'import {{name}} from \'../packages/{{package}}/index.js\';';
var INSTALL_COMPONENT_TEMPLATE = '  {{name}}';
var MAIN_TEMPLATE = `/* Automatically generated by './build/bin/build-entry.js' */

{{include}}
import locale from 'element-ui/src/locale';
import CollapseTransition from 'element-ui/src/transitions/collapse-transition';

const components = [
{{install}},
  CollapseTransition
];

const install = function(Vue, opts = {}) {
  locale.use(opts.locale);
  locale.i18n(opts.i18n);

  components.forEach(component => {
    Vue.component(component.name, component);
  });

  Vue.use(Loading.directive);

  Vue.prototype.$ELEMENT = {
    size: opts.size || '',
    zIndex: opts.zIndex || 2000
  };

  Vue.prototype.$loading = Loading.service;
  Vue.prototype.$msgbox = MessageBox;
  Vue.prototype.$alert = MessageBox.alert;
  Vue.prototype.$confirm = MessageBox.confirm;
  Vue.prototype.$prompt = MessageBox.prompt;
  Vue.prototype.$notify = Notification;
  Vue.prototype.$message = Message;

};

/* istanbul ignore if */
if (typeof window !== 'undefined' && window.Vue) {
  install(window.Vue);
}

module.exports = {
  version: '{{version}}',
  locale: locale.use,
  i18n: locale.i18n,
  install,
  CollapseTransition,
  Loading,
{{list}}
};

module.exports.default = module.exports;
`;

delete Components.font;

var ComponentNames = Object.keys(Components);

var includeComponentTemplate = [];
var installTemplate = [];
var listTemplate = [];

ComponentNames.forEach(name => {
  var componentName = uppercamelcase(name);

  includeComponentTemplate.push(render(IMPORT_TEMPLATE, {
    name: componentName,
    package: name
  }));

  if (['Loading', 'MessageBox', 'Notification', 'Message'].indexOf(componentName) === -1) {
    installTemplate.push(render(INSTALL_COMPONENT_TEMPLATE, {
      name: componentName,
      component: name
    }));
  }

  if (componentName !== 'Loading') listTemplate.push(`  ${componentName}`);
});

var template = render(MAIN_TEMPLATE, {
  include: includeComponentTemplate.join(endOfLine),
  install: installTemplate.join(',' + endOfLine),
  version: process.env.VERSION || require('../../package.json').version,
  list: listTemplate.join(',' + endOfLine)
});

fs.writeFileSync(OUTPUT_PATH, template);
console.log('[build entry] DONE:', OUTPUT_PATH);
Components : 是一个包含UI组件信息的 json 对象,key 是组件的名称,value 是组件的入口文件路径,element这个组件库中提供的所有组件都放在这里面,如下:
{
  "pagination": "./packages/pagination/index.js",
  "dialog": "./packages/dialog/index.js",
 ...
 ...
 ...
  "header": "./packages/header/index.js",
  "aside": "./packages/aside/index.js",
  "main": "./packages/main/index.js",
  "footer": "./packages/footer/index.js"
}
var render = require('json-templater/string');
render : 是'json-templater/string.js'这个文件导出的一个方法replace。
var IMPORT_TEMPLATE = 'import {{name}} from \'../packages/{{package}}/index.js\';';
render(IMPORT_TEMPLATE, {
    name: 'Pagination',
    package: 'pagination'
  })  // =>  import Pagination from '../packages/pagination/index.js'
var uppercamelcase = require('uppercamelcase');
uppercamelcase:转驼峰的一个方法。
uppercamelcase('pagination') // => 'Pagination'
uppercamelcase('dropdown-menu') // => 'DropdownMenu'
var endOfLine = require('os').EOL;
require('os').EOL: A string constant defining the operating system-specific end-of-line marker:
\n on POSIX\r\n on Windowsvar OUTPUT_PATH = path.join(__dirname, '../../src/index.js');
path.join([...paths]):
...paths A sequence of path segmentsReturns: Zero-length path segments are ignored. If the joined path string is a zero-length string then '.' will be returned, representing the current working directory.
OUTPUT_PATH拿到的是'../../src/index.js'文件的绝对路径。
var IMPORT_TEMPLATE = 'import {{name}} from \'../packages/{{package}}/index.js\';';
IMPORT_TEMPLATE:import UI组件的字符串模板。
var INSTALL_COMPONENT_TEMPLATE = ' {{name}}';
INSTALL_COMPONENT_TEMPLATE:字符串模板。
var MAIN_TEMPLATE = `/* Automatically generated by './build/bin/build-entry.js' */

{{include}}
import locale from 'element-ui/src/locale';
import CollapseTransition from 'element-ui/src/transitions/collapse-transition';

const components = [
{{install}},
  CollapseTransition
];

const install = function(Vue, opts = {}) {
  locale.use(opts.locale);
  locale.i18n(opts.i18n);

  components.forEach(component => {
    Vue.component(component.name, component);
  });

  Vue.use(Loading.directive);

  Vue.prototype.$ELEMENT = {
    size: opts.size || '',
    zIndex: opts.zIndex || 2000
  };

  Vue.prototype.$loading = Loading.service;
  Vue.prototype.$msgbox = MessageBox;
  Vue.prototype.$alert = MessageBox.alert;
  Vue.prototype.$confirm = MessageBox.confirm;
  Vue.prototype.$prompt = MessageBox.prompt;
  Vue.prototype.$notify = Notification;
  Vue.prototype.$message = Message;

};

/* istanbul ignore if */
if (typeof window !== 'undefined' && window.Vue) {
  install(window.Vue);
}

module.exports = {
  version: '{{version}}',
  locale: locale.use,
  i18n: locale.i18n,
  install,
  CollapseTransition,
  Loading,
{{list}}
};

module.exports.default = module.exports;
`;
MAIN_TEMPLATE: 要放入到 src/index.js 文件中的字符串模板。
var ComponentNames = Object.keys(Components);
ComponentNames: 包含所有组件名称的数组:
 [ 'pagination',
  'dialog',
  'autocomplete',
  'dropdown',
  'dropdown-menu',
  'dropdown-item',
  'menu',
  'submenu',
  'menu-item',
  'menu-item-group',
  'input',
  'input-number',
  'radio',
  'radio-group',
  'radio-button',
  'checkbox',
  'checkbox-button',
  'checkbox-group',
  'switch',
  'select',
  'option',
  'option-group',
  'button',
  'button-group',
  'table',
  'table-column',
  'date-picker',
  'time-select',
  'time-picker',
  'popover',
  'tooltip',
  'message-box',
  'breadcrumb',
  'breadcrumb-item',
  'form',
  'form-item',
  'tabs',
  'tab-pane',
  'tag',
  'tree',
  'alert',
  'notification',
  'slider',
  'loading',
  'icon',
  'row',
  'col',
  'upload',
  'progress',
  'spinner',
  'message',
  'badge',
  'card',
  'rate',
  'steps',
  'step',
  'carousel',
  'scrollbar',
  'carousel-item',
  'collapse',
  'collapse-item',
  'cascader',
  'color-picker',
  'transfer',
  'container',
  'header',
  'aside',
  'main',
  'footer' ]
includeComponentTemplate的值为:
[ 'import Pagination from \'../packages/pagination/index.js\';',
  'import Dialog from \'../packages/dialog/index.js\';',
  'import Autocomplete from \'../packages/autocomplete/index.js\';',
  'import Dropdown from \'../packages/dropdown/index.js\';',
  'import DropdownMenu from \'../packages/dropdown-menu/index.js\';',
  'import DropdownItem from \'../packages/dropdown-item/index.js\';',
  'import Menu from \'../packages/menu/index.js\';',
  'import Submenu from \'../packages/submenu/index.js\';',
  'import MenuItem from \'../packages/menu-item/index.js\';',
  'import MenuItemGroup from \'../packages/menu-item-group/index.js\';',
  'import Input from \'../packages/input/index.js\';',
  'import InputNumber from \'../packages/input-number/index.js\';',
  'import Radio from \'../packages/radio/index.js\';',
  'import RadioGroup from \'../packages/radio-group/index.js\';',
  'import RadioButton from \'../packages/radio-button/index.js\';',
  'import Checkbox from \'../packages/checkbox/index.js\';',
  'import CheckboxButton from \'../packages/checkbox-button/index.js\';',
  'import CheckboxGroup from \'../packages/checkbox-group/index.js\';',
  'import Switch from \'../packages/switch/index.js\';',
  'import Select from \'../packages/select/index.js\';',
  'import Option from \'../packages/option/index.js\';',
  'import OptionGroup from \'../packages/option-group/index.js\';',
  'import Button from \'../packages/button/index.js\';',
  'import ButtonGroup from \'../packages/button-group/index.js\';',
  'import Table from \'../packages/table/index.js\';',
  'import TableColumn from \'../packages/table-column/index.js\';',
  'import DatePicker from \'../packages/date-picker/index.js\';',
  'import TimeSelect from \'../packages/time-select/index.js\';',
  'import TimePicker from \'../packages/time-picker/index.js\';',
  'import Popover from \'../packages/popover/index.js\';',
  'import Tooltip from \'../packages/tooltip/index.js\';',
  'import MessageBox from \'../packages/message-box/index.js\';',
  'import Breadcrumb from \'../packages/breadcrumb/index.js\';',
  'import BreadcrumbItem from \'../packages/breadcrumb-item/index.js\';',
  'import Form from \'../packages/form/index.js\';',
  'import FormItem from \'../packages/form-item/index.js\';',
  'import Tabs from \'../packages/tabs/index.js\';',
  'import TabPane from \'../packages/tab-pane/index.js\';',
  'import Tag from \'../packages/tag/index.js\';',
  'import Tree from \'../packages/tree/index.js\';',
  'import Alert from \'../packages/alert/index.js\';',
  'import Notification from \'../packages/notification/index.js\';',
  'import Slider from \'../packages/slider/index.js\';',
  'import Loading from \'../packages/loading/index.js\';',
  'import Icon from \'../packages/icon/index.js\';',
  'import Row from \'../packages/row/index.js\';',
  'import Col from \'../packages/col/index.js\';',
  'import Upload from \'../packages/upload/index.js\';',
  'import Progress from \'../packages/progress/index.js\';',
  'import Spinner from \'../packages/spinner/index.js\';',
  'import Message from \'../packages/message/index.js\';',
  'import Badge from \'../packages/badge/index.js\';',
  'import Card from \'../packages/card/index.js\';',
  'import Rate from \'../packages/rate/index.js\';',
  'import Steps from \'../packages/steps/index.js\';',
  'import Step from \'../packages/step/index.js\';',
  'import Carousel from \'../packages/carousel/index.js\';',
  'import Scrollbar from \'../packages/scrollbar/index.js\';',
  'import CarouselItem from \'../packages/carousel-item/index.js\';',
  'import Collapse from \'../packages/collapse/index.js\';',
  'import CollapseItem from \'../packages/collapse-item/index.js\';',
  'import Cascader from \'../packages/cascader/index.js\';',
  'import ColorPicker from \'../packages/color-picker/index.js\';',
  'import Transfer from \'../packages/transfer/index.js\';',
  'import Container from \'../packages/container/index.js\';',
  'import Header from \'../packages/header/index.js\';',
  'import Aside from \'../packages/aside/index.js\';',
  'import Main from \'../packages/main/index.js\';',
  'import Footer from \'../packages/footer/index.js\';' ]
installTemplate是一个关于UI组件名称的数组,不包含'Loading', 'MessageBox', 'Notification', 'Message',值为:
[ '  Pagination',
  '  Dialog',
  '  Autocomplete',
  '  Dropdown',
  '  DropdownMenu',
  '  DropdownItem',
  '  Menu',
  '  Submenu',
  '  MenuItem',
  '  MenuItemGroup',
  '  Input',
  '  InputNumber',
  '  Radio',
  '  RadioGroup',
  '  RadioButton',
  '  Checkbox',
  '  CheckboxButton',
  '  CheckboxGroup',
  '  Switch',
  '  Select',
  '  Option',
  '  OptionGroup',
  '  Button',
  '  ButtonGroup',
  '  Table',
  '  TableColumn',
  '  DatePicker',
  '  TimeSelect',
  '  TimePicker',
  '  Popover',
  '  Tooltip',
  '  Breadcrumb',
  '  BreadcrumbItem',
  '  Form',
  '  FormItem',
  '  Tabs',
  '  TabPane',
  '  Tag',
  '  Tree',
  '  Alert',
  '  Slider',
  '  Icon',
  '  Row',
  '  Col',
  '  Upload',
  '  Progress',
  '  Spinner',
  '  Badge',
  '  Card',
  '  Rate',
  '  Steps',
  '  Step',
  '  Carousel',
  '  Scrollbar',
  '  CarouselItem',
  '  Collapse',
  '  CollapseItem',
  '  Cascader',
  '  ColorPicker',
  '  Transfer',
  '  Container',
  '  Header',
  '  Aside',
  '  Main',
  '  Footer' ]
listTemplate是一个关于组件名称的数组,不包含'Loading',值为:
[ '  Pagination',
  '  Dialog',
  '  Autocomplete',
  '  Dropdown',
  '  DropdownMenu',
  '  DropdownItem',
  '  Menu',
  '  Submenu',
  '  MenuItem',
  '  MenuItemGroup',
  '  Input',
  '  InputNumber',
  '  Radio',
  '  RadioGroup',
  '  RadioButton',
  '  Checkbox',
  '  CheckboxButton',
  '  CheckboxGroup',
  '  Switch',
  '  Select',
  '  Option',
  '  OptionGroup',
  '  Button',
  '  ButtonGroup',
  '  Table',
  '  TableColumn',
  '  DatePicker',
  '  TimeSelect',
  '  TimePicker',
  '  Popover',
  '  Tooltip',
  '  MessageBox',
  '  Breadcrumb',
  '  BreadcrumbItem',
  '  Form',
  '  FormItem',
  '  Tabs',
  '  TabPane',
  '  Tag',
  '  Tree',
  '  Alert',
  '  Notification',
  '  Slider',
  '  Icon',
  '  Row',
  '  Col',
  '  Upload',
  '  Progress',
  '  Spinner',
  '  Message',
  '  Badge',
  '  Card',
  '  Rate',
  '  Steps',
  '  Step',
  '  Carousel',
  '  Scrollbar',
  '  CarouselItem',
  '  Collapse',
  '  CollapseItem',
  '  Cascader',
  '  ColorPicker',
  '  Transfer',
  '  Container',
  '  Header',
  '  Aside',
  '  Main',
  '  Footer' ]
var template = render(MAIN_TEMPLATE, {
  include: includeComponentTemplate.join(endOfLine),
  install: installTemplate.join(',' + endOfLine),
  version: process.env.VERSION || require('../../package.json').version,
  list: listTemplate.join(',' + endOfLine)
});

fs.writeFileSync(OUTPUT_PATH, template);
这段代码的作用就是:用得到的值去替换 MAIN_TEMPLATE 字符串模板中相应的变量,然后将拿到的字符串写入到 '../../src/index.js'文件中。最终'../../src/index.js'文件的内容如下:
/* Automatically generated by './build/bin/build-entry.js' */

import Pagination from '../packages/pagination/index.js';
import Dialog from '../packages/dialog/index.js';
import Autocomplete from '../packages/autocomplete/index.js';
import Dropdown from '../packages/dropdown/index.js';
import DropdownMenu from '../packages/dropdown-menu/index.js';
import DropdownItem from '../packages/dropdown-item/index.js';
import Menu from '../packages/menu/index.js';
import Submenu from '../packages/submenu/index.js';
import MenuItem from '../packages/menu-item/index.js';
import MenuItemGroup from '../packages/menu-item-group/index.js';
import Input from '../packages/input/index.js';
import InputNumber from '../packages/input-number/index.js';
import Radio from '../packages/radio/index.js';
import RadioGroup from '../packages/radio-group/index.js';
import RadioButton from '../packages/radio-button/index.js';
import Checkbox from '../packages/checkbox/index.js';
import CheckboxButton from '../packages/checkbox-button/index.js';
import CheckboxGroup from '../packages/checkbox-group/index.js';
import Switch from '../packages/switch/index.js';
import Select from '../packages/select/index.js';
import Option from '../packages/option/index.js';
import OptionGroup from '../packages/option-group/index.js';
import Button from '../packages/button/index.js';
import ButtonGroup from '../packages/button-group/index.js';
import Table from '../packages/table/index.js';
import TableColumn from '../packages/table-column/index.js';
import DatePicker from '../packages/date-picker/index.js';
import TimeSelect from '../packages/time-select/index.js';
import TimePicker from '../packages/time-picker/index.js';
import Popover from '../packages/popover/index.js';
import Tooltip from '../packages/tooltip/index.js';
import MessageBox from '../packages/message-box/index.js';
import Breadcrumb from '../packages/breadcrumb/index.js';
import BreadcrumbItem from '../packages/breadcrumb-item/index.js';
import Form from '../packages/form/index.js';
import FormItem from '../packages/form-item/index.js';
import Tabs from '../packages/tabs/index.js';
import TabPane from '../packages/tab-pane/index.js';
import Tag from '../packages/tag/index.js';
import Tree from '../packages/tree/index.js';
import Alert from '../packages/alert/index.js';
import Notification from '../packages/notification/index.js';
import Slider from '../packages/slider/index.js';
import Loading from '../packages/loading/index.js';
import Icon from '../packages/icon/index.js';
import Row from '../packages/row/index.js';
import Col from '../packages/col/index.js';
import Upload from '../packages/upload/index.js';
import Progress from '../packages/progress/index.js';
import Spinner from '../packages/spinner/index.js';
import Message from '../packages/message/index.js';
import Badge from '../packages/badge/index.js';
import Card from '../packages/card/index.js';
import Rate from '../packages/rate/index.js';
import Steps from '../packages/steps/index.js';
import Step from '../packages/step/index.js';
import Carousel from '../packages/carousel/index.js';
import Scrollbar from '../packages/scrollbar/index.js';
import CarouselItem from '../packages/carousel-item/index.js';
import Collapse from '../packages/collapse/index.js';
import CollapseItem from '../packages/collapse-item/index.js';
import Cascader from '../packages/cascader/index.js';
import ColorPicker from '../packages/color-picker/index.js';
import Transfer from '../packages/transfer/index.js';
import Container from '../packages/container/index.js';
import Header from '../packages/header/index.js';
import Aside from '../packages/aside/index.js';
import Main from '../packages/main/index.js';
import Footer from '../packages/footer/index.js';
import locale from 'element-ui/src/locale';
import CollapseTransition from 'element-ui/src/transitions/collapse-transition';

const components = [
  Pagination,
  Dialog,
  Autocomplete,
  Dropdown,
  DropdownMenu,
  DropdownItem,
  Menu,
  Submenu,
  MenuItem,
  MenuItemGroup,
  Input,
  InputNumber,
  Radio,
  RadioGroup,
  RadioButton,
  Checkbox,
  CheckboxButton,
  CheckboxGroup,
  Switch,
  Select,
  Option,
  OptionGroup,
  Button,
  ButtonGroup,
  Table,
  TableColumn,
  DatePicker,
  TimeSelect,
  TimePicker,
  Popover,
  Tooltip,
  Breadcrumb,
  BreadcrumbItem,
  Form,
  FormItem,
  Tabs,
  TabPane,
  Tag,
  Tree,
  Alert,
  Slider,
  Icon,
  Row,
  Col,
  Upload,
  Progress,
  Spinner,
  Badge,
  Card,
  Rate,
  Steps,
  Step,
  Carousel,
  Scrollbar,
  CarouselItem,
  Collapse,
  CollapseItem,
  Cascader,
  ColorPicker,
  Transfer,
  Container,
  Header,
  Aside,
  Main,
  Footer,
  CollapseTransition
];

const install = function(Vue, opts = {}) {
  locale.use(opts.locale);
  locale.i18n(opts.i18n);

  components.forEach(component => {
    Vue.component(component.name, component);
  });

  Vue.use(Loading.directive);

  Vue.prototype.$ELEMENT = {
    size: opts.size || '',
    zIndex: opts.zIndex || 2000
  };

  Vue.prototype.$loading = Loading.service;
  Vue.prototype.$msgbox = MessageBox;
  Vue.prototype.$alert = MessageBox.alert;
  Vue.prototype.$confirm = MessageBox.confirm;
  Vue.prototype.$prompt = MessageBox.prompt;
  Vue.prototype.$notify = Notification;
  Vue.prototype.$message = Message;

};

/* istanbul ignore if */
if (typeof window !== 'undefined' && window.Vue) {
  install(window.Vue);
}

module.exports = {
  version: '2.4.11',
  locale: locale.use,
  i18n: locale.i18n,
  install,
  CollapseTransition,
  Loading,
  Pagination,
  Dialog,
  Autocomplete,
  Dropdown,
  DropdownMenu,
  DropdownItem,
  Menu,
  Submenu,
  MenuItem,
  MenuItemGroup,
  Input,
  InputNumber,
  Radio,
  RadioGroup,
  RadioButton,
  Checkbox,
  CheckboxButton,
  CheckboxGroup,
  Switch,
  Select,
  Option,
  OptionGroup,
  Button,
  ButtonGroup,
  Table,
  TableColumn,
  DatePicker,
  TimeSelect,
  TimePicker,
  Popover,
  Tooltip,
  MessageBox,
  Breadcrumb,
  BreadcrumbItem,
  Form,
  FormItem,
  Tabs,
  TabPane,
  Tag,
  Tree,
  Alert,
  Notification,
  Slider,
  Icon,
  Row,
  Col,
  Upload,
  Progress,
  Spinner,
  Message,
  Badge,
  Card,
  Rate,
  Steps,
  Step,
  Carousel,
  Scrollbar,
  CarouselItem,
  Collapse,
  CollapseItem,
  Cascader,
  ColorPicker,
  Transfer,
  Container,
  Header,
  Aside,
  Main,
  Footer
};

module.exports.default = module.exports;
所以 'build-entry.js' 这个文件的作用就是:将一个模板字符串写入 ./src/index.js 文件中。
cross-env BABEL_ENV=utils babel src --out-dir lib --ignore src/index.js
cross-env能跨平台地设置及使用环境变量
大多数情况下,在windows平台下使用类似于: NODE_ENV=production的命令行指令会卡住,windows平台与POSIX在使用命令行时有许多区别(例如在POSIX,使用$ENV_VAR,在windows,使用%ENV_VAR%。。。)
cross-env让这一切变得简单,不同平台使用唯一指令,无需担心跨平台问题。
cross-env的作用就是:让命令能够跨 unix 和 windows 平台运行。
BABEL_ENV=utils的作用是:设置 process.env.BABEL_ENV 的值为 utils .
Unix:
$ BABEL_ENV=production [COMMAND]
$ NODE_ENV=production [COMMAND]
Windows:
$ SET BABEL_ENV=production
$ [COMMAND]
注意:[COMMAND] 指的是任意一个用来运行 Babel 的命令(如:babel,babel-node,或是 node,如果你使用了 register 钩子的话)。

提示:如果你想要让命令能够跨 unix 和 windows 平台运行的话,可以使用 cross-env。
Compile the entire src directory and output it to the lib directory by using either --out-dir or -d. This doesn't overwrite any other files or directories in lib.
npx babel src --out-dir lib
Ignore spec and test files
npx babel src --out-dir lib --ignore "src/**/*.spec.js","src/**/*.test.js"
这条命令的作用:设置环境变量 process.env.BABEL_ENV的值为utils,同时用babel命令编译整个src文件夹,并且将结果输出到lib文件夹下,lib不会去覆盖原来lib下的内容,编译时忽略'src/index.js'文件。
命令执行后,项目目录如下:
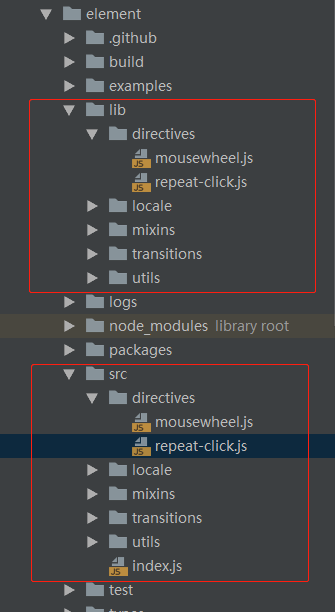
<script type=”text/javascript”>
	function sayHi(){
		alert(“Hi!”);
        }
</script>
包含在<script>元素内部的JavaScript代码将被从上至下依次解释。就拿前面这个例子来说,解释器会解释一个函数的定义,然后将该定义保存在自己的环境当中。在解释器对<script>元素内部的所有代码求值完毕以前,页面中的其余内容都不会被浏览器加载或显示。与解析嵌入式JavaScript代码一样,在解析外部JavaScript文件(包括下载该文件)时,页面的处理也会暂时停止。
无论如何包含代码,只要不存在defer和async属性,浏览器都会按照<script>元素在页面中出现的先后顺序对它们依次进行解析。换句话说,在第一个<script>元素包含的代码解析完成后,第二个<script>包含的代码才会被解析,然后才是第三个、第四个。。。
HTML 4.01为<script>标签定义了defer属性。这个属性的用于是表明脚本在执行时不会影响页面的构造。也就是说,脚本会被延迟到整个页面都解析完毕后再运行。因此,在<script>元素中设置defer属性,相当于告诉浏览器立即下载,但延迟执行。
<!DOCTYPE html>
<html>
  <head>
    <title>Example HTML Page</title>
    <script type="text/javascript" defer="defer" src="example1.js"></script>
    <script type="text/javascript" defer="defer" src="example2.js"></script>
  </head>
  <body>
    <!-- 这里放内容 -->
  </body>
</html>
在这个例子中,虽然我们把<script>元素放在了文档的元素中,但其中包含的脚本将延迟到浏览器遇到标签后再执行。HTML5 规范要求脚本按照它们出现的先后顺序执行,因此第一个延迟脚本会先于第二个延迟脚本执行,而这两个脚本会先于DOMContentLoaded事件执行。在现实当中,延迟脚本并不一定会按照顺序执行,也不一定会在DOMContentLoaded事件触发前执行,因此最好只包含一个延迟脚本。
defer属性只适用于外部脚本文件。这一点在HTML5中已经明确规定,因此支持HTML5的实现会忽略给嵌入脚本设置的defer属性。
在XHTML文档中,要把defer属性设置为defer=”defer”。
HTML5 为<script>元素定义了async 属性。这个属性与defer 属性类似,都用于改变处理脚本的行为。表示应该立即下载脚本,但不应妨碍页面中的其他操作,比如下载其他资源或等待加载其他脚本。只对外部脚本文件有效。但与defer不同的是,标记为async 的脚本并不保证按照指定它们的先后顺序执行。
指定async 属性的目的是不让页面等待两个脚本下载和执行,从而异步加载页面其他内容。为此,建议异步脚本不要在加载期间修改DOM。
异步脚本一定会在页面的load 事件前执行,但可能会在DOMContentLoaded 事件触发之前或之后执行。
在XHTML 文档中,要把async 属性设置为async="async"。
ECMAScript中有:
5种简单数据类型(也称为基本数据类型): Undefined、Null、Boolean、Number、String
1种复杂数据类型:Object
ECMAScript不支持任何创建自定义类型的机制,而所有值最终都将是上述6种数据类型之一。
对一个值使用typeof操作符可能返回下列某个字符串:
typeof null会返回"object",因为特殊值null被认为是一个空的对象引用。
从技术角度讲,函数在ECMAScript中是对象,不是一种数据类型。然而,函数也确实有一些特殊的属性,因此通过typeof操作符来区分函数和其他对象是有必要的。
执行环境(execution context)是JavaScript中最为重要的一个概念。执行环境定义了变量或函数有权访问的其他数据,决定了它们各自的行为。
每个执行环境都有一个与之关联的变量对象(variable object),环境中定义的所有变量和函数都保存在这个对象中。虽然我们编写的代码无法访问这个对象,但解析器在处理数据时会在后台使用它。
全局执行环境是最外围的一个执行环境。根据ECMAScript实现所在的宿主环境不同,表示执行环境的对象也不一样。在WEB浏览器中,全局执行环境被认为是window对象,因此所有全局变量和函数都是作为window对象的属性和方法创建的。
某个执行环境中的所有代码执行完毕后,该环境被销毁,保存在其中的所有变量和函数定义也随之销毁(全局执行环境直到应用程序退出--例如关闭网页或浏览器--时才会被销毁)。
每个函数都有自己的执行环境。当执行流进入一个函数时,函数的环境就会被推入一个环境栈中。而在函数执行之后,栈将其环境弹出,把控制权返回给之前的执行环境。ECMAScript程序中的执行流正是由这个方便的机制控制着。
当代码在一个环境中执行时,会创建变量对象的一个作用域链(scope chain)。作用域链的用途,是保证对执行环境有权访问的所有变量和函数的有序访问。作用域链的前端,始终都是当前执行的代码所在环境的变量对象。如果这个环境是函数,则将其活动对象(activation object)作为变量对象。活动对象在最开始时只包含一个变量,即arguments对象(这个对象在全局环境中是不存在的)。作用域链中的下一个变量对象来自包含(外部)环境,而再下一个变量对象则来自下一个包含环境。这样,一直延续到全局执行环境;全局执行环境的变量对象始终都是作用域链中的最后一个对象。
标识符解析是沿着作用域链一级一级地搜索标识符的过程。搜索过程始终从作用域链的前端开始,然后逐级地向后回溯,直至找到标识符为止(如果找不到标识符,通常会导致错误发生)。
《迈向AngularJS 2》学习笔记
翻译:switching-to-Angular2
This boilerplate is targeted towards large, serious projects and assumes you are somewhat familiar with Webpack and vue-loader. Make sure to also read vue-loader's documentation for common workflow recipes.
这个模板的目标是为了大型项目创建的,并且假定你已经对Webpack和vue-loader有一定程度的了解。创建普通工作流模板请确保同样也要阅读vue-loader的说明文档。
If you just want to try out vue-loader or whip out a quick prototype, use the webpack-simple template instead.
如果你只是想要试用vue-loader或者想要快速创建出一个原型,请使用webpack-simple模板代替。
To use this template, scaffold a project with vue-cli. It is recommended to use npm 3+ for a more efficient dependency tree.
为了使用这个模板,需要用vue-cli当做脚手架来创建一个项目。为了能有更有效的依赖树,推荐使用npm 3+以上的版本。
$ npm install -g vue-cli
$ vue init webpack my-project
$ cd my-project
$ npm install
$ npm run dev
.
├── build/                      # webpack config files
│   └── ...
├── config/
│   ├── index.js                # main project config
│   └── ...
├── src/
│   ├── main.js                 # app entry file
│   ├── App.vue                 # main app component
│   ├── components/             # ui components
│   │   └── ...
│   └── assets/                 # module assets (processed by webpack)
│       └── ...
├── static/                     # pure static assets (directly copied)
├── test/
│   └── unit/                   # unit tests
│   │   ├── specs/              # test spec files
│   │   ├── index.js            # test build entry file
│   │   └── karma.conf.js       # test runner config file
│   └── e2e/                    # e2e tests
│   │   ├── specs/              # test spec files
│   │   ├── custom-assertions/  # custom assertions for e2e tests
│   │   ├── runner.js           # test runner script
│   │   └── nightwatch.conf.js  # test runner config file
├── .babelrc                    # babel config
├── .editorconfig.js            # editor config
├── .eslintrc.js                # eslint config
├── index.html                  # index.html template
└── package.json                # build scripts and dependencies
build/This directory holds the actual configurations for both the development server and the production webpack build. Normally you don't need to touch these files unless you want to customize Webpack loaders, in which case you should probably look at build/webpack.base.conf.js.
这个目录下包含的实际配置文件适用于开发服务,也适用于生产环境下的webpack配置。通常情况下,你不需要去了解这些文件,除非你想要自定义webpack loaders,如果是想要自定义的话,你需要查看build/webpack.base.conf.js这个文件。
config/index.jsThis is the main configuration file that exposes some of the most common configuration options for the build setup. See API Proxying During Development and Integrating with Backend Framework for more details.
这个是主配置文件,它描述了项目建立中一些最常见的配置选项。查看开发过程中的API代理和用后台框架进行整合来了解更多细节。
src/This is where most of your application code will live in. How to structure everything inside this directory is largely up to you; if you are using Vuex, you can consult the recommendations for Vuex applications.
你的大部分应用程序代码将写在这个文件夹中。在这个文件夹中怎样去构建一切大部分取决于你自己。如果你正在使用Vuex,你可以参阅关于Vuex应用程序的推荐。
static/This directory is an escape hatch for static assets that you do not want to process with Webpack. They will be directly copied into the same directory where webpack-built assets are generated.
这个目录是静态资源的存放目录,你不需要用webpack来处理它。当webpack-built资源生成的时候,这个目录会被直接复制到相同的目录中。
See Handling Static Assets for more details.
查看处理静态资源了解更多细节。
test/unitContains unit test related files. See Unit Testing for more details.
这个目录中包含单元测试相关的文件。查看单元测试了解更多细节。
test/e2eContains e2e test related files. See End-to-end Testing for more details.
这个目录包含e2e测试相关的文件。查看End-to-end 测试了解更多细节。
index.htmlThis is the template index.html for our single page application. During development and builds, Webpack will generate assets, and the URLs for those generated assets will be automatically injected into this template to render the final HTML.
这个是我们单页面应用程序的template模板的index.html文件。在开发和建立的过程中,webpack将会生成资源,这些生成的资源的URL会被自动插入到模板来渲染最终的HTML。
package.jsonThe NPM package meta file that contains all the build dependencies and build commands.
这个是NPM包元文件,里面包含所有的创建依赖和创建命令。
All build commands are executed via NPM Scripts.
所有的创建命令都是通过NPM脚本来执行的。
npm run devStarts a Node.js local development server. See API Proxying During Development for more details.
开启一个Node.js本地开发服务。查看开发过程中的API代理了解更多细节。
Webpack + vue-loader for single file Vue components.
State preserving hot-reload
State preserving compilation error overlay
Lint-on-save with ESLint
Source maps
Webpack + vue-loader 用于单文件Vue组件
状态保持热重载
状态保持编译错误覆盖
用Eslint在保存时进行Lint检查
来源映射
npm run buildBuild assets for production. See Integrating with Backend Framework for more details.
为生产创建资源。查看通过后端框架来进行整合了解更多细节。
JavaScript minified with UglifyJS.
HTML minified with html-minifier.
CSS across all components extracted into a single file and minified with cssnano.
All static assets compiled with version hashes for efficient long-term caching, and a production index.html is auto-generated with proper URLs to these generated assets.
Also see deployment notes.
通过UglifyJS对JavaScript文件进行压缩。
通过html-minifier对HTML文件进行压缩。
通过cssnano将所有组件中的css提取出来放到一个单独的文件中,然后进行压缩。
所有的静态资源通过版本哈希值进行编译,以得到有效的长期的缓存,而得到的index.html是自动生成的,它能通过适当的URL来访问这些生成的资源。
看一看部署说明。
npm run unitRun unit tests in PhantomJS with Karma. See Unit Testing for more details.
通过Karma在PhantomJS中运行单元测试。阅读单元测试了解更多细节。
Supports ES2015 in test files.
Supports all webpack loaders.
Easy mock injection.
在测试文件中支持ES2015
支持所有的webpack加载器
npm run e2eRun end-to-end tests with Nightwatch. See End-to-end Testing for more details.
通过 Nightwatch运行端对端的测试。查看 End-to-end Testing了解更多细节。
Run tests in multiple browsers in parallel.
Works with one command out of the box:
Selenium and chromedriver dependencies automatically handled.
Automatically spawns the Selenium server.
在多浏览器中并行地运行测试。
在盒子外用一条命令工作:
Selenium和chromedriver的依赖自动被处理。
自动派生了Selenium服务。
This boilerplate uses ESLint as the linter, and uses the Standard preset with some small customizations.
这个模板使用了ESLint作为linter,使用Standard预设和一些小的自定义。
If you are not happy with the default linting rules, you have several options:
如果你不喜欢这个默认的linting规则,你有以下一些选项:
Overwrite individual rules in .eslintrc.js. For example, you can add the following rule to enforce semicolons instead of omitting them:
"semi": [2, "always"]
Pick a different ESLint preset when generating the project, for example eslint-config-airbnb.
Pick "none" for ESLint preset when generating the project and define your own rules. See ESLint documentation for more details.
在.eslintrc.js文件中重写你个人的规则。比如,你可以添加下面这条规则来规定必须用分号,而不是省略分号:
"semi": [2, "always"]
在生成项目的时候选择不同的ESLint预设,比如用eslint-config-airbnb。
在生成项目的时候选择"none"预设,然后定义你自己的规则。查看ESLint 说明文档了解更多细节。
This boilerplate has pre-configured CSS extraction for most popular CSS pre-processors including LESS, SASS, Stylus, and PostCSS. To use a pre-processor, all you need to do is installing the appropriate webpack loader for it. For example, to use SASS:
这个模板包含预配置CSS提取规则,适用于大部分流行的CSS预处理器,包括:LESS、SASS、Stylus和PostCSS。为了使用预处理器,所有你需要做的就是为它安装一个适当的webpack加载器,比如说,要使用SASS:
npm install sass-loader node-sass --save-dev
Note you also need to install node-sass because sass-loader depends on it as a peer dependency.
提醒你同样需要安装node-sass,因为sass-loader依赖于node-sass,node-sass是sass-loader的同级依赖。
Once installed, you can use the pre-processors inside your *.vue components using the lang attribute on <style> tags:
一旦安装了,你可以在你的 *.vue 组件中使用预处理器,通过在<style> 标签上使用lang属性:
<style lang="scss">
/* write SASS! */
</style>
lang="scss" corresponds to the CSS-superset syntax (with curly braces and semicolones).
lang="sass" corresponds to the indentation-based syntax.
lang="scss"对应CSS超集语法(使用大括号和分号)。
lang="sass"对应基于缩进的语法。
Styles in *.vue files are piped through PostCSS by default, so you don't need to use a specific loader for it. You can simply add PostCSS plugins you want to use in build/webpack.base.conf.js under the vue block:
*.vue文件中的样式会默认通过PostCSS被渲染,所以你不需要为它使用一个具体的加载器。你可以简单地在build/webpack.base.conf.js的vue模块中添加你想要使用的PostCSS插件:
// build/webpack.base.conf.js
module.exports = {
  // ...
  vue: {
    postcss: [/* your plugins */]
  }
}
To ensure consistent extraction and processing, it is recommended to import global, standalone style files from your root App.vue component, for example:
为了确保一致的提取和处理,推荐从你的根组件App.vue中导入全局的、独立的样式文件,比如:
<!-- App.vue -->
<style src="./styles/global.less" lang="less"></style>
Note you should probably only do this for the styles written by yourself for your application. For existing libraries e.g. Bootstrap or Semantic UI, you can place them inside /static and reference them directly in index.html. This avoids extra build time and also is better for browser caching. (See Static Asset Handling)
为了你的应用程序中你自己写的样式,你应该可能只需要做这个。因为对于现有的库,比如Bootstrap或者Semantic UI,你可以在/static中取代它,然后在index.html中直接引用它们。这样避免了额外的创建时间,同样对于浏览器缓存更好。(查看静态资源处理)
You will notice in the project structure we have two directories for static assets: src/assets and static/. What is the difference between them?
你将注意到,在这个项目结构中,我们有两个目录用于存放静态资源:src/assets和static/。它们之间的不同是什么呢?
To answer this question, we first need to understand how Webpack deals with static assets. In *.vue components, all your templates and CSS are parsed by vue-html-loader and css-loader to look for asset URLs. For example, in <img src="./logo.png"> and background: url(./logo.png), "./logo.png" is a relative asset path and will be resolved by Webpack as a module dependency.
为了回答这个问题,我们首先需要理解Webpack是怎样处理静态资源的。在*.vue 组件中,你的所有模板和CSS都是通过vue-html-loader和css-loader来进行解析进而寻找资源URL。比如,在<img src="./logo.png">和background: url(./logo.png)中,"./logo.png"是一个相关的资源路径,它将被Webpack当做一个模块依赖处理。
Because logo.png is not JavaScript, when treated as a module dependency, we need to use url-loader and file-loader to process it. This boilerplate has already configured these loaders for you, so you basically get features such as filename fingerprinting and conditional base64 inlining for free, while being able to use relative/module paths without worrying about deployment.
因为logo.png 不是JavaScript,当把它当做一个模块依赖的时候,我们需要使用url-loader和file-loader来处理它。这个模板已经为你配置了这些加载器,所以当可以使用relative/module路径而不用担心部署的时候,你基本上免费地获得了诸如文件指纹、有条件的base64内联等功能。
Since these assets may be inlined/copied/renamed during build, they are essentially part of your source code. This is why it is recommended to place Webpack-processed static assets inside /src, along side other source files. In fact, you don't even have to put them all in /src/assets: you can organize them based on the module/component using them. For example, you can put each component in its own directory, with its static assets right next to it.
因为这些资源在创建过程中可以被内联/复制/重命名,它们从本质上说是你源代码的一部分。这就是为什么它被建议作为需经过Webpack处理的静态资源存放到/src中,和其他源文件一起。事实上,你不一定非要把它们放到/src/assets中,你可以基于模块/组件来组织它们并使用它们。比如,你可以将每一个组件和它们自己的静态资源一起放到它们自己的目录中。
Relative URLs, e.g. ./assets/logo.png will be interpreted as a module dependency. They will be replaced with an auto-generated URL based on your Webpack output configuration.
Non-prefixed URLs, e.g. assets/logo.png will be treated the same as the relative URLs and translated into ./assets/logo.png.
URLs prefixed with ~ are treated as a module request, similar to require('some-module/image.png'). You need to use this prefix if you want to leverage Webpack's module resolving configurations. For example if you have a resolve alias for assets, you need to use <img src="~assets/logo.png"> to ensure that alias is respected.
Root-relative URLs, e.g. /assets/logo.png are not processed at all.
相关联的URL,比如,./assets/logo.png 将会被当做一个模块依赖来解释。它们会被基于你的Webpack输出配置的自动生成的URL替代。
没有前缀的URL,比如,assets/logo.png,它们会被当做相对URL一样对待,将它们转换成./assets/logo.png。
** ~作为前缀的URL**,它们被当做一个模块请求,类似于require('some-module/image.png')。如果你想要借助Webpack的模块解决配置,你需要使用这个前缀。比如,如果你有一个assets的解决别名,你需要使用 <img src="~assets/logo.png"> 来确保那个别名是被遵守的。
根目录相关的URL,比如,/assets/logo.png 根本不会被处理。
In order for Webpack to return the correct asset paths, you need to use require('./relative/path/to/file.jpg'), which will get processed by file-loader and returns the resolved URL. For example:
为了让Webpack返回正确的静态资源路径,你需要使用require('./relative/path/to/file.jpg'),这种方式将被file-loader处理,返回计算后的URL。比如:
computed: {
  background () {
    return require('./bgs/' + this.id + '.jpg')
  }
}
Note the above example will include every image under ./bgs/ in the final build. This is because Webpack cannot guess which of them will be used at runtime, so it includes them all.
注意上面的例子在最后编译时将包含./bgs/下的所有图片。这是因为Webpack不能猜测里面的哪一些图片将在运行时中被使用,所以它包含了所有的图片。
In comparison, files in static/ are not processed by Webpack at all: they are directly copied to their final destination as-is, with the same filename. You must reference these files using absolute paths, which is determined by joining build.assetsPublicPath and build.assetsSubDirectory in config.js.
相比之下,static/下的文件根本不会被Webpack处理:它们会以相同的文件名被直接复制到它们最终的目录。你必须用绝对路径引用这些文件,这个绝对路径是由config.js中build.assetsPublicPath和build.assetsSubDirectory拼接而成的。
As an example, with the following default values:
下面是一个使用默认值的例子:
// config.js
module.exports = {
  // ...
  build: {
    assetsPublicPath: '/',
    assetsSubDirectory: 'static'
  }
}
Any file placed in static/ should be referenced using the absolute URL /static/[filename]. If you change assetSubDirectory to assets, then these URLs will need to be changed to /assets/[filename].
所有static/ 下的文件应该使用绝对URL引用,像/static/[filename]这样。如果你把assetSubDirectory修改为assets,那么这些URL需要被修改为 /assets/[filename]。
We will learn more about the config file in the section about backend integration.
在后端整合这一节中我们将了解到更多关于配置文件方面的内容。
Sometimes it is practical to have different config values according to the environment that the application is running in.
有时根据应用程序运行的环境不同有不同的配置值是一种实际情况。
As an example:
举个例子:
// config/prod.env.js
module.exports = {
  NODE_ENV: '"production"',
  DEBUG_MODE: false,
  API_KEY: '"..."' // this is shared between all environments
}

// config/dev.env.js
module.exports = merge(prodEnv, {
  NODE_ENV: '"development"',
  DEBUG_MODE: true // this overrides the DEBUG_MODE value of prod.env
})

// config/test.env.js
module.exports = merge(devEnv, {
  NODE_ENV: '"testing"'
})
Note: string variables need to be wrapped into single and double quotes
'"..."'
注意:字符串变量需要被包裹在单引号和双引号之间
'"..."'
So, the environment variables are:
所以,环境变量是:
NODE_ENV = 'production',
DEBUG_MODE = false,
API_KEY = '...'
NODE_ENV = 'development',
DEBUG_MODE = true,
API_KEY = '...'
NODE_ENV = 'testing',
DEBUG_MODE = true,
API_KEY = '...'
As we can see, test.env inherits the dev.env and the dev.env inherits the prod.env.
就像我们看到的, test.env 继承自dev.env,dev.env 继承自prod.env。
It is simple to use the environment variables in your code. For example:
在你的代码中使用环境变量是很简单的。比如:
Vue.config.debug = process.env.DEBUG_MODE
If you are building a purely-static app (one that is deployed separately from the backend API), then you probably don't even need to edit config/index.js. However, if you want to integrate this template with an existing backend framework, e.g. Rails/Django/Laravel, which comes with their own project structures, you can edit config/index.js to directly generate front-end assets into your backend project.
如果你正在创建一个纯静态的应用程序(不依赖后台接口而部署的应用程序),你甚至可能不需要编辑config/index.js。但是,如果你想要用已有的像Rails/Django/Laravel这样的后台框架来整合这个模板,而这些后台框架有它们自己的项目结构,你可以编辑 config/index.js来直接生成前端静态资源到你的后台项目中。
Let's take a look at the default config/index.js:
让我们来看看config/index.js中的默认设置:
var path = require('path')

module.exports = {
  build: {
    index: path.resolve(__dirname, 'dist/index.html'),
    assetsRoot: path.resolve(__dirname, 'dist'),
    assetsSubDirectory: 'static',
    assetsPublicPath: '/',
    productionSourceMap: true
  },
  dev: {
    port: 8080,
    proxyTable: {}
  }
}
Inside the build section, we have the following options:
在build 中,我们有以下选项:
build.indexMust be an absolute path on your local file system.
在你的本地文件系统中必须是一个绝对路径。
This is where the index.html (with injected asset URLs) will be generated.
这是index.html(伴随着被注入的静态资源URL)将要生成的地方。
If you are using this template with a backend-framework, you can edit index.html accordingly and point this path to a view file rendered by your backend app, e.g. app/views/layouts/application.html.erb for a Rails app, or resources/views/index.blade.php for a Laravel app.
如果你正在结合一个后台框架使用这个模板,你可以相应地编辑index.html,并且将这个路径指向一个由你的后台应用程序渲染生成的view文件,比如由Rails渲染生成的app/views/layouts/application.html.erb,或者由Laravel 生成的resources/views/index.blade.php。
build.assetsRootMust be an absolute path on your local file system.
在你的本地文件系统中必须是一个绝对路径。
This should point to the root directory that contains all the static assets for your app. For example, public/ for both Rails/Laravel.
这个路径指向包含你的应用程序中所有静态资源的根目录。比如,Rails/Laravel中的public/。
build.assetsSubDirectoryNest webpack-generated assets under this directory in build.assetsRoot, so that they are not mixed with other files you may have in build.assetsRoot. For example, if build.assetsRoot is /path/to/dist, and build.assetsSubDirectory is static, then all Webpack assets will be generated in path/to/dist/static.
将webpack生成的资源文件放到 build.assetsRoot这个路径下的build.assetsSubDirectory这个文件中,这样这些资源文件就不会和build.assetsRoot这个路径下的其他文件混合。比如,如果build.assetsRoot设置为/path/to/dist,build.assetsSubDirectory 设置为static,然后所有的Webpack资源将生成在path/to/dist/static这个路径下。
This directory will be cleaned before each build, so it should only contain assets generated by the build.
这个路径下的文件将在每一次生成操作(build)之前被全部清空,所以这个路径下应该只包含由生成操作(build)得到的资源。
Files inside static/ will be copied into this directory as-is during build. This means if you change this prefix, all your absolute URLs referencing files in static/ will also need to be changed. See Handling Static Assets for more details.
static/文件夹中的文件在build操作过程中将以原样被复制到这个目录下。这意味着如果你修改这个前缀,你的所有引用了static/这个路径下的文件的绝对路径都需要修改。查看处理静态资源了解更多细节。
build.assetsPublicPathThis should be the URL path where your build.assetsRoot will be served from over HTTP. In most cases, this will be root (/). Only change this if your backend framework serves static assets with a path prefix. Internally, this is passed to Webpack as output.publicPath.
这个路径应当是当你的 build.assetsRoot 在HTTP上运行起来的时的URL路径。在大多数情况下,这个路径的值应该是根路径 (/)。只有当你的后台框架给静态资源提供服务时带了一个路径前缀时才需要修改这个路径的值。在内部,这个路径是被当做 output.publicPath的值传递给Webpack的。
build.productionSourceMapWhether to generate source maps for production build.
是否需要在建立生产文件时创建源映射。
dev.portSpecify the port for the dev server to listen to.
为开发服务器指定监听的端口。
dev.proxyTableDefine proxy rules for the dev server. See API Proxying During Development for more details.
为开发服务器定义代理规则。查看开发过程中的API代理了解更多细节。
When integrating this boilerplate with an existing backend, a common need is to access the backend API when using the dev server. To achieve that, we can run the dev server and the API backend side-by-side (or remotely), and let the dev server proxy all API requests to the actual backend.
当用一个已有的后台整合这个模板时,一个相同的需求是当使用开发服务时需要访问后台API。为了达到这一点,我们可以并行地(或远程地)运行开发服务器和后台API,并且让开发服务器代理所有的到实际后台的API请求。
To configure the proxy rules, edit dev.proxyTable option in config/index.js. The dev server is using http-proxy-middleware for proxying, so you should refer to its docs for detailed usage. But here's a simple example:
为了配置代理规则,可以编辑config/index.js中的dev.proxyTable选项。这个开发服务器是使用http代理中间件来进行代理,所以你应该参考它的文档了解具体的使用。但是这里有一个简单的例子:
// config/index.js
module.exports = {
  // ...
  dev: {
    proxyTable: {
      // proxy all requests starting with /api to jsonplaceholder
      '/api': {
        target: 'http://jsonplaceholder.typicode.com',
        changeOrigin: true,
        pathRewrite: {
          '^/api': ''
        }
      }
    }
  }
}
The above example will proxy the request /api/posts/1 to http://jsonplaceholder.typicode.com/posts/1.
上面的例子将会代理 /api/posts/1 这个请求到http://jsonplaceholder.typicode.com/posts/1。
An overview of the tools used by this boilerplate for unit testing:
一个在这个模板中用于单元测试的工具的回顾
Karma: the test runner that launches browsers, runs the tests and reports the results to us.
karma-webpack: the plugin for Karma that bundles our tests using Webpack.
Mocha: the test framework that we write test specs with.
Chai: test assertion library that provides better assertion syntax.
Sinon: test utility library that provides spies, stubs and mocks.
Karma: 运行于浏览器的测试运行器,运行测试用例并且将结果报告给我们。
karma-webpack:Karma的插件,它使用Webpack绑定我们的测试用例。
Mocha: 我们用来写测试说明的测试框架。
Chai: 提供了更好的断言语法的测试断言库。
Sinon: 提供了spies、stubs和mocks的测试工具库。
Chai and Sinon are integrated using karma-sinon-chai, so all Chai interfaces (should, expect, assert) and sinon are globally available in test files.
Chai和Sinon用karma-sinon-chai进行了整合,所以所有的Chai接口(should, expect, assert)和sinon在测试文件中是全局可用的。
And the files:
并且这些文件:
index.jsThis is the entry file used by karma-webpack to bundle all the test code and source code (for coverage purposes). You can ignore it for the most part.
specs/This directory is where you write your actual tests. You can use full ES2015 and all supported Webpack loaders in your tests.
karma.conf.jsThis is the Karma configuration file. See Karma docs for more details.
index.js这是karma-webpack 使用的入口文件,用来绑定所有的测试代码和源代码(为了覆盖的目的)。在大多数情况下你可以忽略它。
specs/这个目录是你写实际的测试用例的地方。在你的测试用例中,你可以使用ES2015,并且支持Webpack加载器。
karma.conf.js这是Karma的配置文件。查看Karma说明文档了解更多细节。
You can run the tests in multiple real browsers by installing more karma launchers and adjusting the browsers field in test/unit/karma.conf.js.
在安装了更多karma 发射器并且在test/unit/karma.conf.js中调整了browsers 域之后,你可以在多个真实的浏览器中运行测试用例。
This boilerplate comes with inject-loader installed by default. For usage with *.vue components, see vue-loader docs on testing with mocks.
这个模板默认安装情况下携带的是inject-loader 。要了解*.vue组件的使用,请查看用mocks测试时的vue加载器说明文档。
This boilerplate uses Nightwatch.js for e2e tests. Nightwatch.js is a highly integrated e2e test runner built on top of Selenium. This boilerplate comes with Selenium server and chromedriver binaries pre-configured for you, so you don't have to mess with these yourself.
这个模板使用Nightwatch.js 来做e2e测试。Nightwatch.js是一个基于Selenium的高度集成的e2e测试运行器。这个模板为你提供了Selenium服务器和chrome驱动二元预配置,所以你不会把他们混淆。
Let's take a look at the files in the test/e2e directory:
让我们来看下 test/e2e 目录下的文件:
runner.jsA Node.js script that starts the dev server, and then launches Nightwatch to run tests against it. This is the script that will run when you run npm run e2e.
nightwatch.conf.jsNightwatch configuration file. See Nightwatch's docs on configuration for more details.
custom-assertions/Custom assertions that can be used in Nightwatch tests. See Nightwatch's docs on writing custom assertions for more details.
specs/You actual tests! See Nightwatch's docs on writing tests and API reference for more details.
runner.js一个Node.js脚本,它会启动开发服务器,然后启动Nightwatch来运行测试用例。当你运行 npm run e2e时这个脚本就会运行。
nightwatch.conf.jsNightwatch配置文件。查看Nightwatch的配置说明文档了解更多细节。
custom-assertions/自定义断言可以被使用到Nightwatch的测试用例中。查看自定义断言的Nightwatch说明文档了解更多细节。
specs/你实际的测试用例。查看关于写测试用例的Nightwatch说明文档和API参考文档了解更多细节。
To configure which browsers to run the tests in, add an entry under "test_settings" in test/e2e/nightwatch.conf.js , and also the --env flag in [test/e2e/runner.js](https://github.com/vuejs-templates/webpack/blob/master/template/test/e2e/runner.js#L15). If you wish to configure remote testing on services like SauceLabs, you can either make the Nightwatch config conditional based on environment variables, or use a separate config file altogether. Consult Nightwatch's docs on Selenium for more details.
为了配置可以在哪些浏览器中运行测试用例,可以在 test/e2e/nightwatch.conf.js 中的"test_settings" 下添加一个入口,还要在[test/e2e/runner.js](https://github.com/vuejs-templates/webpack/blob/master/template/test/e2e/runner.js#L15)中添加--env 标识。如果你想要在像SauceLabs这样的服务上配置远程测试,你可以有条件地基于环境变量设置Nightwatch配置,或者使用一个单独的配置文件。查看Selenium上的Nightwatch说明文档了解更多细节。
If you want to prerender routes that will not significantly change once pushed to production, use this Webpack plugin: prerender-spa-plugin, which has been tested for use with Vue. For pages that do frequently change, Prerender.io and Netlify both offer plans for regularly re-prerendering your content for search engines.
如果你想要预渲染一旦被推送到生产上将不会被明显改变的路线,可以使用这个Webpack插件:prerender-spa-plugin,这个插件经过了使用Vue的测试。因为页面确实频繁地改变,Prerender.io 和 Netlify 都为搜索引擎有规律地重新预渲染你的内容提供了解决方案。
prerender-spa-plugin(Using prerender-spa-plugin)Install it as a dev dependency:
把它当做一个开发依赖进行安装
npm install --save-dev prerender-spa-plugin
Require it in build/webpack.prod.conf.js:
在 build/webpack.prod.conf.js中引用它:
// This line should go at the top of the file where other 'imports' live in
// 这一行应该在其他'imports'所在的文件的最顶部运行
var PrerenderSpaPlugin = require('prerender-spa-plugin')
new PrerenderSpaPlugin(
  // Path to compiled app
  path.join(__dirname, '../dist'),
  // List of endpoints you wish to prerender
  [ '/' ]
)
If you also wanted to prerender /about and /contact, then that array would be [ '/', '/about', '/contact' ].
如果你也想要预渲染 /about和/contact,那么那个数据应该为[ '/', '/about', '/contact' ]。
目前主流的平台(iOS APP、Android APP、微信小程序、支付宝小程序、百度智能小程序、今日头条小程序(字节跳动小程序)等)对H5页面的支持是通过提供<web-view /> 组件的方式。<web-view /> 组件是一个可以用来承载H5网页的组件,会自动铺满整个小程序页面。
| 微信小程序 | 支付宝小程序 | 百度小程序 | 字节跳动小程序 | iOS APP | Android APP | |
|---|---|---|---|---|---|---|
| 平台入口: | 微信APP 首页 搜索 ,可直接进入小程序; 微信APP -> 发现 -> 小程序 搜索; |
支付宝APP 首页搜索,可直接进入小程序; 支付宝APP -> 朋友 -> 点“小程序”搜索 |
智能小程序目前仍处于入驻申请阶段。目前仅支持在百度APP中扫小程序的二维码进入 | 头条APP 首页 搜索,可直接进入小程序 头条APP -> 我的 -> 小程序 |
- | - |
| 是否支持<web-view /> | √ 基础库 1.6.4 开始支持,低版本需做兼容处理 |
√ 基础库 1.6.0 开始支持,低版本需做兼容 |
√ | √ | √ | √ |
| 基础库当前版本 | 2.0.4 | 1.12.0 | - | - | - | - |
| web-view 网页中支持的接口: | 返回小程序页面 判断客户端是否支持js 图像接口(拍照或上传、上传下载图片、获取本地图片等) 音频接口 智能接口 设备信息 地理位置 摇一摇周边 微信扫一扫 微信卡券 长按识别 |
导航栏(保留当前页面,跳转到应用内的某个指定页面 等) 拍照或从手机相册中选择图片 预览图片 获取用户当前的地理位置信息 使用支付宝内置地图查看位置 交互反馈 缓存 获取当前网络状态 分享当前页面,当执行my.startShare() 时会唤起当前小程序页面的分享功能。 唤起支付 向小程序发送消息 监听小程序发过来的消息 获取当前环境 |
返回智能小程序页面 拨打电话 打开小程序 登录 设置剪贴板 获取网络类型 预览图片 分享 使用内置地图打开地点 获取地理位置 拍照或上传 |
返回小程序页面 | - | - |
| 小程序和web-view网页的双向通信: | 支持web-view网页向小程序发送消息, 但是只会在特定时机(小程序后退、组件销毁、分享)触发并收到消息。 |
目前已支持了双向通信能力。 即:支持web-view网页向小程序发送消息,并且小程序能立即触发并接收到消息,并且立即向H5发送消息。 |
支持web-view网页向小程序发送消息, 但是只会在特定时机(小程序后退、组件销毁、分享)触发并收到消息。 |
× 不支持 |
- | - |
| web-view网页是否支持支付: | × web-view 组件暂不支持微信支付 |
√ web-view 组件支持唤起支付宝支付 |
× 不支持 |
× 不支持 |
√ 可以调原生的方法由原生发起支付 |
√ 可以调原生的方法由原生发起支付 |
| web-view网页需要登录时的鉴权: | √ 支持。 web-view网页需要登录时,跳回小程序进行鉴权,鉴权完成后再返回web-view网页。 |
√ 支持。同微信。 |
√ 支持。同微信。 |
√ 支持。同微信。 |
调原生方法登录 | 调原生方法登录 |
| 详细文档 | 微信小程序 web-view | 支付宝小程序 web-view | 百度智能小程序 web-view | 字节跳动小程序 web-view | - | - |
| 备注 | - | - |
在写.vue文件中的样式时,在<style>标签中最开始用的是原始的css文件,不能写.scss,写sass的样式时,webstorm不能识别。会出现下面的错误:

解决办法是:
安装相应的依赖(sass-loader 、node-sass 、vue-style-loader、scss-loader):
npm install sass-loader node-sass vue-style-loader scss-loader --save-dev
在style标签上添加rel="stylesheet/scss"。这样,webstorm中style标签部分的.scss语法就能识别了。如下图所示:

另:
在*.vue模板中支持几种css预处理器和模板语言jade。但是当你在<style>标签中加上 lang=sass 然后写sass时会发现IDE一片报错。一开始想到的是webstorm的Language Injections,并照着已有的写了一个:

然而并不能用。。。
发现了<style>标签中有 rel="stylesheet/scss"和 type="text/css" 时能正确识别sass语言。其实我试了以后发现,type="text/css" 也可以不需要。如:
<style scoped lang="scss" rel="stylesheet/scss">
这样就能让webstorm识别sass了。同理less也可以。但是需要webstorm版本高于2016.1.1 。
AngularJS是采用JavaScript语言编写的客户端(client-side)MVC框架,帮助开发者编写现代化的单页面(single-page)应用。它尤其适合编写有大量CRUD(增删改查)操作的、具有Ajax风格的富客户端应用。
MVC:
MVC全名是Model View Controller,是模型(model)-视图(view)-控制器(controller)的缩写,一种软件设计典范,用一种业务逻辑、数据、界面显示分离的方法组织代码,将业务逻辑聚集到一个部件里面,在改进和个性化定制界面及用户交互的同时,不需要重新编写业务逻辑。MVC被独特的发展起来用于映射传统的输入、处理和输出功能在一个逻辑的图形化用户界面的结构中。
CRUD:
CRUD是指在做计算处理时的增加(Create)、读取查询(Retrieve)、更新(Update)和删除(Delete)几个单词的首字母简写。主要被用在描述软件系统中数据库或者持久层的基本操作功能。
通过DI,可以用短小精炼且仔细测试过的服务(services)来组建web应用。
<body ng-app="myapp">
    <div ng-controller="HelloCtrl">
        say hello to:
        <input type="text" ng-model="name">
        <h1>Hello,{{name}}!</h1>
    </div>
</body>

<script>
var app = angular.module('myapp', []);
app.controller('HelloCtrl', function($scope) {
    $scope.name = 'world';
});
</script>
AngularJS中的$scope对象是模板的域模型(domain model),也称为作用域实例(instance)。通过为其属性赋值,可以传递数据给模板渲染。
<body ng-app="myapp">
    <div ng-controller="HelloCtrl">
        say hello to:
        <input type="text" ng-model="name">
        <h1>Hello,{{getName()}}!</h1>
    </div>
</body>
<script>
var app = angular.module('myapp', []);
app.controller('HelloCtrl', function($scope) {
    $scope.getName = function() {
        return $scope.name;
    };
});
</script>
控制器(controller)的主要职责是初始化作用域实例。在实践中,初始化逻辑又可以再分为:
控制器实际上就是JavaScript函数。它们不需要扩展任何AngularJS特定的类,也不需要调用任何特定的AngularJS API,就可以正常工作。
AngularJS的模型(model)实际上就是普通的JavaScript对象。与控制器类似,不需要特别地去扩展任何AngularJS的底层类,也不用去构造(construct)模型对象。
可以在模型层中使用任何当前存在的纯JavaScript的类或对象。模型可拥有的属性也不仅限于原始值(primitive values),任何有效的JavaScript对象或数组都是可以的。只需要将模型简单地指派给$scope,AngularJS就可确认它的存在。
每个$scope都是Scope类的实例。Scope类拥有很多方法,用于控制作用域的生命周期、提供事件传播(event-propagation)功能,以及支持模板的渲染等。
ng-controller指令会调用Scope.$new()创建新的作用域$scope 。看上去需要至少一个作用域实例才能创建新的作用域。确实如此,AngularJS拥有$rootScope,它是其他所有作用域的父作用域,将在新应用启动时自动创建。
ng-controller指令是作用域创建(scope creating)指令。当在DOM树中遇到作用域创建指令时,AngularJS都会创建Scope类的新实例$scope 。新创建的作用域实例$scope会拥有$parent属性,并指向它的父作用域。在DOM树中,会有很多这样的指令创建出很多作用域。
众多作用域形成了以$rootScope为根的树结构。鉴于DOM树驱动了作用域的创建,作用域树模仿DOM树的结构就不奇怪了。
某些指令会创建子作用域,也许你会奇怪为什么搞得这么复杂。下面来看下使用ng-repeat指令的例子。
<body ng-app="myapp">
    <ul ng-controller="WorldCtrl">
        <li ng-repeat="country in countries">
            {{country.name}} has population of {{country.population}}
        </li>
        <hr> World's population:{{population}} millions
    </ul>
</body>

<script>
var app = angular.module('myapp', []);
app.controller('WorldCtrl', function($scope) {
    $scope.population = 7000;
    $scope.countries = [{
        name: 'France',
        population: 63.1
    }, {
        name: 'United Kingdom',
        population: 61.8
    }];
});
</script>
ng-repeat指令为国家集合中每个国家创建新的DOM元素。指令的语法很容易理解,对应每项创建新变量country,并暴露给$scope以在视图中渲染。
但这里有个问题,对应每个country,都有个新变量要暴露给$scope,而又不能覆盖之前变量的值。AngularJS为了解决此问题,给集合中每个元素创建新的作用域。这些作用域会组成类似DOM树的层级(hierarchy)结构,运用Chrome扩展Batarang,可以直观地看到。
每个作用域有自己的整套模型值(model values)。在不同的作用域中,定义同名的变量,不会造成命名冲突(不同的DOM元素指向不同的作用域,并使用各自作用域中的变量渲染模板),这相当于集合中每个项目都有自己的命名空间(namespace)。在前面的例子里,每个
尽管AngularJS的事件系统模仿DOM的事件系统,但它们的传播机制却完全独立,没有共通之处。
对于某些问题来说,虽然跨越作用域层级的事件传播(特别是全局的、异步的、关于状态变迁的通知)是非常优雅的解决方案,但还是应该谨慎使用它们。通常可以依赖双向数据绑定,更便捷地解决问题。
在AngularJS框架中,仅有三个事件可以被向上分发(emitted):
七个事件可以被向下广播:
使用作用域事件是相当保守的,我们应该在发送自定义事件前考虑其他选项(大部分情况下是双向数据绑定)。
不要在AngularJS中试图模仿DOM的基于事件的编程模型。大部分情况下,最好使用双向数据绑定。
作用域通常会依赖作用域创建指令而创建和销毁,也可以调用Scope类上的$new()和$destroy()方法,手动创建和销毁作用域。
AngularJS与HTML和DOM有着更加紧密的联系,因为AngularJS依靠浏览器去解析模板文本(就像浏览器对任何HTML文档所做的)。
浏览器将文本转换成DOM树之后,AngularJS参与进来,开始遍历(traverse)解析好的DOM结构。当遇到指令时,AngularJS就执行相关逻辑,将指令转换成页面的动态部分。
因为AngularJS依靠浏览器去解析模板,所以要保证模板是有效的HTML。尤其要小心闭合好HTML标签(未闭合好的标签不会产生任何错误信息,但会让视图不能正常渲染)。AngularJS在有效的DOM树下才能好好工作。
AngularJS扩展了HTML的词汇库(增加新的属性或HTML元素,并告知浏览器如何解释它们),这类似于创造了一门基于HTML的领域特定语言(domain-specific language, DSL),并指导浏览器如何理解它。因此,常听到AngularJS“教浏览器新把戏”的说法。
AngularJS中,不用在JavaScript代码中保存任何对DOM元素的引用,也不用显示地操纵DOM元素。我们只是专注于模型的变化,而让AngularJS去做辛苦的工作。所有需要做的,只是以指令的形式去提供一些提示而已。
AngularJS的指令用声明表达出了需要的效果,所以不用再去按部就班地修改DOM元素(就像那些jQuery应用)。AngularJS提倡在模板中使用声明式编程风格,而在JavaScript代码中(控制器和业务逻辑)使用命令式编程风格。有了AngularJS的支持,很少需要步骤详细的底层DOM操纵(唯一的例外是实现指令的代码)。
重要规则:永远不要在AngularJS的控制器中操纵DOM元素。在控制器中获取对DOM元素的引用、操纵元素的属性,预示着用命令式编程风格来构建UI--这背离了AngularJS之道。
AngularJS为自己定义了全局命名空间(namespace)angular,它提供多种功能及不少便利函数,module就是其中之一。module为AngularJS管理的对象(控制器、服务等)扮演容器的角色。
var app = angular.module('myapp', []);
app.controller('HelloCtrl', function($scope) {
        $scope.message = 'please write';
    }
);
定义新的模块,需要传入名字,作为调用module的第一个参数,而第二个参数则表达此模块依赖哪些其他模块(上例中的模块不依赖其他模块)。
angular.module的调用会返回新创建模块的实例。
controller函数的两个参数:
注册服务:AngularJS只连接其认识的对象。因此,接入依赖注入机制的第一步,是将对象注册在模块(module)上。我们不直接注册对象的实例,而是将对象创建的方案抛给依赖注入系统,然后AngularJS解释这些方案以初始化对象,并在之后连接它们,最后成为可运行的应用。
AngularJS的$provide服务可以注册不同的对象创建方案。之后$injector服务会解释这些方案,生成完备而可用的对象实例(已经解决好所有的依赖关系)。
$injector服务创建的对象称为服务(service)。在整个应用的生命中,每种方案AngularJS仅解释一次,也就是说,每个对象仅有一个实例。
$injector服务创建的对象都是单件(singleton),每个运行中的应用,只拥有一个给定服务的实例。
归根结底,AngularJS模块保存对象实例,而我们控制这些对象的创建。
让AngularJS管理对象最容易的方法是,注册已初始化好的对象,代码如下:
var myMod=angular.module('myMod',[]);
myMod.value('notificationsArchive' , new NotificationsArchive());
AngularJS依赖注入机制管理的服务都需要独立的名字(如上例中的notificationsArchive),然后就是创建新实例的方案。
值(value)对象不太有趣,通过以上方法注册的对象不能依赖于其他对象。这对于NotificationsArchive实例来说不成问题,它没有任何依赖。但实际中,这种注册方法只对非常简单的对象有效(内建(built-in)对象或对象字面量(literal))。
myMod.service('notificationsService' , NotificationsService);
myMod.factory('notificatonsService',function(notificationsArchive,MAX_LEN){

});
myMod.constant('MAX_LEN' , 10);
myMod.provider('notificationsService',function(){

});
AngularJS支持多种对象创建方案,provider是其中的通用方法,它在创建对象实例前可以对其进行配置。为了支持provider,AngularJS将模块的生命周期分为两个阶段,如下:
配置Provider只能在配置阶段。确实,在对象创建好之后,再去修改创建方案也没什么意义。Provider的配置代码如下:
myMod.config(function(notificationsServiceProvider) {
    notificationsServiceProvider.setMaxLen(5);
});
这里重要的是,对notificationsServiceProvider对象的依赖,它有provider的后缀,表明它是即将执行的对象创建方案,配置阶段允许我们对它进行最后的调整。
1.2、运行阶段
运行阶段在应用启动时安排后面要执行的工作。你可能会将运行阶段联想为其他编程语言中的main方法。但是,最大的不同是,AngularJS模块可能有多个配置和运行块(block)。在此意义上,应用没有单一的入口(运行时的应用其实就是一组在协作的对象)。
为了说明运行阶段的作用,我们假设要显示应用的已运行时间给用户。为了实现目标,我们将应用的已运行时间设定为$rootScope实例的属性,代码如下:
angular.module('upTimeApp', []).run(function($rootScope) {
    $rootScope.appStarted = new Date();
});
然后在模板中取回它,代码如下:
Application started at: {{ appStarted }}
在上面的例子中,我们直接为$rootScope设定了属性。不要忘记,$rootScope实例是全局变量,因此它也有全局状态的种种弊端。$rootScope实例应该只定义需要被很多模板访问的属性,且尽量少。
下表是对创建对象的不同方法,以及这些方法对应的模块生命阶段的总结:
| 方法 | 对象种类 | 可以在配置阶段注入 | 可以在运行阶段注入 |
|---|---|---|---|
| Constant | 常量值 | yes | yes |
| Variable | 变量值 | -- | yes |
| Service | 构造函数创建的新对象 | -- | yes |
| Factory | 工厂函数返回的新对象 | -- | yes |
| Provider | $get工厂函数创建的新对象 | yes | -- |
原文地址:https://github.com/ftlabs/fastclick README.md
Javascript的组件生态在最近几年的发展很给力,我们的可选性更加广泛了。这本是一件好事,但是当多个第三方Javascript在一起混合使用的时候,我们可能会遇到一个很尴尬的问题,那就是不是所有的组件都能在一起很愉快的玩耍的。
为了解决这个问题,两种竞争关系的前端模块规范(AMD和CommonJS)问世了。他们规定开发者们采用一种约定好的模式来写代码,以避免污染整个生态系统。
AMD规范,全称”Asynchronous Module Definition”,称为 异步模块加载规范 。一般应用在浏览器端。流行的浏览器端异步加载库 RequireJS ( 中文网站 )实现的就是AMD规范。
下面是使用AMD规范定义一个名为 foo 模块的方式,此模块依赖jquery:
//    filename: foo.js
define(['jquery'], function ($) {
    //    methods
    function myFunc(){};

    //    exposed public methods
    return myFunc;
});
AMD讲究的是前置执行。稍微复杂的例子如下, foo 模块有多个依赖及方法暴漏:
//    filename: foo.js
define(['jquery', 'underscore'], function ($, _) {
    //    methods
    function a(){};    //    private because it's not returned (see below)
    function b(){};    //    public because it's returned
    function c(){};    //    public because it's returned

    //    exposed public methods
    return {
        b: b,
        c: c
    }
});
define 是AMD规范用来声明模块的接口,示例中的第一个参数是一个数组,表示当前模块的依赖。第二个参数是一个回调函数,表示此模块的执行体。只有当依赖数组中的所有依赖模块都是可用的时,AMD模块加载器(比如RequireJS)才会去执行回调函数并返回此模块的暴露接口。
注意,回调函数中参数的顺序与依赖数组中的依赖顺序一致。(即: jquery -> $ , underscore -> _ )
当然,在这里我可以将回调函数的参数名称改成任何我们想用的可用变量名,这并不会对模块的声明造成任何影响。
除此之外,你不能在模块声明的外部使用 $ 或者 _ ,因为他们只在模块的回调函数体中才有定义。
关于AMD规定声明模块的更多内容,请参考 这里 。
CMD规范,全称”Common Module Definition”,称为 通用模块加载规范 。一般也是用在浏览器端。浏览器端异步加载库 Sea.js 实现的就是CMD规范。
下面是使用AMD规范定义一个名为 foo 模块的方式,此模块依赖jquery:
define(function (require, exports, module) {
    // load dependence
    var $ = require('jquery');

    //    methods
    function myFunc(){};

    //    exposed public methods
    return myFunc;
})
CMD规范倾向依赖就近,稍微复杂一点例子:
define(function (requie, exports, module) {
    // 依赖可以就近书写
    var a = require('./a');
    a.test();

    // ...
    // 软依赖
    if (status) {
        var b = requie('./b');
        b.test();
    }
});
根据CommonJS规范,一个单独的文件就是一个模块。每一个模块都是一个单独的作用域,也就是说,在一个文件定义的变量(还包括函数和类),都是私有的,对其他文件是不可见的。
如果你在Node.js平台上写过东西,你应该会比较熟悉CommonJS规范。与前面的AMD及CMD规范不一样的是,CommonJS规范一般应用于服务端(Node.js平台),而且CommonJS加载模块采用的是同步方式(这跟他适用的场景有关系)。同时,得力于 Browserify 这样的第三方工具,我们可以在浏览器端使用采用CommonJS规范的js文件。
下面是使用CommonJS规范声明一个名为 foo 模块的方式,同时依赖 jquery 模块:
//    filename: foo.js

//    dependencies
var $ = require('jquery');

//    methods
function myFunc(){};

//    exposed public method (single)
module.exports = myFunc;
稍微复杂一点的示例如下,拥有多个依赖以及抛出多个接口:
//    filename: foo.js
var $ = require('jquery');
var _ = require('underscore');

//    methods
function a(){};    //    private because it's omitted from module.exports (see below)
function b(){};    //    public because it's defined in module.exports
function c(){};    //    public because it's defined in module.exports

//    exposed public methods
module.exports = {
    b: b,
    c: c
};
因为AMD,CommonJS规范是两种不一致的规范,虽然他们应用的场景也不太一致,但是人们仍然是期望有一种统一的规范来支持这两种规范。于是,UMD(Universal Module Definition,称之为 通用模块规范 )规范诞生了。
客观来说,这个UMD规范看起来的确没有AMD和CommonJS规范简约。但是它支持AMD和CommonJS规范,同时还支持古老的全局模块模式。
我们来看个示例:
(function (root, factory) {
    if (typeof define === 'function' && define.amd) {
        // AMD
        define(['jquery'], factory);
    } else if (typeof exports === 'object') {
        // Node, CommonJS-like
        module.exports = factory(require('jquery'));
    } else {
        // Browser globals (root is window)
        root.returnExports = factory(root.jQuery);
    }
}(this, function ($) {
    //    methods
    function myFunc(){};

    //    exposed public method
    return myFunc;
}));
个人觉得UMD规范更像一个语法糖。应用UMD规范的js文件其实就是一个立即执行函数。函数有两个参数,第一个参数是当前运行时环境,第二个参数是模块的定义体。在执行UMD规范时,会优先判断是当前环境是否支持AMD环境,然后再检验是否支持CommonJS环境,否则认为当前环境为浏览器环境( window )。当然具体的判断顺序其实是可以调换的。
下面是一个更加复杂的示例:
(function (root, factory) {
    if (typeof define === 'function' && define.amd) {
        // AMD
        define(['jquery', 'underscore'], factory);
    } else if (typeof exports === 'object') {
        // Node, CommonJS-like
        module.exports = factory(require('jquery'), require('underscore'));
    } else {
        // Browser globals (root is window)
        root.returnExports = factory(root.jQuery, root._);
    }
}(this, function ($, _) {
    //    methods
    function a(){};    //    private because it's not returned (see below)
    function b(){};    //    public because it's returned
    function c(){};    //    public because it's returned

    //    exposed public methods
    return {
        b: b,
        c: c
    }
}));
Tips: 如果你写了一个小工具库,你想让它及支持AMD规范,又想让他支持CommonJS规范,那么采用UMD规范对你的代码进行包装吧,就像 这样 。
历史上,JavaScript 一直没有模块(module)体系,无法将一个大程序拆分成互相依赖的小文件,再用简单的方法拼装起来。其他语言都有这项功能,比如 Ruby 的require、Python 的import,甚至就连 CSS 都有@import,但是 JavaScript 任何这方面的支持都没有,这对开发大型的、复杂的项目形成了巨大障碍。
在 ES6 之前,社区制定了一些模块加载方案,最主要的有 CommonJS 和 AMD 两种。前者用于服务器,后者用于浏览器。ES6 在语言标准的层面上,实现了模块功能,而且实现得相当简单,完全可以取代 CommonJS 和 AMD 规范,成为浏览器和服务器通用的模块解决方案。
ES6 模块的设计**是尽量地静态化,使得编译时就能确定模块的依赖关系,以及输入和输出的变量。CommonJS 和 AMD 模块,都只能在运行时确定这些东西。比如,CommonJS 模块就是对象,输入时必须查找对象属性。
// CommonJS模块
let { stat, exists, readFile } = require('fs');

// 等同于
let _fs = require('fs');
let stat = _fs.stat;
let exists = _fs.exists;
let readfile = _fs.readfile;
上面代码的实质是整体加载fs模块(即加载fs的所有方法),生成一个对象(_fs),然后再从这个对象上面读取 3 个方法。这种加载称为“运行时加载”,因为只有运行时才能得到这个对象,导致完全没办法在编译时做“静态优化”。
ES6 模块不是对象,而是通过export命令显式指定输出的代码,再通过import命令输入。
// ES6模块
import { stat, exists, readFile } from 'fs';
上面代码的实质是从fs模块加载 3 个方法,其他方法不加载。这种加载称为“编译时加载”或者静态加载,即 ES6 可以在编译时就完成模块加载,效率要比 CommonJS 模块的加载方式高。当然,这也导致了没法引用 ES6 模块本身,因为它不是对象。
由于 ES6 模块是编译时加载,使得静态分析成为可能。有了它,就能进一步拓宽 JavaScript 的语法,比如引入宏(macro)和类型检验(type system)这些只能靠静态分析实现的功能。
除了静态加载带来的各种好处,ES6 模块还有以下好处。
https://www.davidbcalhoun.com/2014/what-is-amd-commonjs-and-umd/
https://www.tuicool.com/articles/nueqi27
http://es6.ruanyifeng.com/#docs/module
这里记录一下我平常在进行项目部署的时候的一般操作步骤。
比如说我本地仓库有 master 和 uat 两个分支,一般对应的远程仓库上也会有两个名字对应相同的分支 master 和 uat 。一般我们编辑修改代码的操作是在 master 中进行,在 master 中将所有功能开发完后,再将代码从 master 分支merge到 uat 分支,在 uat 分支中从 master 分支合并到最新的代码后,进行gulp clean & gulp build 的操作,然后再推送到远端仓库的 uat 分支,然后到Jenkins中对 uat 分支进行部署即可。具体步骤如下:
在 master 中修改完所有代码;
git add .将 master 中所有文件添加到git跟踪中;
git commit -m "此次操作提交记录" 提交此次操作;
git push 将本地 master 分支中的最新代码推送到远程仓库的 master 分支;
git checkout uat 切换到 uat 分支;
git merge master 将 master 分支中的代码merge到当前的分支(uat);
如果有冲突,就解决冲突;
gulp clean 删除当前的dist目录;
gulp build 创建新的dist目录;
git add . 将 uat 中所有文件添加到git跟踪中;
git commit -m "msg" 提交此次操作的记录;
git push -f 将当前分支 uat 中的最新代码强制推送到远端 uat 分支;
到Jenkins中点击“构建计划”按钮,对 uat 分支进行部署。部署成功之后,到对应的网址即可看到最新的功能。
今天开发商城的项目,项目用vue-cli-3.0重新搭建框架,下载完项目之后,我就使用npm install安装依赖包,但是发现并没有用,不能生成node_modules文件夹,于是换cnpm install,结果提示“cnpm不是内部或外部命令,也不是可运行的程序”。于是,就开始了下面的尝试:
使用npm install -g cnpm --registry=https://registry.npm.taobao.org安装淘宝镜像,安装结果如下:

然后,使用cnpm install,结果还是提示“cnpm不是内部或外部命令”:
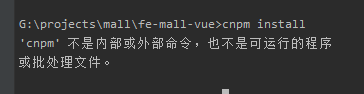
为什么已经安装cnpm还是提示不是内部或外部命令呢?原因是:没有将cnpm的路径配置到环境变量。确切地说,是没有把安装生成的 cnpm.cmd 文件所在路径配置在环境变量中,导致系统不能识别。那么来配置一下,因为我不清楚用户变量和系统变量有啥差别,所以在两个地方的Path中都将cnpm.cmd的路径配置上了,如下图所示:
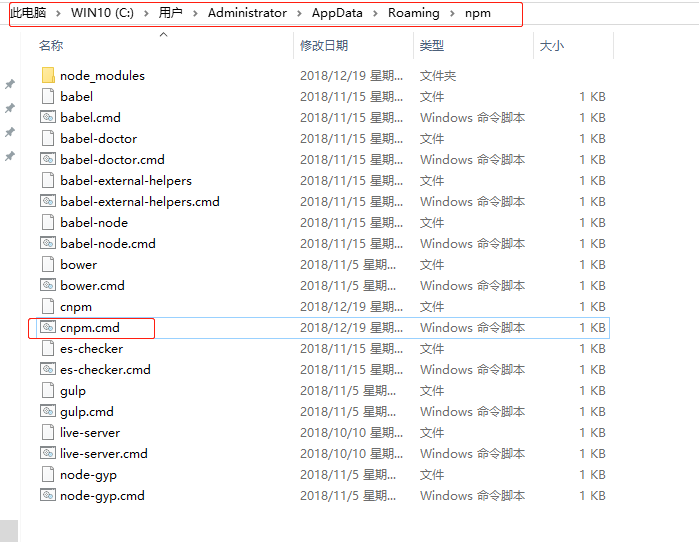
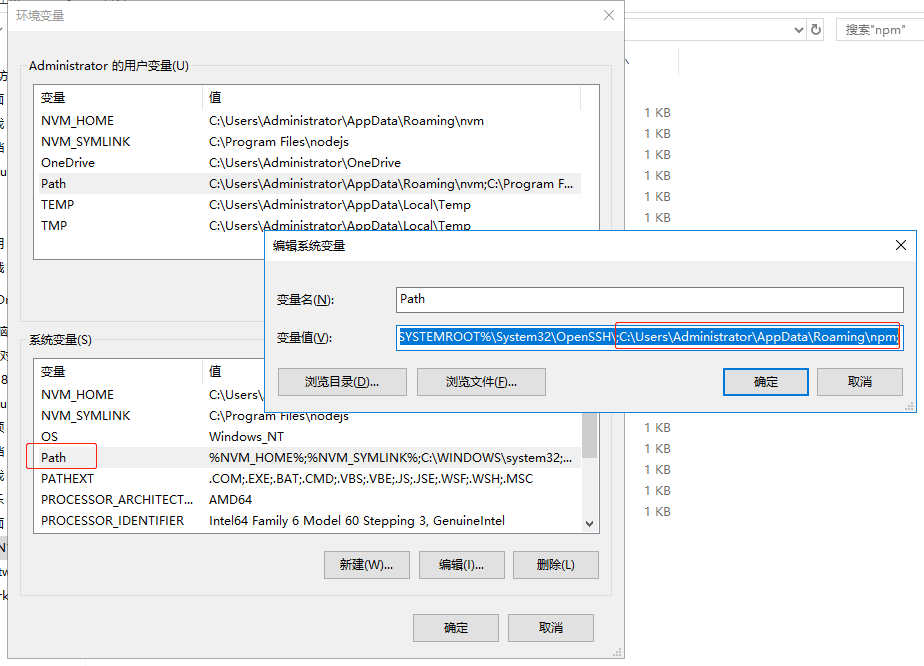
环境变量配置好之后,再运行cnpm的命令,就可以了:
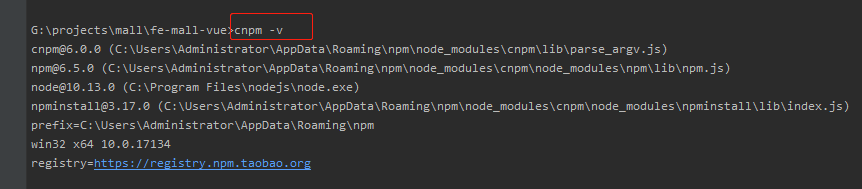
这个插件的作用就是:将ES6 模块规范的代码转成 UMD模块化规范的代码。
关于JS中几种模块化规范(AMD、CMD、CommonJS、UMD、ES6的Module语法)的介绍请查看这里
export default 42;
(function (global, factory) {
  if (typeof define === "function" && define.amd) {
    define(["exports"], factory);
  } else if (typeof exports !== "undefined") {
    factory(exports);
  } else {
    var mod = {
      exports: {}
    };
    factory(mod.exports);
    global.actual = mod.exports;
  }
})(this, function (exports) {
  "use strict";

  Object.defineProperty(exports, "__esModule", {
    value: true
  });

  exports.default = 42;
});
官网地址:https://nodejs.org/en/download/


1、默认安装路径是C盘,为了不占用系统盘空间,在安装时将安装路径换到其他盘。我在安装时将node.js的安装路径更改为了:"D:\Develop\nodejs"。
2、安装完成后,"D:\Develop\nodejs"路径下的安装文件:

因为现在的node.js中自带有npm,安装了node.js,就自带安装了npm 。node.js安装完成后,win+R打开“运行”弹窗,输入cmd打开命令行窗口:


在命令行窗口中输入:node -v 和npm -v分别查看安装的node.js和npm 的版本:

如果能正常查看到,说明node.js安装正确。
这里要进行的环境配置,是配置两个东西:
(1)以后安装全局包时,全局包的安装路径;
(2)缓存cache的路径。
如果不进行配置的话,系统默认的全局包的安装路径为:【C:\Users\用户名\AppData\Roaming\npm】,会占用系统盘空间。
我想把全局安装包的路径和cache文件夹的路径放到node.js的安装路径下,所以我在【D:\Develop\nodejs】下新建了 “node_global”、“node_cache”这两个文件夹:

创建完两个空文件夹之后,打开cmd命令窗口,输入:
npm config set prefix "D:\Develop\nodejs\node_global"
npm config set cache "D:\Develop\nodejs\node_cache"

如下图所示:

默认情况下,安装完node.js之后,Path中会有一条路径为:“C:\Users\用户名\AppData\Roaming\npm”,将这一条修为为“D:\Develop\nodejs\node_global”,如下图所示:

全局安装一个包,然后看这个包是否安装到我们配置的 node_global 文件夹下了。
比如,我全局安装一个cnpm,还全局安装了一个create-react-app,执行如下指令:
npm install -g cnpm --registry=https://registry.npm.taobao.org
npm i -g create-react-app
然后看 "D:\Develop\nodejs\node_global"路径下的文件:

说明环境配置成功。
gen-cssfile.js 文件的内容如下:
var fs = require('fs');
var path = require('path');
var Components = require('../../components.json');
var themes = [
  'theme-chalk'
];
Components = Object.keys(Components);
var basepath = path.resolve(__dirname, '../../packages/');

function fileExists (filePath) {
  try {
    return fs.statSync(filePath).isFile();
  } catch (err) {
    return false;
  }
}

themes.forEach((theme) => {
  var isSCSS = theme !== 'theme-default';
  var indexContent = isSCSS ? '@import "./base.scss";\n' : '@import "./base.css";\n';
  Components.forEach(function (key) {
    if (['icon', 'option', 'option-group'].indexOf(key) > -1) return;
    var fileName = key + (isSCSS ? '.scss' : '.css');
    indexContent += '@import "./' + fileName + '";\n';
    var filePath = path.resolve(basepath, theme, 'src', fileName);
    if (!fileExists(filePath)) {
      fs.writeFileSync(filePath, '', 'utf8');
      console.log(theme, ' 创建遗漏的 ', fileName, ' 文件');
    }
  });
  fs.writeFileSync(path.resolve(basepath, theme, 'src', isSCSS ? 'index.scss' : 'index.css'), indexContent);
});
该模块的作用:将'../../components.json'中所有的组件名称提取出来,拼接成一个导入所有这些组件的.scss文件的字符串,将这个字符串写入'../../packages/theme-chalk/src/index.scss'文件中。
最终,index.scss 文件的内容如下:
@import "./base.scss";
@import "./pagination.scss";
@import "./dialog.scss";
@import "./autocomplete.scss";
@import "./dropdown.scss";
@import "./dropdown-menu.scss";
@import "./dropdown-item.scss";
@import "./menu.scss";
@import "./submenu.scss";
@import "./menu-item.scss";
@import "./menu-item-group.scss";
@import "./input.scss";
@import "./input-number.scss";
@import "./radio.scss";
@import "./radio-group.scss";
@import "./radio-button.scss";
@import "./checkbox.scss";
@import "./checkbox-button.scss";
@import "./checkbox-group.scss";
@import "./switch.scss";
@import "./select.scss";
@import "./button.scss";
@import "./button-group.scss";
@import "./table.scss";
@import "./table-column.scss";
@import "./date-picker.scss";
@import "./time-select.scss";
@import "./time-picker.scss";
@import "./popover.scss";
@import "./tooltip.scss";
@import "./message-box.scss";
@import "./breadcrumb.scss";
@import "./breadcrumb-item.scss";
@import "./form.scss";
@import "./form-item.scss";
@import "./tabs.scss";
@import "./tab-pane.scss";
@import "./tag.scss";
@import "./tree.scss";
@import "./alert.scss";
@import "./notification.scss";
@import "./slider.scss";
@import "./loading.scss";
@import "./row.scss";
@import "./col.scss";
@import "./upload.scss";
@import "./progress.scss";
@import "./spinner.scss";
@import "./message.scss";
@import "./badge.scss";
@import "./card.scss";
@import "./rate.scss";
@import "./steps.scss";
@import "./step.scss";
@import "./carousel.scss";
@import "./scrollbar.scss";
@import "./carousel-item.scss";
@import "./collapse.scss";
@import "./collapse-item.scss";
@import "./cascader.scss";
@import "./color-picker.scss";
@import "./transfer.scss";
@import "./container.scss";
@import "./header.scss";
@import "./aside.scss";
@import "./main.scss";
@import "./footer.scss";
前段时间项目中需要实现一个功能:在一个页面中需要上传照片,照片可以从手机相册中选择,也可以调起手机拍照功能拍照,并使用拍照的照片,照片要在页面预览,然后上传。
<input type="file"
             name="file"
             id="uploadFile"
             accept="image/*;capture=camera"
             multiple="multiple"
             input-on-change
             style="visibility: hidden;">
点击这个标签之后,默认就会打开手机相册和拍照的功能,具体怎么实现每个浏览器不一样,每个浏览器有自己的实现。苹果手机中的safari可以打开相册,然后在相册中一次可以选择多张照片。安卓的手机有的浏览器一次只能选择一张照片,等等,每个浏览器实现细节会不一样。
上面input标签中的input-on-change是一个自定义的指令,我的inputOnChange.directive.js页面的代码如下:
export function InputOnChangeDirective() {
  'ngInject';
  let directive = {
    restrict: 'A',
    controller: InputOnChangeController,
    controllerAs: 'inputOnChange',
    link: function (scope, element) {
      element.bind('change', function () {
        scope.rediagnosisApply.handleImages();
      });
    }
  };
  return directive;
}
class InputOnChangeController {
  constructor($timeout, $log, $rootScope, $scope, $location, toastr) {
    'ngInject';
    this.$timeout = $timeout;
    this.$log = $log;
    this.$rootScope = $rootScope;
    this.$scope = $scope;
    this.$location = $location;
    this.toastr = toastr;
  }
}
写这个指令主要是因为在input标签中没有ng-change事件,当input中选择了照片的时候,不能触发ng-change事件。所以写了一个指令,给input元素绑定了一个change事件,当change事件触发的时候,去调用handleImages()方法。
// input的change事件触发
  handleImages() {
    var self = this;
    var files = this.$document[0].querySelector('input[name="file"]').files;

    // 1、判断这一次选择的文件中有没有非图片,如果有,返回函数,什么都不做
    for (var i = 0; i < files.length; i++) {
      if (!/image\/\w+/.test(files[i].type)) {
        this.toastr.warning(files[i].name + "不是图片!请重新选择!");
        return;
      }
    }

    // 2、限制图片上传数量
    if (files.length > 9 || this.files.length + files.length > 9) {
      this.toastr.warning('最多可上传9张图片,请重新选择!');
      return;
    }

    // 3、判断新增的每一张图片是不是已经选择过的,如果没有选择过,push到filesNoRepeat数组中
    var filesNoRepeat = [];
    for (var k1 = 0; k1 < files.length; k1++) {
      var flag = true;
      for (var k2 = 0; k2 < this.files.length; k2++) {
        if (files[k1].lastModified == this.files[k2].lastModified && files[k1].name == this.files[k2].name && files[k1].size == this.files[k2].size) {
          // 认为是选择过的图片
          flag = false;
          // this.toastr.warning(files[k1].name + '已经添加过');
          break;
        }
      }
      if (flag) {
        filesNoRepeat.push(files[k1]);
      }
    }

    // 4、预览图片
    for (var k3 = 0; k3 < filesNoRepeat.length; k3++) {
      var reader = new FileReader();
      reader.readAsDataURL(filesNoRepeat[k3]);
      reader.onload = function () {
        self.imgsURL.push(this.result);
        self.$scope.$apply();
      };
      reader.onerror = function () {
        self.toastr.warning('图片读取失败');
      };
      reader.onabort = function () {
        self.toastr.warning('图片读取被中止');
      };

      // 更新this.files
      this.files.push(filesNoRepeat[k3]);
    }

  }
this.files中存放的是已经选好,需要上传的照片。files是每一次选择的文件(可能有非照片)。filesNoRepeat是当前这一次选择的与前面没有重复的照片。this.imgsURL是已经选择的所有要上传的照片的base64编码组成的数组。
记录一下windows上安装并使用nvm的步骤。
今天在做商城的项目,这是一个很老的项目,我当前node的版本是10.13.0 ,在运行项目时发现下面几个问题:
用npm install报错,不能创建出 node_modules文件夹;于是我改用cnpm;
用cnpm install也报错,但是能创建出 node_modules文件夹;
用npm run dev运行项目,服务能启动起来,但是webpack打包(本项目webpack版本是1.13.2)时出错。如下所示:
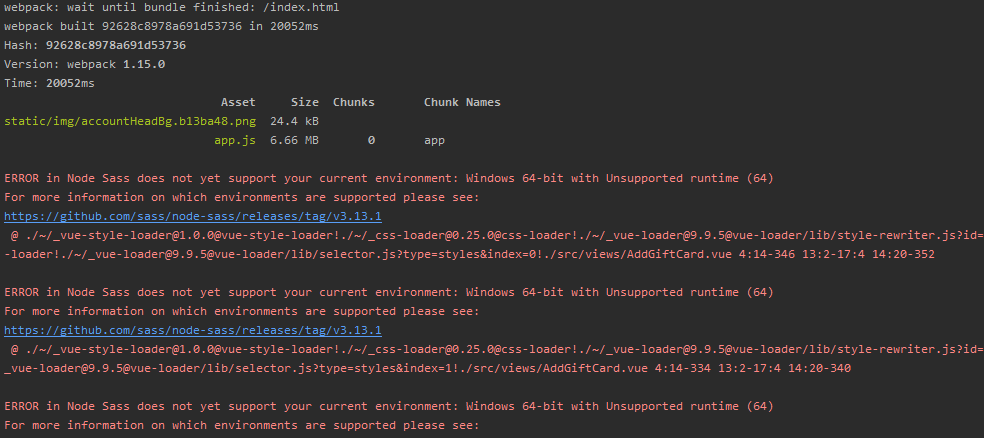
在网上查了一下,是因为node-sass只能用在node 7以下的版本(不知道是不是真的)。所以就想,在本地再安装一个7以下的node,然后用nvm进行管理。nvm安装及使用步骤如下:
下载nvm(下载地址:https://github.com/coreybutler/nvm-windows/releases )。
下载之后进行安装。
我的安装路径是 C:\Users\Administrator\AppData\Roaming\nvm
我的node.js的安装目录是 C:\Program Files\nodejs
nvm安装过程中,安装包自动进行了环境变量的配置。具体说,就是在环境变量的用户变量和系统变量中,自动加上了“NVM_HOME”和“NVM_SYMLINK”两个变量,如下图所示:
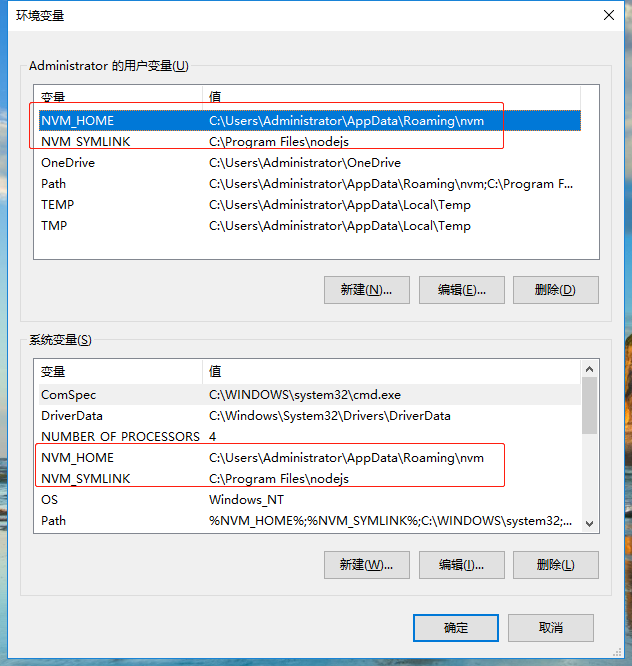
安装完成之后,找到安装路径下的settings.txt文件,此时该文件中设置了root和path两个值。
root // 表示nvm安装路径
path // 表示当前node.js的安装路径
在这个文件中再加入arch、proxy、node_mirror、npm_mirror4个属性的值,如下图所示:
配置完成后,我在nvm安装路径下,打开命令行窗口,输入nvm -v,能查看到版本号,但是在商城这个项目的webstorm的terminal中用这个命令,却始终提示我“nvm不是内部或外部命令,也不是可运行的程序或批处理文件”。但是我如果在商城这个项目下,用 git Bash打开,却发现能正常提示nvm安装的版本号,原来要让webstorm的终端能识别nvm,必须要重启电脑。重启之后,webstorm的终端中能正常使用nvm命令了!
接下来,用nvm install <version>命令安装指定版本的node.js。
然后用nvm list或者nvm ls查看当前可用的Node版本,如下图所示:
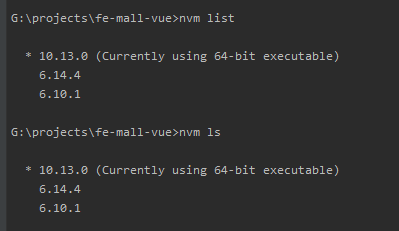
用nvm use <version>将当前项目切换到指定的node版本。如下图所示:

现在Node版本已经切换到7以下了,运行一下看项目能否跑起来。npm run dev,结果如下:
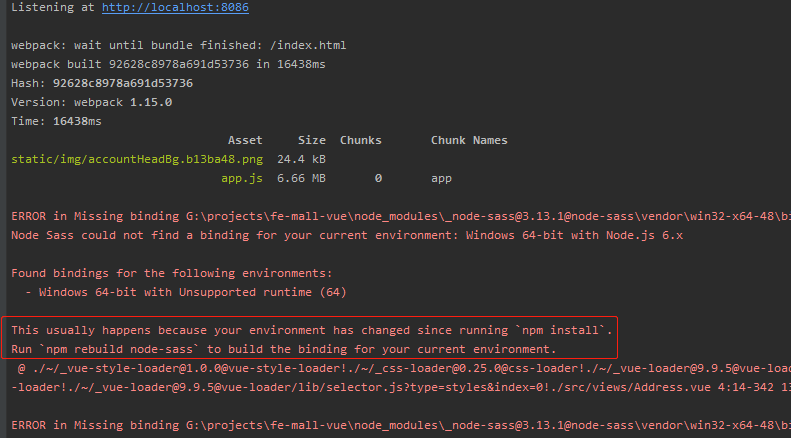
看提示,似乎原因是因为上次npm install时node的版本跟现在node的版本不一样了,所以报错。所以我决定,将node_modules文件夹删除,然后在当前node环境下重新安装依赖包。
删除node_modules文件夹,运行npm install,还是报错,如下图所示:
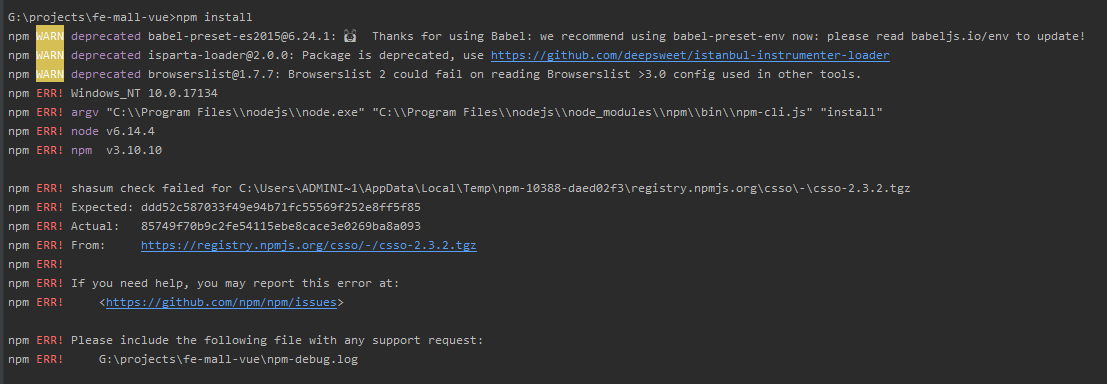
不管上面的报错,运行一下看看npm run dev,结果如下图所示:
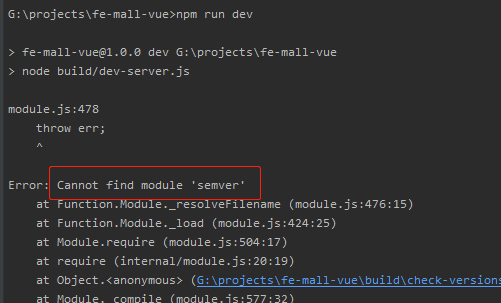
找不到模块,看来是因为npm install没安装上,所以还是用cnpm install来安装吧。
运行cnpm install,然后运行npm run dev,项目终于能够跑起来了!
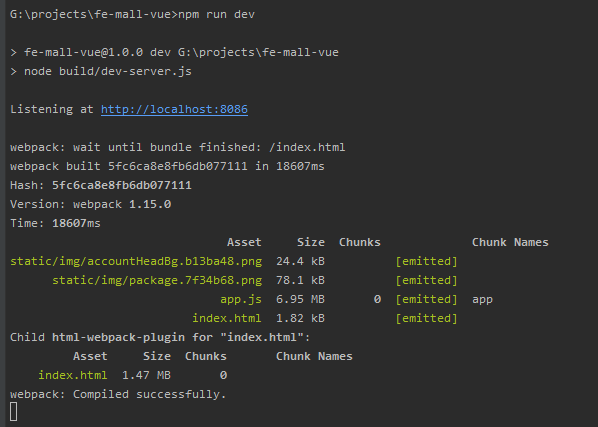
创建一个新的react app,可以选择以下方法:
npx create-react-app my-app
cd my-app
npm start
npx 做的事情应该是先去看当前的全局环境中有没有 create-react-app这个包,
(1)如果已经在全局环境下安装了,就执行
create-react-app my-app
(2)如果没有,就执行:
npm install create-react-app -g
create-react-app my-app
所以,也可以不用 npx,直接使用上面的命令搭建react脚手架。
npm init react-app my-app
yarn create react-app my-app
npm start or yarn start在开发模式下运行应用。可以在浏览器中打开 http://localhost:3000 来查看。修改代码之后页面能自动重新加载。在控制台里面能看到构建时报的错误和lint检查的警告信息。
npm test or yarn testRuns the test watcher in an interactive mode.
By default, runs tests related to files changed since the last commit.
npm run build or yarn build构建打包,用于生产环境。构建好的文件放在 build 文件夹中。
它会在production模式下正确打包文件,并且自动优化构建,以提供最好的性能。
构建好的文件是经过丑化的,文件名中包含hashes值。
uni-app 是一个使用 Vue.js 开发跨平台应用的前端框架,开发者编写一套代码,可编译到iOS、Android、H5、小程序等多个平台。uni-app官方文档
H5
微信小程序
支付宝小程序
百度智能小程序
iOS
Android
cp-cli: The UNIX command cp for Node.js which is useful for cross platform support. 它是执行拷贝的命令行接口。
cp-cli packages/theme-chalk/lib lib/theme-chalk
这条命令的作用就是:将'packages/theme-chalk/lib'这个文件夹拷贝到'lib/theme-chalk'这个目录下。
这里很奇怪的一点是:如果单独执行这条命令,将报错,虽然此时'packages/theme-chalk/lib'这个文件夹和里面的文件已经存在:
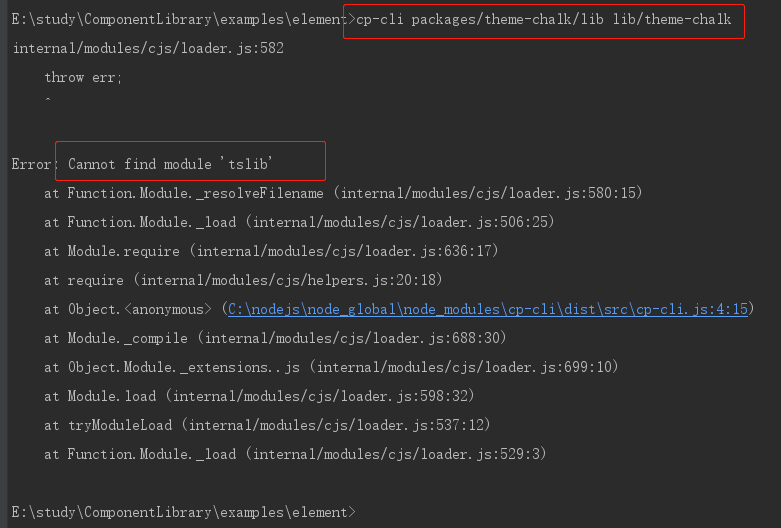
但是,如果执行 npm run build:theme 整条命令,就能执行成功:
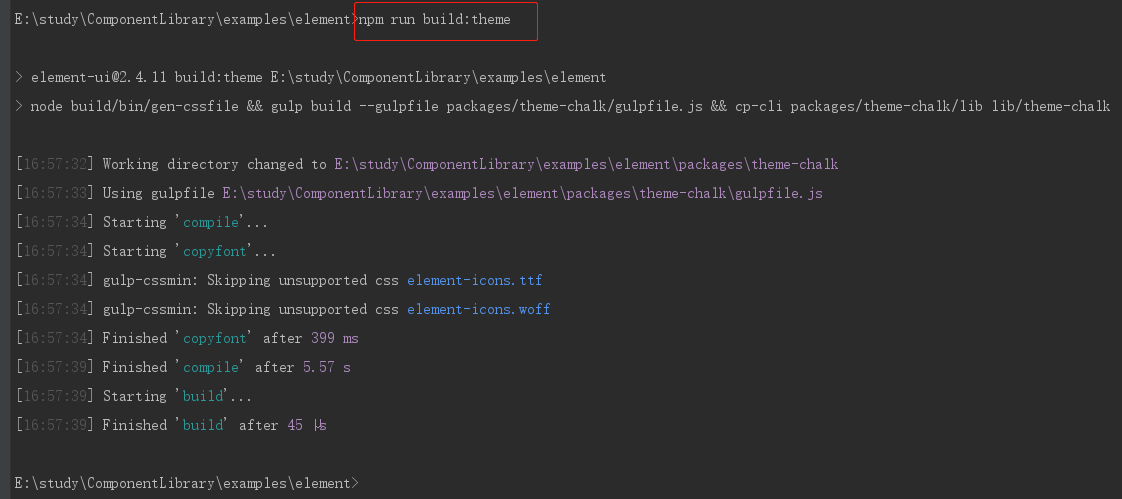
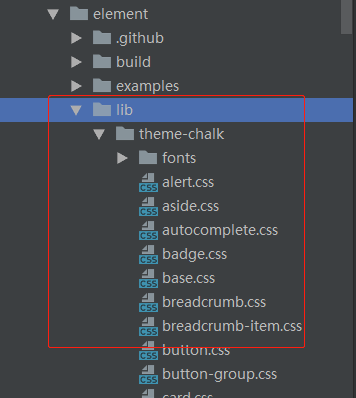
version.js 的内容如下:
var fs = require('fs');
var path = require('path');
var version = process.env.VERSION || require('../../package.json').version;
var content = {'1.4.13': '1.4', '2.0.11': '2.0', '2.1.0': '2.1', '2.2.2': '2.2', '2.3.9': '2.3'};
if (!content[version]) content[version] = '2.4';
fs.writeFileSync(path.resolve(__dirname, '../../examples/versions.json'), JSON.stringify(content));
content 的内容为:
{
'1.4.13': '1.4',
 '2.0.11': '2.0',
'2.1.0': '2.1',
'2.2.2': '2.2',
'2.3.9': '2.3',
'2.4.11':'2.4'
}
将 content 的内容写入到 '../../examples/versions.json' 这个文件中。
所以, 'build/bin/version.js' 这个文件的作用就是将上面的 content 的内容写入到'../../examples/versions.json' 这个文件中。
node build/bin/build-locale.js
'build/bin/build-locale.js'文件的内容如下:
var fs = require('fs');
var save = require('file-save');
var resolve = require('path').resolve;
var basename = require('path').basename;
var localePath = resolve(__dirname, '../../src/locale/lang');
var fileList = fs.readdirSync(localePath);

var transform = function (filename, name, cb) {
  require('babel-core').transformFile(resolve(localePath, filename), {
    plugins: [
      'add-module-exports',
      ['transform-es2015-modules-umd', {loose: true}]
    ],
    moduleId: name
  }, cb);
};

fileList
  .filter(function (file) {
    return /\.js$/.test(file);
  })
  .forEach(function (file) {
    var name = basename(file, '.js');

    transform(file, name, function (err, result) {
      if (err) {
        console.error(err);
      } else {
        var code = result.code;

        code = code
          .replace('define(\'', 'define(\'element/locale/')
          .replace('global.', 'global.ELEMENT.lang = global.ELEMENT.lang || {}; \n    global.ELEMENT.lang.');
        save(resolve(__dirname, '../../lib/umd/locale', file)).write(code);

        console.log(file);
      }
    });
  });
var save = require('file-save');
file-save module will build a write stream to the file, and automatically make directory if the directory is not exist and need to create.
path.resolve()
The path.resolve() method resolves a sequence of paths or path segments into an absolute path.
path.basename()
The path.basename() methods returns the last portion of a path, similar to the Unix basename command. Trailing directory separators are ignored, see path.sep.
path.basename('/foo/bar/baz/asdf/quux.html');
// Returns: 'quux.html'

path.basename('/foo/bar/baz/asdf/quux.html', '.html');
// Returns: 'quux'
fs.readdirSync()
fs.readdir(path[, options], callback): Reads the contents of a directory.
fileList :是一个数组,值为:
[ 'af-ZA.js',
  'ar.js',
  'bg.js',
 ...
  'zh-CN.js',
  'zh-TW.js' ]
babel-core
babel的核心依赖包。
babel.transformFile
babel.transformFile(filename: string, options?: Object, callback: Function)
Asynchronously transforms the entire contents of a file.
异步转译文件中的全部内容。
Example
babel.transformFile("filename.js", options, function (err, result) {
  result; // => { code, map, ast }
});
options:
| 可选参数 | 默认值 | 描述 |
|---|---|---|
| plugins | [] | 需要加载和使用的插件列表。 |
| moduleId | null | 指定模块 ID 的自定义名称。 |
'add-module-exports'
为什么要使用这个插件呢?请查看这里。
'transform-es2015-modules-umd'
babel-plugin-transform-es2015-modules-umd 的介绍请查看这里。
通过 transformFile 这个方法:
(1)将'../../src/locale/lang'下的所有 .js 文件 转成符合 umd 模块化规范的代码;
(2)然后将里面的 'define(''替换为 'define('element/locale/' ,将 'global.' 替换为 'global.ELEMENT.lang = global.ELEMENT.lang || {}; \n global.ELEMENT.lang.' ;
(3)再将替换后的代码写入到 '../../lib/umd/locale'文件夹中;
最终'../../lib/umd/locale'这个目录如下:

所以,这个脚本的作用就是:将'../../src/locale/lang'这个目录下的文件转为umd模块化规范,放入'../../lib/umd/locale'这个路径下。
'../../src/locale/lang'目录如下:

'../../src/locale/lang'目录下的一个文件 af-ZA.js 的内容如下:

脚本执行后,'../../lib/umd/locale'这个目录结构如下:

'../../lib/umd/locale'这个目录下的一个文件 af-ZA.js 的内容如下:

i18n.js 文件内容如下:
'use strict';

var fs = require('fs');
var path = require('path');
var langConfig = require('../../examples/i18n/page.json');

langConfig.forEach(lang => {
  try {
    fs.statSync(path.resolve(__dirname, `../../examples/pages/${ lang.lang }`));
  } catch (e) {
    fs.mkdirSync(path.resolve(__dirname, `../../examples/pages/${ lang.lang }`));
  }

  Object.keys(lang.pages).forEach(page => {
    var templatePath = path.resolve(__dirname, `../../examples/pages/template/${ page }.tpl`);
    var outputPath = path.resolve(__dirname, `../../examples/pages/${ lang.lang }/${ page }.vue`);
    var content = fs.readFileSync(templatePath, 'utf8');
    var pairs = lang.pages[page];

    Object.keys(pairs).forEach(key => {
      content = content.replace(new RegExp(`<%=\\s*${ key }\\s*>`, 'g'), pairs[key]);
    });

    fs.writeFileSync(outputPath, content);
  });
});
langConfig是'../../examples/i18n/page.json'文件中的数组。这个文件是一个包含网站支持语言的配置文件。'../../examples/i18n/page.json'文件内容如下:
[
  {
    "lang": "zh-CN",
    "pages": {
      "index": {
        "1": "网站快速成型工具",
        "2": "Element,一套为开发者、设计师和产品经理准备的基于 Vue 2.0 的桌面端组件库",
        "3": "指南",
        "4": "了解设计指南,帮助产品设计人员搭建逻辑清晰、结构合理且高效易用的产品。",
        "5": "查看详情",
        "6": "组件",
        "7": "使用组件 Demo 快速体验交互细节;使用前端框架封装的代码帮助工程师快速开发。",
        "8": "资源",
        "9": "下载相关资源,用其快速搭建页面原型或高保真视觉稿,提升产品设计效率。",
        "lang": "zh-CN",
        "titleSize": "34",
        "paraSize": "18"
      },
      "component": {},
      "changelog": {
        "1": "更新日志",
        "2": "zh-CN"
      },
      "design": {
        "1": "设计原则",
        "2": "一致",
        "3": "Consistency",
        "4": "反馈",
        "5": "Feedback",
        "6": "效率",
        "7": "Efficiency",
        "8": "可控",
        "9": "Controllability",
        "10": "一致性 Consistency",
        "11": "与现实生活一致:",
        "12": "与现实生活的流程、逻辑保持一致,遵循用户习惯的语言和概念;",
        "13": "在界面中一致:",
        "14": "所有的元素和结构需保持一致,比如:设计样式、图标和文本、元素的位置等。",
        "15": "反馈 Feedback",
        "16": "控制反馈:",
        "17": "通过界面样式和交互动效让用户可以清晰的感知自己的操作;",
        "18": "页面反馈:",
        "19": "操作后,通过页面元素的变化清晰地展现当前状态。",
        "20": "效率 Efficiency",
        "21": "简化流程:",
        "22": "设计简洁直观的操作流程;",
        "23": "清晰明确:",
        "24": "语言表达清晰且表意明确,让用户快速理解进而作出决策;",
        "25": "帮助用户识别:",
        "26": "界面简单直白,让用户快速识别而非回忆,减少用户记忆负担。",
        "27": "可控 Controllability",
        "28": "用户决策:",
        "29": "根据场景可给予用户操作建议或安全提示,但不能代替用户进行决策;",
        "30": "结果可控:",
        "31": "用户可以自由的进行操作,包括撤销、回退和终止当前操作等。"
      },
      "guide": {
        "1": "设计原则",
        "2": "导航"
      },
      "nav": {
        "1": "导航",
        "2": "导航可以解决用户在访问页面时:在哪里,去哪里,怎样去的问题。一般导航会有「侧栏导航」和「顶部导航」2 种类型。",
        "3": "选择合适的导航",
        "4": "选择合适的导航可以让用户在产品的使用过程中非常流畅,相反若是不合适就会引起用户操作不适(方向不明确),以下是「侧栏导航」和 「顶部导航」的区别。",
        "5": "侧栏导航",
        "6": "可将导航栏固定在左侧,提高导航可见性,方便页面之间切换;顶部可放置常用工具,如搜索条、帮助按钮、通知按钮等。适用于中后台的管理型、工具型网站。",
        "7": "一级类目",
        "8": "适用于结构简单的网站:只有一级页面时,不需要使用面包屑。",
        "9": "二级类目",
        "10": "侧栏中最多可显示两级导航;当使用二级导航时,我们建议搭配使用面包屑,方便用户定位自己的位置和快速返回。",
        "11": "三级类目",
        "12": "适用于较复杂的工具型后台,左侧栏为一级导航,中间栏可显示其对应的二级导航,也可放置其他的工具型选项。",
        "13": "顶部导航",
        "14": "顺应了从上至下的正常浏览顺序,方便浏览信息;顶部宽度限制了导航的数量和文本长度。",
        "15": "适用于导航较少,页面篇幅较长的网站。"
      },
      "resource": {
        "1": "资源",
        "2": "整理中",
        "3": "Axure Components",
        "4": "通过在 Axure 中导入 Element 组件库,可以在交互设计阶段方便地调用常用的组件",
        "5": "下载",
        "6": "Sketch Template",
        "7": "从 Element Template 快速调用常用组件,在提升设计效率的同时,保证统一的视觉风格",
        "8": "组件交互文档",
        "9": "进一步查看 Element 交互文档,从一个较为微观的角度详细地了解各个组件的交互细节",
        "paraHeight": "1.8",
        "placeholder1": "整理中",
        "placeholder2": "设计资源正在整理和完善中"
      }
    }
  },
  {
    "lang": "en-US",
    "pages": {
      "index": {
        "1": "A Desktop UI Library",
        "2": "Element, a Vue 2.0 based component library for developers, designers and product managers",
        "3": "Guide",
        "4": "Understand the design guidelines, helping designers build product that's logically sound, reasonably structured and easy to use.",
        "5": "View Detail",
        "6": "Component",
        "7": "Experience interaction details by strolling through component demos. Use encapsulated code to improve developing efficiency.",
        "8": "Resource",
        "9": "Download relevant design resources for shaping page prototype or visual draft, increasing design efficiency.",
        "lang": "en-US",
        "titleSize": "34",
        "paraSize": "18"
      },
      "component": {},
      "changelog": {
        "1": "Changelog",
        "2": "en-US"
      },
      "design": {
        "1": "Design Disciplines",
        "2": "Consistency",
        "3": "",
        "4": "Feedback",
        "5": "",
        "6": "Efficiency",
        "7": "",
        "8": "Controllability",
        "9": "",
        "10": "Consistency",
        "11": "Consistent with real life: ",
        "12": "in line with the process and logic of real life, and comply with languages and habits that the users are used to.",
        "13": "Consistent within interface: ",
        "14": "all elements should be consistent, such as: design style, icons and texts, position of elements, etc.",
        "15": "Feedback",
        "16": "Operation feedback: ",
        "17": "enable the users to clearly perceive their operations by style updates and interactive effects.",
        "18": "Visual feedback: ",
        "19": "reflect current state by updating or rearranging elements of the page.",
        "20": "Efficiency",
        "21": "Simplify the process: ",
        "22": "keep operating process simple and intuitive.",
        "23": "Definite and clear: ",
        "24": "enunciate your intentions clearly so that the users can quickly understand and make decisions.",
        "25": "Easy to identify: ",
        "26": "the interface should be straightforward, which helps the users to identify and frees them from memorizing and recalling.",
        "27": "Controllability",
        "28": "Decision making: ",
        "29": "giving advices about operations is acceptable, but do not make decisions for the users.",
        "30": "Controlled consequences: ",
        "31": "users should be granted the freedom to operate, including canceling, aborting or terminating current operation."
      },
      "guide": {
        "1": "Design Disciplines",
        "2": "Navigation"
      },
      "nav": {
        "1": "Navigation",
        "2": "Navigation focuses on solving the users' problems of where to go and how to get there. Generally it can be categorized into 'sidebar navigation' and 'top navigation'.",
        "3": "Choose the right navigation",
        "4": "An appropriate navigation gives users a smooth experience, while an inappropriate one leads to confusion. Here are the differences between sidebar navigation and top navigation",
        "5": "Side Navigation",
        "6": "Fix the navigation at the left edge, thus improves its visibility, making it easier to switch between pages. In this case, the top area of the page holds commonly used tools, e.g. search bar, help button, notice button, etc. Suitable for background management or utility websites.",
        "7": "Level 1 categories",
        "8": "Suitable for simply structured sites with only one level of pages. No breadcrumb is needed.",
        "9": "Level 2 categories",
        "10": "Sidebar displays up to two levels of navigation. Breadcrumbs are recommended in combination of second level navigation, making it easier for the users to locate and navigate.",
        "11": "Level 3 categories",
        "12": "Suitable for complicated utility websites. The left sidebar holds first level navigation, and the middle column displays second level navigation or other utility options.",
        "13": "Top Navigation",
        "14": "Conforms to the normal browsing order from top to bottom, which makes things more natural. The navigation amount and text length are limited to the width of the top.",
        "15": "Suitable for sites with few navigations and large chunks."
      },
      "resource": {
        "1": "Resource",
        "2": "Under construction.",
        "3": "Axure Components",
        "4": "By importing Element UI in Axure, you can easily apply all the components we provide during interaction design.",
        "5": "Download",
        "6": "Sketch Template",
        "7": "Apply components from Element template, so you can improve design efficiency while keeping a unified visual style.",
        "8": "Interaction Design Documentation",
        "9": "Take a closer look at the interaction design documentation. Learn more details of each component from a microcosmic perspective.",
        "paraHeight": "1.6",
        "placeholder1": "Under construction",
        "placeholder2": "More resources are being developed"
      }
    }
  },
  {
    "lang": "es",
    "pages": {
      "index": {
        "1": "Un kit de interfaz de usuario para la web",
        "2": "Element, una librería de componentes basada en Vue 2.0 para desarrolladores, diseñadores y jefes de producto",
        "3": "Guía",
        "4": "Entender los líneamientos de diseño, ayudando a diseñadores a crear productos que sean lógicos, razonablemente estructurados y fáciles de usar.",
        "5": "Ver detalle",
        "6": "Componentes",
        "7": "Experimenta la interacción al pasear con los ejemplos de los componentes. Utiliza el código encapsulado para mejorar la eficiencia en el desarrollo.",
        "8": "Recursos",
        "9": "Descarga los recursos de diseño relevantes para dar forma a un prototipo o borrador, aumentando la eficiencia del diseño.",
        "lang": "es",
        "titleSize": "34",
        "paraSize": "18"
      },
      "component": {},
      "changelog": {
        "1": "Lista de cambios",
        "2": "es"
      },
      "design": {
        "1": "Disciplinas de diseño",
        "2": "Consistencia",
        "3": "",
        "4": "Comentarios",
        "5": "",
        "6": "Eficiencia",
        "7": "",
        "8": "Control",
        "9": "",
        "10": "Consistencia",
        "11": "Consistente con la vida real: ",
        "12": "en línea con el proceso y la vida real, y cumple con los idiomas y hábitos a los que los usuarios están acostumbrados.",
        "13": "Consistente dentro de la interfaz: ",
        "14": "todos los elementos deben ser consistentes, como: estilo de diseño, iconos y texto, posición de los elementos, etc.",
        "15": "Comentarios",
        "16": "Comentarios sobre la operación: ",
        "17": "Permite a los usuarios percibir claramente las operaciones mediante actualizaciones de estilo y efectos interactivos.",
        "18": "Comentarios visuales: ",
        "19": "Refleja el estado actual al actualizar o reorganizar los elementos de la página.",
        "20": "Eficiencia",
        "21": "Simplifica el proceso: ",
        "22": "Mantiene el proceso operativo simple e intuitivo.",
        "23": "Bien definido y claro: ",
        "24": "Expresa las intenciones claramente para que los usuarios puedan comprender y tomar decisiones rápidamente.",
        "25": "Fácil de identificar: ",
        "26": "La interfaz debe ser sencilla, lo que permitirá a los usuarios a identificar y liberarlos de la memorización y recuerdos.",
        "27": "Control",
        "28": "Toma de decisiones: ",
        "29": "Brindar consejos sobres las operaciones es aceptable, pero no tomar desiciones para los usuarios.",
        "30": "Consecuencias controladas: ",
        "31": "Los usuarios deben tener la libertad de operar, incluida la cancelación, el aborto o la terminación de las operaciones actuales."
      },
      "guide": {
        "1": "Disciplinas de diseño",
        "2": "Navegación"
      },
      "nav": {
        "1": "Navegación",
        "2": "La navegación se centra en resolver los problemas de los usuarios sobre donde ir y como llegar ahí. En general, se puede categorizar en 'navegación de barra lateral' y 'navegación superior'.",
        "3": "Elige la navegación correcta",
        "4": "Una navegación apropiada provee a los usuarios una mejor experiencia, mientras que una inapropiada genera confusión. Esta es la diferencia entre la navegación de la barra lateral y la navegación superior.",
        "5": "Navegación lateral",
        "6": "Fija la navegación del lado izquierdo, esto permitirá una mejor visibilidad, lo que facilitará el cambio de pagina. En este caso, el área superior de la pagina contiene herramientas comúnmente utilizadas, por ejemplo, barra de búsqueda, botón de ayuda, botón de aviso, etc. Adecuado para sitios web de gestión.",
        "7": "Categorías de Nivel 1",
        "8": "Adecuado para sitios con una estructura simple con un solo nivel de páginas. No se necesita un 'breadcrumb'.",
        "9": "Categorías de Nivel 2",
        "10": "La barra lateral muestra hasta dos niveles de navegación. Se recomienda utilizar un 'breadcrumb' en combinación con la navegación de segundo nivel, lo que facilita la localización y navegación de los usuarios.",
        "11": "Categorías de Nivel 3",
        "12": "Adecuado para sitios web bastante complejos. La barra lateral izquierda contiene navegación de primer nivel, y la columna central muestra navegación de segundo nivel u otras opciones de utilidad.",
        "13": "Navegación superior",
        "14": "Se ajusta de acuerdo a la exploración normal de arriba a abajo, lo que hace que las cosas sean más naturales. La cantidad de navegación y la longitud del texto están limitadas al ancho de la parte superior.",
        "15": "Adecuado para sitios con pocas navegaciones y grandes trozos."
      },
      "resource": {
        "1": "Recursos",
        "2": "En construcción",
        "3": "Componetes de Axure",
        "4": "Mediante la importación de elementos de interfaz de usuario en Axure, se puede aplicar fácilmente a todos los componentes que proporcionamos durante el diseño de interacción.",
        "5": "Descarga",
        "6": "Plantilla de Sketch",
        "7": "Aplica componentes de la plantilla Element para que pueda mejorarla eficiencia del diseño manteniendo un estilo visual unificado.",
        "8": "Documentación de diseño de interacción",
        "9": "Eche un vistazo más de cerca a la documentación de diseño de interacción. Conoce más detalles de cada componente desde una perspectiva microcósmica.",
        "paraHeight": "1.6",
        "placeholder1": "En construcción",
        "placeholder2": "Se están desarrollando más recursos"
      }
    }
  }
]
try {
    fs.statSync(path.resolve(__dirname, `../../examples/pages/${ lang.lang }`));
  } catch (e) {
    fs.mkdirSync(path.resolve(__dirname, `../../examples/pages/${ lang.lang }`));
  }
fs.stat(path[, options], callback): Using fs.stat() to check for the existence of a file before calling fs.open(), fs.readFile() or fs.writeFile() is not recommended. Instead, user code should open/read/write the file directly and handle the error raised if the file is not available.
fs.statSync这个方法是用于在调用 fs.open() ,fs.readFile(), 或者fs.writeFile()之前调用的,用于检查对应的文件是否存在。但是现在这个方法不推荐使用,应该直接 打开/读取/写入 一个文件,然后如果文件不可用的话去处理抛出的错误。
To check if a file exists without manipulating it afterwards, fs.access() is recommended.
如果只是要检查一个文件是否存在,而不随后对其进行操作,推荐使用 fs.access()。
fs.mkdirSync(path[, options]): Synchronously creates a directory. Returns undefined. This is the synchronous version of fs.mkdir().同步创建一个目录。返回undefined。它是 fs.mdkir()方法的同步版本。
这段代码的意思就是:先去检查 ../../examples/pages/${ lang.lang } 这个目录是否存在,如果不存在,就创建这个目录。
Object.keys(lang.pages).forEach(page => {
    var templatePath = path.resolve(__dirname, `../../examples/pages/template/${ page }.tpl`);
    var outputPath = path.resolve(__dirname, `../../examples/pages/${ lang.lang }/${ page }.vue`);
    var content = fs.readFileSync(templatePath, 'utf8');
    var pairs = lang.pages[page];

    Object.keys(pairs).forEach(key => {
      content = content.replace(new RegExp(`<%=\\s*${ key }\\s*>`, 'g'), pairs[key]);
    });

    fs.writeFileSync(outputPath, content);
  });
上面代码中,page 是一个页面的名称,是一个字符串,比如'index'。
templatePath 是下面文件所在的绝对路径:
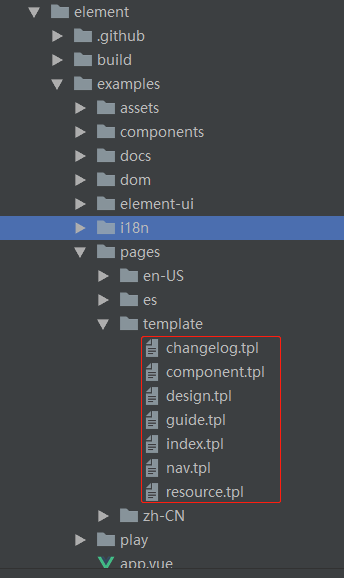
outputPath 是下面文件的绝对路径:
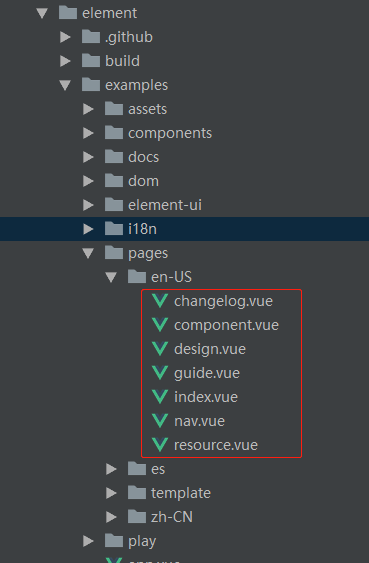
var content = fs.readFileSync(templatePath, 'utf8');
templatePath 是模板文件所在的路径,这些模板文件中存放的是对应的页面的模板内容。这一句的作用是:同步读取页面的内容,放入 content 中。content 为 string 。
 Object.keys(pairs).forEach(key => {
      content = content.replace(new RegExp(`<%=\\s*${ key }\\s*>`, 'g'), pairs[key]);
    });
通过这个代码,将content 中 与正则表达式 /<%=\s*${key}\s*>/g的部分(例如 <%= 1 >),用pairs[key]的内容替换。因为在content模板中,内容部分是用模板字符串写的,而具体内容是放在
'../../examples/i18n/page.json'这个文件中的。这步操作就是将 page.json 文件中的内容放到页面内容模板中去。
fs.writeFileSync(outputPath, content);
然后把替换后的页面内容写入outputPath(也就是 ../../examples/pages/${ lang.lang }/${ page }.vue 这个文件中)。至此,就在 ../../examples/pages/ 目录下,生成了真正的页面文件(.vue文件)。如下图:
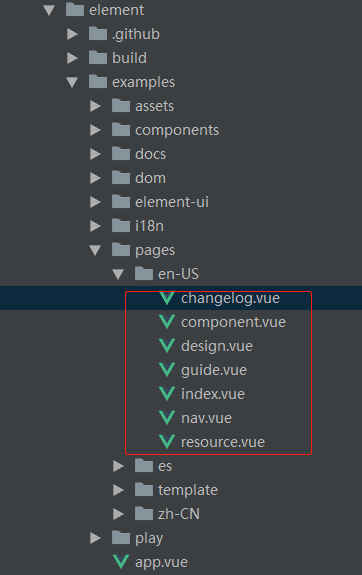
build/bin/i18n.js 的作用是:使得这个网站的所有页面支持多种语言。支持什么语言由'../../examples/i18n/page.json'这个配置文件决定。page.json这个文件中存放的是每个页面中,需要展示为不同语言内容的部分的信息。每个页面文件都有一个模板,存在'../../examples/pages/template'中,模板中需要替换为不同语言文件的部分用模板字符串表示,然后利用这些模板生成每种语言自己的网页文件,放在'../../examples/pages/'下
参考网站:http://www.cnblogs.com/ruanyifeng/p/5283708.html
官方地址:http://eslint.org/
EsLint帮助我们检查Javascript编程时的语法错误。比如:在Javascript应用中,你很难找到你漏泄的变量或者方法。EsLint能够帮助我们分析JS代码,找到bug并确保一定程度的JS语法书写的正确性。
EsLint是建立在Esprima(ECMAScript解析架构)的基础上的。Esprima支持ES5.1,本身也是用ECMAScript编写的,用于多用途分析。EsLint不但提供一些默认的规则(可扩展),也提供用户自定义规则来约束我们写的Javascript代码。
EsLint提供以下支持:
EsLint提供以下几种校验:
npm install gulp-eslint –save-dev
在你的项目目录下,运行:eslint –init将会产生一个.eslintrc的文件,文件内容包含一些校验规则。
{
    "rules": {
        "semi": ["error", "always"],
        "quotes": ["error", "double"]
    }
}
其中”semi”和”quotes”是规则名称。EsLint还提供了error的级别,对应数字,数字越高错误的提示越高,如0代码错误不提示、1代表警告提醒但不影响现有编译、2error会抛出错误。
"extends": "eslint:recommended"
Extends是EsLint默认推荐的验证,你可以使用配置选择哪些校验是你所需要的,可以登录npmjs.com查看。
之前提到你可以关掉所有EsLint默认的验证,自行添加所确切需要的验证规则。为此EsLint提供了2个种方式进行设置:
node --version

npm --version

npx --version

npm install --global gulp-cli


npx mkdirp my-project
cd my-project
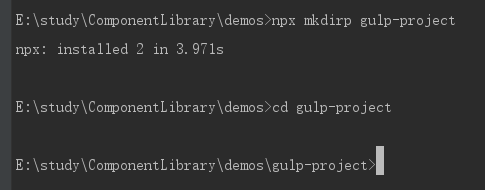
npm init
This will guide you through giving your project a name, version, description, etc.
npm install -save-dev gulp
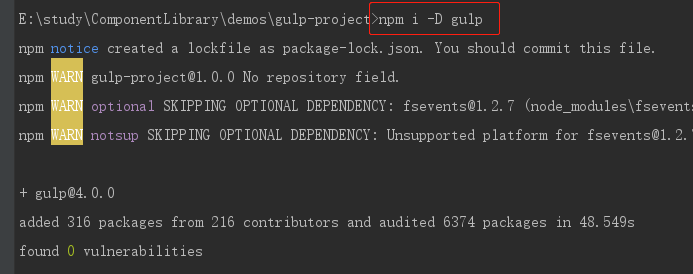
gulp --version
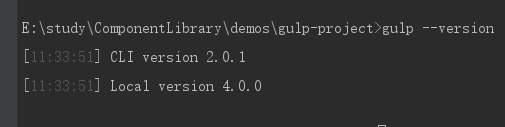
Using your text editor, create a file named gulpfile.js in your project root with these contents:
function defaultTask (cb) {
  // place code for your default task here
  cb();
}

exports.default = defaultTask;
Run the gulp command in your project directory:
gulp
To run multiple tasks, you can use gulp
The default task will run and do nothing.

当执行 gulp 命令时,默认执行的是项目根目录下的 gulpfile.js 这个文件,而且它会调用 gulpfile.js 这个模块的 exports 属性上的 default 属性,这里 default 上挂载的是一个叫做defaultTask 的方法,所以会执行这个 defaultTask 方法。
如果修改 gulpfile.js 这个文件的内容如下:
function defaultTask (cb) {
  // place code for your default task here
  console.log(111)
  cb();
}

exports.default = defaultTask;
再执行 gulp 命令,可以看到输出如下:
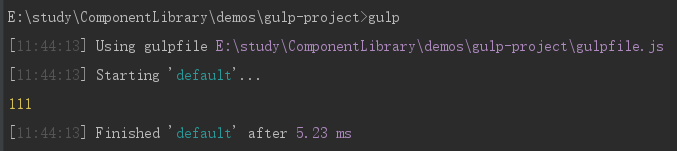
假设现在有一个文件 bundle.js ,它的内容如下:
export default 'foo'
'use strict';

module.exports = 'foo';
当在别的文件中导入这个文件时,得到的是'foo':
require('./bundle.js') // 'foo'
'use strict';

Object.defineProperty(exports, "__esModule", {
  value: true
});
exports.default = 'foo';
当在别的文件中导入这个文件时,得到的是 { default: 'foo '}
require('./bundle.js') // { default: 'foo '}
所以,如果我想直接用'foo'这个值,我需要这么引用:
require('./bundle.js').default
这样就不好看,不方便使用。
这个插件的作用就是延续Babel@5 的行为,将 exports.default 的内容再挂载到 module.exports上:
'use strict';
Object.defineProperty(exports, "__esModule", {
  value: true
});
exports.default = 'foo';
module.exports = exports['default'];
这样,以前在Babel@5 时写的代码依然可以正常工作,引用模块时不需要带'.default'。
require('./bundle.js') // 'foo'
A declarative, efficient, and flexible JavaScript library for building user interfaces.
🖖 Vue.js is a progressive, incrementally-adoptable JavaScript framework for building UI on the web.
TypeScript is a superset of JavaScript that compiles to clean JavaScript output.
An Open Source Machine Learning Framework for Everyone
The Web framework for perfectionists with deadlines.
A PHP framework for web artisans
Bring data to life with SVG, Canvas and HTML. 📊📈🎉
JavaScript (JS) is a lightweight interpreted programming language with first-class functions.
Some thing interesting about web. New door for the world.
A server is a program made to process requests and deliver data to clients.
Machine learning is a way of modeling and interpreting data that allows a piece of software to respond intelligently.
Some thing interesting about visualization, use data art
Some thing interesting about game, make everyone happy.
We are working to build community through open source technology. NB: members must have two-factor auth.
Open source projects and samples from Microsoft.
Google ❤️ Open Source for everyone.
Alibaba Open Source for everyone
Data-Driven Documents codes.
China tencent open source team.