Cookie
我的完整代码
使用场景
Cookie 使基于无状态的HTTP协议记录稳定的状态信息
Cookie 主要用于以下三个方面MDN:
- 会话状态管理(如用户登录状态、购物车、游戏分数或其它需要记录的信息)
- 个性化设置(如用户自定义设置、主题等)
- 浏览器行为跟踪(如跟踪分析用户行为等)
总结一句话:保存用户信息,方便发送到服务器
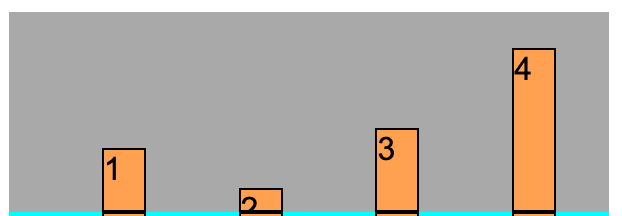
限制
function setCookie(name, value) {
document.cookie = name + "=" + value
}
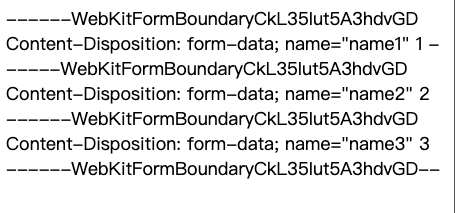
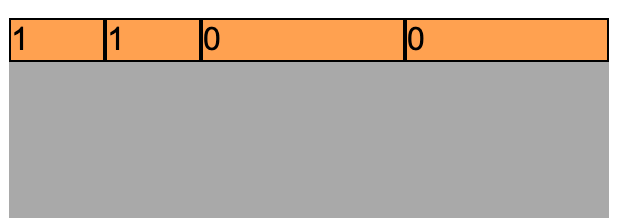
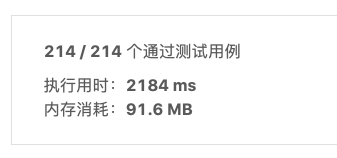
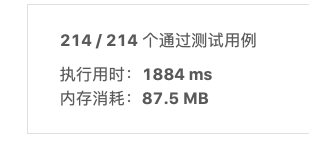
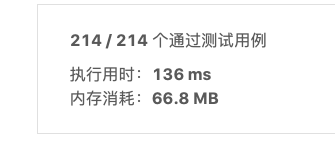
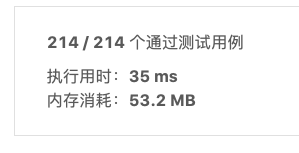
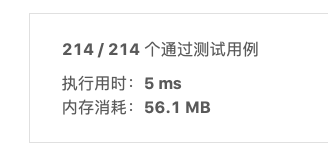
for (let i = 1; i <= 300; i++) {
setCookie(i + 'cookie', "value" + i);
}
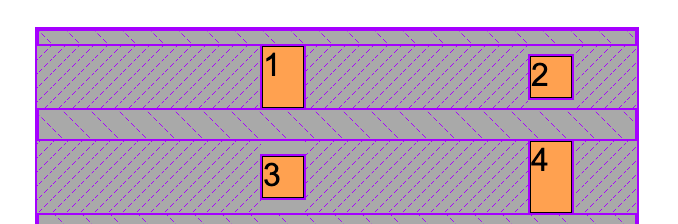
console.log(document.cookie.split(" ").length)编码格式
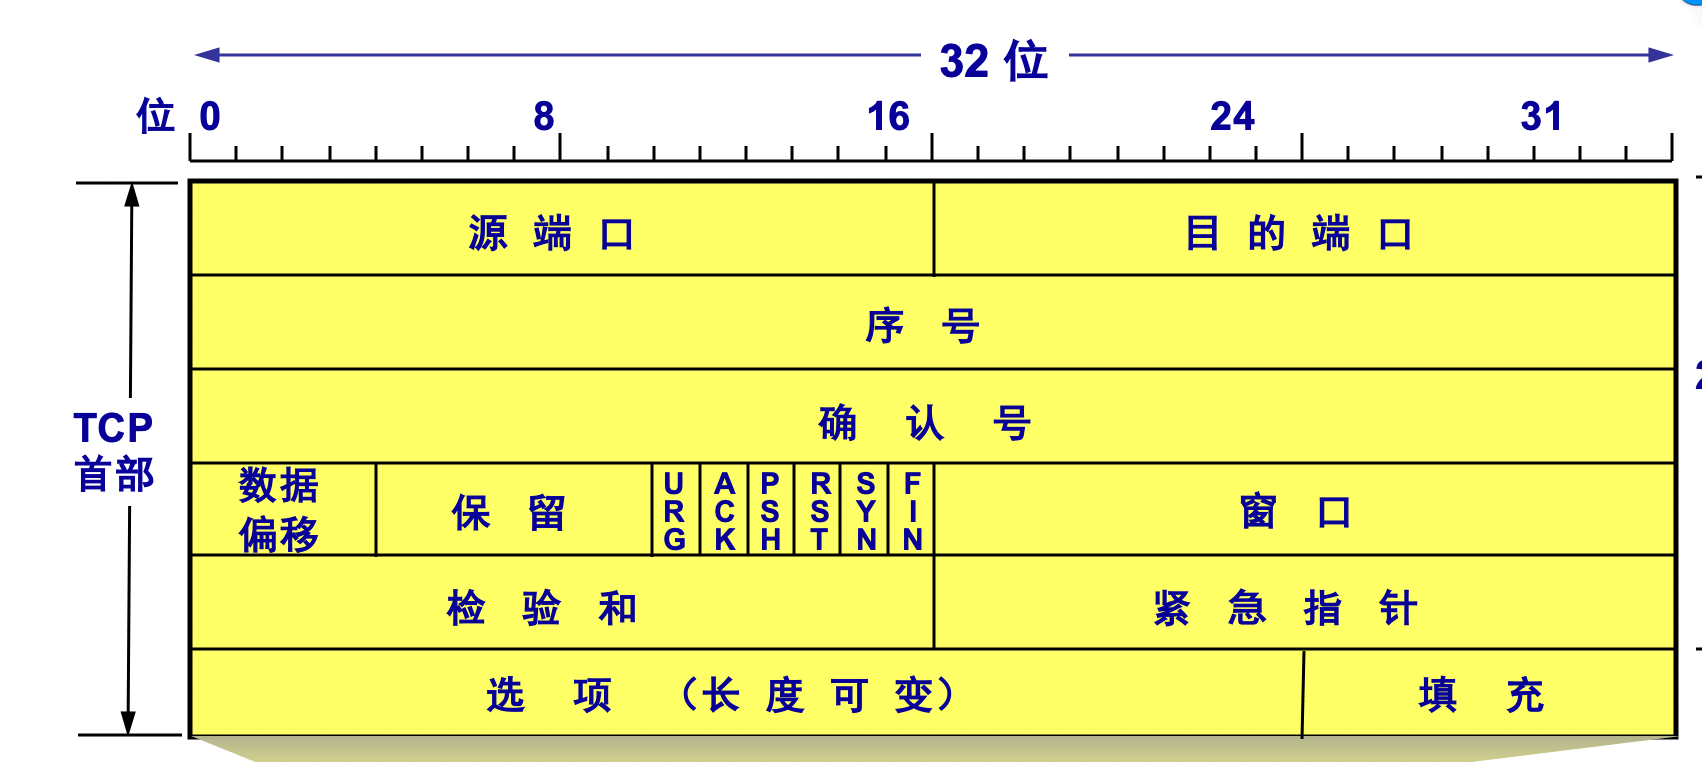
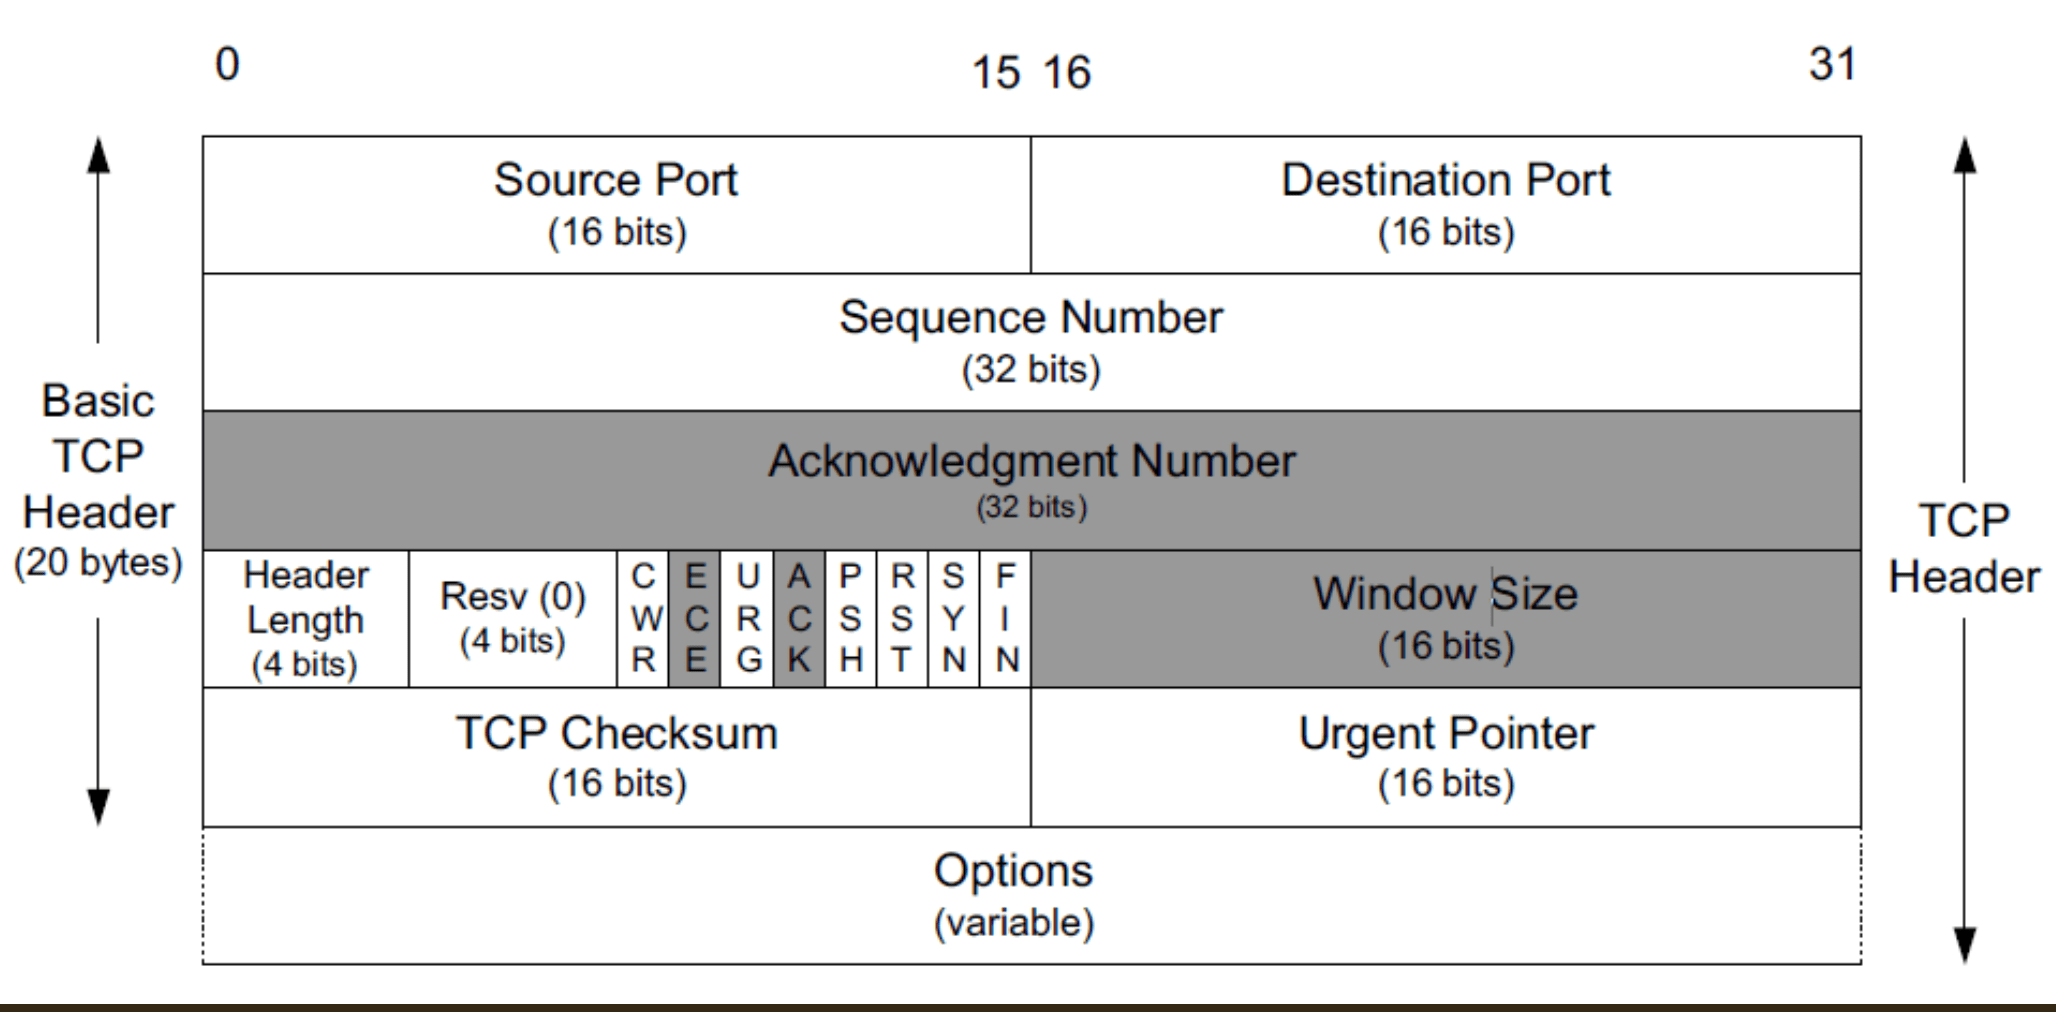
cookie的基本格式为key=value,设置这些属性时,属性之间由一个分号和一个空格隔开。
为什么需要转码?
字符串中逗号、分号、空格被当做了特殊符号(相当于代码中的保留字)
实测分号必须转码,会带来一些列问题。逗号、空格好像没啥影响😨。
(1)escape() 与 unescape()
被废弃,MDN已不推荐使用
(2)encodeURIComponent() 与 decodeURIComponent()
使用encodeURIComponent()对value进行转码
console.log(encodeURIComponent("yyy,y;=y y"));//yyy%2Cy%3B%3Dy%20y
console.log(escape("yyy,y;=y y"));//yyy%2Cy%3B%3Dy%20y

console.log(decodeURIComponent("yyy%2Cy%3B%3Dy%20y"));//yyy,y;=y y
console.log(unescape('yyy%2Cy%3B%3Dy%20y'));//yyy,y;=y y
属性总览
maxAge 和 expires
maxAge标示在 Cookie 失效之前需要经过的时间。(主推)
expires标示 Cookie 的最长有效时间。(兼容)
expires和maxAge决定了 Cookie 存活时间
注意
-
expires和maxAge的单位都是毫秒
-
设置时间都是 GMT 时间,不是当地时间
domain 和 path
Domain 标识指定了哪些主机可以接受 Cookie。
Path 标识指定了主机下的哪些路径可以接受 Cookie。
Domain 和 Path 组合决定了 Cookie 应该发送给哪些URL。
secure 和 httpOnly
标记为 Secure 的 Cookie 只通过被 HTTPS 协议加密过的请求发送给服务端
标记为 httpOnly 的 Cookie 不能被客户端 JavaScript 脚本调用
Secure 和HttpOnly 加强了 Cookie 的安全性
SameSite
SameSite属性用来限制第三方 Cookie。
创建 Cookie
客户端
可以使用封装好的库(例如:js-cookie )。也可以自己手动实现一下代码改自js-cookie.js的使用
function setcookie(name, value, time, path, domain) {
  let exp = new Date();
  exp.setTime(exp.getTime() + time);
  document.cookie = name + "=" + escape(value) + ";expires=" + exp.getUTCDate() + ";path=" + path + ";domain=" + domain;
}
setcookie("age", "18", 6400, '/', "ybf.com")
服务端
使用 Koa 设置 Cookie 。会在 Header 中添加 Set-Cookie
ctx.cookies.set('id', 'apply', {
    httpOnly: false
  })
ctx.cookies.set('name', 'xiaomin', {
    httpOnly: true
})
使用 Cookie
客户端
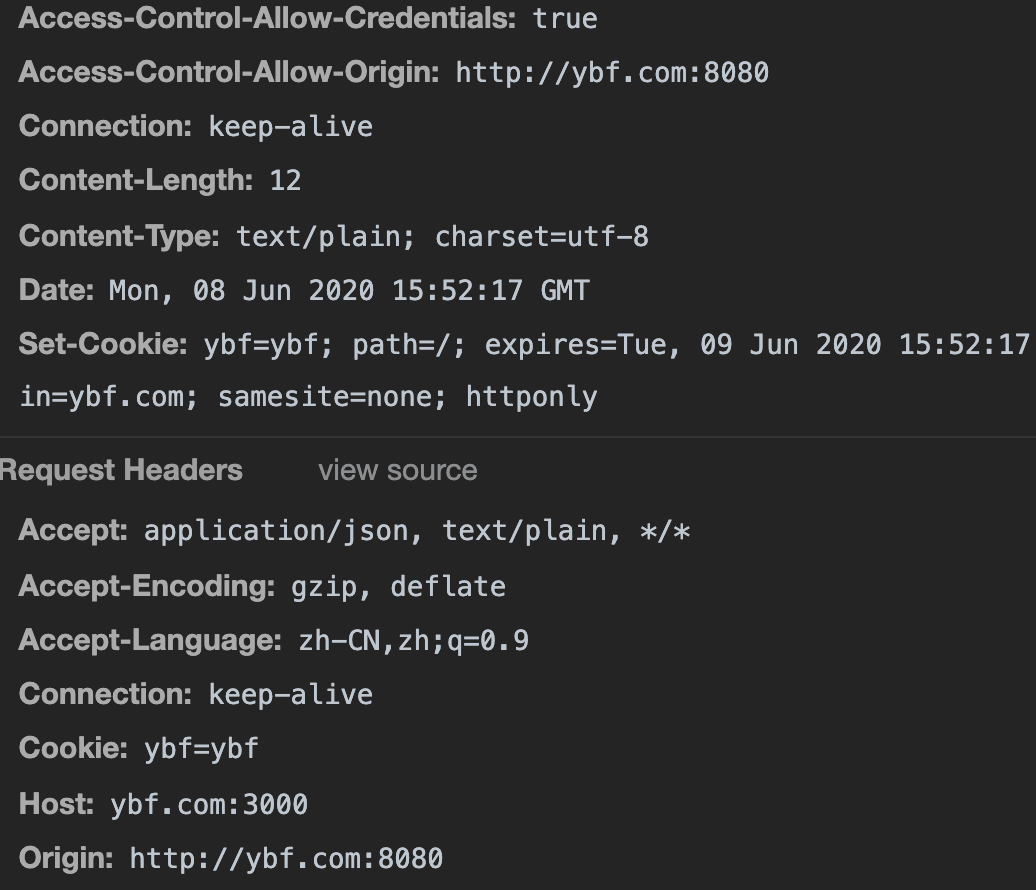
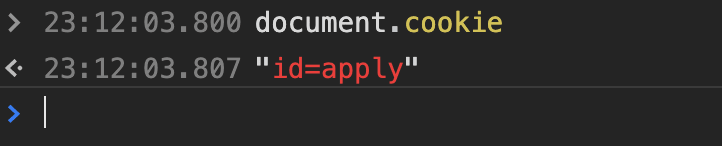
Cookie 挂载在document.cookie上,你可以在控制台打印下试试。( Cookie没有开启httpOnly,就能拿到id=value)
我现在有2个 Cookie,一个开启 httpOnly,另一个不开启。

可以看到我们只能拿到没有开启 httpOnly 的 Cookie

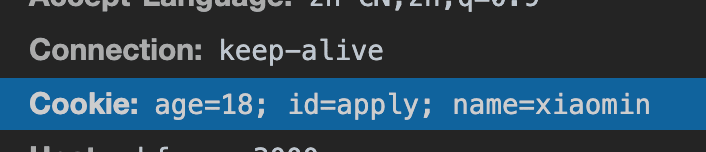
服务端
你本地存在 Cookie 时,在服务端设置获得
浏览器自动帮我们添加上 Cookie 这个 Header

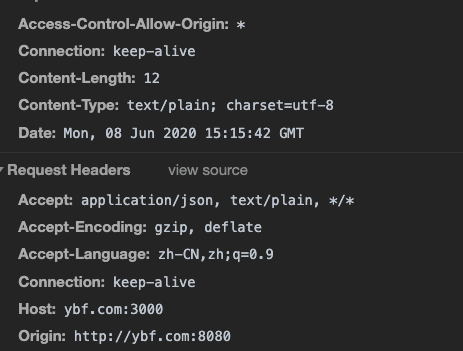
我能不能通过 Set-Cookie 这个 header 拿到cookie ?
答案:不能。
👉引用来自你真的完全理解XMLHttpRequest吗?
W3C的 xhr 标准中做了限制,规定客户端无法获取 response 中的 Set-Cookie、Set-Cookie2这2个字段,无论是同域还是跨域请求。
修改 Cookie
客户端
和创建 Cookie 步骤一致,可以改变 value 和 maxAge / expires。
服务端
直接重新设置即可。可以改变 value,maxAge / expires,httpOnly,secure
删除 Cookie
客户端
expires 设置为过期即可
服务端
直接重新设置即可,maxAge 设置为-1,expires 设置为过期时间
修改和删除注意
需要保持 path 和 domain 一致。
如果改变 path。原 Cookie 修改失败,会创建一个新 Cookie。
对一个已经存在对 Cookie,你不可以设置成其他二级域名
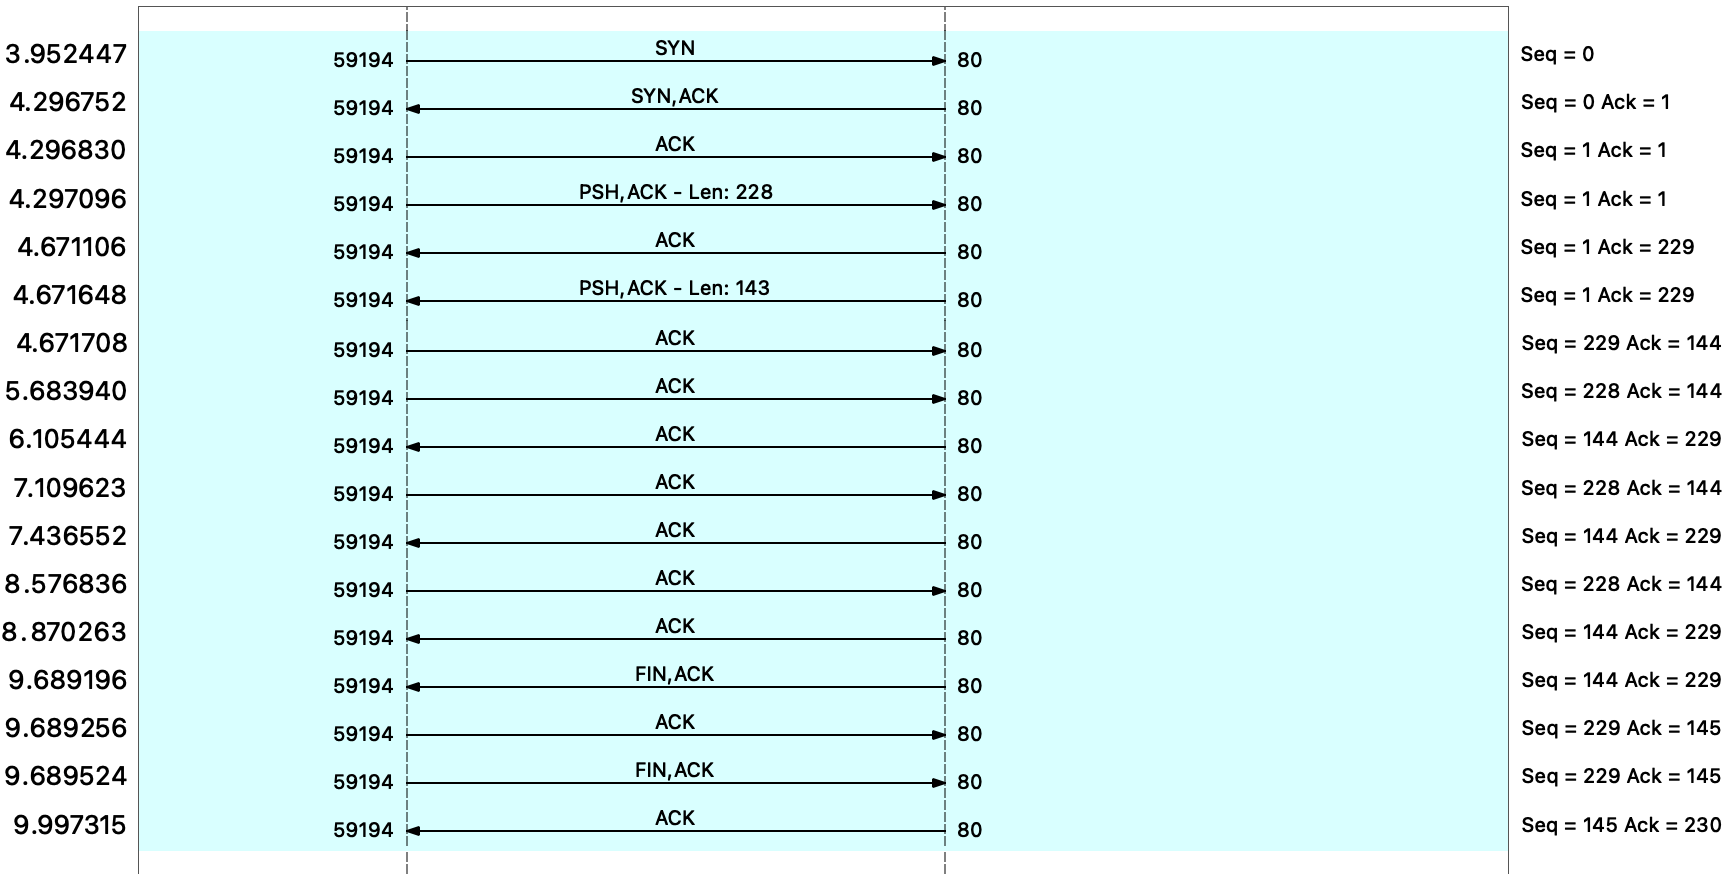
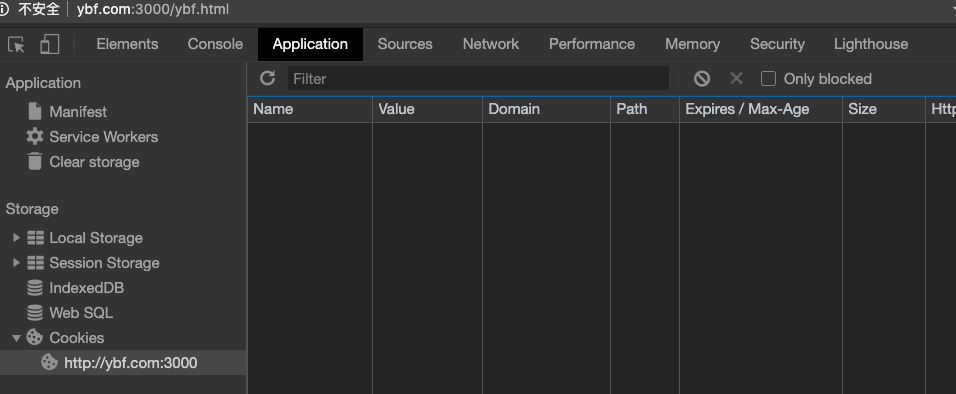
实际测试
会话 Cookie
浏览器关闭之后它会被自动删除,也就是说它仅在会话期内有效。
不指定domain和path
默认为当前文档的主机(不包含子域名)。如果指定了Domain,则一般包含子域名。
path默认为\。
第一条为指定域名,第二条不指定域名

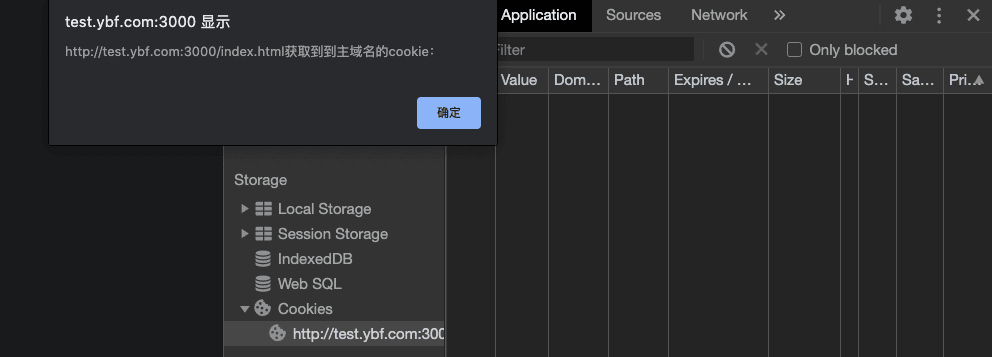
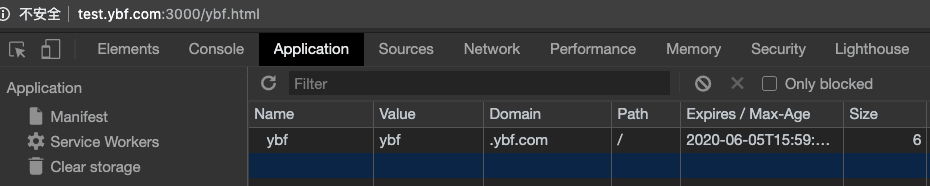
子域名测试
在二级域名 ybf.com 设置 Cookie,去子域名 test.ybf.com 获取 Cookie
- 指定域名的情况下

- 不指定域名的情况下
子域名将无法获取父域名设置的cookie
开启 secure 和 httpOnly
👉这里需要你准备一份证书

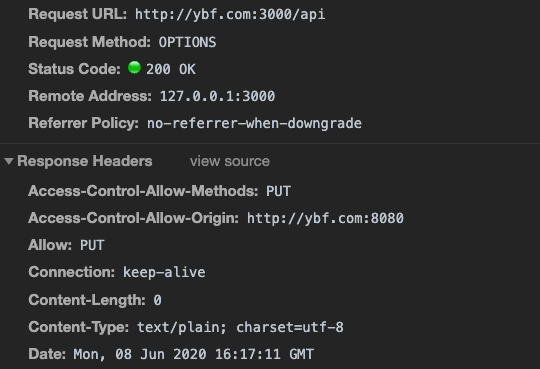
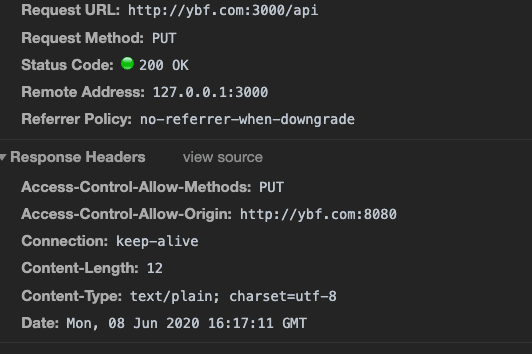
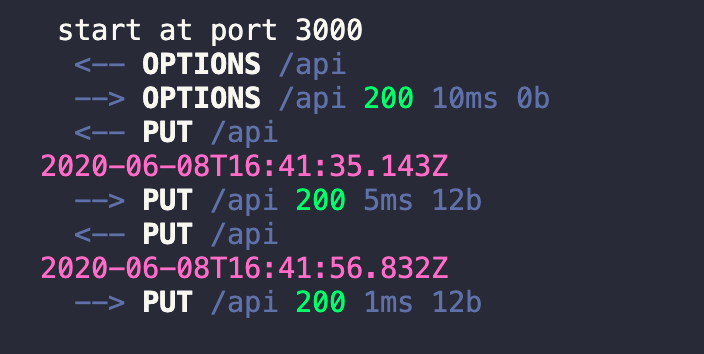
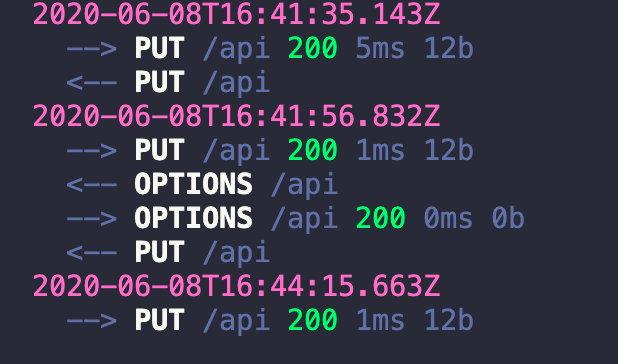
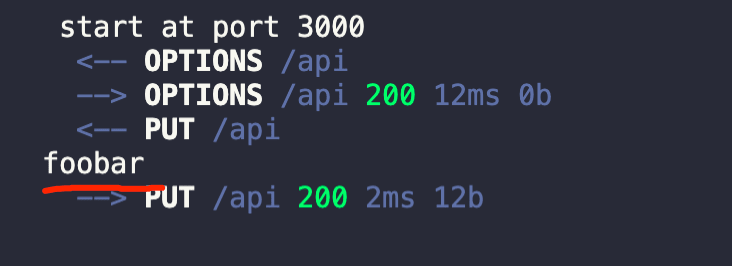
客户端 js 能否设置第三方域名
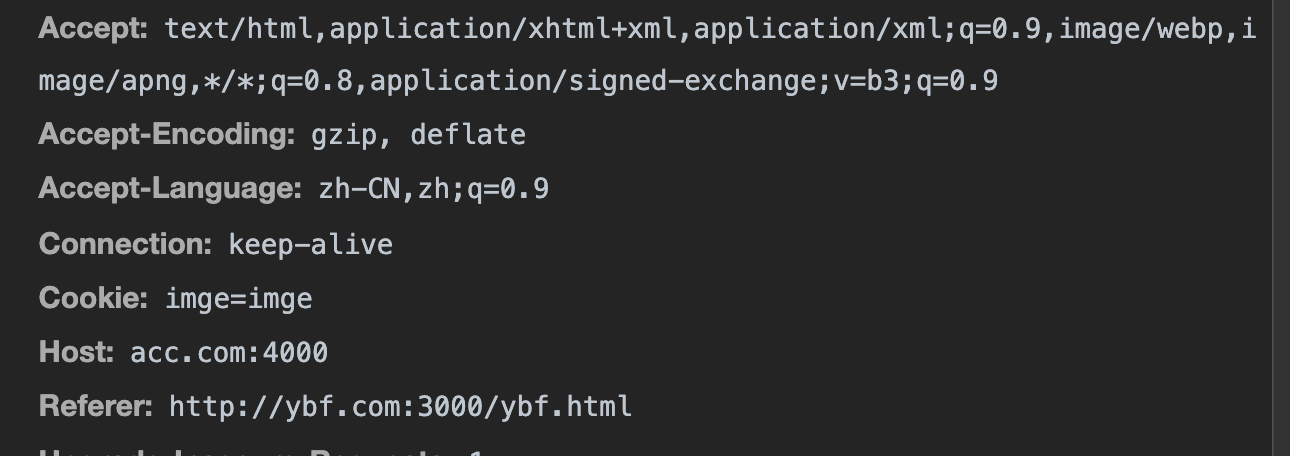
先在 ybf.com 设置 Cookie。
; (function (name, value, time, path, domain) {
  let exp = new Date();
  exp.setTime(exp.getTime() + time);
  document.cookie = name + "=" + value + ";expires=" + exp.toUTCString() + ";path=" + path + ";domain=" + domain;
})("ybf", "ybf", 86400000, '/', "ybf.com")

; (function (name, value, time, path, domain) {
  let exp = new Date();
  exp.setTime(exp.getTime() + time);
  document.cookie = name + "=" + value + ";expires=" + exp.toUTCString() + ";path=" + path + ";domain=" + domain;
})("acc", "acc", 86400000, '/', "acc.com")
域名相同毫无疑问可以设置上,我们去 acc.com 看看是否设置上了😏。
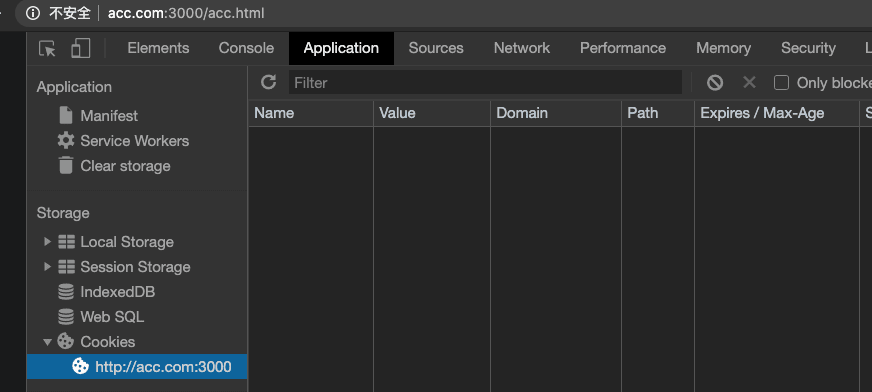
答案:不可以。
一个服务端能否设置2个域名的 Cookie
  ctx.Cookies.set('ybf', 'ybf', {
    maxAge: 86400000,
    domain: 'ybf.com',
    httpOnly: false
  })
  ctx.Cookies.set('acc', 'acc', {
    maxAge: 86400000,
    domain: 'acc.com',
    httpOnly: false
  })
答案:不可以。

你设置时会出警告,设置不上。This Set-Cookie was blocked because its Domain attribute was invalid with regards to the current host url。
在 3 级域名设置 2 级域名
我们执行以下代码,在test.ybf.com设置ybf.com。
; (function (name, value, time, path, domain) {
  let exp = new Date();
  exp.setTime(exp.getTime() + time);
  document.Cookie = name + "=" + value + ";expires=" + exp.toUTCString() + ";path=" + path + ";domain=" + domain;
})("ybf", "ybf", 86400000, '/', "ybf.com")
答案:可以。而且设置完 test.ybf.com 可以直接收到 Cookie。
在 2 级域名设置 3 级域名
我们执行以下代码,在 ybf.com 设置 test.ybf.com
; (function (name, value, time, path, domain) {
  let exp = new Date();
  exp.setTime(exp.getTime() + time);
  document.cookie = name + "=" + value + ";expires=" + exp.toUTCString() + ";path=" + path + ";domain=" + domain;
})("ybf", "ybf", 86400000, '/', "test.ybf.com")
答案:不可以
测试平台
这里需要你频繁的改host文件,推荐使用SwitchHosts!
我使用的使用浏览器版本
-
Chrome 版本 83.0.4103.61
-
Safair 版本13.1.1
-
Edge 版本 81.0.416.72
-
Firefox 77.0
参考
MDN
Set-Cookie
聊一聊 cookie
js-cookie.js的使用
COOKIE长度限制总结
Cookie 的 SameSite 属性


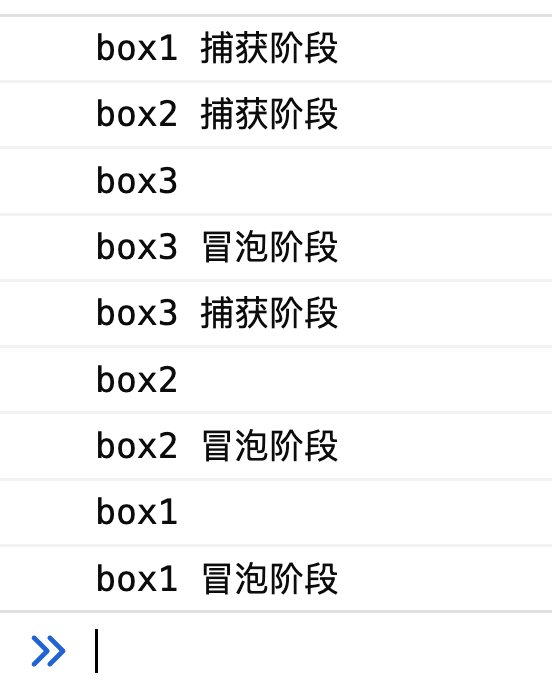
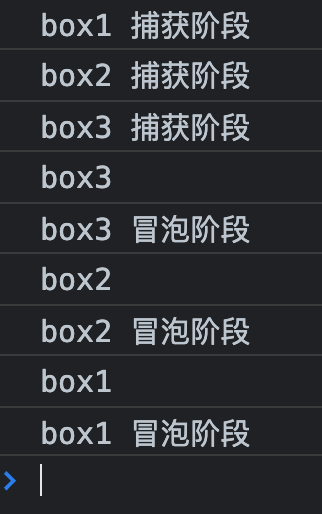


