zhao-core / rust-learn Goto Github PK
View Code? Open in Web Editor NEWRust 入门教程 欢迎Star
Rust 入门教程 欢迎Star


参考官网:https://www.rust-lang.org/zh-CN/tools/install
你使用 Linux 或 Mac,你需要做的仅仅是(注意,你不需要输入$符号,它标识一个命令行的开始):
$ curl -s https://static.rust-lang.org/rustup.sh | sudo sh卸载
$ curl -s https://static.rust-lang.org/rustup.sh | sudo sh -s -- --uninstall在任何时候,你都可以重新执行这个脚本来升级 Rust .
若,你已经安装Rust,打开命令行:
$ rustc --version显示
rustc 1.40.0 (73528e339 2019-12-16)
恭喜,你已经安装成功。windows的同学,参考上面的安装链接。
Cargo:Rust 的构建工具和包管理器
在安装 Rustup 时,也会安装 Rust 构建工具和包管理器的最新稳定版,即 Cargo。Cargo 可以做很多事情:
cargo build 构建项目
cargo run 运行项目
cargo test 测试项目
cargo doc 为项目构建文档
cargo publish 将库发布到 crates.io
要检查您是否安装了 Rust 和 Cargo,可以在终端中运行:
cargo --version打印Cargo版本
cargo 1.40.0 (bc8e4c8be 2019-11-22)
要详细, 研究cargo可以到这里:https://doc.rust-lang.org/cargo/index.html
cargo new hello-worldcargo就自动生成了hello-world项目。
为了好排序,我重命名一下:mv hello-world 01-hello-world。
注意:一般package包名不以数字开头,所以用hello-world。
01-hello-world目录结构如下:
├── Cargo.lock
├── Cargo.toml
├── src
    └── main.rs
01-hello-world/src/main.rs如下:
fn main() {
    println!("Hello, world!");
}
01-hello-world/Cargo.toml
[package]
name = "hello-world"
version = "0.1.0"
authors = ["jsl6 <[email protected]>"]
edition = "2018"

# See more keys and their definitions at https://doc.rust-lang.org/cargo/reference/manifest.html

[dependencies]
运行:
cd 01-hello-world
cargo run
控制台输出:
01-hello-world git:(master) ✗ cargo run
   Compiling hello-world v0.1.0 (/Users/jsl6/work/github/jsl6/rust-learn/01-hello-world)
    Finished dev [unoptimized + debuginfo] target(s) in 2.13s
     Running `target/debug/hello-world`
Hello, world!
恭喜输出:Hello World
使用vscode对rust开发调试
首先安装rust插件
Rust
Rust Extension Pack
Rust Test Explorer
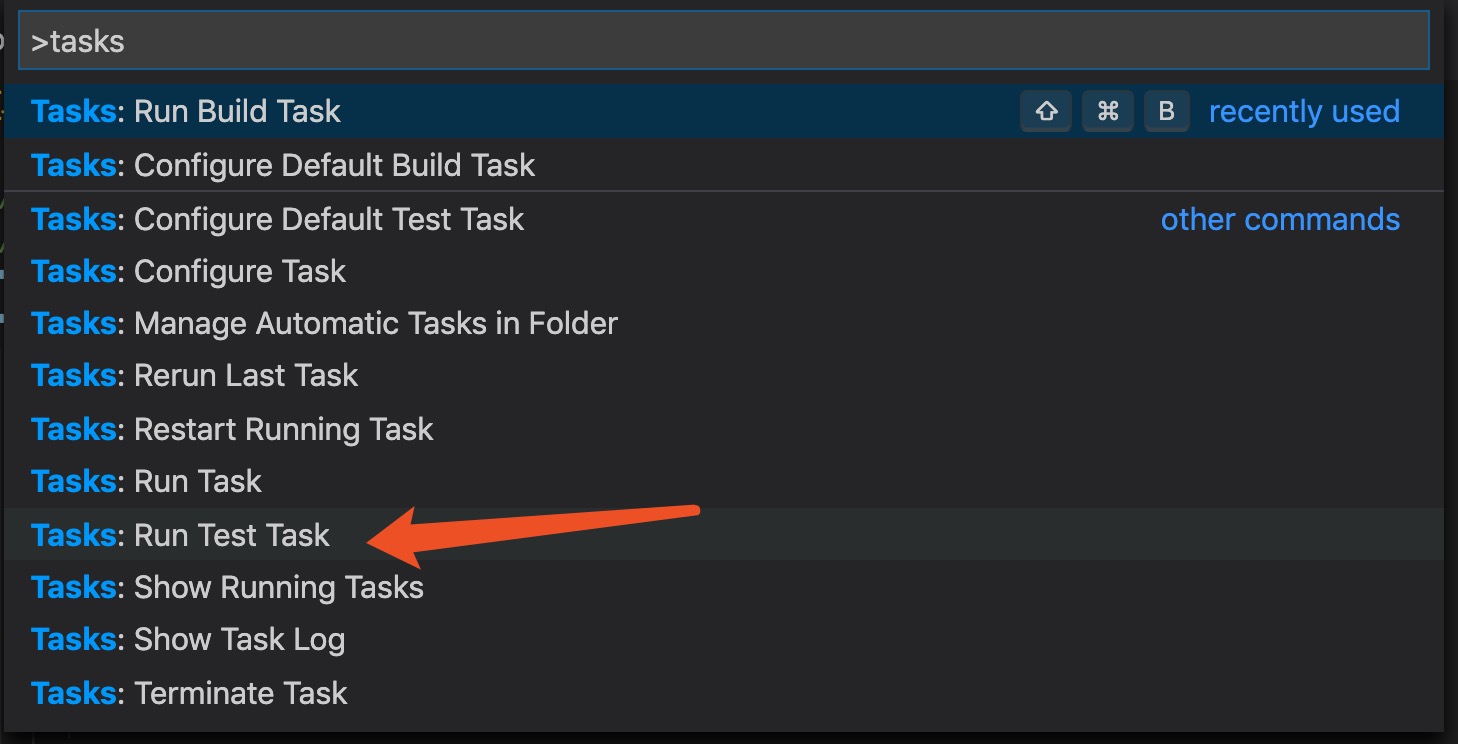
以Mac为例,cmd + shirft + p打开命令面板,输入:
tasks
选择 Tasks: Configure Default Build Task,再选择:Rust: cargo build
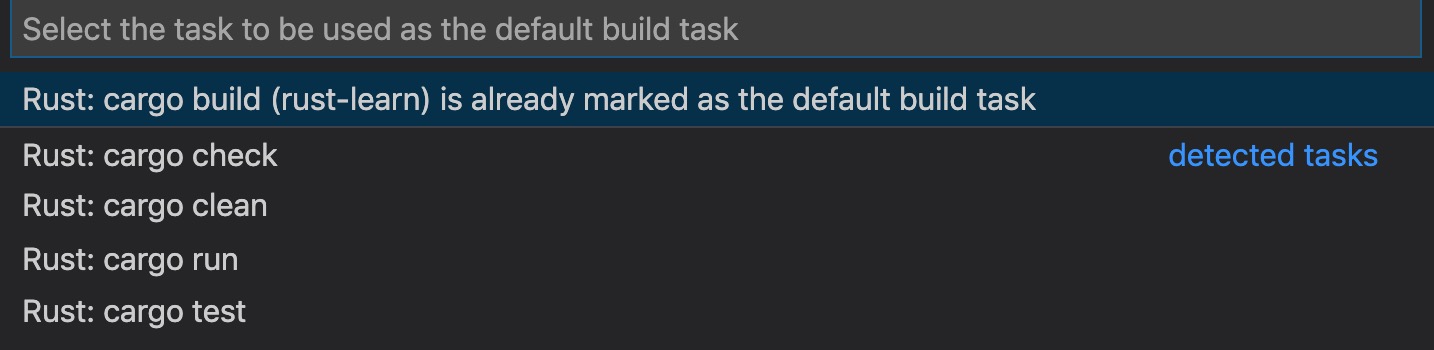
vscode就会生成:.vscode/tasks.json
{
  // See https://go.microsoft.com/fwlink/?LinkId=733558
  // for the documentation about the tasks.json format
  "version": "2.0.0",
  "tasks": [
    {
      "type": "cargo",
      "subcommand": "build",
      "problemMatcher": [
        "$rustc"
      ],
      "group": {
        "kind": "build",
        "isDefault": true
      }
    }
  ]
}
将"subcommand": "build" 改成 :"subcommand": "run"
这样按cmd + shirft + B,就能直接运行:
> Executing task: cargo run <

    Finished dev [unoptimized + debuginfo] target(s) in 0.00s
     Running `target/debug/vscode-rust`
Hello, world!

Terminal will be reused by tasks, press any key to close it.
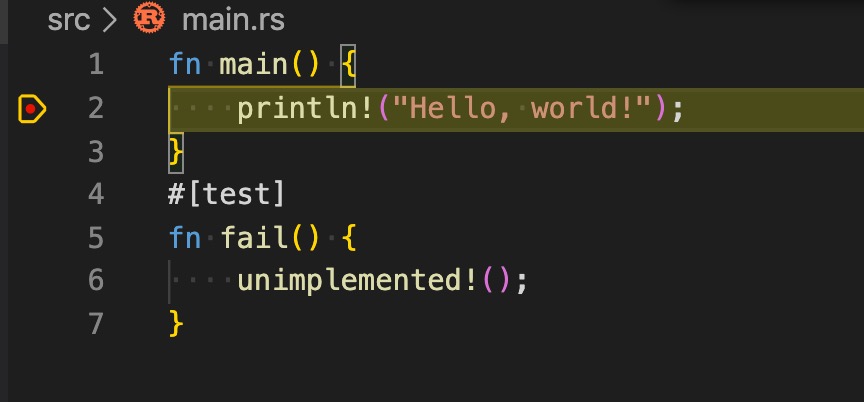
在src/main.rs添加测试方法:
#[test]
fn fail() {
    unimplemented!();
}
以Mac为例,cmd + shirft + p打开命令面板,输入:
tasks
选择 Tasks: Configure Default Test Task,再选择:Rust: cargo test
> Executing task: cargo test <

   Compiling vscode-rust v0.1.0 (/Users/zhaoxiongliang/work/github/jsl6/rust-learn/03-vscode-rust)
    Finished test [unoptimized + debuginfo] target(s) in 0.44s
     Running target/debug/deps/vscode_rust-e3d6a94d5c6c8ae6

running 1 test
test fail ... FAILED

failures:

---- fail stdout ----
thread 'fail' panicked at 'not yet implemented', src/main.rs:6:5
note: run with `RUST_BACKTRACE=1` environment variable to display a backtrace.


failures:
    fail

test result: FAILED. 0 passed; 1 failed; 0 ignored; 0 measured; 0 filtered out

error: test failed, to rerun pass '--bin vscode-rust'
The terminal process terminated with exit code: 101

Terminal will be reused by tasks, press any key to close it.
安装:
C/C++ extension.
Native Debug
!在Debug菜单,Add Congfigration,选择“C++ (Windows)” environment"
debug
生成
{
  // Use IntelliSense to learn about possible attributes.
  // Hover to view descriptions of existing attributes.
  // For more information, visit: https://go.microsoft.com/fwlink/?linkid=830387
  "version": "0.2.0",
  "configurations": [
    {
      "name": "(lldb) 启动",
      "type": "cppdbg",
      "request": "launch",
      "program": "${workspaceFolder}/a.out",
      "args": [],
      "stopAtEntry": false,
      "cwd": "${workspaceFolder}",
      "environment": [],
      "externalConsole": false,
      "MIMode": "lldb"
    }
  ]
}
将"program": "${workspaceFolder}/a.out",改成:
"program": "${workspaceFolder}/target/debug/vscode-rust",
在main.rs打上断点,在debug模式下启动,就能进入程序调试:
先看一段代码,先新建一个项目carog new ownership(见前面的01-Hello-World) , 方便排序,我重名成04-ownership
将src/main.rs改成:
fn main() {
    let a = [1, 2, 3];
    let b = a;
    println!("a = {:?}, b = {:?}",a, b);  // 这是正常: a = [1, 2, 3], b = [1, 2, 3]
}
此时运行正常:
➜  04-ownership git:(master) ✗ cargo run
   Compiling ownership v0.1.0 (/Users/jsl6/work/github/jsl6/rust-learn/04-ownership)
    Finished dev [unoptimized + debuginfo] target(s) in 0.29s
     Running `target/debug/ownership`
a = [1, 2, 3], b = [1, 2, 3]
接着,将src/main.rs改成:
fn main() {
let a = [1, 2, 3];
let b = a;
println!("a = {:?}, b = {:?}",a, b); // 这是正常: a = [1, 2, 3], b = [1, 2, 3]
let c = vec![1, 2, 3];
let d = c;

println!("c = {:?}, d = {:?}",c, d);
}
此时运行cargo
04-ownership git:(master) ✗ cargo run
   Compiling ownership v0.1.0 (/Users/jsl6/work/github/jsl6/rust-learn/04-ownership)
error[E0382]: borrow of moved value: `c`
 --> src/main.rs:9:35
  |
6 |     let c = vec![1, 2, 3];
  |         - move occurs because `c` has type `std::vec::Vec<i32>`, which does not implement the `Copy` trait
7 |     let d = c;
  |             - value moved here
8 |
9 |     println!("c = {:?}, d = {:?}",c, d);
  |                                   ^ value borrowed here after move

error: aborting due to previous error

For more information about this error, try `rustc --explain E0382`.
error: could not compile `ownership`.

To learn more, run the command again with --verbose.
此时运行错误,傲娇的编译器女王,告诉我们:value borrowed here after move
在Rust中,对象都只能有一个所有权(Ownership)。好比一本书,你买了,就有它的所有权,你借给别人,所有权就临时借给了别人,或者到了别人手上,就临时拥有所有权。
Rust的设计哲学,就是默认所有的线程操作都是不安全的。若所有的数据,默认是不可变的,那么所有的线程操作都是线程安全的,是可以共享数据的。
回到上面的例子:
let a = vec![1, 2, 3];
let b = a; // a把数据给b. a已经没有数据的所有权,就访问不了数据,编译器就报错了。
那为何第一段代码不报错了呢?
1.9种基本数据类型: 如:bool(布尔),char(字符),integer(整数),floating(浮点),arrays(数组),tuples(元组),slice(切片),字符串(str),函数指针(functions)
对基本类型的详细说明 可以参考英文教程:
https://learning-rust.github.io/docs/a6.variable_bindings,constants_and_statics.html
或中文参考:http://wiki.jikexueyuan.com/project/rust/primitive-types.html
2.非基本类型:
即除基本类型外的其它类型,一般为引用类型。
所以,Rust内部又定义了两种类型:复制类型(Copy type ),移动类型( Move type )。
注意一点,对于函数指针类型,一般情况下为移动类型( Move type ),但如果它实现以下接口:
core::marker::Copy trait
则它也是复制类型,执行复制的模式。
新建项目cargo,重名02-cargo并且启动:
cargo new cargo
mv cargo 02-cargo # 这部分为了排序方便,可忽略
cd 02-cargo
cargo run
可以在 crates.io,即 Rust 包的仓库中找到所有类别的库。在 Rust 中,我们通常把包称作“crates”。
在本项目中,我们使用了名为 ferris-says 的库。
我们在 Cargo.toml 文件中添加以下信息(从 crate 页面上获取):
[dependencies]
ferris-says = "0.1"
接着运行:
cargo build
此命令就会自动下载依赖包,生成新文件 Cargo.lock,该文件记录了本地所用依赖库的精确版本.
接着使用该依赖,打开src/main.rs:
use ferris_says::say;
use std::io::{stdout, BufWriter};

fn main() {
    let stdout = stdout();
    let out = b"Hello, world!";
    let width = 24;

    let mut writer = BufWriter::new(stdout.lock());
    say(out, width, &mut writer).unwrap();
    println!("");
}
命令行运行
cargo run
首次会下载依赖包,并且编译:
02-cargo git:(master) ✗ cargo run
    Updating crates.io index
  Downloaded ferris-says v0.1.1
  Downloaded smallvec v0.4.5
  Downloaded error-chain v0.10.0
  Downloaded clap v2.33.0
  Downloaded ansi_term v0.11.0
  Downloaded backtrace v0.3.42
  Downloaded strsim v0.8.0
  Downloaded textwrap v0.11.0
  Downloaded unicode-width v0.1.7
  Downloaded atty v0.2.14
  Downloaded vec_map v0.8.1
  Downloaded cc v1.0.50
   Compiling libc v0.2.66
   Compiling cc v1.0.50
   Compiling bitflags v1.2.1
   Compiling rustc-demangle v0.1.16
   Compiling unicode-width v0.1.7
   Compiling cfg-if v0.1.10
   Compiling strsim v0.8.0
   Compiling ansi_term v0.11.0
   Compiling vec_map v0.8.1
   Compiling smallvec v0.4.5
   Compiling textwrap v0.11.0
   Compiling atty v0.2.14
   Compiling clap v2.33.0
   Compiling backtrace-sys v0.1.32
   Compiling backtrace v0.3.42
   Compiling error-chain v0.10.0
   Compiling ferris-says v0.1.1
   Compiling cargo v0.1.0 (/Users/zhaoxiongliang/work/github/jsl6/rust-learn/02-cargo)
    Finished dev [unoptimized + debuginfo] target(s) in 31.88s
     Running `target/debug/cargo`

----------------------------
| Hello, world!            |
----------------------------
              \
               \
                  _~^~^~_
              \) /  o o  \ (/
                '_   -   _'
                / '-----' \
如果你能看到最后的打印结果。
那么恭喜你,你已经可以写rust的代码了。
A declarative, efficient, and flexible JavaScript library for building user interfaces.
🖖 Vue.js is a progressive, incrementally-adoptable JavaScript framework for building UI on the web.
TypeScript is a superset of JavaScript that compiles to clean JavaScript output.
An Open Source Machine Learning Framework for Everyone
The Web framework for perfectionists with deadlines.
A PHP framework for web artisans
Bring data to life with SVG, Canvas and HTML. 📊📈🎉
JavaScript (JS) is a lightweight interpreted programming language with first-class functions.
Some thing interesting about web. New door for the world.
A server is a program made to process requests and deliver data to clients.
Machine learning is a way of modeling and interpreting data that allows a piece of software to respond intelligently.
Some thing interesting about visualization, use data art
Some thing interesting about game, make everyone happy.
We are working to build community through open source technology. NB: members must have two-factor auth.
Open source projects and samples from Microsoft.
Google ❤️ Open Source for everyone.
Alibaba Open Source for everyone
Data-Driven Documents codes.
China tencent open source team.