These scripts configure a GNU/Linux or macOS system for Raspberry Pi Pico development, producing:
- Raspberry Pi Pico C/C++ SDK
- Raspberry Pi Pico Python SDK (MicroPython RP2 port)
- OpenOCD
- Picoprobe
- Picotool
Caveats:
- On Fedora, a multi-architecture GNU debugger (gdb) is not available.
- On Apple silicon, gdb requires Rosetta 2.
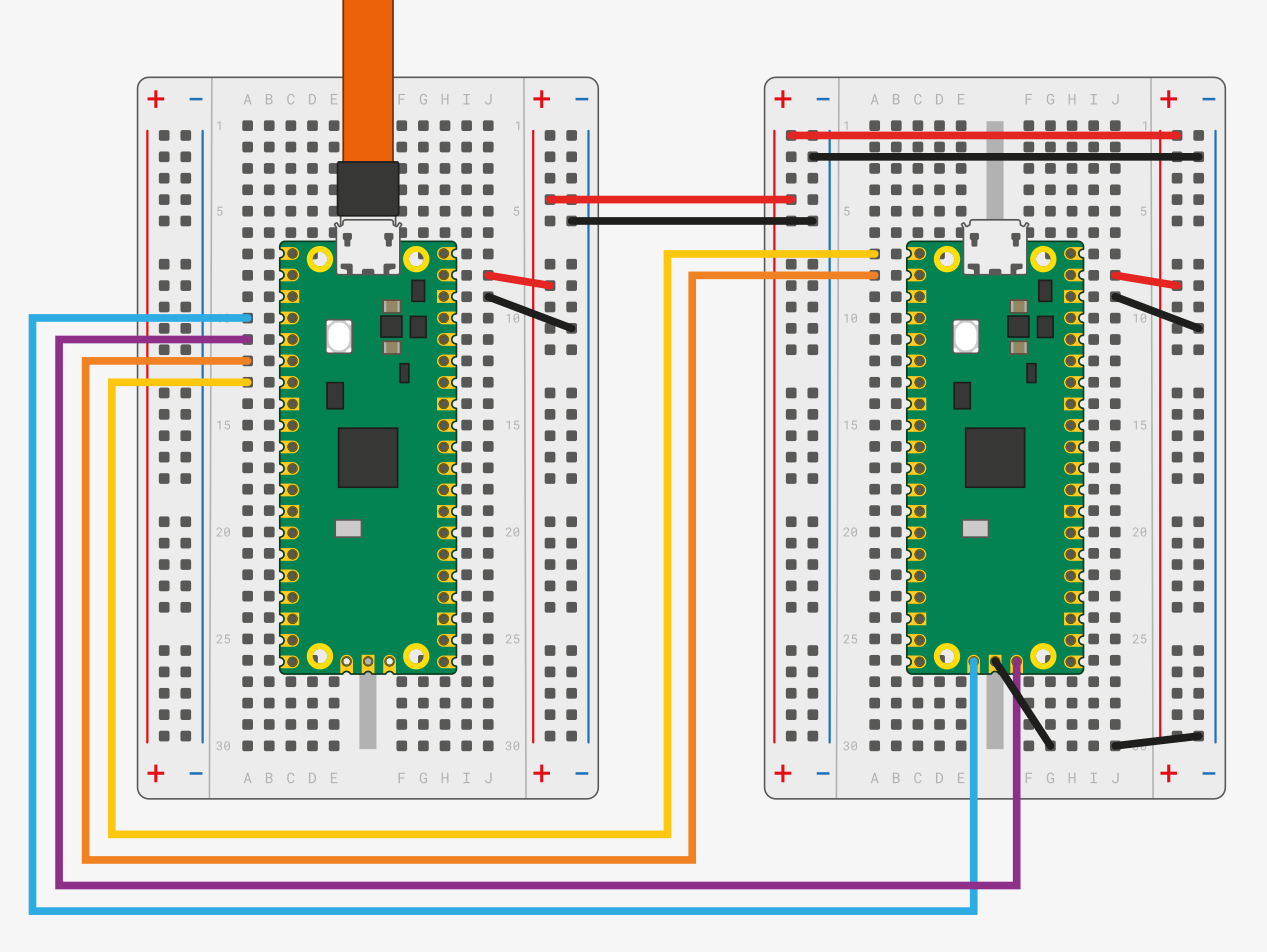
In following figure, the Raspberry Pi Pico on the left acts as a debug probe/serial console for the Pico under development on the right. The Pico debug probe is connected via USB to a desktop/build system from which these scripts are run.
 |
|---|
| Pico configured as debug probe (Image credit: Raspberry Pi) |
NB: If the Pico under development is a USB host then, instead of wiring VSYS to VSYS (Pico pin 39), wire VBUS to VBUS (Pico pin 40) so that development USB can provide 5V.
For further information, please refer to:
Until a release version of these scripts is distributed, the following utilities are needed to generate the configure script:
- GNU autotools (i.e., autoconf, automake, libtool)
- GNU make
- GNU bash version 5+
On Debian/Ubuntu, run:
sudo apt install -y autoconf automake libtool makeon Fedora, run:
sudo dnf install -y autoconf automake libtool makeIn addition to Xcode, to be able to install the requisite software, the build script assumes that MacPorts is already installed. It's possible to use Homebrew instead, but the build script would need to be updated accordingly.
sudo port install bash bash-completion autoconf automake libtool gmake
export PATH=/usr/local/bin:$PATHIn a terminal, run:
git clone https://github.com/revolution-robotics/rp2.git
cd rp2
./autogen.sh
./configure
make PICO_BOARD=pico PICO_BASEDIR=${PWD}/build
To build for Pico W, replace PICO_BOARD=pico above with
PICO_BOARD=pico_w.
Follow the instructions for updating the shell initialization scripts
printed at the end of make command. Finally, run:
sudo make installTo install Picoprobe, the debug probe Pico (i.e., in the diagram above, the left Pico) first needs to be mounted on the build system as a USB Mass Storage device as follows:
With the Pico connected via USB cable to the build system, press and hold the Pico BOOTSEL button on the debug probe, then momentarily short the debug probe pins 30 (RUN) and 28 (GND). A moment later, release BOOTSEL. Shorting the RUN pin to ground causes the Pico to reset and, with BOOTSEL pressed, boot into USB Mass Storage mode.
If all went well, the Pico should be mounted on a folder of the build system, i.e., on
- Ubuntu as: /media/${USER}/RPI-RP2
- Fedora as: /run/media/${USER}/RPI-RP2
- macOS as: /Volumes/RPI-RP2
Picoprobe can now be installed to the Pico by copying the file picoprobe.uf2 to Pico's mount point, i.e., on
- Ubuntu, run:
cp ${PICO_BASEDIR}/picoprobe/build/picoprobe.uf2 \
/run/media/${USER}/RPI-RP2- Fedora, run:
cp ${PICO_BASEDIR}/picoprobe/build/picoprobe.uf2 \
/run/media/${USER}/RPI-RP2- macOS, run:
cp ${PICO_BASEDIR}/picoprobe/build/picoprobe.uf2 \
    /Volumes/RPI-RP2
That's it!
After installing Picoprobe, OpenOCD can be used for flashing applications to the development system. For instance, to flash MicroPython, run:
make -C "$PICO_BUILD_PATH" flash \
    PICO_IMAGE="${PICO_BASEDIR}/micropython/ports/rp2/build-PICO/firmware.elf"
Then open the REPL with:
ttypicoTo illustrate, debugging, start by flashing the blink application to the Pico:
make -C "$PICO_BUILD_PATH" flash \
    PICO_IMAGE="${PICO_BASEDIR}/pico-examples/build/blink.elf"
Verify that the development Pico's LED is blinking, then start the debug server:
make -C "$PICO_BUILD_PATH" debugIn another terminal, open the blink ELF image in GNU debugger:
gdb-multiarch "${PICO_BASEDIR}/pico-examples/build/blink/blink.elf"At the GNU debugger prompt, (gdb), connect to the OpenOCD debug server:
target remote localhost:3333Set a breakpoint, restart the blink application and list or step through it:
break main
monitor reset init
continue
list
step
After entering a command, hit the Enter key to repeat it. Use quit
to exit the GNU debugger and CTRL+C to terminate the debug server.


