GithubHelp home page GithubHelp logo

self-driving-car's Introduction

Self Driving (Toy) Ferrari

img_1015

img_1045

img_1022

Web App

I built a web app with the goal of being able to go from nothing (no data or model) to collected data, a trained and deployed model, and a fully autonomous vehicle all in under an hour. The web app runs locally on your laptop and facilitates every part of the model development life cycle.

I have a strong background in data science, machine learning, data engieering, and devops, but I'm new to front-end, javascript, and UX design work, so I paid $50 for a bootstrap js template that I heavily modified.

The app persists all data to a local Postgres Docker container with a mounted file system (a folder shared between the local container and your laptop). I'm still working on dockerizing the web app. Right now if you try to run it anywhere other than my laptop you'll get a lot of import and dependency errors.

Once you collect driving data with a PS3 controller, you can click a button on the app to transfer the data from the Pi to the laptop. Screen Shot 2020-05-17 at 3 16 53 PM

Review the data you've collected to delete bad records caused by video latency or hardware failures on the PS3 controller.

Screen Shot 2020-05-17 at 3 51 28 PM

You can also adjust the size of the image for substantially faster training and inference, or chop off the top portion of an image so that the model is less distracted by background noise (helpful if you're in a time crunch and don't have time to collect a lot of data). The app lets you see the effect of these changes so that you can see what the model sees. Screen Shot 2020-05-17 at 3 51 57 PM
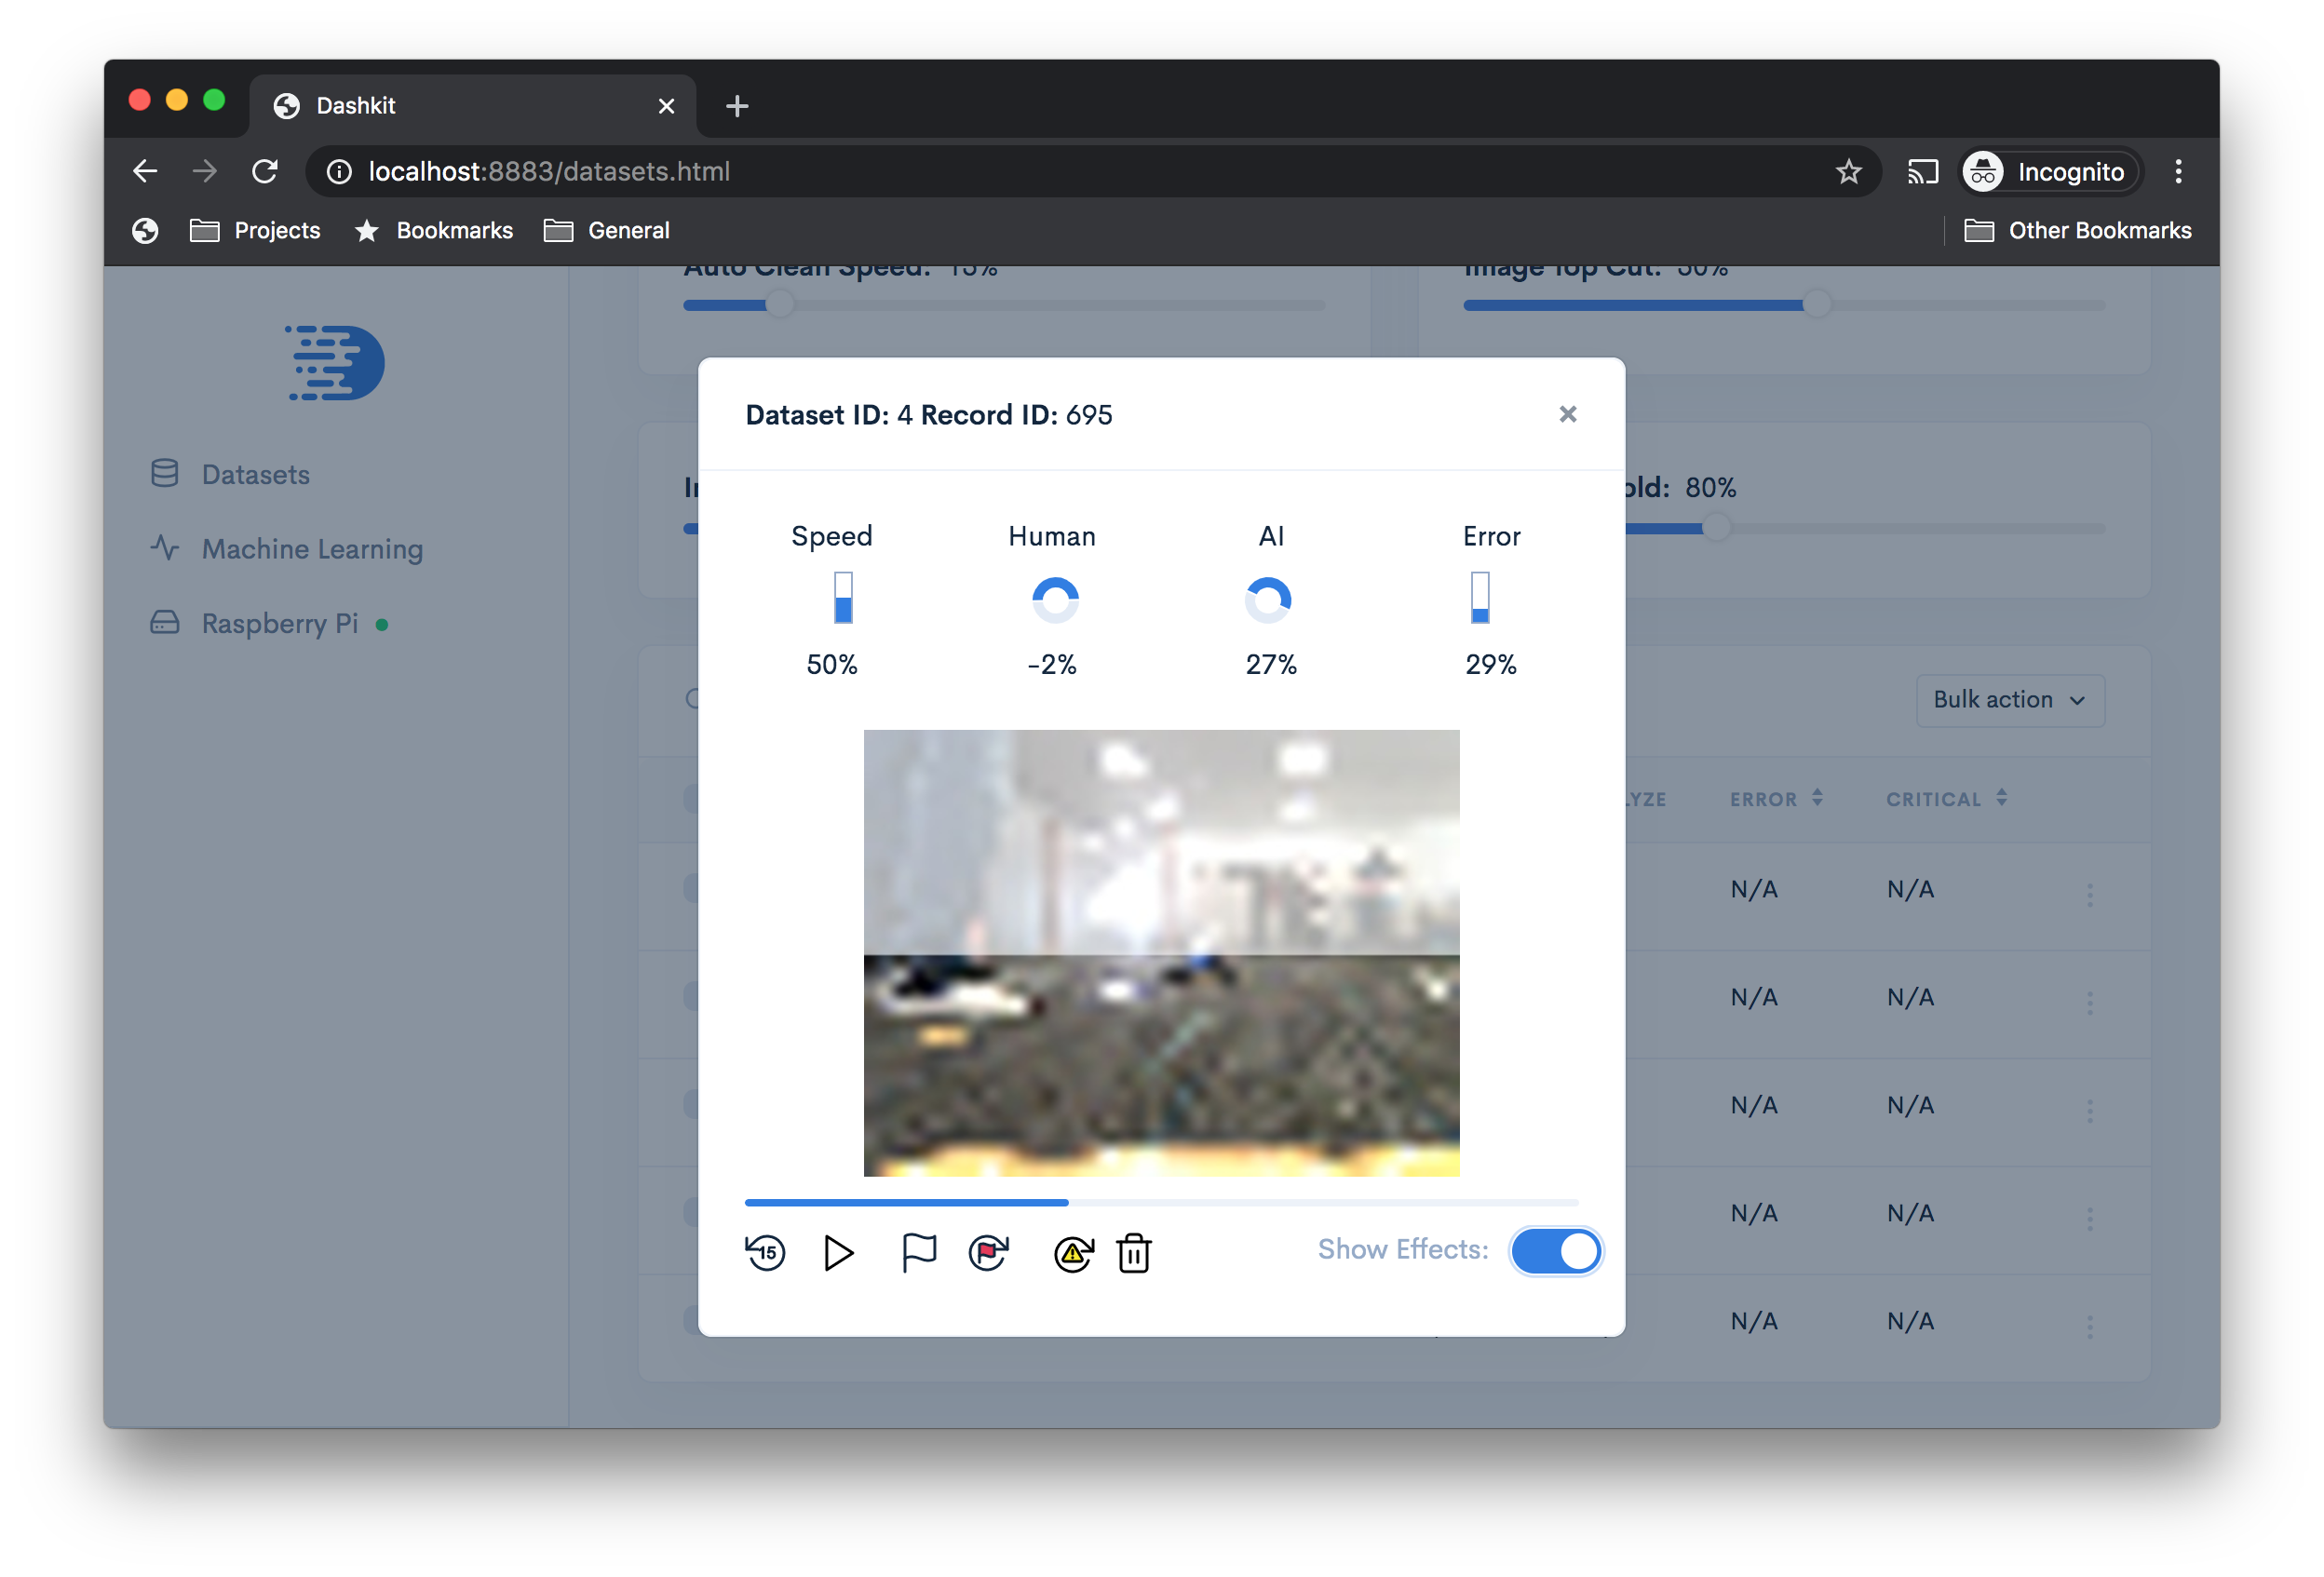
The app makes it easier to select model training and test datasets.

Screen Shot 2020-05-17 at 3 13 40 PM

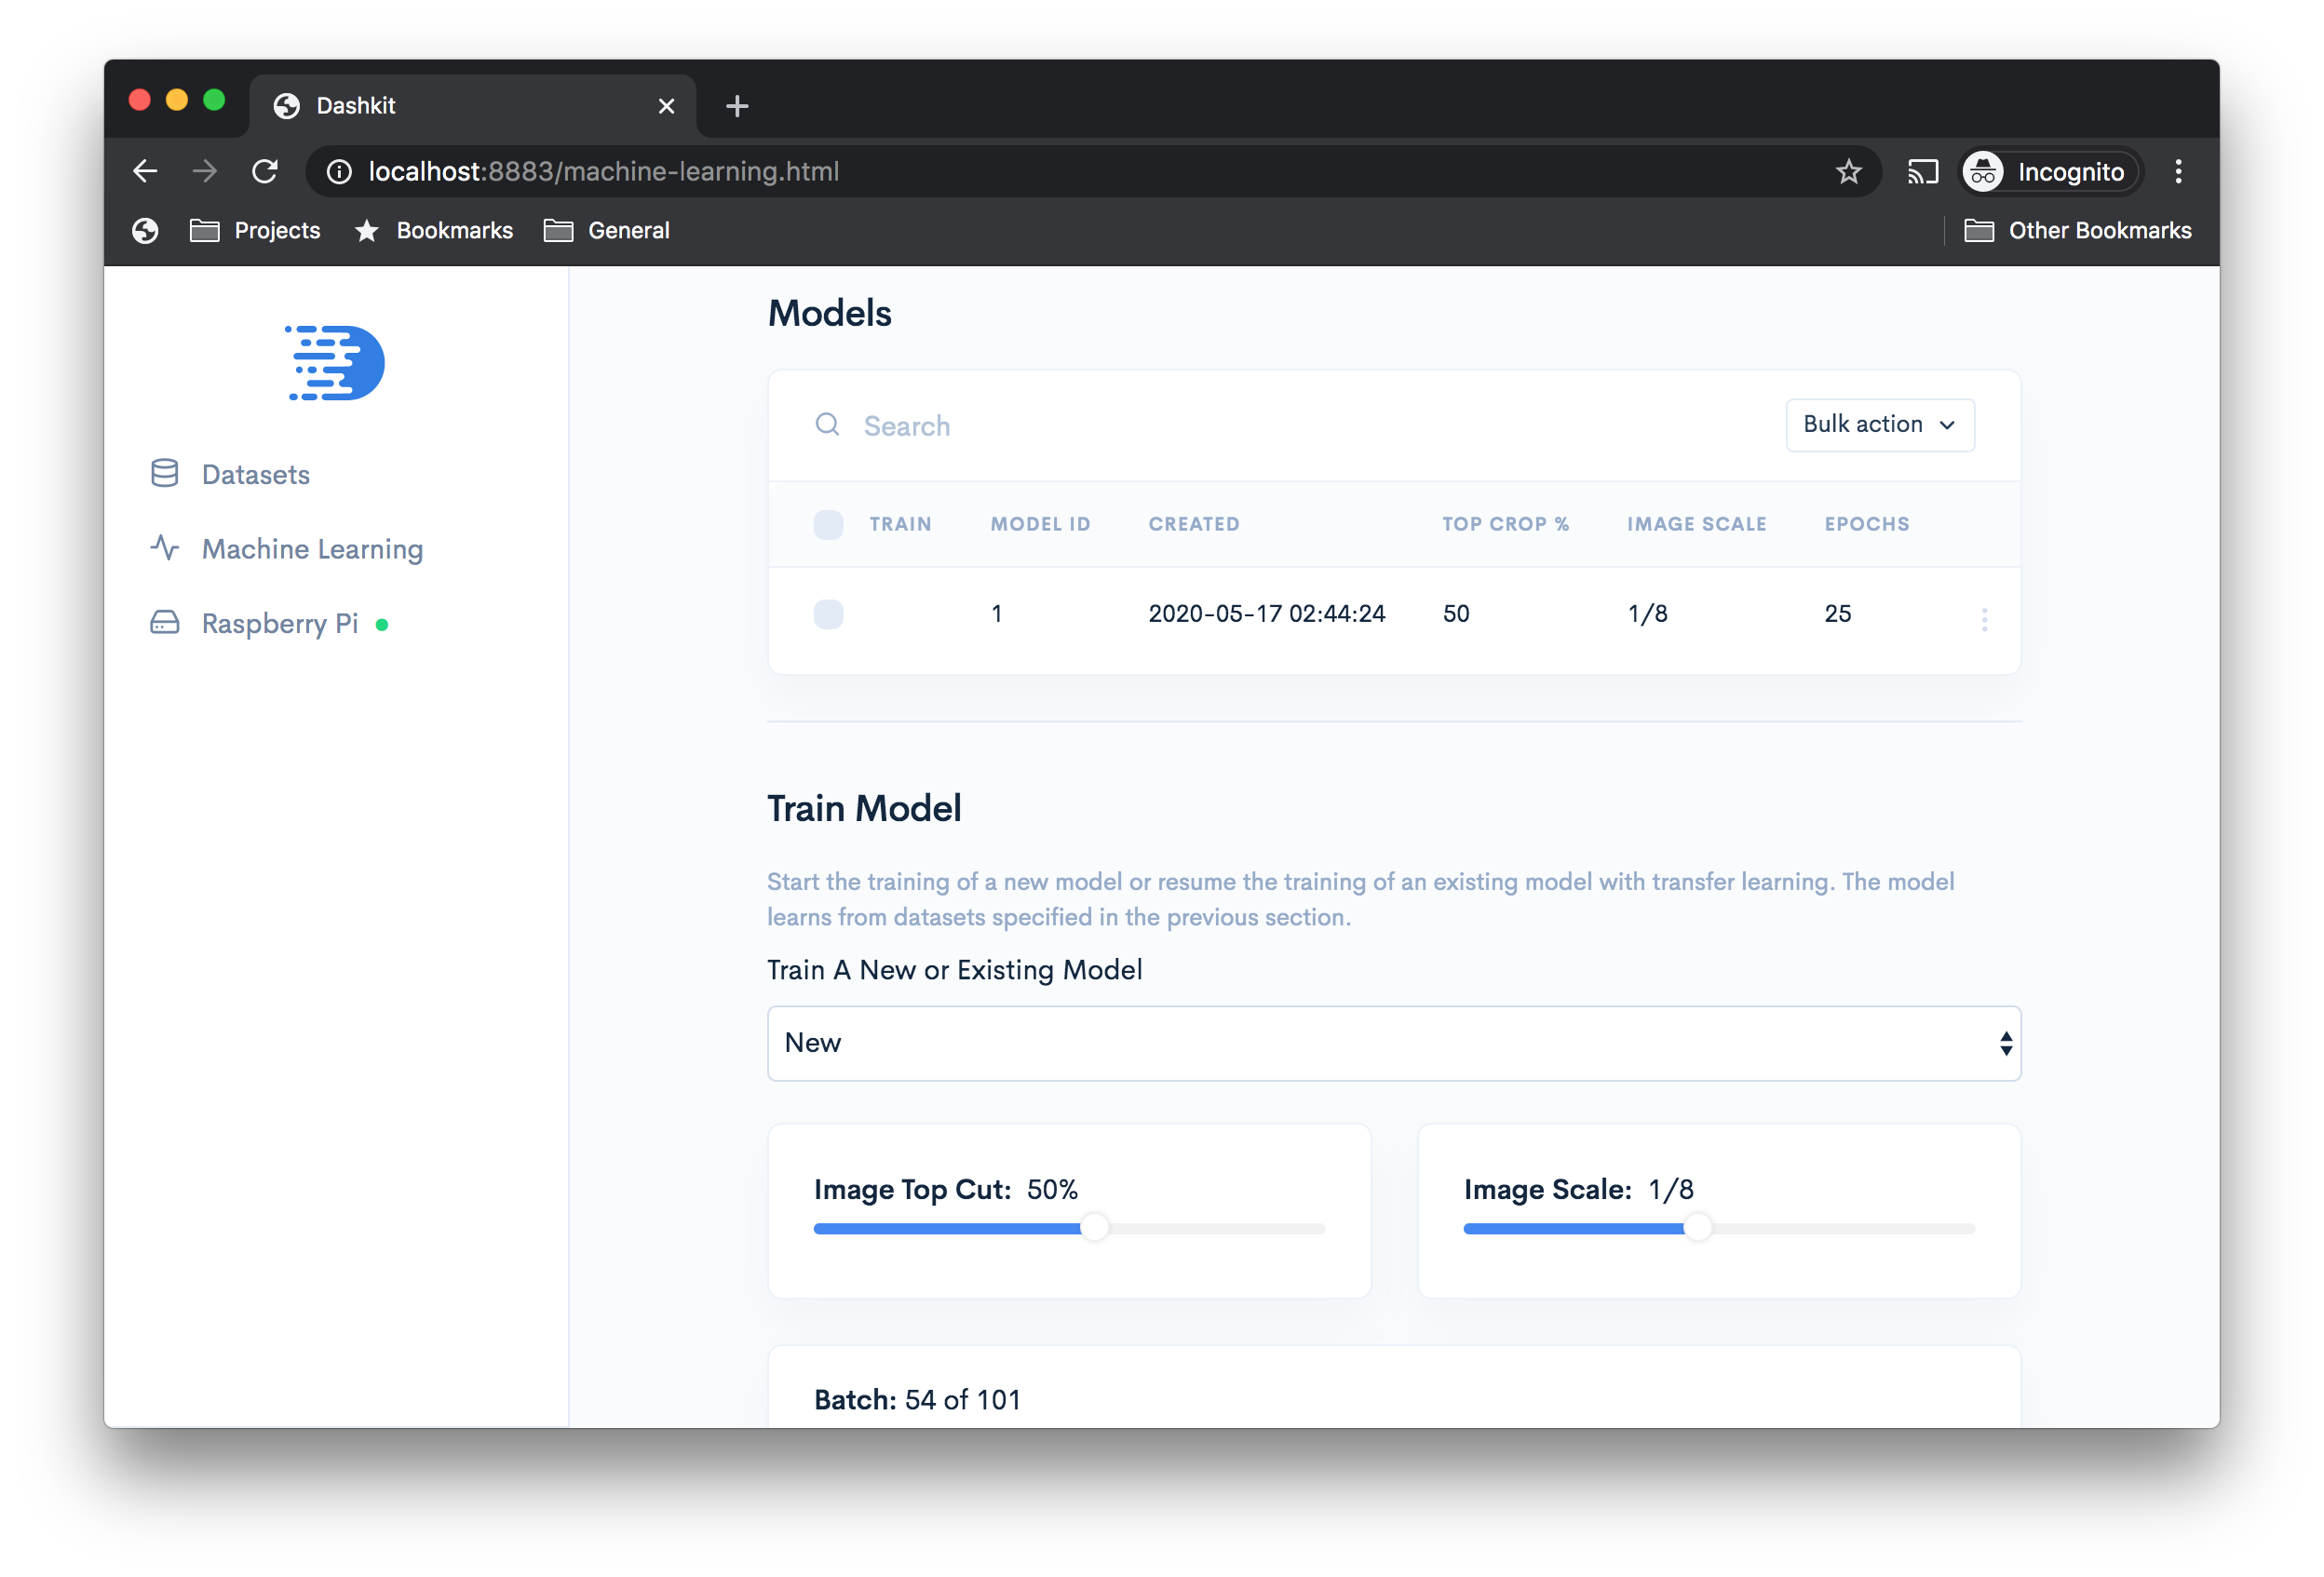
Train a new or existing model (transfer learning), and apply image size and crop settings.

Screen Shot 2020-05-17 at 3 13 59 PM

The app shows you training progress and model performance over time.

Screen Shot 2020-05-17 at 3 14 08 PM

Once you stop training you can deploy the model to your dockerized app on your laptop or the Pi.

Screen Shot 2020-05-17 at 3 14 12 PM

I also simplified the interaction with the Pi (where to save the data, the model, etc). The "dashboard" section allows you to see model predictions in real-time and toggle between human data gathering (with the PS3), and model inference (i.e., autonomous driving).

Screen Shot 2020-05-17 at 3 14 37 PM

The app also tracks the health of all the dockerized part services that the Pi runs.

Screen Shot 2020-05-17 at 3 14 43 PM

It even facilities PS3 controller pairing.

Screen Shot 2020-05-17 at 3 14 51 PM

SD Card Setup

You're going to end up with a lot of software and data on your Pi. If you're really frugal with storage, it's possible you might be able to get by with the SD card (8 GB?) that was shipped with your Pi. I choose to buy a 64 GB SD card to be safe, but that meant that I had to format it. There are lots of tutorials available elsewhere that explain how to do this.

I have a Mac and followed the steps here: https://stackoverflow.com/a/44205432/554481. If your SD card has more than 32 GB, you'll have to do a few additional steps, as noted here: https://www.raspberrypi.org/documentation/installation/sdxc_formatting.md. Basically the extra steps involve preformatting the SD card with Apple's built-in Disk Utility tool.

Hostname and SSH Configuration

Follow the steps here to turn on SSH.

If your Pi and laptop are on the same wifi network you can test a connection to the Pi from your laptop with the command below:

# Run this command
ping raspberrypi.local

# And you should see results like this:
PING raspberrypi.local (192.168.1.11): 56 data bytes
64 bytes from 192.168.1.11: icmp_seq=0 ttl=64 time=12.195 ms
64 bytes from 192.168.1.11: icmp_seq=1 ttl=64 time=155.695 ms
64 bytes from 192.168.1.11: icmp_seq=2 ttl=64 time=49.939 ms
64 bytes from 192.168.1.11: icmp_seq=3 ttl=64 time=31.751 ms

# If you're able to ping the Pi, you should also be able to ssh into it
ssh [email protected]

All Raspberry Pis should respond to the raspberrypi.local hostname, but this becomes problematic if you have multiple Pis on the same wifi network (e.g., if you're using the same wifi as other autonomous Pi cars during a race at a public event). You should change the hostname to avoid these name collisions, otherwise you might not be able to find and connect to your car. On the Pi, open this file: /etc/hosts. Before making any edits, the file should look something like this:

127.0.0.1       localhost
::1             localhost ip6-localhost ip6-loopback
ff02::1         ip6-allnodes
ff02::2         ip6-allrouters

127.0.1.1       raspberrypi

Replace raspberrypi with whatever new name you want to use. In my case, I'm choosing ryanzotti. Next, edit the following file /etc/hostname. By default this file should only contain the text raspberrypi. Replace it with the new name, then save the file. Now commit the changes to the system and reboot:

# Commit the change
sudo /etc/init.d/hostname.sh

# Reboot the Pi
sudo reboot

You should now be able to log into your Pi like so:

Circuitry

I specialize in machine learning, not hardware, and this was my first time working with circuits. If you have prior circuitry experience and come across something I've done that doesn't make sense, go with your instinct because I could be wrong. I followed tutorials from here:

Note that you won't be able to follow the tutorials verbatim. One of the tutorials uses a Raspberry Pi 2 whereas I use a 3. The differences are not significant, so you should be able to figure it out. Both tutorials give much better explanations than I can, but if you're curious exactly how I did the wiring, see my diagram below.

frame

Useful Links

self-driving-car's People

Contributors

ryanzotti avatar

Stargazers

 avatar  avatar  avatar  avatar  avatar  avatar  avatar  avatar  avatar  avatar  avatar  avatar  avatar  avatar  avatar  avatar  avatar  avatar  avatar  avatar  avatar  avatar  avatar  avatar  avatar  avatar  avatar  avatar  avatar  avatar  avatar  avatar  avatar  avatar  avatar  avatar  avatar  avatar  avatar  avatar  avatar  avatar  avatar  avatar  avatar  avatar  avatar  avatar  avatar  avatar  avatar  avatar  avatar  avatar  avatar  avatar  avatar  avatar  avatar  avatar  avatar  avatar  avatar  avatar  avatar  avatar  avatar  avatar  avatar  avatar  avatar  avatar  avatar  avatar  avatar  avatar  avatar  avatar  avatar  avatar  avatar  avatar  avatar  avatar  avatar  avatar  avatar  avatar  avatar  avatar  avatar  avatar  avatar  avatar  avatar  avatar  avatar  avatar  avatar  avatar

Watchers

 avatar  avatar  avatar  avatar  avatar  avatar  avatar  avatar  avatar  avatar  avatar  avatar  avatar  avatar  avatar  avatar  avatar  avatar  avatar  avatar  avatar  avatar  avatar  avatar  avatar  avatar  avatar  avatar  avatar  avatar  avatar  avatar  avatar  avatar  avatar  avatar  avatar  avatar  avatar  avatar  avatar  avatar  avatar  avatar  avatar  avatar  avatar  avatar  avatar  avatar  avatar  avatar  avatar  avatar  avatar  avatar  avatar  avatar  avatar  avatar  avatar  avatar  avatar  avatar  avatar  avatar  avatar  avatar  avatar  avatar  avatar  avatar  avatar  avatar  avatar  avatar  avatar  avatar  avatar  avatar  avatar  avatar  avatar  avatar  avatar  avatar  avatar  avatar  avatar  avatar

self-driving-car's Issues

drive_api.py does not show live feed?

Based on the screenshot on README.MD, I was under the impression that a live video feed would be shown with the keyboard arrow keys.

drive_api.py only shows text, and I didn't see anything in the code that would make it show the feed webcam.mjpeg or the file output.mov

Or we are supposed to follow the car with a laptop and drive with the video?

Thanks

Improve Deployed Model's Autonomous Driving Behavior

@zfhall You've probably noticed that I haven't updated this repo in a little while. That's mainly because I've hit a wall on how to improve the car's disengagement event frequency (when I have to intervene because the model has made a poor driving decision). In particular, the car does poorly on sharp turns and doesn't know how to correct itself once it's gotten in a bad situation (it only sees the current frame, so it has very limited context). You've gotten far enough in the project that I figured you might have some good ideas.

Some of my thoughts:

  • Camera Positioning: Did I poorly position my camera? How did you position yours? Does your car handle sharp turns well? Other toy self-driving car projects position the camera higher up so that the camera has more of a birds-eye-view, looking immediately down on the front hood of the car and the road that the car is already on top of. For aesthetic purposes I kept my camera angle low, but that means the car only sees parts of the road that are more than about a foot away. This means that on sharp turns where the car is on the outside of the track, the camera is mostly looking at background and not road even when all wheels are still on the road.
  • Localization / Mapping: This is how real self-driving cars work and therefore has obvious appeal. Google's cars have detailed maps of their surroundings and know precisely where the car is within that map. If the car makes a mistake and winds up way off on the side of the road, the localization system essentially tells the car the corrections to get back on track. It basically involves making a map of the track in real-time. The downside is that I basically have no idea how to do localization (at least not yet). It's not really machine learning. It's more of a robotics concept. I would also have to install an accelerometer on the Pi. On the other hand, it's used in autonomous drones, which is pretty cool.
  • Multiple Cameras: Nvida's paper talks about using three cameras to cope with the "recovering from mistakes" issue. Quoting from their paper:

Training with data from only the human driver is not sufficient. The network must
learn how to recover from mistakes. Otherwise the car will slowly drift off the road. The training
data is therefore augmented with additional images that show the car in different shifts from the
center of the lane and rotations from the direction of the road. Images for two specific off-center shifts can be obtained from the left and the right camera. Additional shifts between the cameras and all rotations are simulated by viewpoint transformation of the image from the nearest camera.

  • Better Models: I've thought of training an CNN-RNN. This is kind of a long shot, but the idea is that since my car can only see far ahead of it, to know where it is in the track now would require looking back a few frames. RNNs are good at looking back at previous points in time. I already use CNNs. CNN-RNNs have been used for Google image captioning and at other places for OCR.

  • Steering Angle Instead of Arrow Keys: My car is small and simple and so I resorted to arrow keys. I might have gotten better performance if I had used steering angle. This would involve a major code re-write. On the other hand, I've seen a lot of other toy cars use arrow-key steering just fine.

model

where can i get pre trained model for this architecture

FFmpeg

How do I install FFmpeg?

Image size

Did you try to resize input image to 128x128 or smaller?
Because now you are working with so big images, and it takes too much time to train nn.
And what FPS you receive from raspberry pi on computer?

TensorBoard Visualisation

@RyanZotti First of all I apologise for how many questions I have had recently, I'm a real novice when it comes to Tensorflow and ML so I need all the help I can get! So thank you in advance if you are sparing the time to read this.

Currently I'm trying to figure out how to implement accuracy and loss visualisation into your code. It seems you have already done this somewhat, however I cannot get it to work. All I have managed to do is visualise the weights in each layer and the model graph.

For example in the code below you have created an operations to log a scalar, however I cannot see where you write the values into the log file later on? Am I missing something?

    def train(self, sess, x, y_, accuracy, train_step, train_feed_dict, test_feed_dict):

        # To view graph: tensorboard --logdir=/Users/ryanzotti/Documents/repos/Self_Driving_RC_Car/tf_visual_data/runs
        tf.summary.scalar('accuracy_summary', accuracy)
        merged = tf.summary.merge_all()

/etc/ff.conf_original

Hello Ryan:

I am having trouble getting the video to stream. Is there any way you could post your /etc/ff.conf_original file? I noticed that in save_streaming_video_data.py you open a connection to the URL like this:

stream = urllib.request.urlopen('http://{ip}/webcam.mjpeg'.format(ip=ip))

The /etc/ffserver.conf that came with my ffmpeg installation didn't have any references to webcam.ffm. If you could post your config file that could help clear some things up for me.

Thanks Ryan! Awesome project and I am looking forward to getting things running!

ai_drive not working.

Hi @RyanZotti ,
Firstly thank you for your project. It's a great project. I'm following your steps and I am in the last step. However when I try to run ai_drive.py I've a trouble.
I trained cnn model by my computer. There are 4 files under the directory "/ tf_visual_data / runs / 2 / trained_model/" after training.
These files are checkpoint, model.ckpt.data, model.ckpt.index, model.ckpt.meta.
I gave RPi IP and '/ tf_visual_data / runs / 2 / trained_model/' as parameters to ai_drive.py and I runned it. Then an error occured in get_prev_epoch method at util.py. raw_results variable that is in get_prev_epoch took a '.ckpt' value and then program crashed.
Do you have any idea to solve this problem?

FFSERVER

Hello RyanZotti, I've some problem with using ffmpeg. i use cd /usr/src/ffmpeg ... after i run

sudo ffserver -f /etc/ff.conf_original & ffmpeg -v quiet -r 5 -s 320x240 -f video4linux2 -i /dev/video0 http://localhost/webcam.ffm

It shows no such file directory for /etc/ff.conf_original ... ๐Ÿ˜

Item list

Hi, Ryan,

Could you reply the item list for the self driving toy car , it'll be more helpful if the direct purchase links for the items are included.

Output Video Frame Rate?

Hello @RyanZotti

After collecting training data I noticed that when I watch the output.mov file after a session, the video is greatly sped up and thus shorter than it should be. Is this intended or is it a fault on my end? I'm guessing its not supposed to be this way as the time stamps do not match up with the video. Any ideas?

Z

ai_drive not working from cnn trained models.

ai_drive works just fine for other models like glm and Ann but has errors when ran from cnn trained models.
the error is:
tensorflow.python.framework.errors_impl.InvalidArgumentError: You must feed a value for placeholder tensor 'Placeholder' with dtype float
[[Node: Placeholder = Placeholderdtype=DT_FLOAT, shape=, _device="/job:localhost/replica:0/task:0/device:CPU:0"]]

i think the error lies here.
in glm and ann:
x = tf.placeholder(tf.float32, shape=[None, 240, 320, 3], name='x')
y_ = tf.placeholder(tf.float32, shape=[None, 3], name='y_')
x_shaped = tf.reshape(x, [-1, 240 * 320 * 3])

but in cnn:
x = tf.placeholder(tf.float32, shape=[None, 240, 320, 3], name='x')
y_ = tf.placeholder(tf.float32, shape=[None, 3], name='y_')

why do you only reshape for glm and ann.

full error in console:
2018-07-21 11:39:54.144693: W tensorflow/core/framework/allocator.cc:101] Allocation of 629145600 exceeds 10% of system memory.
2018-07-21 11:40:04.581812: W tensorflow/core/framework/allocator.cc:101] Allocation of 629145600 exceeds 10% of system memory.
2018-07-21 11:40:14.998577: W tensorflow/core/framework/allocator.cc:101] Allocation of 629145600 exceeds 10% of system memory.
2018-07-21 11:40:25.908618: W tensorflow/core/framework/allocator.cc:101] Allocation of 629145600 exceeds 10% of system memory.
2018-07-21 11:40:25.908639: W tensorflow/core/framework/allocator.cc:101] Allocation of 629145600 exceeds 10% of system memory.
2018-07-21 11:40:25.908857: W tensorflow/core/framework/allocator.cc:101] Allocation of 629145600 exceeds 10% of system memory.
Exception in thread Prediction thread:
Traceback (most recent call last):
File "/home/the_pradeep/.local/lib/python3.6/site-packages/tensorflow/python/client/session.py", line 1322, in _do_call
return fn(*args)
File "/home/the_pradeep/.local/lib/python3.6/site-packages/tensorflow/python/client/session.py", line 1307, in _run_fn
options, feed_dict, fetch_list, target_list, run_metadata)
File "/home/the_pradeep/.local/lib/python3.6/site-packages/tensorflow/python/client/session.py", line 1409, in _call_tf_sessionrun
run_metadata)
tensorflow.python.framework.errors_impl.InvalidArgumentError: You must feed a value for placeholder tensor 'Placeholder' with dtype float
[[Node: Placeholder = Placeholderdtype=DT_FLOAT, shape=, _device="/job:localhost/replica:0/task:0/device:CPU:0"]]

During handling of the above exception, another exception occurred:

Traceback (most recent call last):
File "/usr/lib/python3.6/threading.py", line 916, in _bootstrap_inner
self.run()
File "/usr/lib/python3.6/threading.py", line 864, in run
self._target(*self._args, **self._kwargs)
File "/home/the_pradeep/PycharmProjects/untitled/CommandCenter.py", line 113, in predict_from_queue
command_index = self.prediction.eval(feed_dict={self.x: normalized_images}, session=self.sess)[0]
File "/home/the_pradeep/.local/lib/python3.6/site-packages/tensorflow/python/framework/ops.py", line 710, in eval
return _eval_using_default_session(self, feed_dict, self.graph, session)
File "/home/the_pradeep/.local/lib/python3.6/site-packages/tensorflow/python/framework/ops.py", line 5180, in _eval_using_default_session
return session.run(tensors, feed_dict)
File "/home/the_pradeep/.local/lib/python3.6/site-packages/tensorflow/python/client/session.py", line 900, in run
run_metadata_ptr)
File "/home/the_pradeep/.local/lib/python3.6/site-packages/tensorflow/python/client/session.py", line 1135, in _run
feed_dict_tensor, options, run_metadata)
File "/home/the_pradeep/.local/lib/python3.6/site-packages/tensorflow/python/client/session.py", line 1316, in _do_run
run_metadata)
File "/home/the_pradeep/.local/lib/python3.6/site-packages/tensorflow/python/client/session.py", line 1335, in _do_call
raise type(e)(node_def, op, message)
tensorflow.python.framework.errors_impl.InvalidArgumentError: You must feed a value for placeholder tensor 'Placeholder' with dtype float
[[Node: Placeholder = Placeholderdtype=DT_FLOAT, shape=, _device="/job:localhost/replica:0/task:0/device:CPU:0"]]

Caused by op 'Placeholder', defined at:
File "/home/the_pradeep/PycharmProjects/untitled/ai_drive.py", line 18, in
command_center = CommandCenter(checkpoint_dir_path=checkpoint_dir_path, ip=ip)
File "/home/the_pradeep/PycharmProjects/untitled/CommandCenter.py", line 32, in init
saver = tf.train.import_meta_graph(checkpoint_dir_path + "/" + graph_name + ".meta")
File "/home/the_pradeep/.local/lib/python3.6/site-packages/tensorflow/python/training/saver.py", line 1955, in import_meta_graph
**kwargs)
File "/home/the_pradeep/.local/lib/python3.6/site-packages/tensorflow/python/framework/meta_graph.py", line 743, in import_scoped_meta_graph
producer_op_list=producer_op_list)
File "/home/the_pradeep/.local/lib/python3.6/site-packages/tensorflow/python/util/deprecation.py", line 432, in new_func
return func(*args, **kwargs)
File "/home/the_pradeep/.local/lib/python3.6/site-packages/tensorflow/python/framework/importer.py", line 513, in import_graph_def
_ProcessNewOps(graph)
File "/home/the_pradeep/.local/lib/python3.6/site-packages/tensorflow/python/framework/importer.py", line 303, in _ProcessNewOps
for new_op in graph._add_new_tf_operations(compute_devices=False): # pylint: disable=protected-access
File "/home/the_pradeep/.local/lib/python3.6/site-packages/tensorflow/python/framework/ops.py", line 3540, in _add_new_tf_operations
for c_op in c_api_util.new_tf_operations(self)
File "/home/the_pradeep/.local/lib/python3.6/site-packages/tensorflow/python/framework/ops.py", line 3540, in
for c_op in c_api_util.new_tf_operations(self)
File "/home/the_pradeep/.local/lib/python3.6/site-packages/tensorflow/python/framework/ops.py", line 3428, in _create_op_from_tf_operation
ret = Operation(c_op, self)
File "/home/the_pradeep/.local/lib/python3.6/site-packages/tensorflow/python/framework/ops.py", line 1718, in init
self._traceback = self._graph._extract_stack() # pylint: disable=protected-access

InvalidArgumentError (see above for traceback): You must feed a value for placeholder tensor 'Placeholder' with dtype float
[[Node: Placeholder = Placeholderdtype=DT_FLOAT, shape=, _device="/job:localhost/replica:0/task:0/device:CPU:0"]]

Using a Servo motor for Steering

I am attempting to implement a servo motor to steer the car.

This allows for more precise and variable turns, since the servo is able to turn to a specific angle instead of just switching directions (left or right in this case).

So far I have got the car to turn right and left when the corresponding arrow keys are pushed. However, when I press the up and down arrows the car doesn't move and the servo makes a slight hum, but doesn't move much.

These are the additions I made to the drive_api.py program, mostly found online.

Declaring the servo at the top of the program:


import argparse
import tornado.ioloop
import tornado.web
from datetime import datetime
import os
from operator import itemgetter
import RPi.GPIO as GPIO
import requests
from time import sleep

GPIO.setmode(GPIO.BOARD)
GPIO.setup(12, GPIO.OUT)
pwm=GPIO.PWM(12, 50)
pwm.start(0)

SetAngle function near the bottom of the program that handles servo movement and logic

def SetAngle(angle):
    duty = angle / 18 + 2
    GPIO.output(12 , True)
    pwm.ChangeDutyCycle(duty)
    sleep(1)
    GPIO.output(12, False)
    pwm.ChangeDutyCycle(0)


if __name__ == "__main__":

    # Parse CLI args
    ap = argparse.ArgumentParser()
    ap.add_argument("-s", "--speed_percent", required=True, help="Between 0 and 100")
    args = vars(ap.parse_args())
    GPIO.setmode(GPIO.BOARD)
    motor = Motor(16, 18, 22, 19, 21, 23)
    log_entries = []
    settings = {'speed':float(args['speed_percent'])}
    app = make_app(settings)
    app.listen(81)
    tornado.ioloop.IOLoop.current().start()

Setting the angles for left, right and stop:

def forward(self, speed):
        """ pinForward is the forward Pin, so we change its duty
             cycle according to speed. """
        self.pwm_backward.ChangeDutyCycle(0)
        self.pwm_forward.ChangeDutyCycle(speed)    

    def forward_left(self, speed):
        """ pinForward is the forward Pin, so we change its duty
             cycle according to speed. """
        self.pwm_backward.ChangeDutyCycle(0)
        self.pwm_forward.ChangeDutyCycle(speed)  
        # self.pwm_right.ChangeDutyCycle(0)
        # self.pwm_left.ChangeDutyCycle(100)   
        SetAngle(120)


    def forward_right(self, speed):
        """ pinForward is the forward Pin, so we change its duty
             cycle according to speed. """
        self.pwm_backward.ChangeDutyCycle(0)
        self.pwm_forward.ChangeDutyCycle(speed)
        # self.pwm_left.ChangeDutyCycle(0)
        # self.pwm_right.ChangeDutyCycle(100)
        SetAngle(0)

    def backward(self, speed):
        """ pinBackward is the forward Pin, so we change its duty
             cycle according to speed. """

        self.pwm_forward.ChangeDutyCycle(0)
        self.pwm_backward.ChangeDutyCycle(speed)

    def left(self, speed):
        """ pinForward is the forward Pin, so we change its duty
             cycle according to speed. """
        # self.pwm_right.ChangeDutyCycle(0)
        # self.pwm_left.ChangeDutyCycle(speed)  
        

    def right(self, speed):
        """ pinForward is the forward Pin, so we change its duty
             cycle according to speed. """
        # self.pwm_left.ChangeDutyCycle(0)
        # self.pwm_right.ChangeDutyCycle(speed)   
        

    def stop(self):
        """ Set the duty cycle of both control pins to zero to stop the motor. """

        self.pwm_forward.ChangeDutyCycle(0)
        self.pwm_backward.ChangeDutyCycle(0)
        # self.pwm_left.ChangeDutyCycle(0)
        # self.pwm_right.ChangeDutyCycle(0)
        SetAngle(50)

If anyone might know why I am getting the issues above, please comment.

Thanks.

localhost/drive not found

2020-02-18-165404_1600x900_scrot

only works on pi

I'm using L298N dual driver is this the problem?(right now ENA,INA1,INA2,INB1.INB2.ENB are connected to 16,18,22,19,21,23)
Also, save_streaming_data.py only works when pi is connected via an HDMI to a monitor on remote execution(SSH) I get
: cannot connect to X server
(Assuming this is GUI problem)

Edit : on changing the port from 8090 to 81 results to following

drive_api.py:151: RuntimeWarning: This channel is already in use, continuing anyway. Use GPIO.setwarnings(False) to disable warnings.
GPIO.setup(self.pinForward, GPIO.OUT)
drive_api.py:152: RuntimeWarning: This channel is already in use, continuing anyway. Use GPIO.setwarnings(False) to disable warnings.
GPIO.setup(self.pinBackward, GPIO.OUT)
drive_api.py:153: RuntimeWarning: This channel is already in use, continuing anyway. Use GPIO.setwarnings(False) to disable warnings.
GPIO.setup(self.pinControlStraight, GPIO.OUT)
drive_api.py:155: RuntimeWarning: This channel is already in use, continuing anyway. Use GPIO.setwarnings(False) to disable warnings.
GPIO.setup(self.pinLeft, GPIO.OUT)
drive_api.py:156: RuntimeWarning: This channel is already in use, continuing anyway. Use GPIO.setwarnings(False) to disable warnings.
GPIO.setup(self.pinRight, GPIO.OUT)
drive_api.py:157: RuntimeWarning: This channel is already in use, continuing anyway. Use GPIO.setwarnings(False) to disable warnings.
GPIO.setup(self.pinControlSteering, GPIO.OUT)
Traceback (most recent call last):
File "drive_api.py", line 238, in
app.listen(81)
File "/usr/lib/python3/dist-packages/tornado/web.py", line 2042, in listen
server.listen(port, address)
File "/usr/lib/python3/dist-packages/tornado/tcpserver.py", line 143, in listen
sockets = bind_sockets(port, address=address)
File "/usr/lib/python3/dist-packages/tornado/netutil.py", line 168, in bind_sockets
sock.bind(sockaddr)
OSError: [Errno 98] Address already in use

A better walkthrough of the training data collection process?

Could you please give me a clearer overview of how the training data was collected?
A brief run down of your tech stack for streaming and the Python files which were would greatly help.
I am currently using
raspivid -n -t 0 -rot 270 -w 960 -h 720 -fps 30 -b 6000000 -o - | gst-launch-1.0 -e -vvvv fdsrc ! h264parse ! rtph264pay pt=96 config-interval=5 ! udpsink host=192.168.1.2 port=5000
to stream video

Then view it using gstreamer.
gst-launch-1.0 -e -v udpsrc port=5000 ! application/x-rtp, payload=96 ! rtpjitterbuffer ! rtph264depay ! avdec_h264 ! fpsdisplaysink sync=false

I am also trying Hamuchiwa's Approach no luck yet. Which collection method would be better?

That seems to work fine but I don't know how I would pipe/send this to OpenCV?
An clearer explanation on your method would greatly help me.

Circuit connecttion

Hi Ryan, how can I get to know about the circuit connection?would you please help me out?

Dataprep error

I'm trying to reproduce the training process
I have saved all the training files in ~/Self-Driving-Car/data

When I run Save-all_runs_as_numpy.py
I get the following error

`Started work on clean_session.txt
b'/home/hunter/Self-Driving-Car/data/clean_session.txt'
Traceback (most recent call last):
File "save_all_runs_as_numpy_files.py", line 29, in
predictors, targets = process_session(data_path, gamma_map, rgb)
File "/home/hunter/Self-Driving-Car/dataprep.py", line 128, in process_session
gamma_image = adjust_gamma(frame, gamma_table)
File "/home/hunter/Self-Driving-Car/dataprep.py", line 23, in adjust_gamma
return cv2.LUT(image, table)

cv2.error: OpenCV(4.2.0) /io/opencv/modules/core/src/matrix.cpp:406: error: (-215:Assertion failed) m.dims >= 2 in function 'Mat'`

The opencv window pops up and closes with this error.

Thank you for the code. I have achieved it.

Hi @RyanZotti
I'm from China.A senior student.
I've seen your speech in Youtube.
I'm interested in artificial intelligence and autopilot(I majored in communication engineering).
I just wanted to express my gratitude.Thank you for your code.

Possible Issue with "self.images_per_epoch" in Dataset.py

@RyanZotti perhaps you can clear this up for me. Notice in the code below for Dataset.py, self.images_per_epoch = int(self.train_metadata_summaries['image_count']* self.train_percentage) instead isn't int(self.train_metadata_summaries['image_count']) the amount of images per epoch, as the folders have already been split? Why multiply it by the train percentage again? Maybe I have just confused myself, but this doesn't seem right to me.

import os
import numpy as np
from random import shuffle
import random
from util import shuffle_dataset, summarize_metadata, sanitize_data_folders


class Dataset:

    def __init__(self,input_file_path,images_per_batch=50,train_percentage=0.8, max_sample_records=1000):
        self.input_file_path = input_file_path
        folders = os.listdir(self.input_file_path)
        folders = sanitize_data_folders(folders)
        self.train_folders, self.test_folders = Dataset.train_test_split(folders)
        self.train_percentage = train_percentage
        self.max_sample_records = max_sample_records
        self.train_metadata_summaries, self.train_metadata = summarize_metadata(self.input_file_path,self.train_folders)
        self.train_folder_weights = self.get_folder_weights(self.train_folders)
        self.test_metadata_summaries, self.test_metadata = summarize_metadata(self.input_file_path, self.test_folders)
        self.test_folder_weights = self.get_folder_weights(self.test_folders)
        self.images_per_batch = images_per_batch
        self.images_per_epoch = int(self.train_metadata_summaries['image_count']* self.train_percentage)
        self.batches_per_epoch = int(self.images_per_epoch / self.images_per_batch)
        self.samples_per_epoch = int(self.images_per_epoch / self.max_sample_records)


    # TODO (ryanzotti): Make this asynchronous to parallelize disk reads during GPU/CPU train_step cycles
    def get_sample(self,train=True):
        if train:
            folders = self.train_folders
        else:
            folders = self.test_folders
        folders_per_batch = 10
        images = []
        labels = []
        for _ in range(folders_per_batch):
            folder = self.get_weighted_random_folder(folders)
            folder_path = self.input_file_path + '\\' + str(folder) + '\\predictors_and_targets.npz'
            npzfile = np.load(folder_path)
            images.extend(npzfile['predictors'])
            labels.extend(npzfile['targets'])
            if len(images) > self.max_sample_records:
                images, labels = self.reduce_record_count(images, labels)
                return images, labels
        images = np.array(images)
        labels = np.array(labels)
        images, labels = shuffle_dataset(images,labels)
        return images, labels

    def get_folder_weights(self,folders):
        folder_weights = {}
        metadata_summaries, folder_metadata = summarize_metadata(self.input_file_path, include_folders=folders)
        images_processed = 0
        for folder, metadata in folder_metadata.items():
            upper_bound = images_processed + metadata['image_count']
            folder_weights[folder] = {'lower_bound': images_processed,
                                      'upper_bound': upper_bound,
                                      'weight': metadata['image_count'] / metadata_summaries['image_count']}
            images_processed = upper_bound
        return folder_weights

    def get_weighted_random_folder(self,is_train=True):
        if is_train:
            folder_weights = self.train_folder_weights
            image_count = self.train_metadata_summaries['image_count']
        else:
            folder_weights = self.test_folder_weights
            image_count = self.test_metadata_summaries['image_count']
        random_image_index = random.randint(0, image_count)
        for folder, folder_data in folder_weights.items():
            if folder_data['lower_bound'] <= random_image_index < folder_data['upper_bound']:
                return folder

    # Fixes GPU memory problem when I consume large files
    def reduce_record_count(self, images, labels):
        index = np.random.choice(len(images), self.max_sample_records, replace=False)
        return np.array(images)[index], np.array(labels)[index]

    def batchify(self,sample):
        images, labels = sample[0], sample[1]
        batches_in_sample = int(len(images) / self.images_per_batch)  # Round down to avoid out of index errors
        for batch_index in range(batches_in_sample):
            batch_start = batch_index * self.images_per_batch
            batch_end = (batch_index + 1) * self.images_per_batch
            yield images[batch_start:batch_end], labels[batch_start:batch_end]

    def train_test_split(folders):
        shuffle(folders)
        train_folder_size = int(len(folders) * 0.8)
        train = [folder for folder in folders[:train_folder_size]]
        test = list(set(folders) - set(train))
        return train, test

    def get_batches(self,train=True):
        samples = range(self.samples_per_epoch)
        for sample in samples:
            batches = self.batchify(self.get_sample(train=train))
            for batch in batches:
                yield batch

REST API

I'm facing some problem to use it on RPi , Can you please suggest me how to implement Restful Api on Raspberry Pi ? This is my first time i use REST API and implementing it on RPi and it's making some confusion to me.

Reinforcement learning

Hi Ryan,
Great project and thank you for sharing it with us. I am trying to learn reinforcement learning and I wondered if you considered using RL instead of supervised learning? Since you are doing inference (predicting the cars next steering action) wirelessly from a laptop I assume you could also train a neural net using Deep Q Learning the same way. Just curious about what you think of that approach and would it work. Also, do you think a Jetson board would be able to do inference on the robot car itself assuming a bigger car and a bigger budget for the Jetson board vs. Raspberry Pi.
Thank again,
Ross

Recommend Projects

  • React photo React

    A declarative, efficient, and flexible JavaScript library for building user interfaces.

  • Vue.js photo Vue.js

    ๐Ÿ–– Vue.js is a progressive, incrementally-adoptable JavaScript framework for building UI on the web.

  • Typescript photo Typescript

    TypeScript is a superset of JavaScript that compiles to clean JavaScript output.

  • TensorFlow photo TensorFlow

    An Open Source Machine Learning Framework for Everyone

  • Django photo Django

    The Web framework for perfectionists with deadlines.

  • D3 photo D3

    Bring data to life with SVG, Canvas and HTML. ๐Ÿ“Š๐Ÿ“ˆ๐ŸŽ‰

Recommend Topics

  • javascript

    JavaScript (JS) is a lightweight interpreted programming language with first-class functions.

  • web

    Some thing interesting about web. New door for the world.

  • server

    A server is a program made to process requests and deliver data to clients.

  • Machine learning

    Machine learning is a way of modeling and interpreting data that allows a piece of software to respond intelligently.

  • Game

    Some thing interesting about game, make everyone happy.

Recommend Org

  • Facebook photo Facebook

    We are working to build community through open source technology. NB: members must have two-factor auth.

  • Microsoft photo Microsoft

    Open source projects and samples from Microsoft.

  • Google photo Google

    Google โค๏ธ Open Source for everyone.

  • D3 photo D3

    Data-Driven Documents codes.