GithubHelp home page GithubHelp logo

isl-org / openbot Goto Github PK

View Code? Open in Web Editor NEW
2.7K 144.0 500.0 124.04 MB

OpenBot leverages smartphones as brains for low-cost robots. We have designed a small electric vehicle that costs about $50 and serves as a robot body. Our software stack for Android smartphones supports advanced robotics workloads such as person following and real-time autonomous navigation.

Home Page: https://www.openbot.org

License: MIT License

C++ 3.40% Java 34.07% Python 9.81% Jupyter Notebook 1.22% Shell 0.05% HTML 0.30% Kotlin 6.48% CSS 0.25% JavaScript 1.72% TypeScript 3.19% GLSL 0.40% Swift 35.49% Metal 0.10% Ruby 0.13% Objective-C 0.01% Dart 3.39%
openbot android smartphone robot robotics education research arduino deeplearning

openbot's Introduction

Banner

Turning Smartphones into Robots

GitHub build GitHub issues GitHub pull requests GitHub forks GitHub stars Github downloads Github size Github license

English | 简体中文

OpenBot leverages smartphones as brains for low-cost robots. We have designed a small electric vehicle that costs about $50 and serves as a robot body. Our software stack for Android smartphones supports advanced robotics workloads such as person following and real-time autonomous navigation.

Get started with OpenBot

Get the source code

  • You can download the repo as a zip file and extract it into a folder of your choice.
  • You can clone the OpenBot repository from GitHub with the following command:
    git clone https://github.com/intel-isl/OpenBot.git
  • You can fork the OpenBot repository and then clone your local copy. This is recommended, especially if you want to contribute.

Videos

youtube video youtube video

Cool projects using OpenBot

There are a lot of cool projects using OpenBot already. Below is a small selection. Click on the images to be redirected to the respective projects.

Tank OpenBot 2WD OpenBot Cardboard OpenBot Baby Yoda OpenBot

Contact

  • Join our Slack channel to connect with the OpenBot community.
  • Contact us via Email

Contribute

Please read the contribution guidelines. If you are not sure where to start have a look at the open issues.

Citation

Please cite our paper if you use OpenBot.

@inproceedings{mueller2021openbot,
    title     = {OpenBot: Turning Smartphones into Robots},
    author    = {M{\"u}ller, Matthias and Koltun, Vladlen},
    booktitle = {Proceedings of the International Conference on Robotics and Automation (ICRA)},
    year = {2021},
}
Footer

openbot's People

Contributors

1ars-d avatar a-to-the-5 avatar custom-build-robots avatar dependabot[bot] avatar dhruv2295 avatar dvdhfnr avatar eagleanurag avatar francisduvivier avatar izivkov avatar leegang avatar m-s-10 avatar marcelsan avatar mohammedz666 avatar msesma avatar quentin-leboutet avatar reger24 avatar sanyatuning avatar sloretz avatar sparsh3dwe avatar thias15 avatar travis-millet avatar usman094 avatar vkuehn avatar wangruoyao avatar yijunwu avatar yunaik avatar zhaoyshine avatar

Stargazers

 avatar  avatar  avatar  avatar  avatar  avatar  avatar  avatar  avatar  avatar  avatar  avatar  avatar  avatar  avatar  avatar  avatar  avatar  avatar  avatar  avatar  avatar  avatar  avatar  avatar  avatar  avatar  avatar  avatar  avatar  avatar  avatar  avatar  avatar  avatar  avatar  avatar  avatar  avatar  avatar  avatar  avatar  avatar  avatar  avatar  avatar  avatar  avatar  avatar  avatar  avatar  avatar  avatar  avatar  avatar  avatar  avatar  avatar  avatar  avatar  avatar  avatar  avatar  avatar  avatar  avatar  avatar  avatar  avatar  avatar  avatar  avatar  avatar  avatar  avatar  avatar  avatar  avatar  avatar  avatar  avatar  avatar  avatar  avatar  avatar  avatar  avatar  avatar  avatar  avatar  avatar  avatar  avatar  avatar  avatar  avatar  avatar  avatar  avatar  avatar

Watchers

 avatar  avatar  avatar  avatar  avatar  avatar  avatar  avatar  avatar  avatar  avatar  avatar  avatar  avatar  avatar  avatar  avatar  avatar  avatar  avatar  avatar  avatar  avatar  avatar  avatar  avatar  avatar  avatar  avatar  avatar  avatar  avatar  avatar  avatar  avatar  avatar  avatar  avatar  avatar  avatar  avatar  avatar  avatar  avatar  avatar  avatar  avatar  avatar  avatar  avatar  avatar  avatar  avatar  avatar  avatar  avatar  avatar  avatar  avatar  avatar  avatar  avatar  avatar  avatar  avatar  avatar  avatar  avatar  avatar  avatar  avatar  avatar  avatar  avatar  avatar  avatar  avatar  avatar  avatar  avatar  avatar  avatar  avatar  avatar  avatar  avatar  avatar  avatar  avatar  avatar  avatar  avatar  avatar  avatar  avatar  avatar  avatar  avatar  avatar  avatar

openbot's Issues

Error at "Save tf lite models for best and last checkpoint"

I cant seem to get further than this command, and I have had no luck fixing it myself.

best_index = np.argmax(np.array(history.history['val_angle_metric']) \ + np.array(history.history['val_direction_metric'])) best_checkpoint = str("cp-%04d.ckpt" % (best_index+1)) best_model = utils.load_model(os.path.join(checkpoint_path,best_checkpoint),loss_fn,metric_list) best_tflite = utils.generate_tflite(checkpoint_path, best_checkpoint) utils.save_tflite (best_tflite, checkpoint_path, "best") print("Best Checkpoint (val_angle: %s, val_direction: %s): %s" \ %(history.history['val_angle_metric'][best_index],\ history.history['val_direction_metric'][best_index],\ best_checkpoint))

It returns the error
`---------------------------------------------------------------------------
ValueError Traceback (most recent call last)
in
2 + np.array(history.history['val_direction_metric']))
3 best_checkpoint = str("cp-%04d.ckpt" % (best_index+1))
----> 4 best_model = utils.load_model(os.path.join(checkpoint_path,best_checkpoint),loss_fn,metric_list)
5 best_tflite = utils.generate_tflite(checkpoint_path, best_checkpoint)
6 utils.save_tflite (best_tflite, checkpoint_path, "best")

~/git/OpenBot/policy/utils.py in load_model(model_path, loss_fn, metric_list)
72
73 def load_model(model_path,loss_fn,metric_list):
---> 74 model = tf.keras.models.load_model(model_path,
75 custom_objects=None,
76 compile=False

~/anaconda3/envs/openbot/lib/python3.8/site-packages/tensorflow/python/keras/saving/save.py in load_model(filepath, custom_objects, compile)
188 if isinstance(filepath, six.string_types):
189 loader_impl.parse_saved_model(filepath)
--> 190 return saved_model_load.load(filepath, compile)
191
192 raise IOError(

~/anaconda3/envs/openbot/lib/python3.8/site-packages/tensorflow/python/keras/saving/saved_model/load.py in load(path, compile)
114 # TODO(kathywu): Add saving/loading of optimizer, compiled losses and metrics.
115 # TODO(kathywu): Add code to load from objects that contain all endpoints
--> 116 model = tf_load.load_internal(path, loader_cls=KerasObjectLoader)
117
118 # pylint: disable=protected-access

~/anaconda3/envs/openbot/lib/python3.8/site-packages/tensorflow/python/saved_model/load.py in load_internal(export_dir, tags, loader_cls)
600 object_graph_proto = meta_graph_def.object_graph_def
601 with ops.init_scope():
--> 602 loader = loader_cls(object_graph_proto,
603 saved_model_proto,
604 export_dir)

~/anaconda3/envs/openbot/lib/python3.8/site-packages/tensorflow/python/keras/saving/saved_model/load.py in init(self, *args, **kwargs)
186 self._models_to_reconstruct = []
187
--> 188 super(KerasObjectLoader, self).init(*args, **kwargs)
189
190 # Now that the node object has been fully loaded, and the checkpoint has

~/anaconda3/envs/openbot/lib/python3.8/site-packages/tensorflow/python/saved_model/load.py in init(self, object_graph_proto, saved_model_proto, export_dir)
121 self._concrete_functions[name] = _WrapperFunction(concrete_function)
122
--> 123 self._load_all()
124 self._restore_checkpoint()
125

~/anaconda3/envs/openbot/lib/python3.8/site-packages/tensorflow/python/keras/saving/saved_model/load.py in _load_all(self)
207 # loaded from config may create variables / other objects during
208 # initialization. These are recorded in _nodes_recreated_from_config.
--> 209 self._layer_nodes = self._load_layers()
210
211 # Load all other nodes and functions.

~/anaconda3/envs/openbot/lib/python3.8/site-packages/tensorflow/python/keras/saving/saved_model/load.py in _load_layers(self)
310
311 for node_id, proto in metric_list:
--> 312 layers[node_id] = self._load_layer(proto.user_object, node_id)
313 return layers
314

~/anaconda3/envs/openbot/lib/python3.8/site-packages/tensorflow/python/keras/saving/saved_model/load.py in _load_layer(self, proto, node_id)
335 obj, setter = self._revive_from_config(proto.identifier, metadata, node_id)
336 if obj is None:
--> 337 obj, setter = revive_custom_object(proto.identifier, metadata)
338
339 # Add an attribute that stores the extra functions/objects saved in the

~/anaconda3/envs/openbot/lib/python3.8/site-packages/tensorflow/python/keras/saving/saved_model/load.py in revive_custom_object(identifier, metadata)
776 return revived_cls._init_from_metadata(metadata) # pylint: disable=protected-access
777 else:
--> 778 raise ValueError('Unable to restore custom object of type {} currently. '
779 'Please make sure that the layer implements get_config'
780 'and from_config when saving. In addition, please use '

ValueError: Unable to restore custom object of type _tf_keras_metric currently. Please make sure that the layer implements get_configand from_config when saving. In addition, please use the custom_objects arg when calling load_model().
`

Every thing else runs smoothly.

OpenBot phone using front camera

Hey guys,

I've made my OpenBot and upon installing the app, the phone views through the front camera and not the rear camera. I tried all the buttons on my controller and look at the .ino code but I still haven't been able to find out why it's happening. Can you please help me out?

Many thanks,
Nathaniel

what are the robot's dimensions?

I couldn't find it in the site or README, and it's not clear to me from the models, since I'm new to 3d printing.
Thanks!

ps: any chance you have body parts that fit in a 200x200 build plate?

Battery Holder Wiring Colors

Normally the solid black wire is positive and the black wire with a white stripe is negative. The battery holder in the BOM has this convention backwards. When you hook it up, make sure you connect the solid black wire to negative (gnd) and the black and white strip to +12V. There is no fuse in the project, so if you hook it up backwards you will see some magic smoke... :-)

Tips on printing on a printer with smaller build volume?

First of all thank you for sharing this project. 💯

I am really excited to make one and run my on models on it.

Do you have any tips about printing on a smaller build volume? I have Ultimaker 2 extended which has a build volume of 223 mm × 223 mm × 305 mm. The body of the bot does not fit? The best I can get is this
image

angle_metric vs val_angle_metric

What is the difference between the angle_metric and the val_angle_metric? I ask because I realize the goal is the make the angle_metric as high as possible, approaching 1, but it seems that the val_angle_metric is really the value you want to approach towards 1 and that's the way you guage whether your training is working. What's confusing to me is what's the difference between the two?

When I'm running a training, like I am now, I can see the angle_metric growing (usually) at each epoch, albeit growing slowly, but then at the end of the epoch it calculates the val_angle_metric. I'm just wondering why/how?

image

Likewise what's the difference with direction_metric and val_direction_metric?

Vin/ADC7 in schematic

Hey, guys, awsome work!

On the wiring diagram, Vcc is connected to the A7 pin in the Arduino Nano, is that correct?

I have a battery pack which I'll use because it is rechargeable. I intended to connect the 5V regulated output from the driver board to the Vin Arduino pin.

Will try and give some feedback on my attempt here!

-Caio

Consider tagging "releases" to help us make sense of PCB and firmware revs

I have v1 of the PCB and was getting ready to assemble with my daughter and see now that you have a V2 of the PCB and firmware has changed etc. It isn't clear to me which commit to checkout to have a working, coherent "v1" repository that should mostly just work if I follow directions in the READMEs.

Which motors connect to which output?

Really appreciate your project and all the hard work you put in. I know the wiring diagram is coming, but can you comment on which motors goes to Out1/2 and which motors go to Out3/4?

I'm writing this to help others out as well. :-)

Power supply for Nano

Is the Nano going to be powered from the phone USB port?

The directions say to wire the speed sensors to 5V. Is this the 5V on the Nano board or the 5V on the L298N?

A wiring diagram would be helpful. :-)

Separate designator for second U1 pin header

Could the second pin header get a separate designator in the BOM, also adding it to the centroid file?

As it is, when requesting assembly for the custom PCB, PCBWay complains that they do not know where to place it

Openbot Android app

Hi I have a issue on connecting my nano USB to my mobile type c. cant able to establish USB Connection.I have enabled my developer USB debugging in my android mobile. But still device is not connected in OpenBot app.What is the issue ?
issue

[Feature] Button to switch camera

Hello. I run the app on my phone but it display picture from front camera. After debugging I realize that I need to change https://github.com/intel-isl/OpenBot/blob/master/android/app/src/main/java/org/openbot/CameraActivity.java#L110 to 0 (LENS_FACING_FRONT) and it working fine... I don't know why front and back are reversed in my case but it could help you in future for debug the same problems.

My device is Asus Zenfone Max Pro (M2) ZB631KL, Android 9. Other cameras apps working fine.

[Feature] Build and publish Android Debug apk from GitHub Actions

Hi, just first want to say thanks a lot for this project, it really helps me for getting into hobby robotics, AI, 3D printing, electronics and Arduino.
I was looking at the build pipelines for Android and I see that currently, the android app is not being built(since android/gradlew is executed from the root of the repo, which has no gradle project) or uploaded.

I've worked with Bitbucket pipelines and I would love to contribute and get some experience with GitHub's build pipelines, so I would like to improve this in 2 PR's:

  1. Add a build step to build the app module, I'm thinking of using https://github.com/marketplace/actions/android-build for that, but I still have to experiment with that a little. With this, we can already ensure that on every PR, the app build is still working.

  2. Upload the debug apk to the build artifacts. I was thinking to follow this guide for that, but here also I still have to experiment a little first. With this, people could download this apk to their device so that they would not necessarily need to install android studio. They would still have to change settings on their phone to allow the installation though so this PR should also include some documentation with a (or link to) explanation about installing a debug apk on your android phone.

A nice third step would be to instead upload a signed apk, but this requires to store the signing keys somewhere safe, so I won't be able to set that up as an external contributor.
And from there, you could also include an automatic deployment to the F-Droid repo or google play store. But also, since it requires signing keys and authorization, it's out of scope for an external contributor I would think.

Let me know if you guys think the above 2 PR's would be useful. The downside will be that the build will take a lot longer, I think it can certainly add multiple minutes to the build.

Sonarr and indicator not working

I'm not familear with JAVA, so I just test the arduino firmware, sonar and indicator LED seem work fine. But when I pugin the phone and make it follow a person, the robot bump around and the indictors never light up. Is there anything wrong with my android app?

only one PCB ordering w/ SMT assembly vendors?

Hello,

Are you aware of PCB vendors offering SMT assembly that accept 1 PCB order?

I tried PCBway and JLCPCB but they requires me, if i understood correctly, to order 5 PCB, with at least 2 fully assembled (SMT).

Also, I tried to see if some DIY shops sell OpenBOT kits, but did not find some for now.

To sum up, more guidance for the hardware part (PCB) would be of great help for newbie makers like me ;-)

Thanks, and keep the good works!

100% Successful AI Run!

I realize this is not an "issue", so this is not the best place to post this, but since there's no discussion forum for this project it's the best place to share this as I may be the 1st person to get a 100% successful AI training outside of the author of this project, so I'd like to inspire others to get to this spot as well.

https://www.youtube.com/watch?v=vfas-lWZl4c

Here's the video of the OpenBot making it around my kitchen with just the Autopilot turned on. This was an amazing moment for me as it took a couple weeks to get to this spot. I trained about 120,000 images with about 20,000 test images. I even had my kids help gather the training data since it got so tedious.

Wiring diagram

May you provide wiring diagram for the robot?

I'm little bit confused with point 17 in the build instructions:

  • (Optional) Connect the voltage divider to pin A7 of the Arduino

What is the voltage divider, why we need it and how we can connect it to the robot.

Other question about point 14:
Why we need connect echo and trigger pins together in one arduino port? Other samples told us to use two ports for this...

P.S. Thank you for your project!

License

The license description is missing :)

如何获取 3D 机身

@leegang
嗨,我想组装一个,我看其他的零配件都有写店铺地址,但是 3D 打印的机身没有说具体的怎么去弄
对于这方面不是特别的了解,想请教下怎么在国内并且没有相关设备的情况下去弄一个机身,以及大概的价格是多少
谢谢

Unable to compile the firmware

I am new to this kind of thing, I realized that the firmware needed to get to the arduino board however if you read the documentation it mentions nothing. I downloaded arduino IDE added the board in the board manager and sent the file to the board. Got lots of errors in the IDE (don't know if it was something I did), tried to get the thing to drive....... nothing. After multimeter testing terminals realized pins needed to be uncommented in the firmware.........sent it to the board with a large list of errors. Still not getting any wheel spinning. Scratching my head as to the issue. I have bought everything to stick with the build as documented hoping I could have my handheld as build this.

Using DIY in firmware

If we're using the DIY method (not custom PCB) should we update the firmware to
#define DIY 1
#define PCB 0

Thank you!

Alternative Parts?

Is it possible to add 2-3 alternative parts/manufacturers for the drive components? Many of the suggestions in the description are not available on Amazon US.

Clarification needed regarding the BOM and U1 Quantity

Please confirm the quantity for ID 7 in the BOM.csv. The BOM states 2 but this seems to be in contradiction to the written description of the Electrical Design contained in the Paper.

ID | Name | Designator | Footprint | Quantity | Manufacturer Part | Manufacturer | Supplier | Supplier Part | LCSC Assembly
7 | ARDUINO_NANO | U1 | ARDUINO_NANO | 2 | 2685Y-115CNG1SNA01 | HOAUC | LCSC | C350309 |  

Thanks

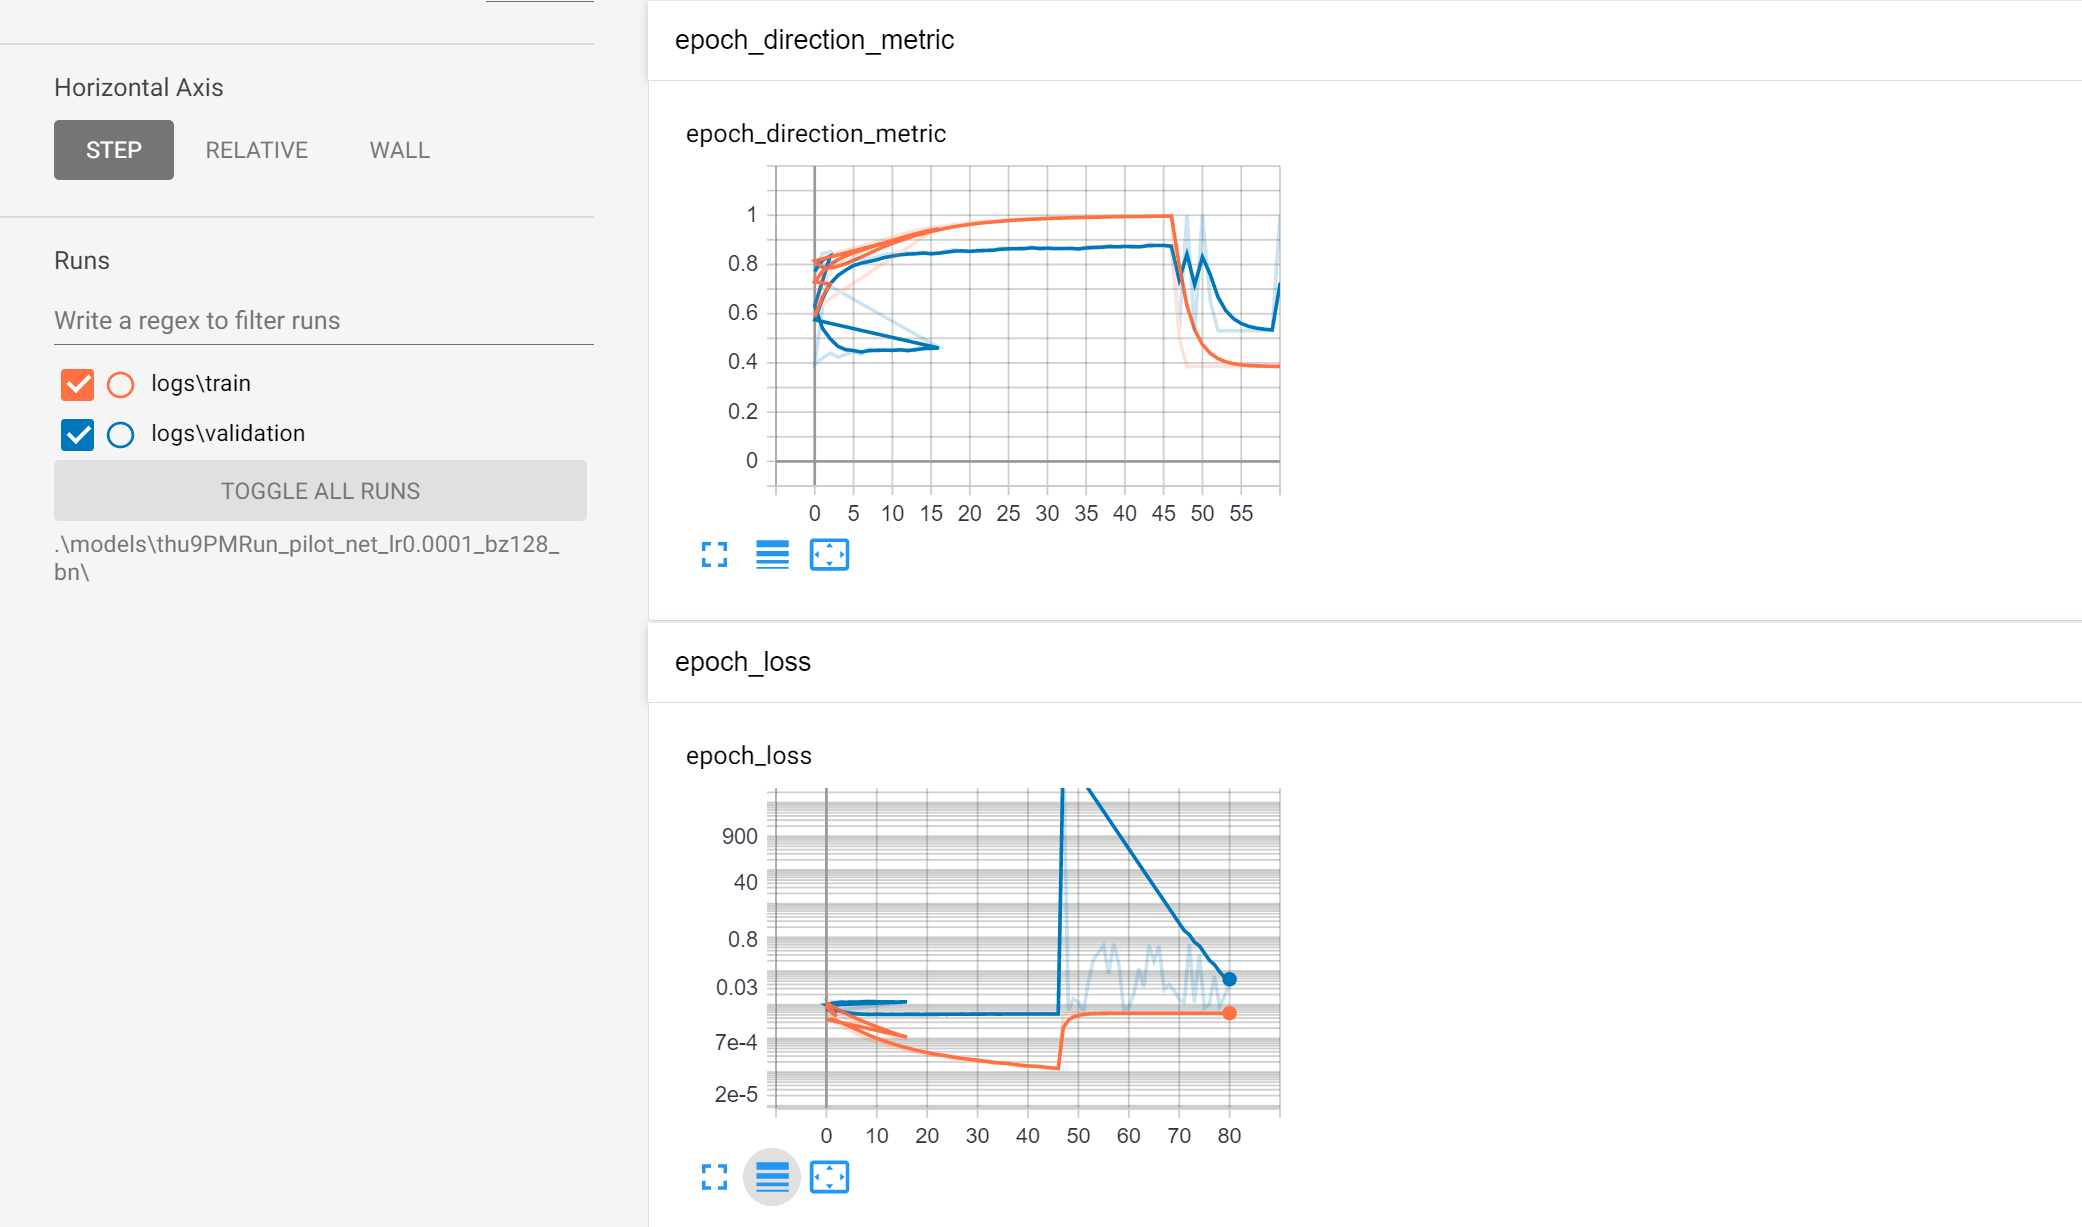
Is there a way to stop the epochs, but not lose the generate tflite data?

Question. Can I stop the epochs run in the middle, but not lose the generating of the best/last tflite files? I'm in a situation where I trained for 100 epochs, but at about epoch 47 I reached the max training and now it's overfitting (I believe). I've been processing for like 7 hours so far, so to wait another 3 hours is a waste of time and energy, but I don't want to lose the work it took to get to the 47th epoch.

Here are my graphs of the output as it's going along. I'm using Tensorboard to show the graphs as the epochs are running.

image
image

Little warning concerning hyperparameters

I've successfully trained just for testing my implementation, in notebook policy/policy_learning.ipynb
this took 15mn with thoses parameters of issues #31 and files provided by @chilipeppr
TRAIN_BATCH_SIZE = 10 #128
TEST_BATCH_SIZE = 10 #128

I think it can be usefull to warn users with "low" config, here 32Mo RAM & RTX 2060 6Go Ram
that setting batch size between 32 & 128 can cause serious problem to use their computer for a little time.

Tensorflow-lite not found error?

Hi,
First of all thanks for making such an awesome robot!!! I have been waiting for something like this for years!!!
I tried to follow the app build instructions but hit an error in the middle.

It says tensorflow-lite doesn't exists in the folder. I am an amateur in android studio so don't really know if this should happen or not. I checked the cloned folder and there wan't any tensor flow file.
Hope this is not confusing and I would really appreciate help on this.

Thank you!!!

_Download https://services.gradle.org/distributions/gradle-5.4.1-all.zip (132.77 MB)
Download https://services.gradle.org/distributions/gradle-5.4.1-all.zip finished succeeded, took 7 m 49 s 218 ms
Starting Gradle Daemon...
Gradle Daemon started in 1 s 617 ms
<ij_msg_gr>Project resolve errors<ij_msg_gr><ij_nav>/home/pinkpanther/Github_cloned/OpenBot/android/build.gradle<ij_nav>root project 'android': Unable to resolve additional project configuration.Details: org.apache.tools.ant.BuildException: Basedir /home/pinkpanther/Github_cloned/OpenBot/android/tensorflow-lite does not exist
File /home/pinkpanther/.android/repositories.cfg could not be loaded.
Checking the license for package Android SDK Build-Tools 28.0.3 in /home/pinkpanther/Android/Sdk/licenses
License for package Android SDK Build-Tools 28.0.3 accepted.
Preparing "Install Android SDK Build-Tools 28.0.3 (revision: 28.0.3)".
"Install Android SDK Build-Tools 28.0.3 (revision: 28.0.3)" ready.
Installing Android SDK Build-Tools 28.0.3 in /home/pinkpanther/Android/Sdk/build-tools/28.0.3
"Install Android SDK Build-Tools 28.0.3 (revision: 28.0.3)" complete.
"Install Android SDK Build-Tools 28.0.3 (revision: 28.0.3)" finished.
Checking the license for package Android SDK Platform 28 in /home/pinkpanther/Android/Sdk/licenses
License for package Android SDK Platform 28 accepted.
Preparing "Install Android SDK Platform 28 (revision: 6)".
"Install Android SDK Platform 28 (revision: 6)" ready.
Installing Android SDK Platform 28 in /home/pinkpanther/Android/Sdk/platforms/android-28
"Install Android SDK Platform 28 (revision: 6)" complete.
"Install Android SDK Platform 28 (revision: 6)" finished.
Calling mockable JAR artifact transform to create file: /home/pinkpanther/.gradle/caches/transforms-2/files-2.1/60b701dab9dbd0c40a2aad2e3a66fedc/android.jar with input /home/pinkpanther/Android/Sdk/platforms/android-28/android.jar

Deprecated Gradle features were used in this build, making it incompatible with Gradle 6.0.
Use '--warning-mode all' to show the individual deprecation warnings.
See https://docs.gradle.org/5.4.1/userguide/command_line_interface.html#sec:command_line_warnings

CONFIGURE SUCCESSFUL in 28m 46s_

Need Circuit Diagram

Circuit diagram for custom pcb will be more helpful for me pls share the schematic or circuit diagram for custom pcb which you have made

FIXED: ctrlLog.txt is/was logging zeros due to (int) conversion in CameraActivity.java

Hey, just a heads up to anyone else running into this, but my ctrlLog.txt was logging mostly zeros and the post-processing of the autopilot was then dropping all frames. The problem turned out to be this method.

image

The problem is likely that across Java compilers the order of operations on line 845 and 846 is such that the author's Java compiler was converting to int after the multiplication occurred. In my compiler the (int) conversion was happening prior to the multiplication, so I was ending up with mostly zeros because the getLeft() and getRight() returns a float unless you're at full speed for which you get a 1. Those were the only lines where I got a value in ctrlLog.txt.

So, the fix is to put quotes around the multiplication step so it occurs first.

My ctrlLog.txt now looks like this:
image

It used to look almost completely like this:
image

I can not put the customer PCB and L298N into the box at the same time.

1: I can not put the customer PCB and L298N into the box at the same time, Because no enough space.
2: It seams that the L298N and customer PCB (with the chip DRV8871DDAR SOP8) both for driver the motor;

So i guess that just need one of L298N and customer PCB ,right? If not. please tell me the different function for L298N and customer PCB.

3: I find something of customer PCB not match with the instruction below:
"14,Connect Echo and Trigger of the ultrasonic sensor to pin D4 of the Arduino.".
In the fact, the customer PCB is connect the Connect Echo and Trigger of the ultrasonic sensor to pin D3.

So, i just do not need customer PCB,right?

Slim model for build plates 200x200

200x200 it usually an entry level for 3D printer. This project is awesome and will reach more people if we can get real slim model 😁 . If someone has a working model for 200x200 please share. I tried working on it with blender but I am not an expert with 3D modeling. Even if the need can have it in pieces and put it back together some way it be at lease a solution.
Thanks

BOM Question, Replacement for TMCP1D104MTRF?

Hi team - First, great project - I cant thank you enough for the work the team has done, Im very excited to play around with the project.

On the BOM, you have a Capacitor, Vendor part TMCP1D104MTRF, but at LCSC it has been discontinued, and the only direct replacement has also been discontinued. They have every other part, so I was wondering if you had a replacement capacitor from LCSC that you could suggest? The closest match I could find is TAJA104K035RNJ from AVX - It may be a good replacement, but before ordering the entire BOM from LCSC, it would be great to have a confirmation.

Thanks!

Can't get Autopilot to train correctly

Thanks again for the great work on this project.

I've spent a couple days now trying to get the Autopilot to train and nothing has quite worked for me. All I get when I turn the Network on after training/post-processing/recompiling the Android app is the OpenBot driving in a slow straight line and crashing into the wall.

Here's what I've gone through thus far...

  1. To train, I use the default Data Logger of crop_img. I have the Model set to AUTOPILOT_F and I set the Device to GPU. I leave Drive Mode set to Controller and then I turn on Logging from the XBox controller by hitting the A button. I hear the MP3 file say "Logging started" and then I start driving around my kitchen.

WIN_20200913_18_17_07_Pro

  1. Once I've created about 5 minutes worth of data from driving around I turn off Logging by hitting A again on the XBox controller. I hear the MP3 file play of "Logging stopped". This part seems fine.

  2. I download the Zip file of the logging and place it the policy folder. I'm showing the hierarchy here because your docs say to create a folder called "train" but the Python script looks for "train_data". I also initially didn't realize you had to create manual folders for your set of log data, so I now have that correct such that I do get through the Jupiter Notebook process fine rather than failing on Step 10, which is what happens if you create your folder structure incorrectly.
    image

  3. My images seem to be fine. The resolution is small at 256x96 but I presume that's the correct size for the crop_img default setting.

image
image

  1. My sensor_data seems ok too.

image

The ctrlLog.txt seems ok (after I fixed that int problem that I posted earlier as a FIXED issue.)
image

My indicatorLog.txt always looks like this. I suppose this could possibly be a problem as it's quite confusing what the indicatorLog.txt is even for. I realize hitting X, Y, or B turns the vehicleIndicator to -1, 0, and 1, but it doesn't really make sense why.

image

I realize the indicatorLog.txt gets merged with ctrlLog.txt and rgbFrames.txt into the following combined file, but all seems good assuming a "cmd" of 1 from indicatorLog.txt is the value I want for the post-processing.
image

  1. In the Jupiter Notebook everything seems to run correctly. It opens my manually created folders correctly after I modified the Python code to read the correct manually created folders I created. It reads in my sample data. It removes my frames where the motors were at 0.

image

I get the correct amount of training frames and test frames.

image

In this part I am confused as to these Clipping input data errors and to what Cmd means as it seems to relate to indicatorLog.txt but I'm not sure what a -1, 0, or 1 would indicate in the caption above the images. My guess on the Label is that those are the motor values that would be generated during a Network run on the OpenBot for each image, but not sure since each one says the same motor value of 0.23.

image

In Step 31 of the Jupiter Notebook the output seems fine.

image

In Step 33 the epochs all seem to have run correctly. They took quite a while to finish.

image

And in Step 34 thru 37 the graph seems reasonable, but not really sure what to expect here...

image

image

In Step 41 this seems to be ok, but it's making me think Pred means "prediction" which are the motor values. Still not sure what the Cmd and Label are then.
image

  1. Once the best.tflite file is generated and placed into the "checkpoints" folder...

image

I then copy it to the "networks" folder for the Android app, rename it to "autopilot_float.tflite" and recompile the Android app.

image

Here is Android Studio recompiling.

image

That's about all I can think of to describe what I'm doing to try to get the training going. I would really love to get this working. Your help is greatly appreciated.

Thanks,
John

Recommend Projects

  • React photo React

    A declarative, efficient, and flexible JavaScript library for building user interfaces.

  • Vue.js photo Vue.js

    🖖 Vue.js is a progressive, incrementally-adoptable JavaScript framework for building UI on the web.

  • Typescript photo Typescript

    TypeScript is a superset of JavaScript that compiles to clean JavaScript output.

  • TensorFlow photo TensorFlow

    An Open Source Machine Learning Framework for Everyone

  • Django photo Django

    The Web framework for perfectionists with deadlines.

  • D3 photo D3

    Bring data to life with SVG, Canvas and HTML. 📊📈🎉

Recommend Topics

  • javascript

    JavaScript (JS) is a lightweight interpreted programming language with first-class functions.

  • web

    Some thing interesting about web. New door for the world.

  • server

    A server is a program made to process requests and deliver data to clients.

  • Machine learning

    Machine learning is a way of modeling and interpreting data that allows a piece of software to respond intelligently.

  • Game

    Some thing interesting about game, make everyone happy.

Recommend Org

  • Facebook photo Facebook

    We are working to build community through open source technology. NB: members must have two-factor auth.

  • Microsoft photo Microsoft

    Open source projects and samples from Microsoft.

  • Google photo Google

    Google ❤️ Open Source for everyone.

  • D3 photo D3

    Data-Driven Documents codes.